Venture into the delightful world of afternoon teas with our curated collection of 20 delicious recipes, perfect for those relaxing evenings when you crave something sweet or savory. Whether you’re a seasoned baker or just starting out, these easy-to-follow recipes will inspire you to create memorable moments. So, grab your favorite teacup and let’s dive into a world of flavor and comfort that awaits in every bite.
Classic English Scones with Clotted Cream and Jam
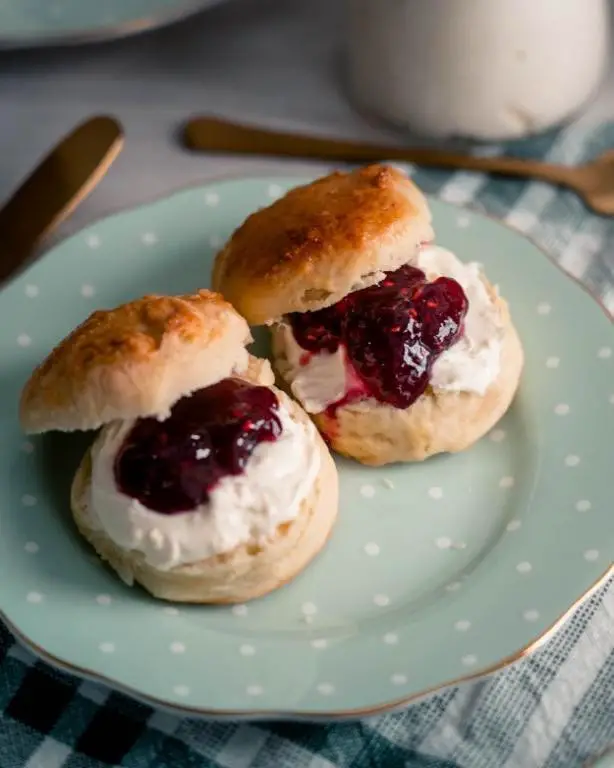
Let’s bake some Classic English Scones with Clotted Cream and Jam—flaky, buttery, and downright irresistible. Perfect for your next brunch or tea time, these scones are a game-changer.
Ingredients
- 2 cups all-purpose flour (I swear by King Arthur for the fluffiest scones)
- 1/4 cup granulated sugar (because life’s too short for bland scones)
- 1 tbsp baking powder (freshness is key—check the date!)
- 1/2 tsp salt (I use sea salt for a subtle crunch)
- 1/2 cup unsalted butter, cold and cubed (keep it chilly for flaky layers)
- 1/2 cup whole milk (room temp blends better)
- 1 large egg (room temp, always)
- 1 tsp vanilla extract (the good stuff—no imitations)
- Clotted cream and jam, for serving (go wild with the flavors)
Instructions
- Preheat your oven to 400°F—no shortcuts here, folks.
- In a large bowl, whisk together flour, sugar, baking powder, and salt.
- Add cold butter cubes. Use your fingers to rub them into the flour until it resembles coarse crumbs. Tip: Work quickly to keep the butter cold.
- In a separate bowl, whisk milk, egg, and vanilla. Pour into the flour mixture.
- Gently mix until just combined—overmixing is the enemy of fluffy scones.
- Turn dough onto a floured surface. Pat into a 1-inch thick circle. Tip: Use a bench scraper for clean edges.
- Cut into 8 wedges. Place on a baking sheet, 2 inches apart.
- Bake for 15-18 minutes until golden. Tip: Rotate the tray halfway for even browning.
- Cool on a wire rack for 5 minutes—patience is a virtue.
Absolutely divine when warm, split open, and slathered with clotted cream and jam. The contrast of the crisp exterior and tender interior? *Chef’s kiss.* Try serving them with a side of fresh berries for a pop of color and acidity.
Earl Grey Tea Infused Victoria Sponge Cake
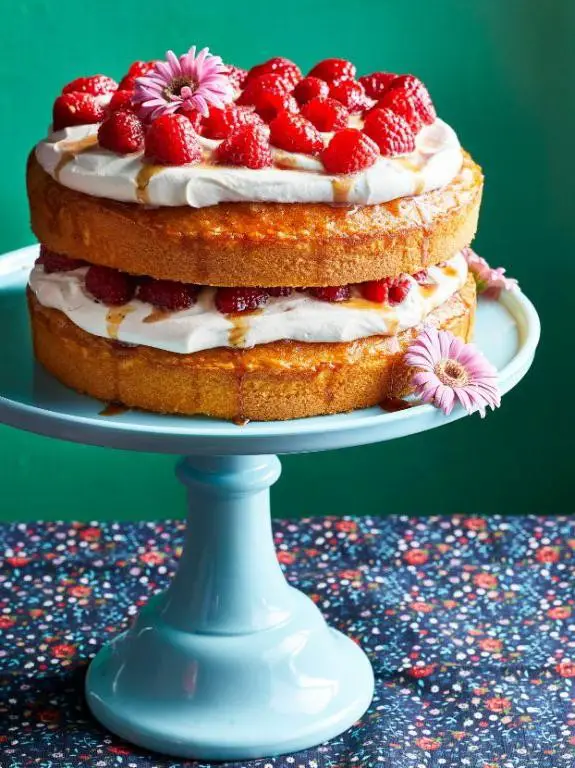
Here’s a twist on the classic Victoria Sponge that’ll have your taste buds dancing—infused with the aromatic elegance of Earl Grey tea. Perfect for tea time or anytime you crave something uniquely delightful.
Ingredients
- 1 cup unsalted butter, softened (I swear by Kerrygold for its richness)
- 1 cup granulated sugar (because sweetness is non-negotiable)
- 4 large eggs, room temperature (they blend smoother, trust me)
- 2 cups all-purpose flour (sifted, for that airy texture we all love)
- 1 tbsp baking powder (the unsung hero of fluffiness)
- 1/2 cup whole milk (warmed with 2 Earl Grey tea bags for that signature flavor)
- 1 tsp vanilla extract (the secret whisper of warmth)
- 1/2 cup raspberry jam (go for the seedless kind for a sleek finish)
- 1 cup heavy cream, whipped to stiff peaks (because decadence is key)
Instructions
- Preheat your oven to 350°F (175°C) and grease two 8-inch round cake pans. Line with parchment for a foolproof release.
- In a large bowl, cream together the butter and sugar until light and fluffy. This is where the magic starts—don’t rush it.
- Beat in the eggs one at a time, ensuring each is fully incorporated before adding the next. Room temp eggs are your friend here.
- Alternately add the sifted flour and baking powder with the Earl Grey-infused milk, starting and ending with flour. Mix until just combined—overmixing is the enemy of fluff.
- Divide the batter evenly between the pans. Smooth the tops with a spatula for an even bake.
- Bake for 25-30 minutes, or until a toothpick comes out clean. The cakes should be golden and spring back when lightly pressed.
- Let the cakes cool in the pans for 10 minutes, then transfer to a wire rack to cool completely. Patience is key—warm cakes crumble.
- Once cooled, spread raspberry jam over one cake layer. Top with whipped cream, then place the second layer on top. Dust with powdered sugar for a picture-perfect finish.
Serve this Earl Grey Tea Infused Victoria Sponge Cake and watch as the delicate tea flavor and creamy jam filling steal the show. Perfect with a cup of—you guessed it—Earl Grey.
Lemon Drizzle Loaf with a Twist
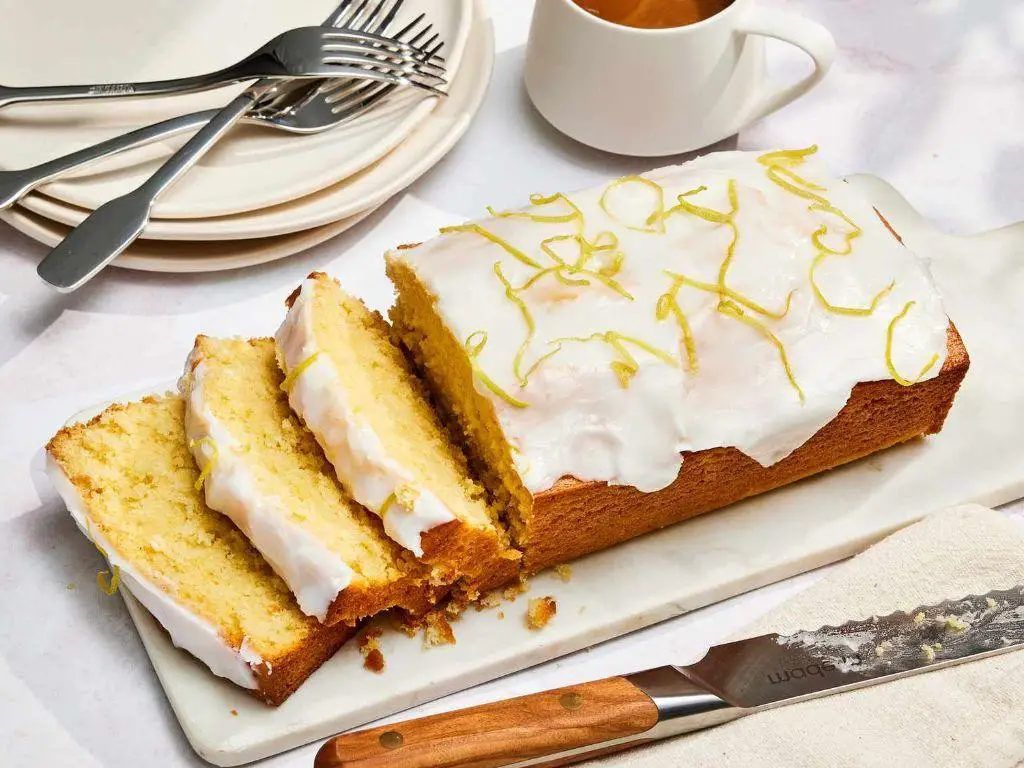
Dive into this zesty Lemon Drizzle Loaf with a Twist—it’s the perfect blend of tangy and sweet, with a surprise ingredient that’ll have everyone asking for seconds.
Ingredients
- 1 1/2 cups all-purpose flour (I swear by King Arthur for consistent results)
- 1/2 cup unsalted butter, softened (room temp is key for a smooth batter)
- 1 cup granulated sugar (because life’s too short for less sweetness)
- 2 large eggs (room temp eggs blend better, trust me)
- 1/4 cup fresh lemon juice (bottled just won’t give you that bright flavor)
- 1 tbsp lemon zest (the more, the merrier for that citrus punch)
- 1/2 cup plain Greek yogurt (the twist! It keeps the loaf incredibly moist)
- 1 tsp baking powder (the silent hero of rise and fluff)
- 1/4 tsp salt (just a pinch to balance the sweetness)
Instructions
- Preheat your oven to 350°F (175°C) and grease a 9×5 inch loaf pan. Tip: Use butter for greasing to add extra flavor.
- In a large bowl, cream together the softened butter and sugar until light and fluffy, about 3 minutes. Tip: Don’t rush this step—it’s crucial for texture.
- Beat in the eggs one at a time, then stir in the lemon juice and zest. The mixture might look curdled, but it’s fine.
- Fold in the Greek yogurt until just combined. Tip: Overmixing can lead to a dense loaf, so gentle does it.
- In another bowl, whisk together the flour, baking powder, and salt. Gradually add to the wet ingredients, mixing until just incorporated.
- Pour the batter into the prepared loaf pan and smooth the top. Bake for 50-55 minutes, or until a toothpick inserted comes out clean. Tip: Ovens vary, so start checking at 45 minutes.
- Let the loaf cool in the pan for 10 minutes, then transfer to a wire rack to cool completely.
Absolutely irresistible, this loaf boasts a moist crumb and vibrant lemon flavor. Serve it with a dollop of whipped cream and fresh berries for a dessert that’s as beautiful as it is delicious.
Chocolate Orange Battenberg Cake
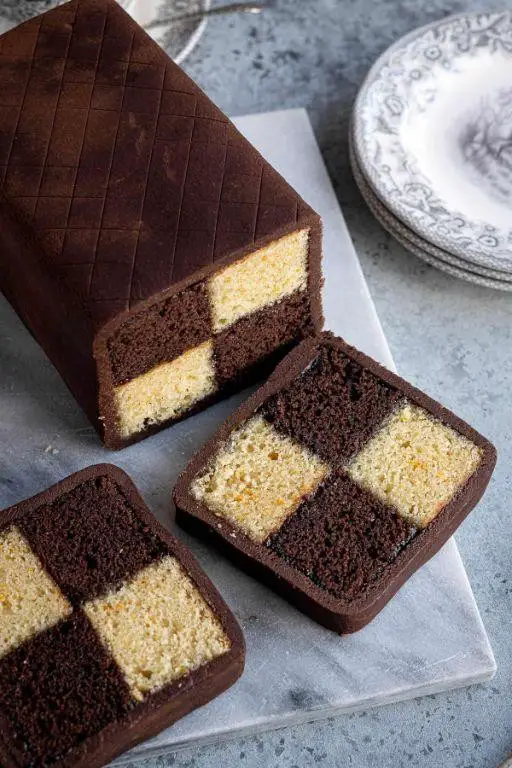
Here’s a twist on the classic Battenberg that’ll make your taste buds dance—**Chocolate Orange Battenberg Cake**. It’s visually stunning, perfectly moist, and packed with bold flavors.
Ingredients
- 1 cup unsalted butter, softened (I swear by Kerrygold for that rich flavor)
- 1 cup granulated sugar (because life’s sweet, but not too sweet)
- 4 large eggs, room temp (they blend smoother, trust me)
- 1 cup all-purpose flour (sifted, unless you enjoy lumpy cakes)
- 1/2 cup almond flour (for that nutty, moist crumb)
- 1 tsp baking powder (the unsung hero of fluffiness)
- 2 tbsp cocoa powder (Dutch-processed for depth)
- Zest of 1 orange (freshly grated—no bottled nonsense)
- 1/2 tsp orange extract (a little goes a long way)
- 1/4 cup apricot jam (warmed, for that glossy stick)
- 7 oz marzipan (roll it out like Play-Doh for nostalgia)
Instructions
- Preheat your oven to 350°F. Grease and line an 8-inch square pan with parchment, creating a divider in the middle.
- Cream butter and sugar until pale. Tip: Scrape the bowl often for even mixing.
- Beat in eggs one at a time. Room temp eggs prevent curdling—science!
- Fold in flours and baking powder. Divide batter in half.
- Mix cocoa into one half; orange zest and extract into the other. Keep colors vibrant by not overmixing.
- Spread each batter into a separate side of the pan. Bake for 25 mins or until a skewer comes out clean.
- Cool cakes, then trim edges. Cut each into two long rectangles.
- Brush apricot jam on one chocolate and one orange piece, stick them together. Repeat, alternating colors.
- Roll out marzipan to 1/4-inch thick. Wrap it around the cake, sealing the seam with a dab of jam.
**Key takeaway**: This cake is a showstopper with its checkerboard interior and marzipan hug. The chocolate and orange play off each other like best friends—bold, sweet, and slightly zesty. Serve with a dollop of whipped cream or a cup of Earl Grey to elevate the experience.
Strawberry and Cream Cheese Finger Sandwiches
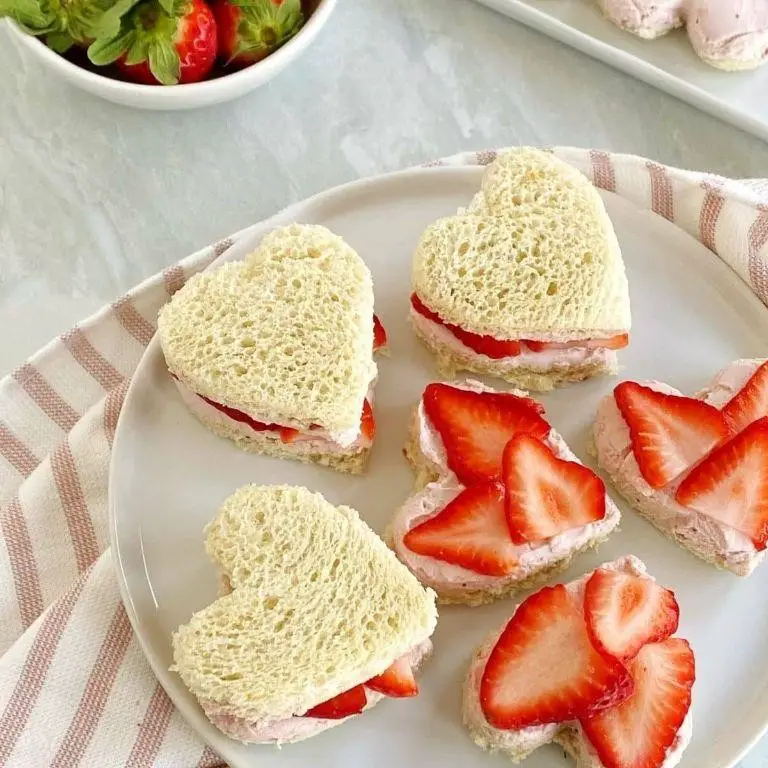
These Strawberry and Cream Cheese Finger Sandwiches are your next obsession. Transform your snack game with this creamy, fruity delight that’s as easy to make as it is to devour.
Ingredients
- 8 slices of soft white bread – I swear by Pepperidge Farm for that perfect fluff.
- 1 cup fresh strawberries, thinly sliced – the juicier, the better.
- 4 oz cream cheese, softened – leave it out for 30 minutes to spread like a dream.
- 2 tbsp powdered sugar – because a little sweetness never hurt anybody.
- 1 tsp vanilla extract – the secret weapon for depth of flavor.
Instructions
- In a medium bowl, mix the softened cream cheese, powdered sugar, and vanilla extract until smooth. Tip: A hand mixer on low speed makes this effortless.
- Lay out all 8 slices of bread on a clean surface. Spread the cream cheese mixture evenly on one side of each slice.
- Arrange the strawberry slices on the cream cheese side of 4 bread slices. Tip: Overlap the slices slightly for every bite to have strawberry goodness.
- Top with the remaining 4 slices, cream cheese side down, to form sandwiches. Press gently to adhere.
- Using a sharp knife, trim the crusts off each sandwich for that polished look. Tip: A serrated knife gives you clean cuts without squishing the bread.
- Cut each sandwich into 3 equal fingers. Serve immediately or chill for up to 2 hours for a firmer texture.
Delight in the contrast of creamy cheese and fresh strawberries with every bite. Perfect for picnics or as a fancy afternoon treat, these sandwiches are a hit every time.
Cucumber and Mint Tea Sandwiches
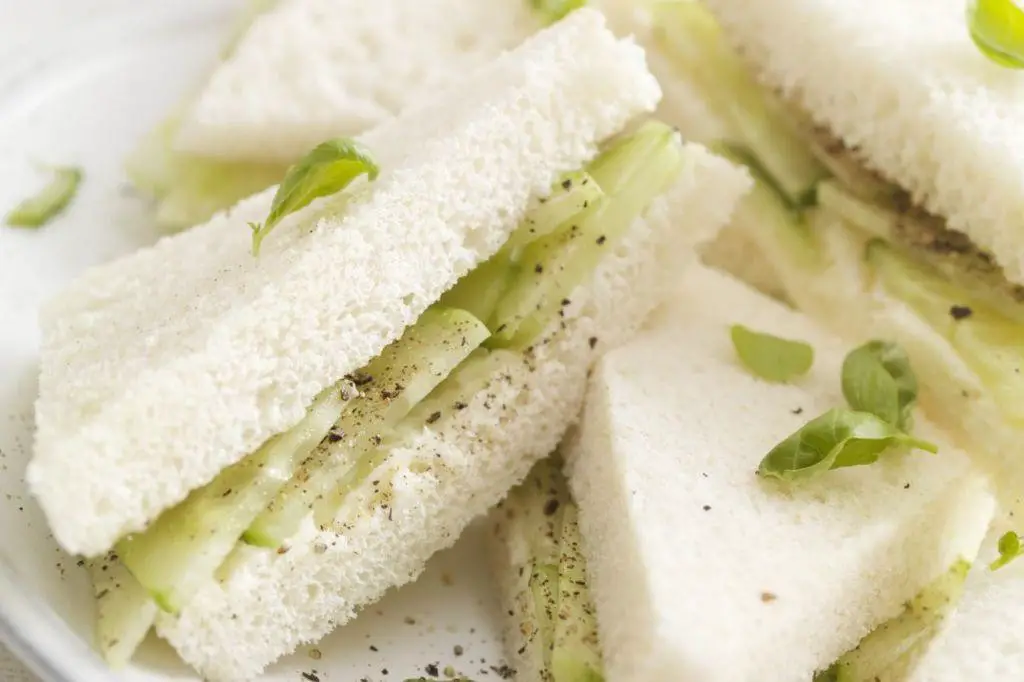
Make your next tea party unforgettable with these crisp, refreshing Cucumber and Mint Tea Sandwiches. They’re light, they’re breezy, and they pack a punch of flavor in every bite.
Ingredients
- 1 large cucumber, thinly sliced (I like English cucumbers for their fewer seeds)
- 8 oz cream cheese, softened (room temp blends smoother)
- 1/4 cup fresh mint leaves, finely chopped (trust me, fresh makes all the difference)
- 1 tbsp lemon juice (for that zesty kick)
- 1/2 tsp salt (to balance the flavors)
- 8 slices white bread (I opt for soft, pillowy bread for the perfect bite)
Instructions
- In a medium bowl, mix the softened cream cheese, chopped mint, lemon juice, and salt until well combined. Tip: Use a hand mixer for a fluffier spread.
- Lay out the bread slices on a clean surface. Evenly spread the cream cheese mixture on one side of each slice. Tip: Don’t over-spread to avoid soggy bread.
- Arrange the cucumber slices in a single layer over the cream cheese on half of the bread slices. Tip: Pat the cucumber slices dry with a paper towel to prevent excess moisture.
- Top with the remaining bread slices, cream cheese side down, to form sandwiches. Press gently to adhere.
- Using a sharp knife, trim the crusts off each sandwich for a clean look, then cut into quarters. Tip: A serrated knife works best for clean cuts without squishing.
Here’s the deal: these sandwiches are all about the contrast—creamy, crunchy, and cool with a hint of minty freshness. Serve them on a vintage platter for that Instagram-worthy tea time spread.
Smoked Salmon and Dill Cream Cheese Triangles

Slice through brunch boredom with these Smoked Salmon and Dill Cream Cheese Triangles—**flaky, creamy, and ridiculously easy** to whip up.
Ingredients
- 1 sheet puff pastry, thawed (I always keep a box in the freezer for emergencies)
- 4 oz smoked salmon, thinly sliced (go for the good stuff—it makes a difference)
- 1/2 cup cream cheese, softened (full-fat for the win)
- 1 tbsp fresh dill, chopped (dried works in a pinch, but fresh is best)
- 1 egg, beaten (room temp eggs blend smoother)
- 1 tbsp everything bagel seasoning (for that extra crunch and flavor)
Instructions
- Preheat your oven to 400°F. Line a baking sheet with parchment paper.
- Roll out the puff pastry on a lightly floured surface to a 10×10 inch square.
- Spread the cream cheese evenly over the pastry, leaving a 1-inch border around the edges.
- Layer the smoked salmon on top of the cream cheese, then sprinkle with dill.
- Brush the edges with the beaten egg, then fold the pastry in half diagonally to form a triangle. Press the edges to seal.
- Cut the large triangle into 4 smaller triangles. Transfer to the prepared baking sheet.
- Brush the tops with the remaining beaten egg and sprinkle with everything bagel seasoning.
- Bake for 15-20 minutes, or until golden brown and puffed.
- Let cool for 5 minutes before serving. They’re best warm!
Golden and flaky on the outside, with a creamy, smoky center—these triangles are a brunch game-changer. Try serving them with a side of capers for a salty kick.
Homemade Shortbread Cookies with Lavender
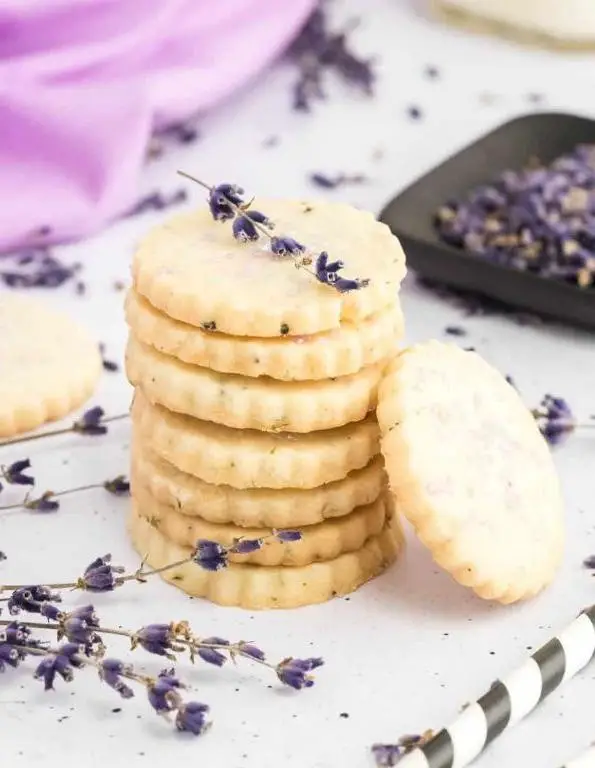
Make these buttery, floral shortbread cookies in under an hour—yes, they’re that easy. Mix, shape, bake, and watch them disappear.
Ingredients
- 1 cup unsalted butter, softened (I swear by Kerrygold for that rich flavor)
- 1/2 cup granulated sugar (for that perfect sweetness)
- 2 cups all-purpose flour (scoop and level for accuracy)
- 1 tbsp culinary lavender (find it in the spice aisle or online)
- 1/4 tsp salt (balances the sweetness)
Instructions
- Preheat your oven to 325°F—low and slow is the key to golden edges.
- In a large bowl, cream the butter and sugar together until light and fluffy, about 3 minutes. Tip: Use a stand mixer for ease, but a hand mixer works too.
- Gently fold in the flour, lavender, and salt until just combined. Overmixing leads to tough cookies.
- Roll the dough into a log about 2 inches in diameter, wrap in plastic, and chill for 30 minutes. Tip: Chilling firms up the dough for clean slices.
- Slice the log into 1/4-inch rounds and place on a parchment-lined baking sheet, spacing them 1 inch apart.
- Bake for 18-20 minutes until the edges are lightly golden. Tip: Rotate the pan halfway for even baking.
- Let cool on the sheet for 5 minutes, then transfer to a wire rack.
Just out of the oven, these cookies are crisp with a melt-in-your-mouth center. Serve them with a dollop of lemon curd or alongside your afternoon tea for a floral twist.
Raspberry and White Chocolate Scones
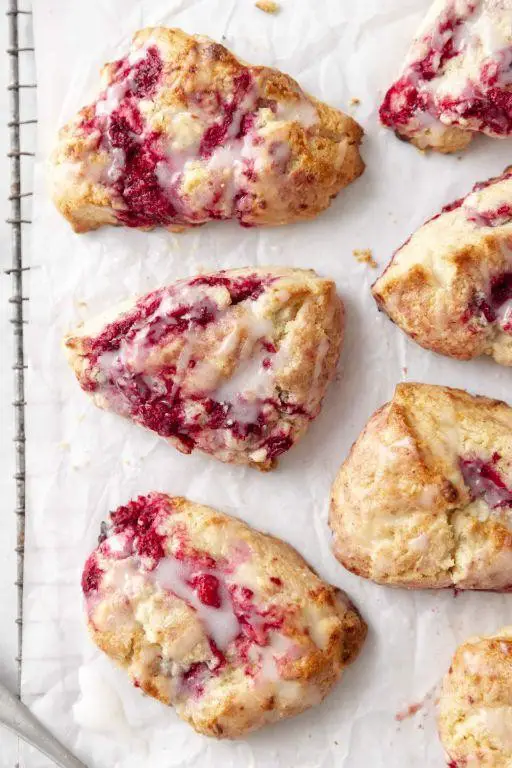
Get ready to bake the most Instagram-worthy scones that’ll have your followers begging for the recipe. These raspberry and white chocolate scones are a game-changer—flaky, buttery, and bursting with juicy berries.
Ingredients
- 2 cups all-purpose flour (I swear by King Arthur for the fluffiest texture)
- 1/3 cup granulated sugar (because life’s too short for less sweet)
- 1 tbsp baking powder (freshness is key—check the date!)
- 1/2 tsp salt (I use sea salt for that extra crunch)
- 1/2 cup unsalted butter, cold and cubed (keep it cold for flaky layers)
- 1/2 cup heavy cream (plus extra for brushing)
- 1 large egg (room temp blends smoother)
- 1 tsp vanilla extract (the real deal, no imitations)
- 1 cup fresh raspberries (frozen work, but fresh is chef’s kiss)
- 3/4 cup white chocolate chips (I prefer Ghirardelli for quality)
Instructions
- Preheat your oven to 400°F. Line a baking sheet with parchment paper.
- In a large bowl, whisk together flour, sugar, baking powder, and salt.
- Add cold cubed butter. Use your fingers to rub it into the flour until it resembles coarse crumbs.
- In a separate bowl, whisk heavy cream, egg, and vanilla extract.
- Pour the wet ingredients into the dry. Gently mix until just combined—don’t overwork the dough.
- Fold in raspberries and white chocolate chips with a spatula. The dough will be sticky; that’s perfect.
- Turn the dough onto a floured surface. Pat into a 1-inch thick circle.
- Cut into 8 wedges. Place on the prepared baking sheet, 2 inches apart.
- Brush the tops with heavy cream for a golden finish.
- Bake for 18-20 minutes, until golden brown. Let cool on a wire rack.
Here’s the deal: these scones are flaky on the outside, tender inside, with pockets of melted white chocolate and tart raspberries. Serve them warm with a dollop of clotted cream or your favorite jam for extra decadence.
Blueberry and Almond Tartlets
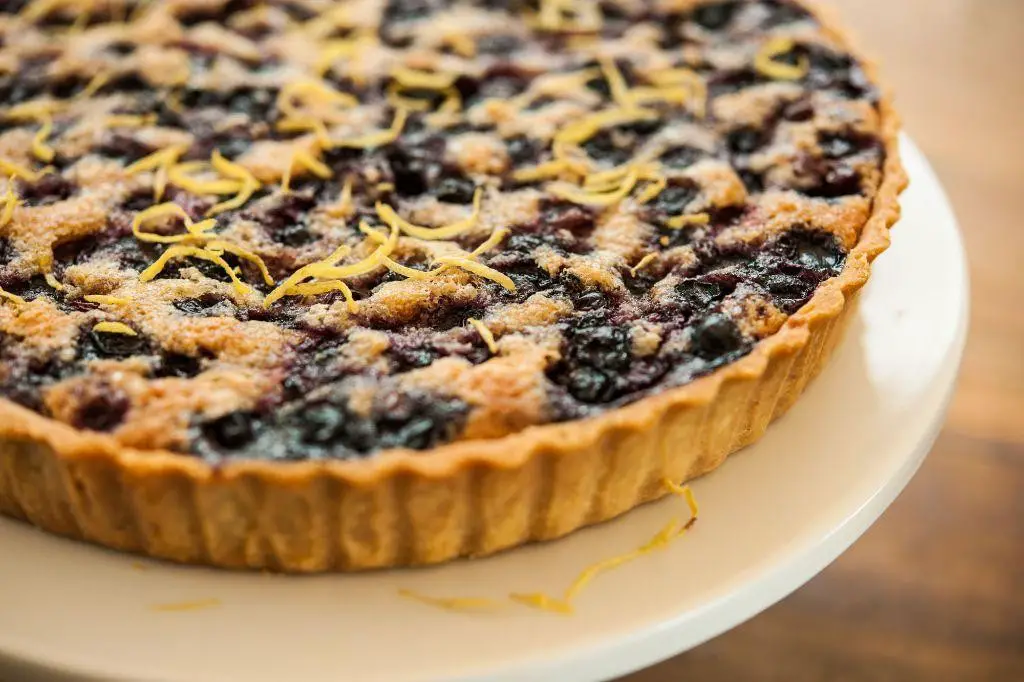
Ready to dazzle your taste buds? These Blueberry and Almond Tartlets are a game-changer—crunchy, fruity, and utterly Instagram-worthy.
Ingredients
- 1 cup all-purpose flour (I swear by King Arthur for that perfect crumb)
- 1/2 cup unsalted butter, chilled and cubed (cold butter is key for flakiness)
- 1/4 cup granulated sugar (because life’s too short for bland desserts)
- 1/4 tsp salt (just a pinch to balance the sweetness)
- 1/2 cup almond flour (for that nutty, rich texture)
- 1 cup fresh blueberries (the juicier, the better)
- 1 tbsp lemon zest (brightens up the whole dish)
- 1 egg, beaten (room temp eggs mix better, trust me)
- 1 tbsp turbinado sugar (for that sparkling finish)
Instructions
- Preheat your oven to 375°F—no guessing, use an oven thermometer.
- In a food processor, pulse all-purpose flour, butter, granulated sugar, and salt until crumbs form. Tip: Don’t overmix; you want pea-sized bits.
- Add almond flour and pulse just to combine. The dough should look sandy.
- Press the dough into 4-inch tartlet pans, making sure the edges are neat. Chill for 15 minutes—this prevents shrinking.
- Prick the bottoms with a fork, then blind bake for 10 minutes until lightly golden. Tip: Use pie weights or dried beans for even baking.
- Remove from oven, let cool slightly, then sprinkle with lemon zest.
- Arrange blueberries in a single layer over the zest. Tip: Crowd them for a lush, bursting look.
- Brush the edges with beaten egg and sprinkle turbinado sugar for a caramelized crunch.
- Bake for another 15 minutes until the crust is golden and the berries are bubbling.
Now, these tartlets are a textural dream—crispy crust, jammy blueberries, and a nutty undertone. Serve them warm with a dollop of mascarpone for a next-level experience.
Chai Spiced Madeleines
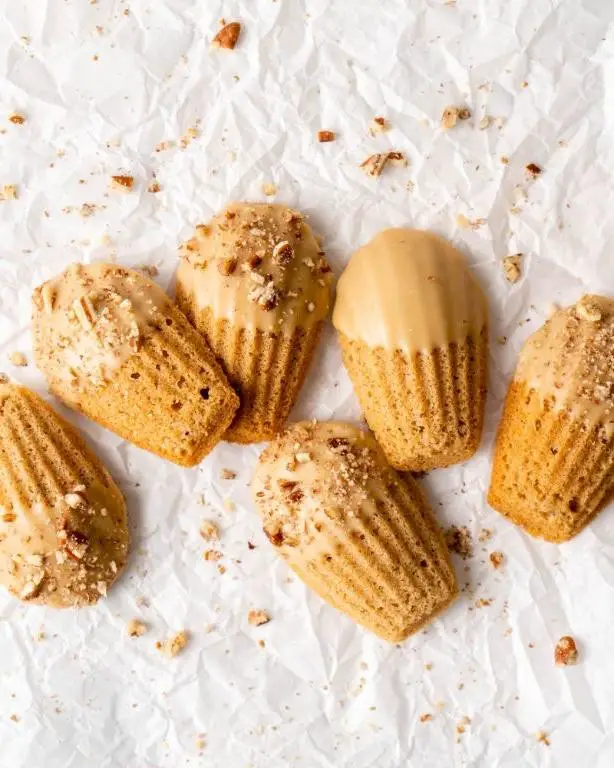
Hit the weekend right with these buttery, chai-spiced madeleines—your tea’s new best friend.
Ingredients
- 1 cup all-purpose flour (scoop and level for perfection)
- 2/3 cup granulated sugar (because life’s sweet enough)
- 1/2 cup unsalted butter, melted (and slightly cooled, trust me)
- 2 large eggs (room temp hugs the batter better)
- 1 tbsp chai spice mix (homemade or store-bought, no judgment)
- 1 tsp vanilla extract (the good stuff, please)
- 1/2 tsp baking powder (for that just-right puff)
- Pinch of salt (to balance the sweet)
Instructions
- Preheat your oven to 375°F—no guessing, use an oven thermometer.
- Butter and flour your madeleine pan like it’s a treasure map—every crevice counts.
- Whisk together flour, baking powder, salt, and chai spice in a bowl. Set aside.
- In another bowl, beat eggs and sugar until pale and fluffy, about 3 minutes.
- Drizzle in melted butter and vanilla, mixing just until combined.
- Gently fold in the dry ingredients—overmixing is the enemy of tender madeleines.
- Spoon batter into molds, filling each 3/4 full. Bake for 10-12 minutes until edges are golden.
- Let them cool for 5 minutes in the pan, then transfer to a rack. They’ll practically jump out.
Light as air with a crisp edge, these madeleines are a spiced dream. Serve them warm with a dusting of powdered sugar or dunked in a creamy latte for extra drama.
Pistachio and Rosewater Cupcakes
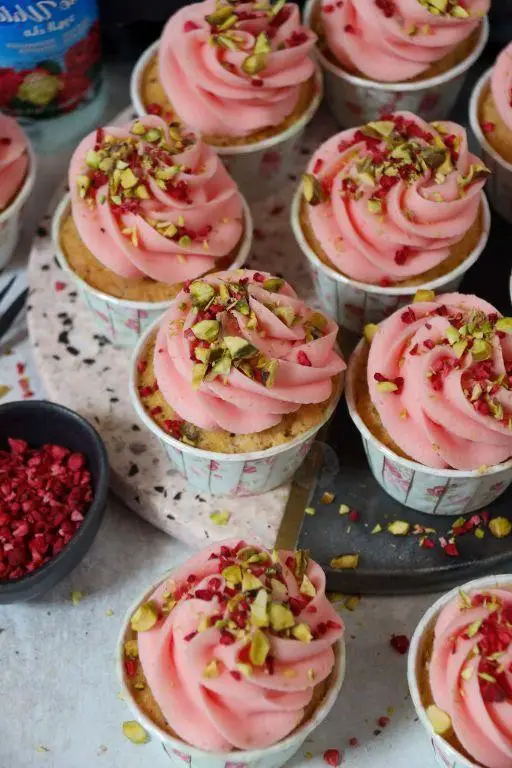
Absolutely no one can resist the exotic charm of pistachio and rosewater cupcakes—fluffy, fragrant, and downright Instagram-worthy.
Ingredients
- 1 1/2 cups all-purpose flour (I swear by King Arthur for consistent results)
- 1 cup granulated sugar (because life’s too short for less sweetness)
- 1/2 cup unsalted butter, softened (room temp is key for that perfect creaminess)
- 2 large eggs (let them sit out for 30 minutes—trust me)
- 1/2 cup shelled pistachios, finely ground (the greener, the better)
- 1/4 cup whole milk (whole milk makes them extra tender)
- 2 tbsp rosewater (a little goes a long way, so don’t overdo it)
- 1 tsp baking powder (freshness matters—check the date)
- 1/2 tsp salt (I prefer sea salt for a cleaner taste)
Instructions
- Preheat your oven to 350°F (175°C) and line a muffin tin with cupcake liners.
- In a large bowl, cream the butter and sugar together until light and fluffy—about 3 minutes.
- Beat in the eggs one at a time, mixing well after each addition. Tip: Scrape the bowl edges to ensure even mixing.
- Whisk the flour, baking powder, salt, and ground pistachios in a separate bowl.
- Alternately add the dry ingredients and milk to the butter mixture, starting and ending with the dry ingredients. Tip: Mix just until combined to avoid tough cupcakes.
- Stir in the rosewater gently—overmixing here can make the batter bitter.
- Divide the batter evenly among the cupcake liners, filling each about 2/3 full.
- Bake for 18-20 minutes, or until a toothpick inserted comes out clean. Tip: Rotate the pan halfway for even baking.
- Let cool in the pan for 5 minutes, then transfer to a wire rack to cool completely.
Unbelievably moist with a delicate crumb, these cupcakes are a floral-nutty dream. Serve them with a sprinkle of crushed pistachios and a drizzle of honey for extra flair.
Matcha Green Tea Macarons
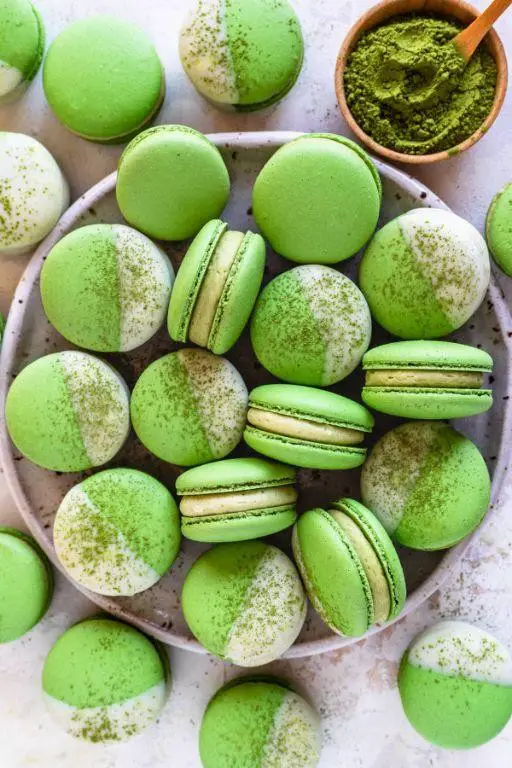
Oozing with vibrant color and a delicate crunch, these Matcha Green Tea Macarons are your next baking obsession. Whip them up for a fancy treat that’s surprisingly simple—just follow the steps below.
Ingredients
- 1 cup almond flour (blanched for a smoother texture, trust me)
- 1 3/4 cups powdered sugar (sifted twice to avoid lumps)
- 3 large egg whites (room temp eggs whip up better)
- 1/4 cup granulated sugar (for that perfect sweet balance)
- 2 tsp matcha powder (go for ceremonial grade—it’s worth it)
- 1/4 tsp cream of tartar (helps stabilize those peaks)
Instructions
- Preheat your oven to 300°F and line two baking sheets with parchment paper.
- Sift together almond flour, powdered sugar, and matcha powder into a large bowl. Discard any large bits.
- In a separate bowl, beat egg whites and cream of tartar on medium speed until foamy. Tip: Ensure your bowl is grease-free for maximum volume.
- Gradually add granulated sugar, then increase speed to high. Beat until stiff peaks form—about 5 minutes.
- Gently fold the dry ingredients into the egg whites in three additions. Tip: Fold just until combined to keep the batter airy.
- Transfer batter to a piping bag fitted with a round tip. Pipe 1-inch circles onto prepared sheets, spacing 1 inch apart.
- Tap the sheets firmly on the counter to release air bubbles. Let sit for 30 minutes until the tops are no longer sticky.
- Bake for 15-18 minutes, rotating sheets halfway. They’re done when they lift cleanly off the paper.
- Cool completely on the sheets before filling. Tip: Pair with white chocolate ganache for a decadent twist.
Kick your dessert game up a notch with these macarons—crisp shells give way to a chewy center, and the matcha offers a grassy, slightly bitter contrast. Serve them stacked high on a vintage cake stand for instant Instagram fame.
Honey and Walnut Tea Cake
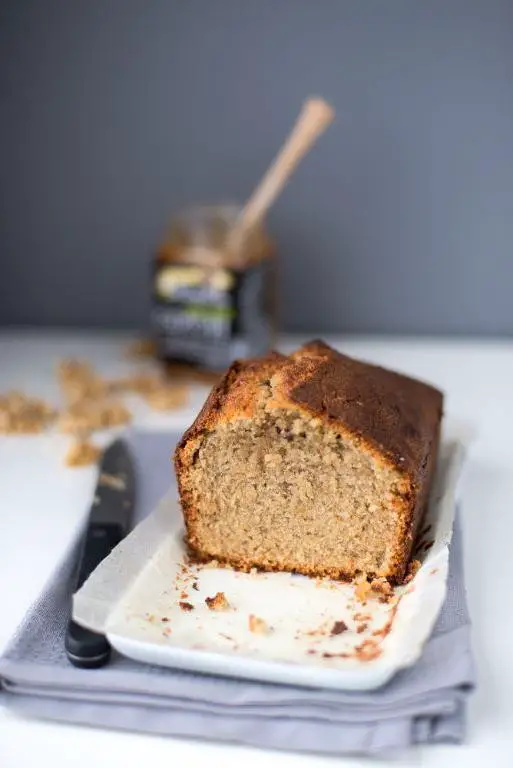
Zesty and sweet, this Honey and Walnut Tea Cake is your next baking obsession. **Whip it up** for a cozy afternoon or to impress at brunch—no fancy skills needed.
Ingredients
- 1 cup all-purpose flour (I swear by King Arthur for consistent results)
- 1/2 cup honey (local if you can—it makes a difference)
- 1/2 cup chopped walnuts (toast them first for extra crunch)
- 1/2 cup unsalted butter, softened (room temp is key for easy mixing)
- 2 large eggs (room temp eggs blend smoother)
- 1 tsp vanilla extract (the real deal, not imitation)
- 1/2 tsp baking powder (aluminum-free for no bitter aftertaste)
- 1/4 tsp salt (I like sea salt for its subtle minerality)
Instructions
- **Preheat** your oven to 350°F (175°C) and grease a 9-inch loaf pan. Tip: Use butter for greasing to add extra flavor.
- In a large bowl, **cream together** the softened butter and honey until light and fluffy, about 3 minutes. Tip: Scrape the bowl sides to ensure even mixing.
- **Beat in** the eggs one at a time, then stir in the vanilla extract. Tip: Adding eggs one by one prevents the mixture from curdling.
- **Whisk together** the flour, baking powder, and salt in a separate bowl. Gradually **fold** this into the wet ingredients until just combined. Overmixing leads to a tough cake.
- **Gently stir** in the chopped walnuts. Pour the batter into the prepared loaf pan.
- **Bake** for 40-45 minutes, or until a toothpick inserted into the center comes out clean. Tip: Check at 40 minutes to avoid overbaking.
- **Let cool** in the pan for 10 minutes, then transfer to a wire rack to cool completely.
Delightfully moist with a crunchy walnut surprise, this cake pairs perfectly with a dollop of clotted cream or a drizzle of extra honey. **Slice it thick** for a satisfying bite or toast lightly for a crispy edge.
Caramelized Onion and Goat Cheese Tart
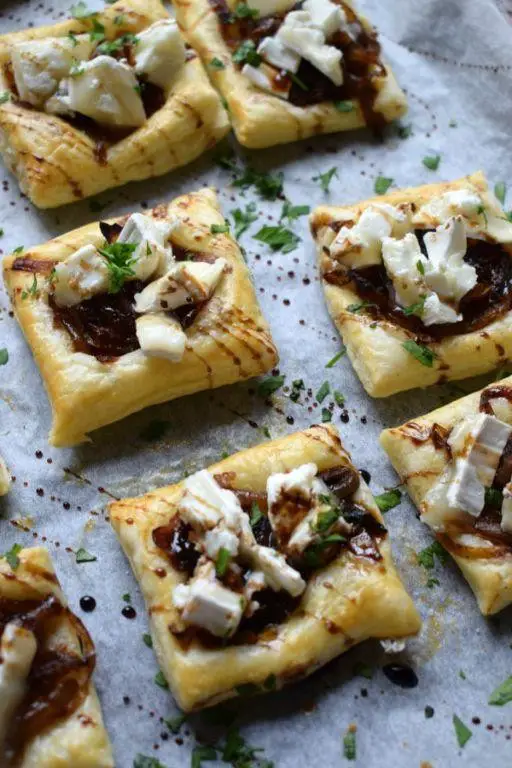
Yes, you need this Caramelized Onion and Goat Cheese Tart in your life. It’s the perfect blend of sweet, savory, and creamy—ideal for impressing guests or treating yourself.
Ingredients
- 1 pre-made pie crust (I swear by the frozen ones for ease)
- 2 large yellow onions, thinly sliced (the thinner, the better for caramelization)
- 2 tbsp unsalted butter (because everything’s better with butter)
- 1 tbsp olive oil (extra virgin is my kitchen staple)
- 4 oz goat cheese, crumbled (room temp spreads easier)
- 1 tsp sugar (just a pinch to help those onions caramelize)
- Salt to taste (don’t skimp—it brings out the flavors)
- Fresh thyme leaves (for that herby freshness)
Instructions
- Preheat your oven to 375°F. Unroll the pie crust into a tart pan, pressing it gently into the edges. Prick the bottom with a fork to prevent puffing.
- In a large skillet over medium heat, melt butter with olive oil. Add onions, sugar, and a pinch of salt. Cook, stirring occasionally, for 25-30 minutes until deeply golden. Tip: Lower the heat if they’re browning too fast.
- Spread the caramelized onions evenly over the pie crust. Sprinkle crumbled goat cheese and thyme leaves on top.
- Bake for 20-25 minutes until the crust is golden and the cheese is slightly melted. Tip: Let it cool for 5 minutes before slicing to keep it neat.
Velvety onions meet tangy goat cheese in every bite, with a buttery crust that crumbles just right. Serve warm with a drizzle of honey for an extra sweet touch.
Mini Chocolate Éclairs with Vanilla Cream

Forget everything you know about éclairs—these mini versions are a game-changer. Packed with rich chocolate and smooth vanilla cream, they’re bite-sized perfection.
Ingredients
- 1 cup water (I use filtered for a cleaner taste)
- 1/2 cup unsalted butter (European-style butter makes all the difference)
- 1 cup all-purpose flour (sifted, always sifted)
- 4 large eggs (room temp eggs blend smoother, trust me)
- 1 cup heavy cream (the higher the fat, the richer the cream)
- 1 tsp pure vanilla extract (skip the imitation stuff)
- 1/2 cup semi-sweet chocolate chips (I prefer Ghirardelli for melting)
- 1 tbsp unsalted butter (for the chocolate glaze)
Instructions
- Preheat your oven to 375°F (190°C)—no guessing, use an oven thermometer.
- In a medium saucepan, combine water and butter. Bring to a rolling boil over medium heat.
- Reduce heat to low and add flour all at once. Stir vigorously with a wooden spoon until the mixture forms a ball—about 1 minute.
- Remove from heat and let cool for 2 minutes. This prevents scrambled eggs—yikes!
- Add eggs one at a time, beating well after each addition. The dough should be shiny and smooth.
- Pipe 1-inch mounds onto a parchment-lined baking sheet. Space them 2 inches apart—they puff up!
- Bake for 20-25 minutes until golden brown. Resist opening the oven—steam is their best friend.
- While shells cool, whip heavy cream and vanilla to stiff peaks. Pipe into cooled éclairs.
- Melt chocolate chips and butter in 30-second intervals, stirring until smooth. Dip éclair tops in glaze.
- Let set for 5 minutes. Serve immediately or refrigerate—if you can wait.
Perfectly crisp shells give way to creamy vanilla centers, all wrapped in a glossy chocolate coat. Try stacking them for a stunning dessert tower at your next brunch.
Apple and Cinnamon Tea Loaf
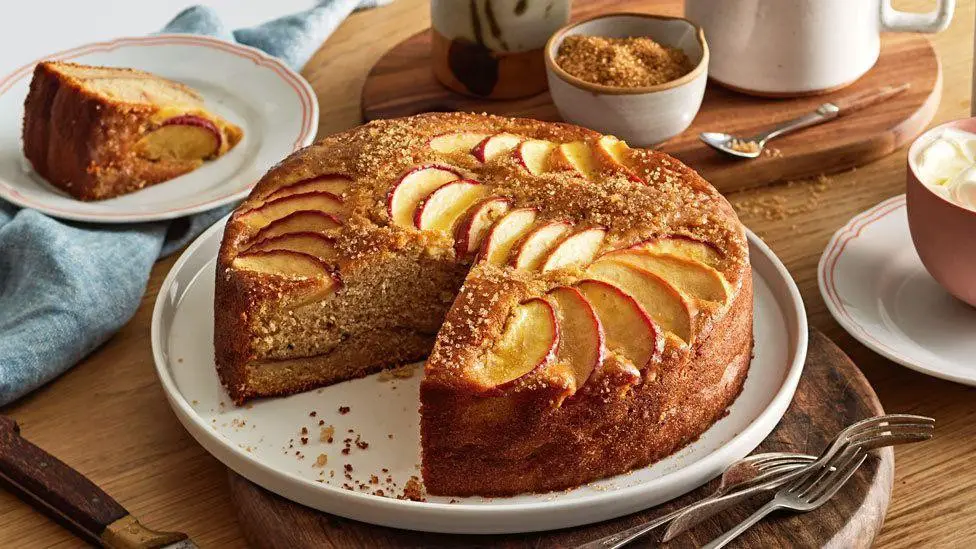
Elevate your tea time with this cozy Apple and Cinnamon Tea Loaf—moist, fragrant, and packed with warm spices. Perfect for those crisp mornings or as a sweet afternoon pick-me-up.
Ingredients
- 2 cups all-purpose flour (I swear by King Arthur for consistent results)
- 1 tsp baking soda (freshness is key—check the date!)
- 1/2 tsp salt (I like sea salt for its subtle crunch)
- 1 tsp ground cinnamon (go for Ceylon if you can find it)
- 1/2 cup unsalted butter, softened (room temp blends smoother)
- 1 cup granulated sugar (I sometimes swap in brown sugar for depth)
- 2 large eggs (room temp eggs incorporate better)
- 1 tsp vanilla extract (pure extract makes all the difference)
- 2 cups diced apples (I love Honeycrisp for their sweetness and bite)
- 1/2 cup buttermilk (full-fat gives the loaf incredible moisture)
Instructions
- Preheat your oven to 350°F (175°C) and grease a 9×5 inch loaf pan.
- In a medium bowl, whisk together flour, baking soda, salt, and cinnamon—set aside.
- In a large bowl, cream butter and sugar until light and fluffy, about 3 minutes.
- Beat in eggs one at a time, then stir in vanilla.
- Alternately add flour mixture and buttermilk to the butter mixture, starting and ending with flour.
- Fold in diced apples until just combined—don’t overmix!
- Pour batter into prepared pan and smooth the top with a spatula.
- Bake for 50-60 minutes, or until a toothpick comes out clean. Tip: Cover with foil if top browns too quickly.
- Let cool in pan for 10 minutes, then transfer to a wire rack to cool completely.
Warm slices of this loaf are heavenly with a smear of butter or a drizzle of caramel. The apples stay tender, and the cinnamon spice is just right—not too overpowering. Try toasting a slice for breakfast with a dollop of Greek yogurt on top.
Cherry Bakewell Thumbprint Cookies
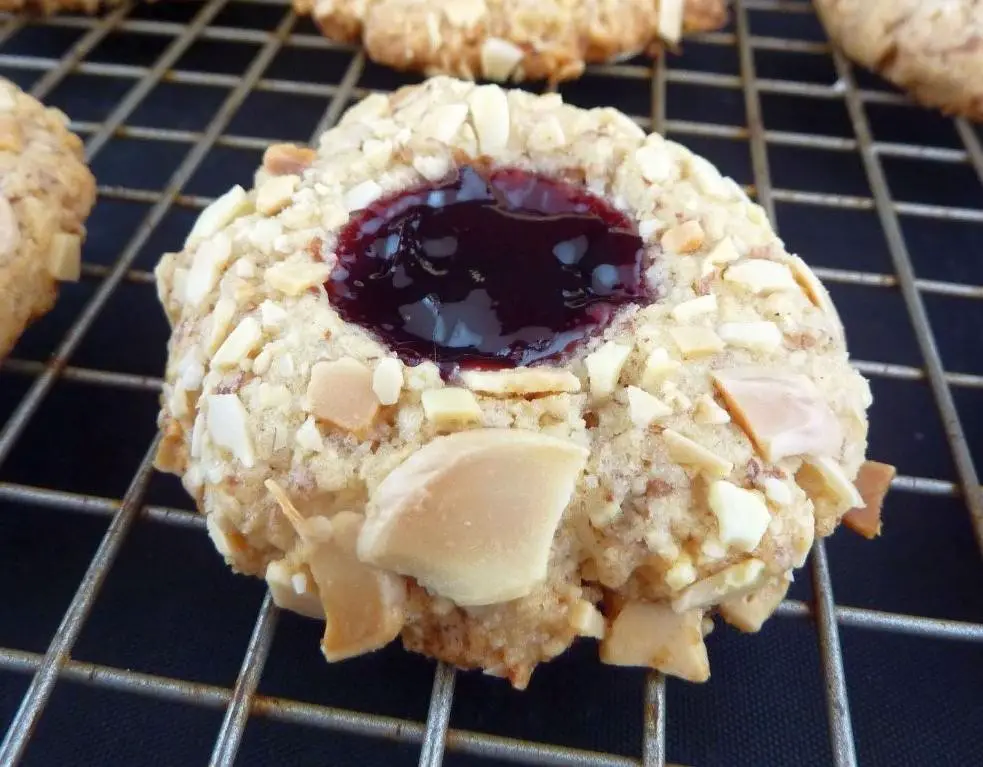
Zesty and sweet, these Cherry Bakewell Thumbprint Cookies are your next baking obsession. Perfect for tea time or as a sweet snack, they’re a breeze to make and even easier to love.
Ingredients
- 1 cup unsalted butter, softened (I swear by Kerrygold for that rich flavor)
- 1/2 cup granulated sugar (because life’s sweet enough, but not too sweet)
- 2 cups all-purpose flour (scoop and level for perfection)
- 1/2 tsp almond extract (the secret weapon for that Bakewell vibe)
- 1/4 cup cherry jam (bonus points if it’s homemade)
- 1/2 cup powdered sugar (for that snowy finish)
Instructions
- Preheat your oven to 350°F. Line a baking sheet with parchment paper—trust me, it’s a game-changer.
- In a large bowl, cream together the softened butter and granulated sugar until light and fluffy. About 3 minutes should do the trick.
- Mix in the almond extract, then gradually add the flour. The dough should come together but not be sticky. Pro tip: If it’s too crumbly, a splash of cold water helps.
- Roll the dough into 1-inch balls and place them on the prepared baking sheet. Use your thumb to make an indent in the center of each.
- Fill each indent with about 1/2 tsp of cherry jam. Don’t overfill, or you’ll have a sticky situation.
- Bake for 12-14 minutes, until the edges are just golden. They’ll firm up as they cool, so resist the urge to overbake.
- Let the cookies cool on the sheet for 5 minutes, then transfer to a wire rack. Once completely cool, dust with powdered sugar.
Crumbly yet tender, these cookies are a textural dream with a burst of cherry in every bite. Serve them stacked high on a vintage plate for that Instagram-worthy moment.
Peach and Raspberry Frangipane
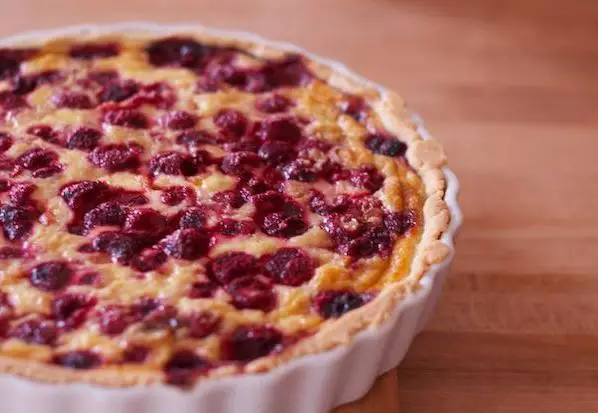
Craving a dessert that’s equal parts elegant and easy? This Peach and Raspberry Frangipane is your answer—juicy fruit meets nutty, buttery bliss in every bite.
Ingredients
- 1 cup all-purpose flour (I swear by King Arthur for consistency)
- 1/2 cup unsalted butter, chilled and cubed (European-style butter elevates the flavor)
- 1/4 cup granulated sugar (for that perfect sweetness)
- 1/4 tsp salt (balances the sweetness)
- 1 large egg yolk (room temp blends smoother)
- 1/2 cup almond flour (the secret to frangipane’s texture)
- 1/4 cup honey (local if you can, for a floral note)
- 1 tsp vanilla extract (pure, not imitation)
- 2 ripe peaches, sliced (freestone peaches are easier to pit)
- 1/2 cup fresh raspberries (they add a pop of color and tartness)
Instructions
- Preheat your oven to 375°F (190°C)—no guessing, use an oven thermometer.
- Pulse flour, butter, sugar, and salt in a food processor until crumbs form. Tip: Stop before it becomes a ball.
- Add egg yolk; pulse just until dough comes together. Overworking makes it tough.
- Press dough into a 9-inch tart pan, prick with a fork, and chill for 15 minutes. This prevents shrinking.
- Blind bake for 10 minutes, then remove weights and bake 5 more minutes until golden.
- Whisk almond flour, honey, and vanilla for the frangipane. Spread over the crust.
- Arrange peaches and raspberries on top. Tip: Overlap peaches for a rose-like effect.
- Bake for 25-30 minutes until frangipane is set and golden. A toothpick should come out clean.
Every bite is a contrast—creamy frangipane, juicy peaches, and tart raspberries. Serve warm with a scoop of vanilla ice cream for the ultimate summer dessert.
Vanilla Bean Panna Cotta with Berry Compote
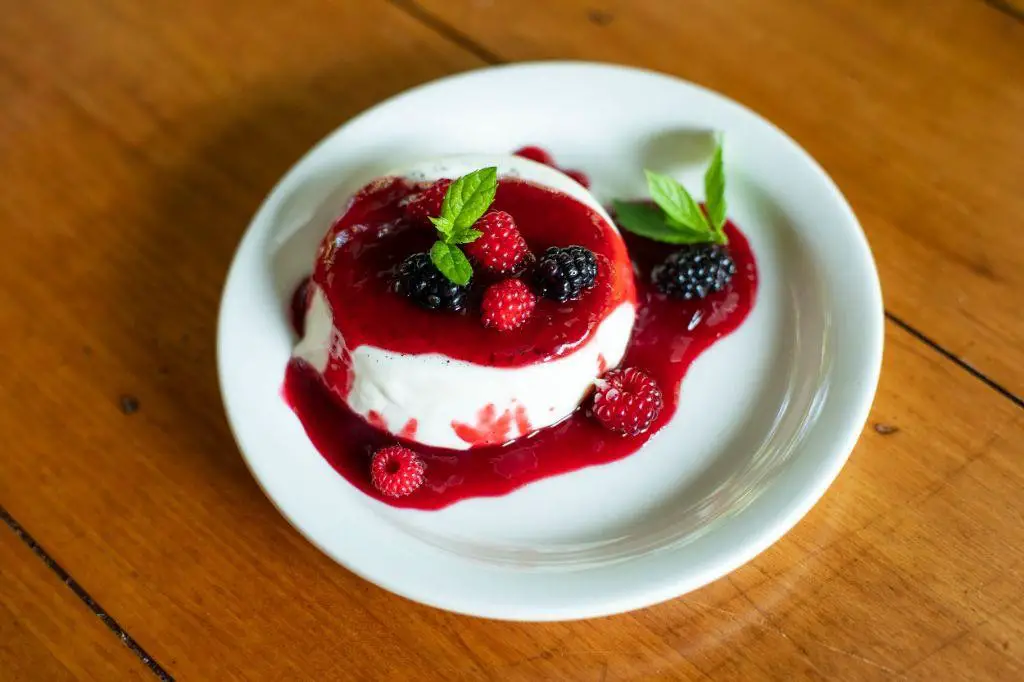
Bold flavors meet creamy dreams in this vanilla bean panna cotta topped with a vibrant berry compote. It’s the no-bake dessert that’s as easy to make as it is to devour.
Ingredients
- 2 cups heavy cream (go for the good stuff—it makes all the difference)
- 1/2 cup whole milk (I swear by organic for the creamiest texture)
- 1/2 cup granulated sugar (because life’s too short for less sweetness)
- 1 vanilla bean, split and scraped (or 1 tsp vanilla extract in a pinch)
- 2 1/4 tsp unflavored gelatin (the silent hero that sets it all)
- 3 tbsp cold water (just enough to bloom the gelatin)
- 2 cups mixed berries (fresh or frozen, but fresh screams summer)
- 1/4 cup honey (local if you can, for that floral kick)
- 1 tbsp lemon juice (brightens up the compote like magic)
Instructions
- In a small bowl, sprinkle gelatin over cold water. Let it sit for 5 minutes until it blooms—think spongy and expanded.
- Combine heavy cream, milk, and sugar in a saucepan. Scrape in the vanilla bean seeds and toss in the pod for extra flavor. Heat over medium until steam rises, but don’t let it boil—about 5 minutes.
- Remove from heat. Fish out the vanilla pod (or don’t, if you’re a rebel who loves extra vanilla specs). Stir in the bloomed gelatin until fully dissolved.
- Pour the mixture into 4 ramekins or glasses. Chill for at least 4 hours, or until set—like a creamy, jiggly dream.
- For the compote, toss berries, honey, and lemon juice in a saucepan. Simmer over low heat for 10 minutes, stirring occasionally, until berries break down but still have some texture.
- Let the compote cool slightly before spooning over the set panna cotta. Serve immediately or chill for up to 2 days.
Get ready for a dessert that’s silky, rich, and perfectly balanced by the tangy compote. Try layering it in clear glasses for a stunning, Instagram-worthy presentation.
Conclusion
Exploring these 20 Delicious Afternoon Tea Recipes offers a perfect way to unwind and savor relaxing evenings. Whether you’re a seasoned baker or trying your hand at tea-time treats for the first time, there’s something here for everyone. We’d love to hear which recipes became your favorites—drop us a comment below! And don’t forget to share the joy by pinning this article on Pinterest for others to discover. Happy brewing and baking!

Michael Johnson is the founder of Pan Mastery, Inspired by his blacksmith grandfather’s legacy has a deep appreciation for hand-crafted pots and pans, he provides invaluable guides, reviews, and recipes to enhance your culinary journey.