Desserts are the sweet finale every meal deserves, and we’ve rounded up 18 irresistible recipes that promise to delight your taste buds and impress your guests. From creamy cheesecakes to gooey chocolate treats, this collection is a treasure trove for anyone with a sweet tooth. Ready to dive into a world of delectable desserts? Keep scrolling to discover your next favorite recipe!
Chocolate Lava Cake
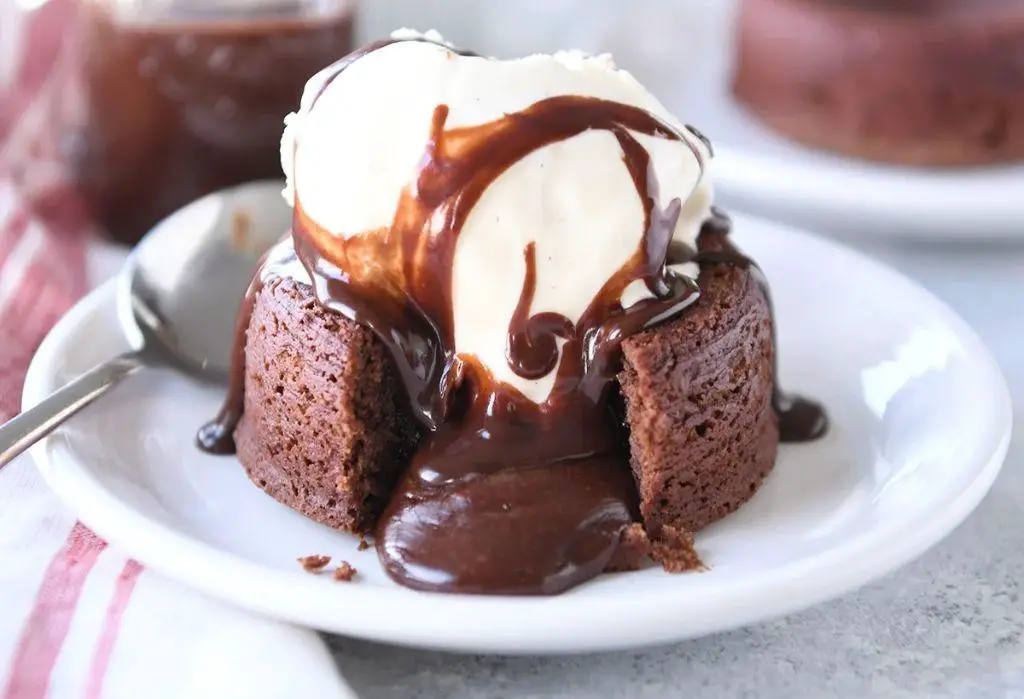
Kind of like a hug in dessert form, Chocolate Lava Cake has been my go-to for impressing dinner guests or treating myself after a long week. There’s something magical about breaking into that tender exterior to reveal a river of molten chocolate. I remember the first time I made it, I was so nervous it wouldn’t turn out right, but now it’s a staple in my recipe arsenal.
Ingredients
- 1/2 cup unsalted butter (I always use European-style for its richer flavor)
- 4 ounces semi-sweet chocolate (chopped, because I find it melts more evenly)
- 1 cup powdered sugar (sifted to avoid lumps)
- 2 large eggs (room temperature, as they incorporate better into the batter)
- 2 large egg yolks (extra richness never hurt anyone)
- 1 teaspoon vanilla extract (pure, for that authentic depth of flavor)
- 1/2 cup all-purpose flour (measured by spooning into the cup to avoid packing)
- 1/4 teaspoon salt (just a pinch to balance the sweetness)
Instructions
- Preheat your oven to 425°F (218°C). This high heat is crucial for creating that perfect lava flow.
- Generously butter four 6-ounce ramekins. I like to use my fingers to ensure every nook is covered, preventing sticking.
- In a microwave-safe bowl, melt the butter and chocolate together in 30-second bursts, stirring in between, until smooth. Tip: Overheating can seize the chocolate, so patience is key.
- Whisk in the powdered sugar until fully incorporated. The mixture will look grainy at first but keep going.
- Add the eggs, egg yolks, and vanilla extract, whisking vigorously to create a silky batter. Tip: This is where room temperature eggs make a difference, blending seamlessly.
- Gently fold in the flour and salt until just combined. Overmixing can lead to a tough cake, so a light hand is essential.
- Divide the batter evenly among the prepared ramekins. I use an ice cream scoop for uniformity.
- Bake for 12-14 minutes. The edges should be set, but the center will jiggle slightly when shaken. Tip: Underbaking is better than overbaking to achieve that lava center.
- Let the cakes rest for 1 minute before inverting onto plates. Run a knife around the edges if needed to loosen.
Nothing beats the contrast of the crisp outer layer against the oozing chocolate center. Serve it with a scoop of vanilla ice cream for that classic hot-and-cold combo, or fresh berries for a touch of acidity. Either way, it’s a showstopper.
Vanilla Bean Cheesecake
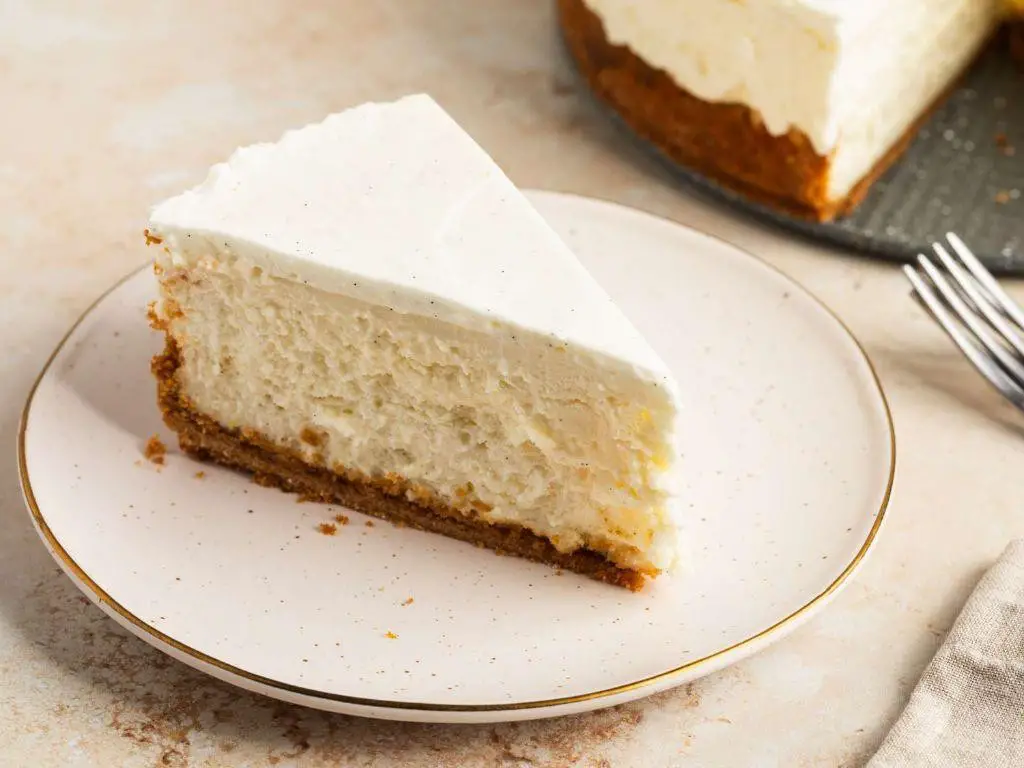
Absolutely nothing beats the classic, creamy delight of a homemade Vanilla Bean Cheesecake. It’s the kind of dessert that brings back memories of family gatherings and cozy Sunday dinners for me. Today, I’m sharing my go-to recipe that’s foolproof and always gets rave reviews.
Ingredients
- 2 cups graham cracker crumbs (I always grab the honey-flavored ones for a bit of extra sweetness)
- 1/2 cup unsalted butter, melted (because let’s be honest, butter makes everything better)
- 4 (8 oz) packages cream cheese, softened to room temperature (this is crucial for a smooth filling)
- 1 1/4 cups granulated sugar (I sometimes reduce this to 1 cup if I’m topping it with a sweet sauce)
- 1 vanilla bean, split and seeds scraped (or 1 tbsp pure vanilla extract in a pinch, but the bean is worth it)
- 4 large eggs, room temperature (they blend better when not cold)
- 2/3 cup sour cream (full-fat for the win)
- 2/3 cup heavy cream (it adds that luxurious texture)
Instructions
- Preheat your oven to 325°F (163°C) and wrap the outside of a 9-inch springform pan with aluminum foil to prevent water seepage.
- Mix the graham cracker crumbs and melted butter until combined, then press firmly into the bottom of the pan. Bake for 10 minutes, then let cool.
- Beat the cream cheese on medium speed until smooth, about 3 minutes. Gradually add sugar, then the vanilla bean seeds, scraping down the bowl as needed.
- Add eggs one at a time, beating just until blended after each. Overbeating incorporates too much air, which can cause cracks.
- Stir in the sour cream and heavy cream until the mixture is smooth and creamy.
- Pour the filling over the crust and smooth the top. Place the pan in a larger baking dish and fill the dish with hot water until halfway up the sides of the springform pan.
- Bake for about 1 hour and 15 minutes, or until the edges are set but the center still jiggles slightly.
- Turn off the oven, crack the door open, and let the cheesecake cool inside for 1 hour to prevent sinking.
- Remove from the oven and water bath, then refrigerate for at least 4 hours, preferably overnight.
When you finally slice into this cheesecake, you’ll be greeted with a velvety texture and the rich, aromatic flavor of vanilla that’s simply irresistible. Serve it with a drizzle of caramel or fresh berries for an extra special touch.
Strawberry Shortcake
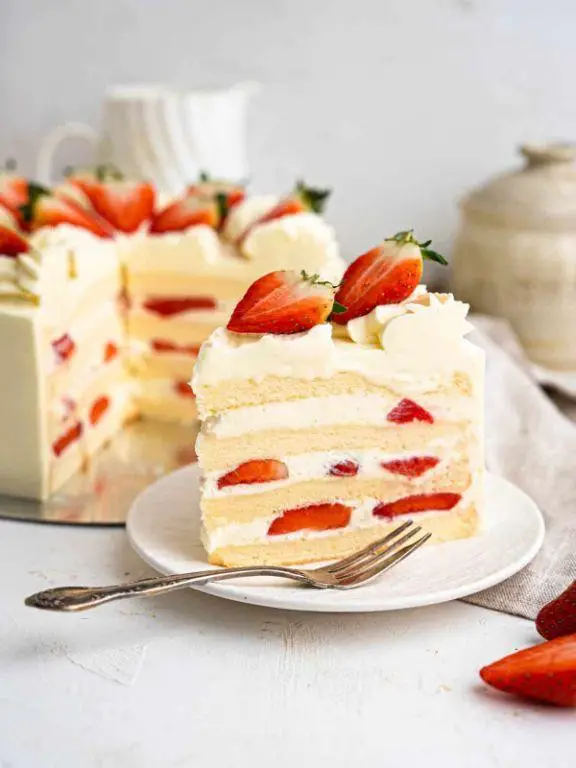
How many times have I found myself staring at a basket of strawberries, wondering how to turn them into something spectacular? Too many to count, but the answer is always the same: Strawberry Shortcake. It’s a classic that never fails to bring smiles, and today, I’m sharing my go-to recipe that’s as easy as it is delicious.
Ingredients
- 2 cups all-purpose flour (I swear by King Arthur for that perfect rise)
- 1/4 cup granulated sugar (because a little sweetness in the biscuit makes all the difference)
- 1 tbsp baking powder (the fresher, the better – it’s the secret to fluffy biscuits)
- 1/2 tsp salt (I use sea salt for a cleaner taste)
- 1/2 cup unsalted butter, cold and cubed (trust me, cold butter is non-negotiable)
- 3/4 cup heavy cream (plus a little extra for brushing)
- 1 lb fresh strawberries, hulled and sliced (the riper, the better)
- 2 tbsp granulated sugar (for the strawberries, because they need a little help to shine)
- 1 cup whipped cream (homemade or store-bought, no judgment here)
Instructions
- Preheat your oven to 425°F. A hot oven is key to getting those biscuits just right.
- In a large bowl, whisk together the flour, 1/4 cup sugar, baking powder, and salt. This ensures everything is evenly distributed.
- Add the cold, cubed butter to the dry ingredients. Using your fingers or a pastry cutter, work the butter into the flour until the mixture resembles coarse crumbs. Tip: The butter should remain cold, so work quickly.
- Pour in the heavy cream and stir until just combined. Overmixing leads to tough biscuits, so stop as soon as the dough comes together.
- Turn the dough onto a lightly floured surface and gently pat it into a 1-inch thick rectangle. Use a biscuit cutter to cut out rounds, pressing straight down without twisting for the best rise.
- Place the biscuits on a baking sheet, brush the tops with a little heavy cream for that golden finish, and bake for 12-15 minutes, or until they’re golden brown.
- While the biscuits bake, toss the sliced strawberries with 2 tbsp sugar and let them sit. This draws out their juices, creating a naturally sweet syrup.
- Once the biscuits are cool enough to handle, split them in half. Layer the bottom halves with strawberries and their juices, top with a dollop of whipped cream, and crown with the biscuit tops.
Nothing beats the contrast of the tender, buttery biscuit against the juicy strawberries and cloud-like whipped cream. For an extra touch of elegance, serve them on a vintage cake stand – it makes all the difference.
Red Velvet Cupcakes
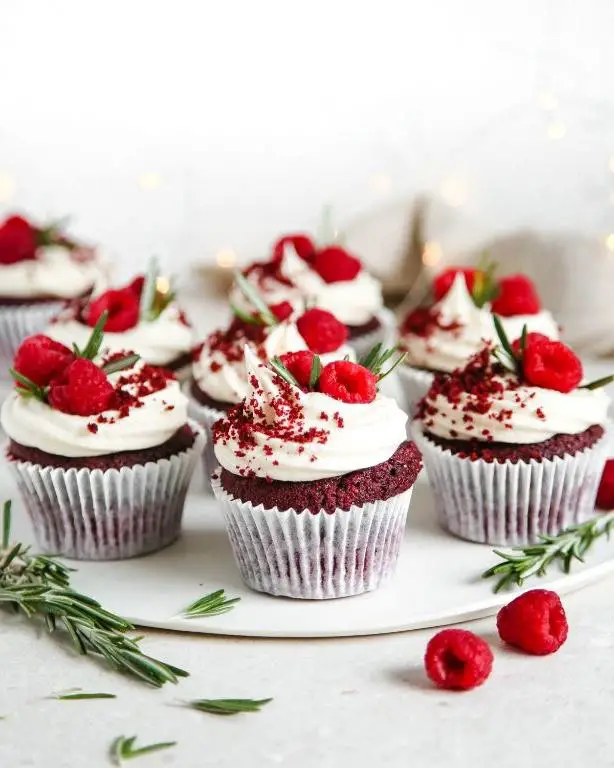
Oh, the joy of biting into a perfectly moist and velvety red velvet cupcake! It’s like a little celebration in your mouth, and today, I’m sharing my go-to recipe that never fails to impress. Whether it’s for a special occasion or just because, these cupcakes are a delightful treat that everyone seems to love.
Ingredients
- 1 1/4 cups all-purpose flour – I swear by King Arthur for consistent results.
- 1/4 cup unsweetened cocoa powder – The darker, the better for that rich color and flavor.
- 1/2 teaspoon baking soda – Freshness is key, so I always check the date.
- 1/2 teaspoon salt – A pinch of sea salt enhances all the flavors.
- 1/2 cup unsalted butter, room temperature – Soft butter is a must for that smooth batter.
- 1 cup granulated sugar – For that perfect sweetness.
- 2 large eggs, room temperature – They blend better when not cold.
- 1 teaspoon vanilla extract – Pure vanilla makes all the difference.
- 1/2 cup buttermilk – Adds moisture and a slight tang.
- 1 tablespoon red food coloring – I like the gel kind for vibrant color.
- 1 teaspoon white vinegar – A secret ingredient for that classic texture.
Instructions
- Preheat your oven to 350°F (175°C) and line a muffin tin with cupcake liners.
- In a medium bowl, whisk together the flour, cocoa powder, baking soda, and salt until well combined.
- In a large bowl, beat the butter and sugar together on medium speed until light and fluffy, about 3 minutes.
- Add the eggs one at a time, beating well after each addition, then stir in the vanilla.
- Alternately add the flour mixture and buttermilk to the butter mixture, starting and ending with the flour. Mix until just combined.
- Stir in the red food coloring and vinegar until the batter is uniformly red.
- Divide the batter evenly among the prepared muffin cups, filling each about 2/3 full.
- Bake for 18-20 minutes, or until a toothpick inserted into the center comes out clean.
- Let the cupcakes cool in the pan for 5 minutes, then transfer to a wire rack to cool completely.
Rich in flavor with a tender crumb, these red velvet cupcakes are a dream. Top them with cream cheese frosting for the ultimate indulgence, or enjoy them as is for a simpler pleasure. Either way, they’re sure to disappear fast!
Lemon Meringue Pie
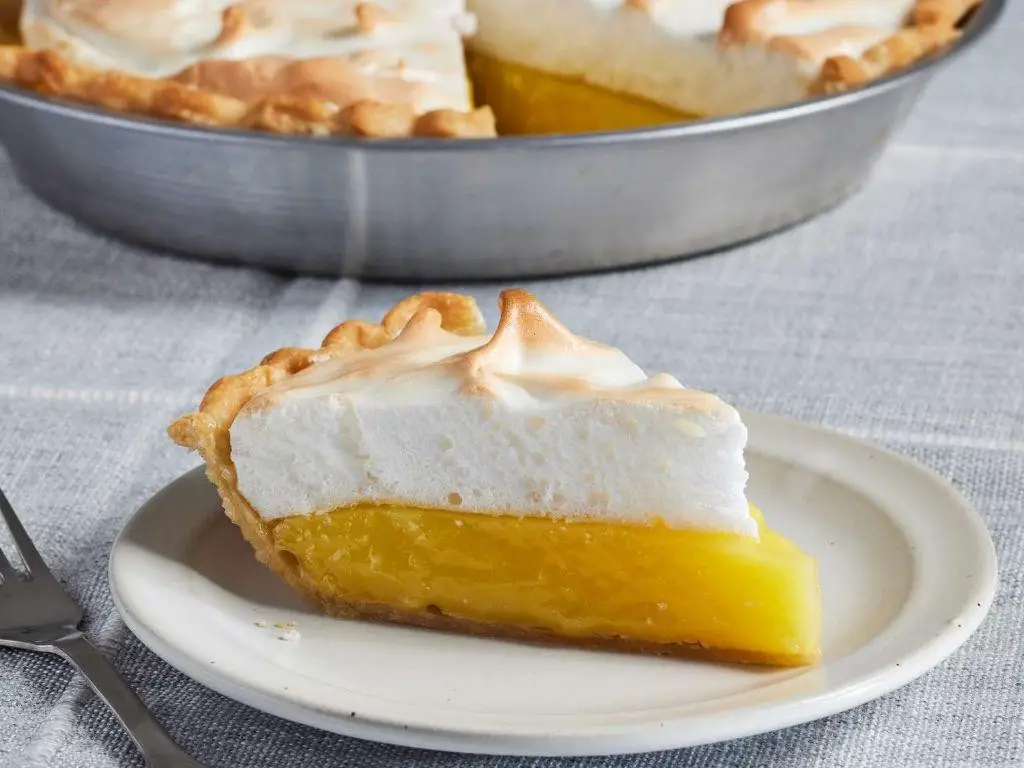
This morning, as I sipped my coffee and watched the sunrise, I couldn’t help but think about the perfect summer dessert—Lemon Meringue Pie. There’s something about the tangy lemon filling paired with the sweet, fluffy meringue that just screams summer to me. It’s a recipe that’s been in my family for generations, and today, I’m excited to share it with you.
Ingredients
- 1 1/2 cups granulated sugar (I always use organic for a cleaner taste)
- 1/4 cup cornstarch (this is the secret to a thick, luscious filling)
- 1 1/2 cups water (filtered makes a difference in the purity of flavors)
- 4 large egg yolks, lightly beaten (room temp eggs blend smoother)
- 1/2 cup fresh lemon juice (about 3 lemons, and yes, fresh is non-negotiable)
- 2 tbsp unsalted butter (I prefer European-style for its richness)
- 1 pre-baked 9-inch pie crust (homemade or store-bought, no judgment here)
- 4 large egg whites (again, room temp for optimal volume)
- 1/4 tsp cream of tartar (this stabilizes the meringue like a dream)
- 1/2 cup granulated sugar (for the meringue, because sweetness is key)
Instructions
- Preheat your oven to 350°F (175°C) to ensure it’s ready for the meringue.
- In a medium saucepan, whisk together 1 1/2 cups sugar and cornstarch to prevent lumps.
- Gradually stir in water, then bring the mixture to a boil over medium heat, stirring constantly. Tip: A silicone whisk is my go-to for avoiding scratches on my pans.
- Once boiling, cook for 1 minute until the mixture thickens. It should coat the back of a spoon.
- Remove from heat and gradually whisk in the egg yolks to temper them, preventing curdling.
- Return to heat and cook for 2 more minutes, stirring constantly. Tip: Keep the heat medium to avoid scorching.
- Off the heat, stir in lemon juice and butter until smooth. Pour into the pre-baked pie crust.
- For the meringue, beat egg whites and cream of tartar on medium until soft peaks form. Tip: Ensure your bowl and beaters are grease-free for the best volume.
- Gradually add 1/2 cup sugar, beating until stiff, glossy peaks form.
- Spread the meringue over the hot filling, sealing to the edges to prevent shrinking.
- Bake for 12-15 minutes until the meringue is golden. Cool on a wire rack for 2 hours before serving.
Here’s the thing about this pie—the contrast between the silky, tart lemon filling and the cloud-like meringue is nothing short of magical. Serve it chilled with a sprinkle of lemon zest on top for an extra zing that’ll make your taste buds dance.
Tiramisu
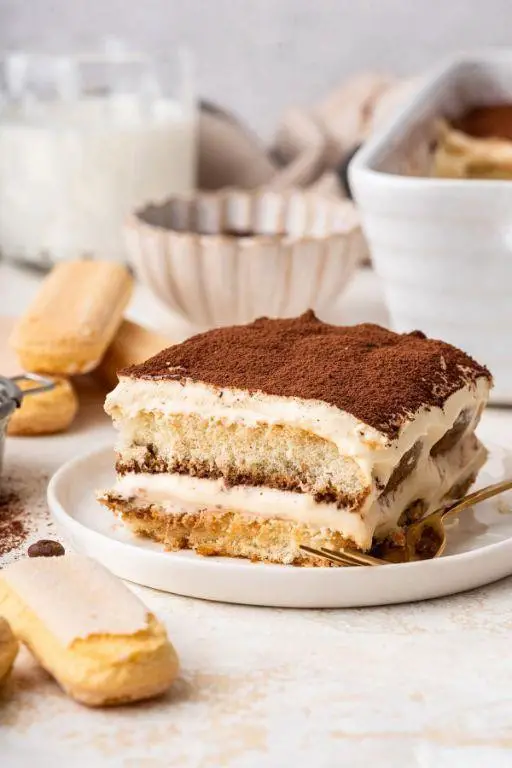
Believe it or not, my first encounter with Tiramisu was at a tiny Italian café in New York, where the layers of coffee-soaked ladyfingers and mascarpone cream convinced me that dessert could indeed be a sophisticated affair. Since then, I’ve tweaked this classic to suit my lazy Sunday afternoons, where the coffee is strong, and the dessert, even stronger.
Ingredients
- 6 large egg yolks (I swear by room temp eggs for a smoother blend)
- 3/4 cup granulated sugar (because life’s too short for less sweet)
- 2/3 cup milk (whole milk makes the mascarpone mixture luxuriously creamy)
- 1 1/4 cups heavy cream (chilled, for peaks that stand tall)
- 8 oz mascarpone cheese (let it sit out for a bit to avoid lumps)
- 1 cup strong brewed coffee, cooled (espresso is my go-to for that authentic kick)
- 2 tbsp coffee liqueur (optional, but why not?)
- 24 ladyfingers (because symmetry is satisfying)
- Unsweetened cocoa powder, for dusting (the final touch that makes it Instagram-worthy)
Instructions
- In a medium saucepan, whisk together egg yolks and sugar until well blended.
- Gradually whisk in milk and cook over medium heat, stirring constantly, until the mixture thickens and coats the back of a spoon, about 10 minutes. Tip: Don’t rush this step; patience ensures a silky custard.
- Remove from heat and let cool slightly. Then, whisk in mascarpone until smooth. Tip: A few lumps are okay; they’ll disappear as it chills.
- In a large bowl, beat heavy cream until stiff peaks form. Gently fold into the mascarpone mixture. Tip: Fold, don’t stir, to keep the air in the cream.
- Combine coffee and liqueur in a shallow dish. Quickly dip each ladyfinger into the coffee mixture (1 second per side) and layer in a 9×13-inch dish.
- Spread half the mascarpone mixture over the ladyfingers. Repeat layers, ending with mascarpone.
- Cover and refrigerate for at least 4 hours, preferably overnight. Tip: The longer it chills, the better the flavors meld.
- Dust with cocoa powder just before serving.
Creamy, dreamy, and with just the right amount of coffee punch, this Tiramisu is a testament to the beauty of simple ingredients coming together. Serve it in glass cups for a deconstructed version that’s as pretty as it is delicious.
Peanut Butter Cookies
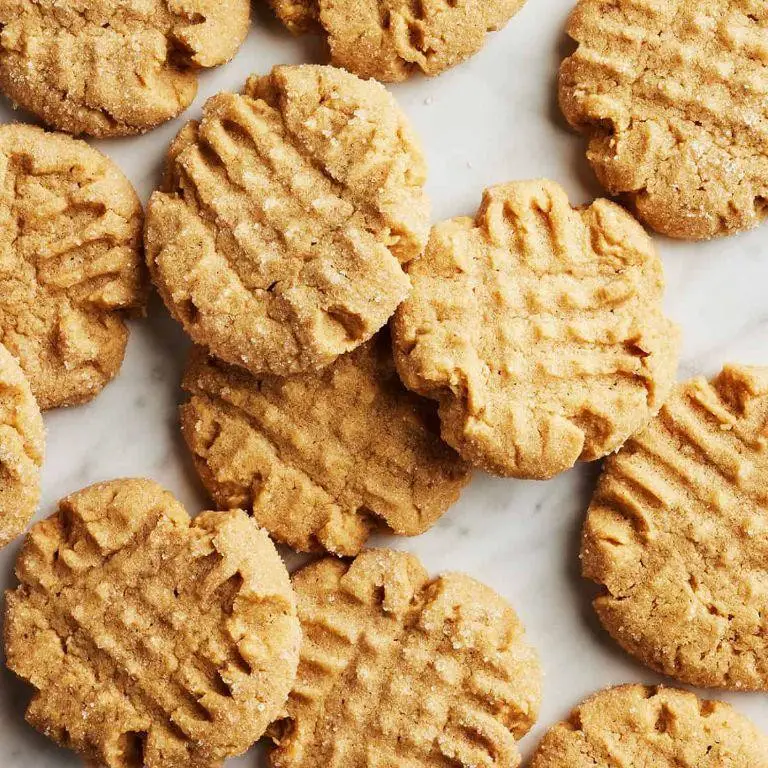
Last weekend, I found myself craving something sweet but simple, and that’s when I remembered my grandma’s peanut butter cookies. They’re the perfect blend of chewy and crisp, with a rich peanut butter flavor that’s not too overpowering. Here’s how I make them, with a few personal tweaks along the way.
Ingredients
- 1 cup creamy peanut butter (I swear by the natural kind for a deeper flavor)
- 1 cup granulated sugar (yes, it’s a bit indulgent, but worth it)
- 1 large egg (room temperature eggs mix better, in my experience)
- 1 tsp vanilla extract (the real deal, not imitation)
- A pinch of salt (to balance the sweetness)
Instructions
- Preheat your oven to 350°F (175°C) and line a baking sheet with parchment paper. This prevents sticking and makes cleanup a breeze.
- In a large bowl, mix together the peanut butter, sugar, egg, vanilla extract, and salt until well combined. The dough will be thick and sticky—that’s exactly what you want.
- Roll the dough into 1-inch balls and place them on the prepared baking sheet, spacing them about 2 inches apart. Pro tip: Use a fork to gently press down on each ball, creating a crisscross pattern. This not only looks classic but helps the cookies bake evenly.
- Bake for 10-12 minutes, or until the edges are just starting to turn golden. They might seem soft, but they’ll firm up as they cool.
- Let the cookies cool on the baking sheet for 5 minutes before transferring them to a wire rack to cool completely. This patience-testing step ensures they don’t fall apart.
Great for sharing (or not), these peanut butter cookies have a delightful texture that’s slightly crisp on the outside and tender on the inside. Try sandwiching them with a dollop of chocolate ganache for an extra decadent treat.
Carrot Cake
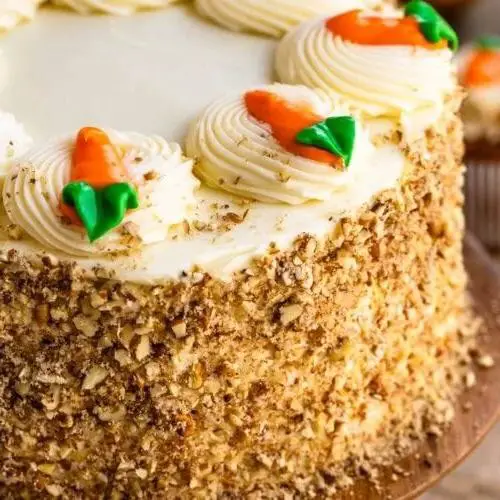
Remember the first time I tried carrot cake? It was at a cozy little bakery in Vermont, and I was instantly hooked by its moist texture and the perfect balance of sweetness and spice. Now, I make it at home whenever I need a comforting treat, and I’ve tweaked the recipe to perfection over the years.
Ingredients
- 2 cups all-purpose flour (I always sift mine for a lighter cake)
- 2 tsp baking soda (freshness is key here, so check the date)
- 1/2 tsp salt (I use sea salt for a cleaner taste)
- 2 tsp ground cinnamon (the heart of the spice profile)
- 1 cup granulated sugar (I sometimes reduce this to 3/4 cup for a less sweet version)
- 1 cup brown sugar, packed (dark brown gives a deeper flavor)
- 1 cup vegetable oil (I’ve tried coconut oil, but vegetable works best)
- 4 large eggs (room temperature eggs blend more smoothly)
- 3 cups grated carrots (I grate mine fine for a uniform texture)
- 1 cup chopped walnuts (toasting them first brings out their flavor)
Instructions
- Preheat your oven to 350°F (175°C) and grease a 9×13 inch baking pan. Tip: Use parchment paper for easy removal.
- In a large bowl, whisk together the flour, baking soda, salt, and cinnamon until well combined.
- In another bowl, beat the granulated sugar, brown sugar, and vegetable oil together until smooth. Tip: A stand mixer makes this step a breeze.
- Add the eggs one at a time, beating well after each addition. Tip: Room temperature eggs incorporate better, preventing a greasy batter.
- Gradually mix in the dry ingredients to the wet ingredients, stirring just until combined.
- Fold in the grated carrots and chopped walnuts until evenly distributed throughout the batter.
- Pour the batter into the prepared pan and smooth the top with a spatula.
- Bake for 40-45 minutes, or until a toothpick inserted into the center comes out clean. Tip: Don’t overbake; the cake continues to cook as it cools.
- Let the cake cool in the pan for 10 minutes, then transfer to a wire rack to cool completely.
Just out of the oven, this carrot cake is incredibly moist with a tender crumb, and the spices meld beautifully with the sweetness of the carrots. For an extra special touch, serve slices with a dollop of cream cheese frosting and a sprinkle of toasted walnuts on top.
Blueberry Muffins
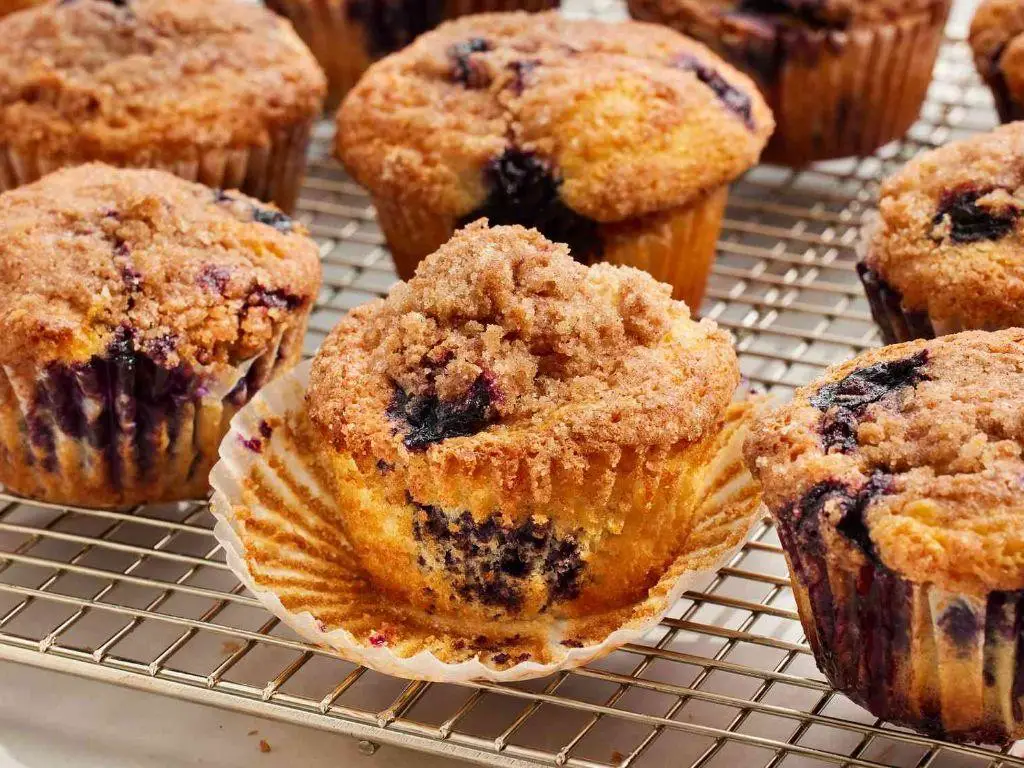
Some mornings just call for something sweet and comforting, and that’s exactly when I turn to these homemade blueberry muffins. There’s something about the burst of juicy blueberries and the tender crumb that makes them irresistible, not to mention how they fill the kitchen with the most inviting aroma.
Ingredients
- 2 cups all-purpose flour (I swear by King Arthur for consistent results)
- 1/2 cup granulated sugar (sometimes I’ll sneak in a tablespoon more if I’m feeling indulgent)
- 1/2 cup brown sugar (for that deep, molasses-y sweetness)
- 1 tbsp baking powder (make sure it’s fresh for the best rise)
- 1/2 tsp salt (I use fine sea salt for even distribution)
- 1 cup milk (whole milk makes them extra rich, but any works)
- 1/2 cup unsalted butter, melted and slightly cooled (I prefer European-style for its higher fat content)
- 1 large egg, room temperature (it blends into the batter more smoothly)
- 1 tsp vanilla extract (pure, not imitation, makes all the difference)
- 1 1/2 cups fresh blueberries (frozen work in a pinch, but don’t thaw them)
Instructions
- Preheat your oven to 375°F (190°C) and line a muffin tin with paper liners or grease it well.
- In a large bowl, whisk together the flour, granulated sugar, brown sugar, baking powder, and salt.
- In another bowl, mix the milk, melted butter, egg, and vanilla extract until well combined.
- Pour the wet ingredients into the dry ingredients and stir until just combined; overmixing leads to tough muffins.
- Gently fold in the blueberries, being careful not to crush them.
- Divide the batter evenly among the muffin cups, filling each about 3/4 full.
- Bake for 20-25 minutes, or until the tops are golden and a toothpick inserted comes out clean.
- Let the muffins cool in the pan for 5 minutes, then transfer to a wire rack to cool completely.
Now, these muffins are best enjoyed warm, with the blueberries still a bit jammy inside. Not only do they make a perfect breakfast, but they’re also fantastic as a midday snack with a dollop of clotted cream or a drizzle of honey for an extra treat.
Pumpkin Pie

Unbelievably, the first time I tried making pumpkin pie, it was a disaster—soggy crust, undercooked filling, you name it. But after years of tweaking, I’ve landed on a foolproof recipe that’s as comforting as it is delicious, perfect for any season.
Ingredients
- 1 1/2 cups all-purpose flour (I swear by King Arthur for that perfect flaky crust)
- 1/2 teaspoon salt (a pinch more if you’re like me and love a salty-sweet contrast)
- 1/2 cup unsalted butter, chilled and diced (cold butter is the secret to flakiness)
- 4-6 tablespoons ice water (just enough to bring the dough together)
- 1 can (15 oz) pumpkin puree (not pumpkin pie filling—trust me, there’s a difference)
- 3/4 cup granulated sugar (I sometimes use brown sugar for a deeper flavor)
- 1 teaspoon ground cinnamon (the heart of the pie’s spice profile)
- 1/2 teaspoon ground ginger (a little goes a long way)
- 1/4 teaspoon ground cloves (for that unmistakable pumpkin pie aroma)
- 1/2 teaspoon salt (balances the sweetness perfectly)
- 2 large eggs (room temp blends smoother into the filling)
- 1 can (12 oz) evaporated milk (makes the filling luxuriously creamy)
Instructions
- Preheat your oven to 425°F. A hot oven is crucial for setting the crust quickly.
- In a large bowl, whisk together flour and salt. Add chilled butter, using your fingers to work it into the flour until the mixture resembles coarse crumbs.
- Gradually add ice water, one tablespoon at a time, mixing until the dough just comes together. Tip: Overworking the dough makes it tough.
- Roll out the dough on a floured surface to fit a 9-inch pie dish. Trim and crimp the edges. Chill for 30 minutes to prevent shrinking.
- Line the chilled crust with parchment paper and fill with pie weights or dried beans. Blind bake for 15 minutes, then remove weights and bake 5 more minutes until lightly golden.
- Reduce oven to 350°F. In a bowl, whisk pumpkin puree, sugar, spices, and salt. Beat in eggs one at a time, then stir in evaporated milk until smooth.
- Pour filling into the pre-baked crust. Bake for 45-50 minutes until the center is set but slightly wobbly. Tip: A knife inserted near the center should come out clean.
- Cool on a wire rack for at least 2 hours. This patience-testing step ensures the filling sets properly.
My favorite part? The way the spices meld together, creating a pie that’s rich, creamy, and just sweet enough. Serve it with a dollop of whipped cream or a scoop of vanilla ice cream for an extra indulgent treat.
Apple Crumble
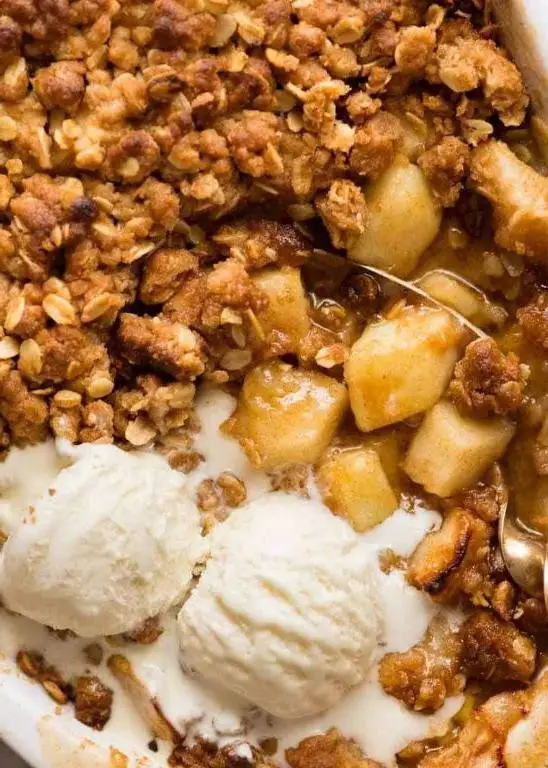
Every time I think of comfort food, my mind instantly goes to the warm, spiced aroma of apple crumble baking in the oven. It’s a dish that reminds me of chilly autumn evenings and the joy of sharing dessert with loved ones. Here’s how I make my go-to apple crumble, with a few personal twists along the way.
Ingredients
- 4 large Granny Smith apples, peeled and sliced (I find their tartness balances the sweetness perfectly)
- 1/2 cup granulated sugar (I sometimes reduce this to 1/3 cup if the apples are very sweet)
- 1 tsp ground cinnamon (a little extra never hurts)
- 1 cup all-purpose flour (I’ve tried whole wheat, but all-purpose gives the best texture)
- 1/2 cup packed brown sugar (the darker, the better for that deep molasses flavor)
- 1/2 cup unsalted butter, cold and cubed (I keep mine in the freezer for about 10 minutes before using)
- 1/2 cup old-fashioned oats (for that irresistible crunch)
Instructions
- Preheat your oven to 375°F (190°C) and lightly grease a 9-inch baking dish.
- In a large bowl, toss the sliced apples with granulated sugar and cinnamon until evenly coated, then spread them in the prepared baking dish.
- In another bowl, combine flour, brown sugar, and oats. Add the cold butter cubes and use your fingers to rub the mixture until it resembles coarse crumbs. (Tip: Working quickly keeps the butter cold, which helps achieve a flaky topping.)
- Sprinkle the crumb mixture evenly over the apples. (Tip: Don’t press it down; let it stay loose for maximum crunch.)
- Bake for 35-40 minutes, or until the topping is golden brown and the apples are bubbly. (Tip: Place a baking sheet underneath to catch any drips and make cleanup easier.)
Golden and fragrant straight from the oven, this apple crumble is best served warm with a scoop of vanilla ice cream. The contrast between the crispy topping and the soft, cinnamon-spiced apples is simply divine. For an extra special touch, drizzle with caramel sauce before serving.
Banana Bread
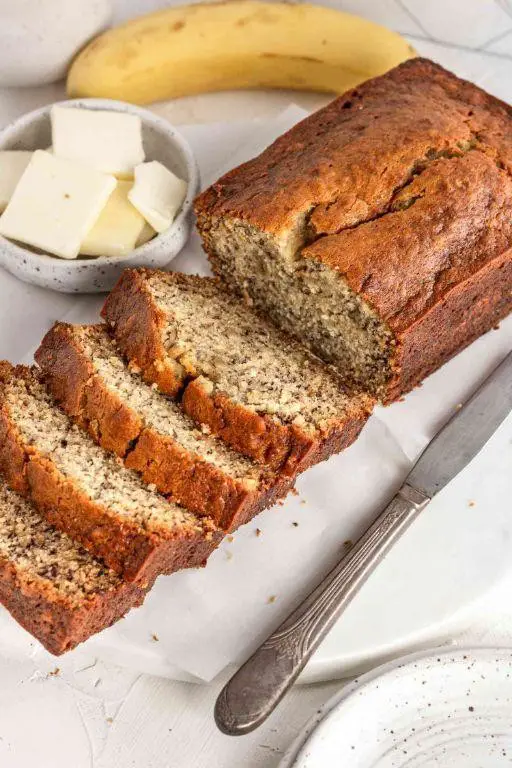
Just like many of you, I’ve had my fair share of banana bread experiments, some more successful than others. But this recipe? It’s the one that’s never let me down, turning overripe bananas into a moist, flavorful loaf that’s perfect for any time of the day.
Ingredients
- 3 ripe bananas (the spottier, the better for sweetness and moisture)
- 1/2 cup unsalted butter, melted (I always use unsalted to control the bread’s saltiness)
- 1 cup sugar (I’ve found this to be the sweet spot for sweetness without overdoing it)
- 2 large eggs, room temperature (they blend into the batter more smoothly this way)
- 1 tsp vanilla extract (pure extract makes all the difference)
- 1 1/2 cups all-purpose flour (I sometimes swap half for whole wheat for a nuttier flavor)
- 1 tsp baking soda (freshness is key here for the perfect rise)
- 1/2 tsp salt (just enough to balance the sweetness)
Instructions
- Preheat your oven to 350°F (175°C) and grease a 9×5 inch loaf pan. Tip: Lining the pan with parchment paper makes removal a breeze.
- In a large bowl, mash the bananas with a fork until smooth. Stir in the melted butter.
- Mix in the sugar, eggs, and vanilla extract until well combined. Tip: Don’t overmix to keep the bread tender.
- Gently fold in the flour, baking soda, and salt until just incorporated. Tip: A few lumps are okay; they’ll disappear during baking.
- Pour the batter into the prepared loaf pan and smooth the top with a spatula.
- Bake for 60-65 minutes, or until a toothpick inserted into the center comes out clean. Visual cue: The bread should be golden brown and pull away slightly from the pan’s edges.
- Let the bread cool in the pan for 10 minutes, then transfer to a wire rack to cool completely.
Every slice of this banana bread is a delightful mix of moist crumb and crispy edges, with a deep banana flavor that’s perfectly sweet. Try toasting a slice and slathering it with peanut butter for an indulgent twist.
Chocolate Chip Cookies
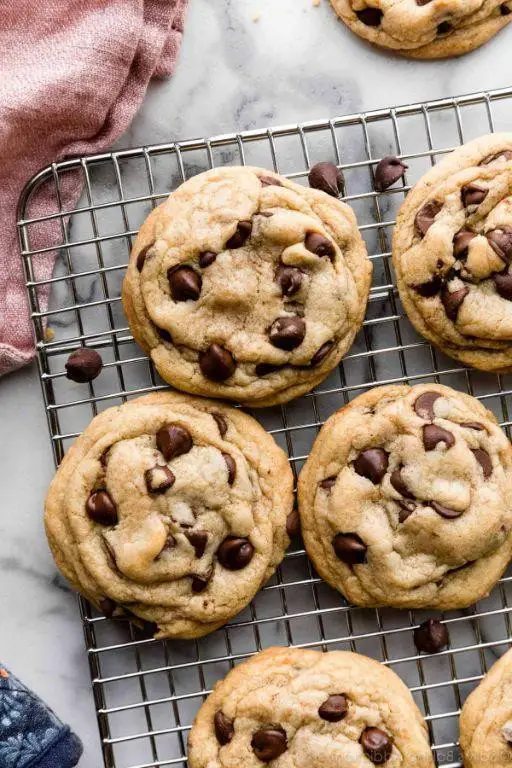
Craving something sweet and comforting? Chocolate chip cookies are my go-to for a quick treat that feels like a warm hug. Whether it’s a lazy Sunday afternoon or a hectic weekday, these cookies never fail to bring a smile to my face.
Ingredients
- 1 cup unsalted butter, softened (I swear by room temp butter for that perfect mix)
- 3/4 cup granulated sugar (because life’s too short for less sugar)
- 3/4 cup packed brown sugar (the secret to that chewy center)
- 2 large eggs (room temp, as always, for smoother blending)
- 2 tsp pure vanilla extract (the real deal makes all the difference)
- 2 1/4 cups all-purpose flour (sifted, to avoid those pesky lumps)
- 1 tsp baking soda (freshness is key, so check the date)
- 1/2 tsp salt (just a pinch to balance the sweetness)
- 2 cups semi-sweet chocolate chips (because more is always better)
Instructions
- Preheat your oven to 375°F (190°C) and line your baking sheets with parchment paper for easy cleanup.
- In a large bowl, cream together the softened butter, granulated sugar, and brown sugar until light and fluffy. Tip: Don’t rush this step; the fluffier, the better the texture.
- Beat in the eggs one at a time, then stir in the vanilla extract. Tip: Adding eggs one by one ensures they’re fully incorporated.
- In a separate bowl, whisk together the sifted flour, baking soda, and salt. Gradually add this to the butter mixture, mixing just until combined. Tip: Overmixing leads to tough cookies, so stop when you see no more flour streaks.
- Fold in the chocolate chips until evenly distributed throughout the dough.
- Drop rounded tablespoons of dough onto the prepared baking sheets, spacing them about 2 inches apart.
- Bake for 9 to 11 minutes, or until the edges are golden but the centers are still soft. Tip: They’ll continue to cook on the sheet, so pull them out when they’re just set.
- Let the cookies cool on the baking sheets for 5 minutes before transferring to wire racks to cool completely.
These cookies come out perfectly chewy with a slight crisp around the edges, and the chocolate chips are little pockets of joy in every bite. Serve them warm with a glass of cold milk, or stack them high for a visually stunning dessert table centerpiece.
Key Lime Pie

Zesty and vibrant, Key Lime Pie is a dessert that brings a slice of sunshine to any table. I remember the first time I tried it on a balmy Florida evening, the tangy sweetness was a revelation. Now, it’s my go-to when I need a quick dessert that feels special.
Ingredients
- 1 1/2 cups graham cracker crumbs (I always grab the honey-flavored ones for a bit more sweetness)
- 1/3 cup granulated sugar (because life’s too short for skimping on sweetness)
- 6 tbsp unsalted butter, melted (I like to let it cool slightly so it doesn’t make the crumbs soggy)
- 3 large egg yolks (room temperature eggs blend smoother, trust me)
- 14 oz sweetened condensed milk (the secret to its creamy dreaminess)
- 1/2 cup key lime juice (freshly squeezed makes all the difference, but bottled works in a pinch)
- 1 tbsp key lime zest (for that extra punch of flavor)
Instructions
- Preheat your oven to 350°F. A properly heated oven is crucial for that perfect crust.
- In a medium bowl, mix the graham cracker crumbs, sugar, and melted butter until well combined. The mixture should hold together when pressed.
- Press the mixture firmly into a 9-inch pie dish, making sure to cover the bottom and sides evenly. I use the bottom of a measuring cup to get it nice and compact.
- Bake the crust for 10 minutes, then let it cool on a wire rack. This step ensures your crust won’t get soggy from the filling.
- In another bowl, whisk together the egg yolks and condensed milk until smooth. Gradually add the lime juice and zest, whisking until fully incorporated.
- Pour the filling into the cooled crust and bake for 15 minutes. The filling should be set but still slightly jiggly in the center.
- Let the pie cool to room temperature, then refrigerate for at least 4 hours, preferably overnight. Patience is key here for the perfect slice.
Velvety smooth with a perfect balance of sweet and tart, this Key Lime Pie is a crowd-pleaser. Serve it with a dollop of whipped cream and a sprinkle of lime zest for an extra touch of elegance.
Molten Chocolate Soufflé
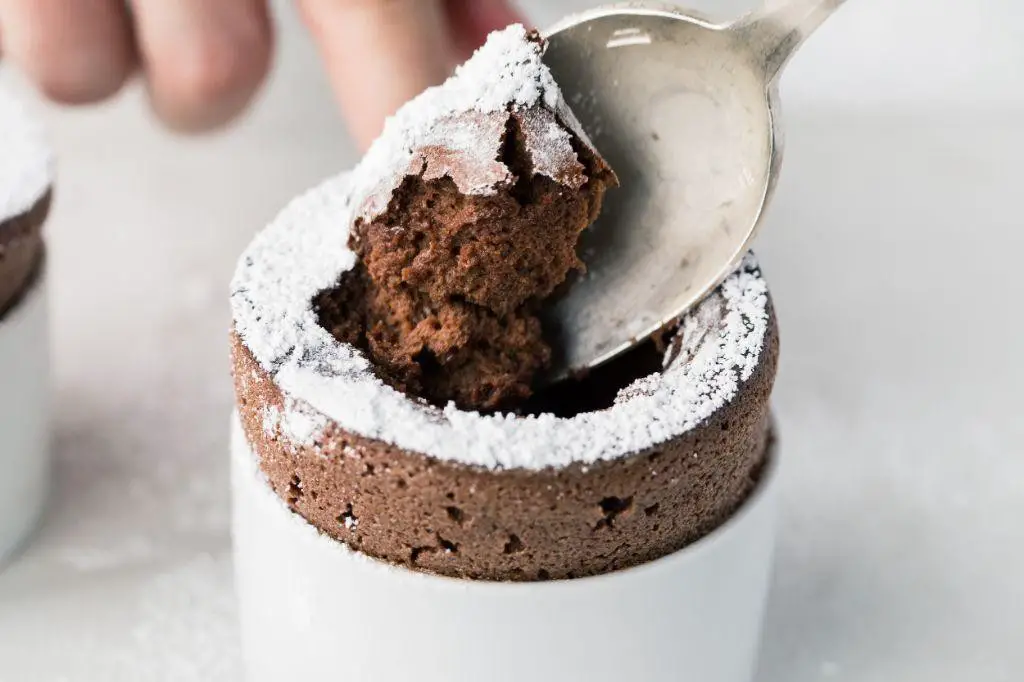
Delightfully decadent and surprisingly simple to make, this Molten Chocolate Soufflé has been my go-to dessert for impressing dinner guests. There’s something magical about breaking into the delicate exterior to reveal the rich, flowing chocolate center.
Ingredients
- 1/2 cup unsalted butter (I always use European-style for its richer flavor)
- 4 oz high-quality dark chocolate (70% cocoa works best for that deep chocolatey taste)
- 1/4 cup granulated sugar (plus a little extra for dusting the ramekins)
- 2 large eggs (room temperature eggs blend more smoothly into the batter)
- 2 large egg yolks (saves the whites for a healthy omelet the next morning)
- 1 tsp vanilla extract (pure vanilla makes all the difference)
- Pinch of salt (just a pinch to balance the sweetness)
Instructions
- Preheat your oven to 375°F (190°C). Proper oven temperature is crucial for the soufflé to rise.
- Butter four 6-ounce ramekins and dust with granulated sugar, tapping out the excess. This ensures your soufflés will slide out beautifully.
- Melt the butter and chocolate together in a double boiler over simmering water, stirring until smooth. Tip: Keep the water at a gentle simmer to avoid seizing the chocolate.
- Remove from heat and whisk in the sugar until fully incorporated.
- Add the eggs and egg yolks one at a time, whisking well after each addition. Tip: Room temperature eggs prevent the chocolate from cooling too quickly and becoming lumpy.
- Stir in the vanilla extract and a pinch of salt.
- Divide the batter evenly among the prepared ramekins.
- Bake for 12-14 minutes, until the edges are set but the center is still soft. Tip: Resist the urge to open the oven door; the draft can cause your soufflés to fall.
- Remove from the oven and let sit for 1 minute before serving.
Unbelievably rich and creamy, each spoonful of this Molten Chocolate Soufflé is a little taste of heaven. Serve it with a scoop of vanilla ice cream for an irresistible contrast of temperatures and textures.
Raspberry Sorbet
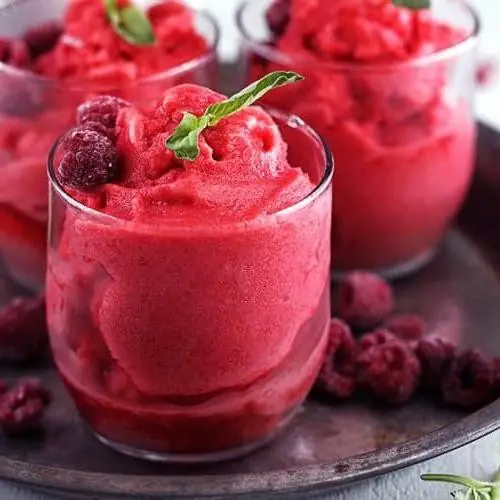
Unbelievably refreshing and bursting with flavor, this Raspberry Sorbet is my go-to summer dessert. I remember the first time I made it; the vibrant color and the tangy sweetness instantly won me over. It’s perfect for those scorching days when you crave something light yet satisfying.
Ingredients
- 4 cups fresh raspberries (I always look for the plumpest, juiciest ones at the market)
- 1 cup granulated sugar (adjust based on your sweetness preference, but this is my sweet spot)
- 1 cup water (filtered makes a difference in clarity of flavor)
- 1 tbsp lemon juice (freshly squeezed, please—it brightens the whole dish)
Instructions
- In a medium saucepan, combine the sugar and water. Heat over medium heat, stirring constantly until the sugar completely dissolves, about 5 minutes. This is your simple syrup—don’t let it boil.
- Remove the saucepan from the heat and let the syrup cool to room temperature. Patience here ensures your sorbet is smooth, not grainy.
- While the syrup cools, puree the raspberries in a blender until smooth. Strain through a fine-mesh sieve to remove the seeds, pressing with a spoon to extract all the juice.
- Stir the raspberry puree and lemon juice into the cooled syrup. Mix well to combine.
- Pour the mixture into an ice cream maker and churn according to the manufacturer’s instructions, usually about 20-25 minutes, until it reaches a soft-serve consistency.
- Transfer the sorbet to a freezer-safe container and freeze for at least 4 hours, or until firm. This step is crucial for that perfect scoopable texture.
Absolutely divine, this Raspberry Sorbet is a symphony of sweet and tart with a velvety texture that melts in your mouth. Serve it in chilled glasses for an elegant touch or alongside fresh berries for a burst of color and flavor.
Oreo Truffles
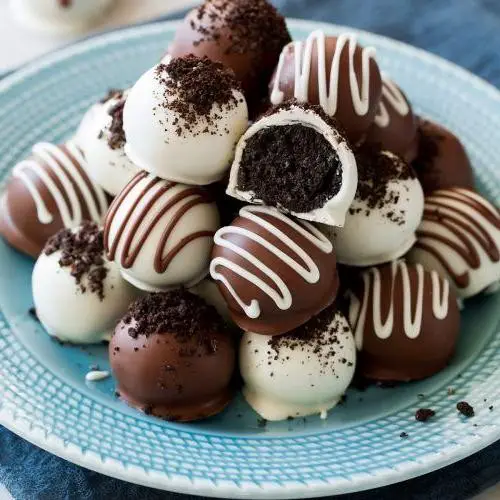
Perfect for any occasion, these Oreo truffles are a no-bake delight that I stumbled upon during a last-minute potluck panic. They’re so simple, yet irresistibly decadent, making them a go-to in my recipe arsenal.
Ingredients
- 1 package (14.3 oz) Oreo cookies – I like to use the original, but mint or peanut butter flavors add a fun twist.
- 1 package (8 oz) cream cheese, softened – Room temperature blends smoother, trust me.
- 2 cups semi-sweet chocolate chips – For that perfect melt, I swear by Ghirardelli.
- 1 tbsp coconut oil – A little secret to make the chocolate coating silky.
Instructions
- Place the Oreo cookies in a food processor and pulse until they turn into fine crumbs. No big chunks allowed!
- Transfer the crumbs to a large bowl and add the softened cream cheese. Mix until fully combined. Tip: Use a spatula at first, then your hands to really get it uniform.
- Roll the mixture into 1-inch balls and place them on a baking sheet lined with parchment paper. Chill in the freezer for 15 minutes to firm up. Tip: This step is crucial for easy dipping later.
- In a microwave-safe bowl, combine the chocolate chips and coconut oil. Microwave in 30-second intervals, stirring in between, until fully melted. Tip: Don’t overheat, or the chocolate will seize.
- Using a fork, dip each truffle into the melted chocolate, tapping off the excess. Return to the parchment paper and let them set at room temperature. For a quicker set, pop them back in the freezer for 10 minutes.
Outrageously creamy with a satisfying crunch, these truffles are a hit at parties. Try rolling them in crushed Oreos or drizzling with white chocolate for an extra flair.
Pecan Pie
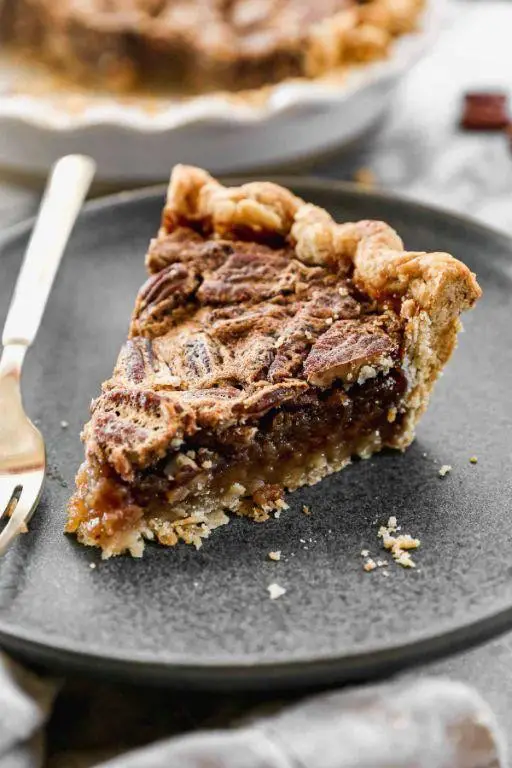
There’s something undeniably comforting about a slice of pecan pie, especially when it’s fresh out of the oven. I remember the first time I tried making it at home; the kitchen smelled like a cozy autumn afternoon, even though it was the middle of summer. That’s the magic of pecan pie—it brings warmth any time of year.
Ingredients
- 1 cup granulated sugar (I like to use organic cane sugar for a slightly deeper flavor)
- 3 large eggs (room temperature eggs blend more smoothly into the filling)
- 1 cup light corn syrup (this is the secret to that classic gooey texture)
- 2 tbsp unsalted butter, melted (I always go for unsalted to control the sweetness)
- 1 tsp vanilla extract (a splash of pure vanilla makes all the difference)
- 1 1/2 cups pecan halves (toasted pecans add an extra layer of nuttiness)
- 1 unbaked 9-inch pie crust (homemade or store-bought, no judgment here)
Instructions
- Preheat your oven to 350°F (175°C). A properly heated oven ensures even baking.
- In a large bowl, whisk together the sugar, eggs, corn syrup, melted butter, and vanilla extract until smooth. Tip: Whisk gently to avoid incorporating too much air into the filling.
- Stir in the pecan halves until they’re evenly distributed throughout the filling.
- Pour the filling into the unbaked pie crust, spreading the pecans into an even layer. Tip: Lightly tapping the pie dish on the counter helps remove any air bubbles.
- Bake for 50 to 60 minutes, or until the filling is set and the crust is golden brown. Tip: Cover the edges of the crust with foil if they start to brown too quickly.
- Let the pie cool completely on a wire rack before slicing. This patience-testing step ensures clean slices.
Let me tell you, the first bite of this pecan pie is a revelation—crispy crust, gooey center, and the perfect crunch from the pecans. Serve it with a dollop of whipped cream or a scoop of vanilla ice cream for an extra indulgent treat.
Conclusion
Outstanding desserts await in our roundup of 18 delicious recipes that promise to sweeten any occasion. From classic comforts to innovative treats, there’s something for every home cook to explore. We’d love to hear which recipes become your favorites—drop us a comment below! And if you enjoyed this collection, don’t forget to share the sweetness by pinning this article on Pinterest. Happy baking!

Michael Johnson is the founder of Pan Mastery, Inspired by his blacksmith grandfather’s legacy has a deep appreciation for hand-crafted pots and pans, he provides invaluable guides, reviews, and recipes to enhance your culinary journey.