Craving a chicken dish that’s juicy, flavorful, and downright irresistible? You’re in the right place! Brining is the secret to transforming your poultry into a mouthwatering masterpiece, and we’ve rounded up 18 delicious recipes that do just that. From classic herb-infused to bold and spicy, these brining techniques will elevate your chicken game. Ready to dive into a world of savory goodness? Let’s get started!
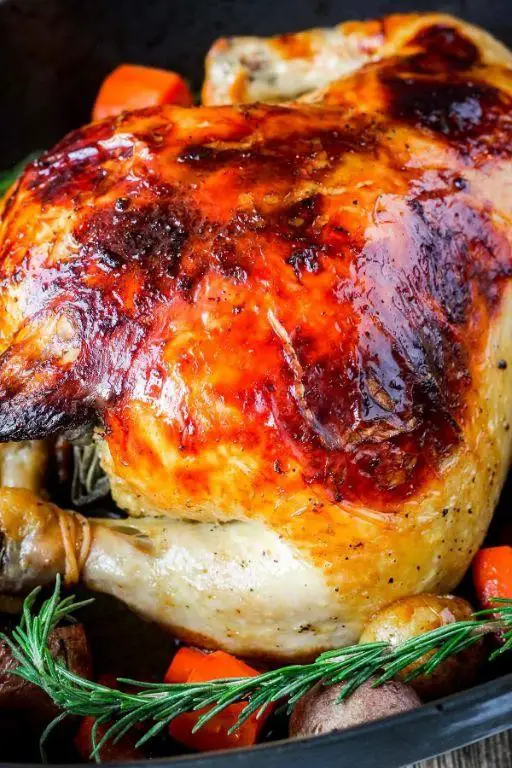
Classic Brined Roast Chicken
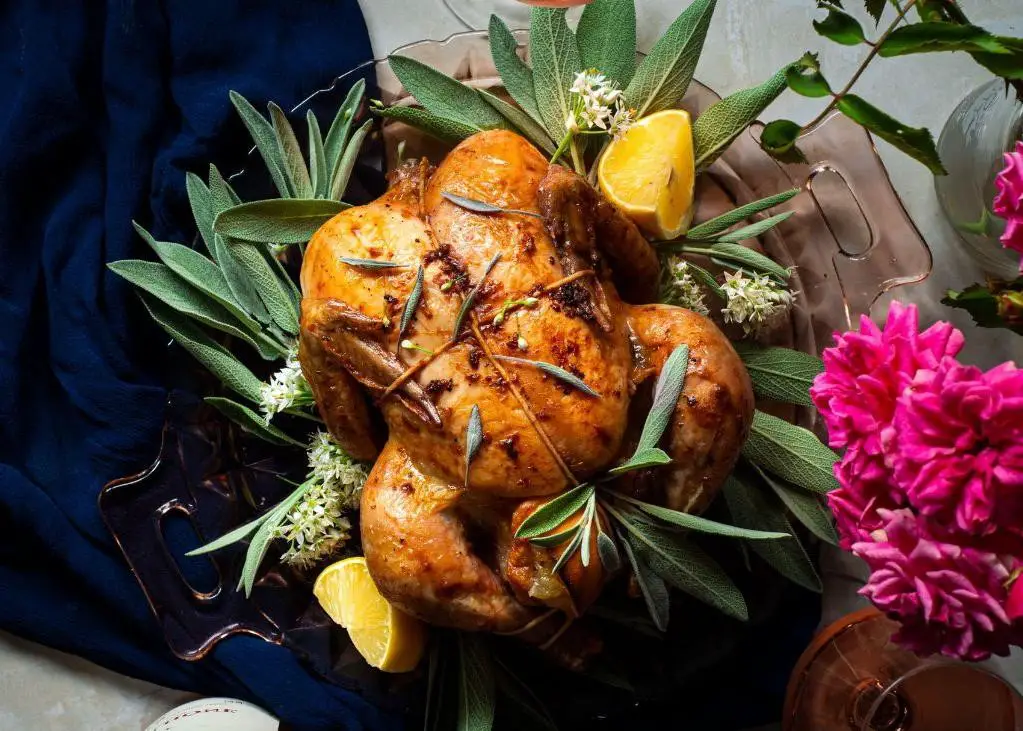
Nothing brings back memories of Sunday dinners at grandma’s house like the aroma of a perfectly roasted chicken wafting through the kitchen. I’ve tweaked her classic recipe over the years, adding a brine for that unbeatable juiciness and flavor that’ll have everyone asking for seconds.
Ingredients
- 1 whole chicken (about 4 lbs), preferably organic for the best flavor
- 1/2 cup kosher salt, for that deep seasoning penetration
- 1/4 cup granulated sugar, to balance the saltiness
- 1 tbsp whole black peppercorns, for a subtle heat
- 2 bay leaves, dried or fresh, adding an earthy depth
- 4 cups cold water, to dissolve the brine ingredients
- 2 tbsp unsalted butter, melted, for a golden, crispy skin
- 1 tsp smoked paprika, for a hint of smokiness
Instructions
- In a large pot, combine the kosher salt, granulated sugar, black peppercorns, bay leaves, and cold water. Stir until the salt and sugar are completely dissolved.
- Submerge the whole chicken in the brine, ensuring it’s fully covered. Refrigerate for 12 to 24 hours for optimal flavor and juiciness.
- Preheat your oven to 375°F (190°C). Remove the chicken from the brine, pat dry with paper towels, and let it sit at room temperature for 30 minutes to ensure even cooking.
- Brush the chicken all over with melted butter and sprinkle with smoked paprika for that irresistible color and flavor.
- Place the chicken on a rack in a roasting pan, breast side up. Roast in the preheated oven for about 1 hour and 20 minutes, or until the internal temperature reaches 165°F (74°C) at the thickest part of the thigh.
- Let the chicken rest for 15 minutes before carving to allow the juices to redistribute, ensuring every bite is moist and flavorful.
Key to this dish’s success is the crispy, golden skin giving way to tender, juicy meat infused with subtle smoky and peppery notes. Serve it atop a bed of roasted vegetables or alongside a crisp salad for a meal that feels both indulgent and wholesome.
Herb-Infused Brined Chicken
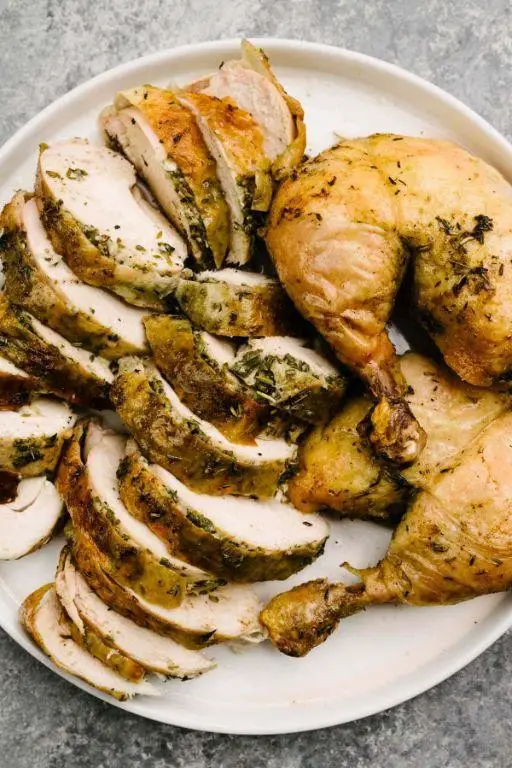
Yesterday, I found myself staring at a whole chicken in my fridge, pondering how to elevate its flavor beyond the usual roast. That’s when I remembered my grandmother’s secret—herb-infused brine. It’s a game-changer, trust me.
Ingredients
- 1 gallon cold, crisp water
- 1 cup coarse, sea salt
- 1/2 cup golden, raw honey
- 4 cloves garlic, freshly crushed
- 2 sprigs rosemary, fragrant and woody
- 4 sprigs thyme, earthy and fresh
- 1 whole chicken, plump and about 4 lbs
Instructions
- In a large pot, combine the cold water, sea salt, and raw honey, stirring until the salt and honey dissolve completely.
- Add the freshly crushed garlic, rosemary, and thyme to the pot, bringing the mixture to a gentle simmer over medium heat to infuse the flavors, about 5 minutes.
- Remove the pot from heat and let the brine cool to room temperature, then chill in the refrigerator until it’s thoroughly cold, about 2 hours.
- Submerge the whole chicken in the chilled brine, ensuring it’s fully covered. Refrigerate for 12 to 24 hours for optimal flavor penetration.
- Preheat your oven to 375°F (190°C). Remove the chicken from the brine, pat dry with paper towels, and let it sit at room temperature for 30 minutes to ensure even cooking.
- Roast the chicken on a rack in a roasting pan for about 1 hour and 15 minutes, or until the internal temperature reaches 165°F (74°C) at the thickest part of the thigh.
- Let the chicken rest for 15 minutes before carving to allow the juices to redistribute.
Rich in flavor and incredibly juicy, this herb-infused brined chicken boasts a perfect balance of savory and sweet. Serve it alongside roasted vegetables or over a bed of wild rice for a meal that’s as nutritious as it is delicious.
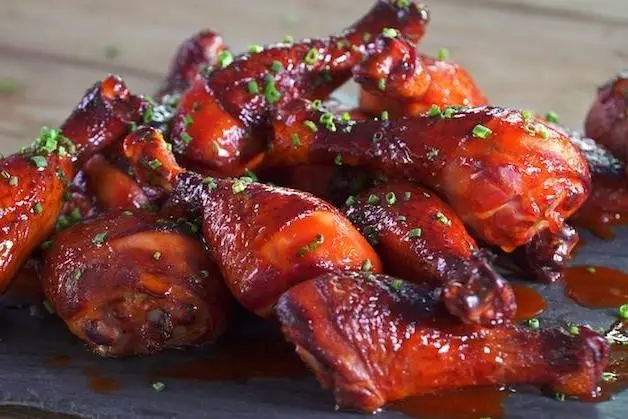
Spicy Brined Chicken Wings

After countless backyard barbecues and a few too many bland wings, I finally stumbled upon a game-changer: Spicy Brined Chicken Wings. Let me tell you, the difference a good brine makes is night and day, turning even the most skeptical wing lovers into believers.
Ingredients
- 4 lbs of plump, fresh chicken wings
- 1/2 cup of coarse kosher salt
- 1/4 cup of granulated sugar
- 4 cups of ice-cold water
- 2 tbsp of fiery cayenne pepper
- 1 tbsp of freshly ground black pepper
- 3 cloves of garlic, finely minced
- 1/4 cup of rich apple cider vinegar
- 2 tbsp of smooth honey
Instructions
- In a large bowl, whisk together the kosher salt, sugar, and ice-cold water until the salt and sugar are completely dissolved.
- Submerge the chicken wings in the brine, ensuring they’re fully covered. Cover the bowl and refrigerate for exactly 12 hours for optimal flavor penetration.
- Preheat your oven to 400°F (204°C) and line a baking sheet with parchment paper for easy cleanup.
- Remove the wings from the brine, pat them dry with paper towels to ensure crispy skin, and arrange them on the prepared baking sheet.
- In a small bowl, mix together the cayenne pepper, black pepper, minced garlic, apple cider vinegar, and honey to create a spicy glaze.
- Brush the wings generously with the spicy glaze, making sure each wing is evenly coated.
- Bake in the preheated oven for 45 minutes, flipping the wings halfway through, until they’re golden brown and crispy.
- For an extra kick, brush the wings with any remaining glaze right after they come out of the oven.
How these wings turn out is nothing short of magical—crispy on the outside, juicy on the inside, with a heat that builds with every bite. Serve them alongside a cool blue cheese dip and celery sticks to balance the spice, or go all out and toss them in your favorite hot sauce for double the heat.
Sweet and Tangy Brined Chicken Thighs

Just last weekend, I found myself staring at a pack of chicken thighs in my fridge, wondering how to turn them into something extraordinary. That’s when I remembered my grandma’s secret—brining. It’s a game-changer, folks, and today, I’m sharing my twist on it with these Sweet and Tangy Brined Chicken Thighs.
Ingredients
- 4 bone-in, skin-on chicken thighs (about 2 lbs), plump and juicy
- 1/4 cup kosher salt, coarse and flaky
- 1/4 cup brown sugar, packed and molasses-rich
- 2 cups cold water, crisp and clear
- 1 cup apple cider vinegar, tangy and sharp
- 2 tbsp honey, golden and sweet
- 1 tsp crushed red pepper flakes, fiery and bold
- 2 cloves garlic, minced and pungent
- 1 tbsp fresh rosemary, finely chopped and aromatic
Instructions
- In a large bowl, whisk together the kosher salt, brown sugar, and cold water until the salt and sugar are completely dissolved.
- Add the apple cider vinegar, honey, crushed red pepper flakes, minced garlic, and fresh rosemary to the brine, stirring to combine.
- Submerge the chicken thighs in the brine, ensuring they’re fully covered. Cover the bowl and refrigerate for at least 4 hours, or overnight for deeper flavor.
- Preheat your oven to 375°F (190°C) and line a baking sheet with parchment paper for easy cleanup.
- Remove the chicken thighs from the brine, letting any excess drip off, and place them skin-side up on the prepared baking sheet.
- Bake for 35-40 minutes, or until the skin is crispy and golden and the internal temperature reaches 165°F (74°C).
- Let the chicken rest for 5 minutes before serving to allow the juices to redistribute.
Yielded to perfection, these chicken thighs are a harmonious blend of sweet, tangy, and spicy, with a crispy skin that gives way to succulent, flavorful meat. Serve them atop a bed of creamy mashed potatoes or alongside a crisp, green salad for a meal that’s sure to impress.
Garlic and Lemon Brined Chicken Breast

Garlic and lemon brined chicken breast is a game-changer for weeknight dinners, transforming the often-overlooked chicken breast into a juicy, flavor-packed centerpiece. I stumbled upon this method during a desperate attempt to salvage a batch of dry chicken, and now it’s my go-to for ensuring every bite is as succulent as the last.
Ingredients
- 4 boneless, skinless chicken breasts (about 1.5 lbs)
- 1/4 cup kosher salt (for that perfect brine)
- 1/4 cup granulated sugar (to balance the saltiness)
- 4 cups cold water (ice-cold to keep the chicken safe)
- 3 cloves garlic, smashed (for a pungent kick)
- 1 lemon, thinly sliced (bright and zesty)
- 2 tbsp fresh lemon juice (for an extra tang)
- 1 tbsp olive oil (rich and smooth)
- 1 tsp black pepper (freshly ground for aroma)
Instructions
- In a large bowl, whisk together the kosher salt, sugar, and cold water until fully dissolved to create the brine.
- Add the smashed garlic cloves and thinly sliced lemon to the brine, stirring gently to infuse the flavors.
- Submerge the chicken breasts in the brine, ensuring they’re fully covered. Cover the bowl and refrigerate for exactly 1 hour for optimal juiciness.
- After brining, remove the chicken from the brine and pat dry with paper towels to ensure a good sear.
- Heat olive oil in a large skillet over medium-high heat until shimmering, about 2 minutes.
- Season the chicken breasts with freshly ground black pepper and place them in the skillet. Cook for 6-7 minutes on each side, or until the internal temperature reaches 165°F.
- Remove the chicken from the skillet and let it rest for 5 minutes before slicing to retain all its juices.
Every bite of this garlic and lemon brined chicken breast is a burst of flavor, with the perfect balance of tangy and savory. Serve it over a bed of creamy mashed potatoes or slice it atop a crisp salad for a refreshing contrast.
Maple Brined Chicken Drumsticks
Last summer, I stumbled upon the magic of brining chicken during a backyard BBQ mishap, and let me tell you, it was a game-changer. These Maple Brined Chicken Drumsticks are my go-to for juicy, flavorful meat that’s packed with a sweet and savory depth you’ll love.
Ingredients
- 8 chicken drumsticks, skin-on for that crispy finish
- 1/2 cup pure maple syrup, the darker the better for robust flavor
- 1/4 cup kosher salt, for the perfect brine
- 4 cups cold water, to submerge the chicken fully
- 2 tbsp whole black peppercorns, for a subtle spice
- 3 garlic cloves, smashed to release their aromatic oils
- 2 sprigs fresh thyme, for an herby undertone
Instructions
- In a large bowl, whisk together the maple syrup, kosher salt, cold water, black peppercorns, smashed garlic cloves, and fresh thyme until the salt is completely dissolved.
- Submerge the chicken drumsticks in the brine, ensuring they’re fully covered. Cover the bowl with plastic wrap and refrigerate for at least 4 hours, but no more than 8 hours to prevent over-salting.
- Preheat your oven to 375°F (190°C) and line a baking sheet with parchment paper for easy cleanup.
- Remove the drumsticks from the brine, pat them dry with paper towels to ensure crispy skin, and discard the brine.
- Arrange the drumsticks on the prepared baking sheet, leaving space between each for even cooking.
- Bake for 35-40 minutes, flipping halfway through, until the skin is golden brown and the internal temperature reaches 165°F (74°C).
- Let the drumsticks rest for 5 minutes before serving to allow the juices to redistribute.
Best enjoyed hot off the oven, these drumsticks boast a caramelized exterior with a moist, tender interior that’s bursting with maple sweetness and a hint of garlic. Serve them alongside a crisp apple slaw for a refreshing contrast.
Apple Cider Brined Whole Chicken
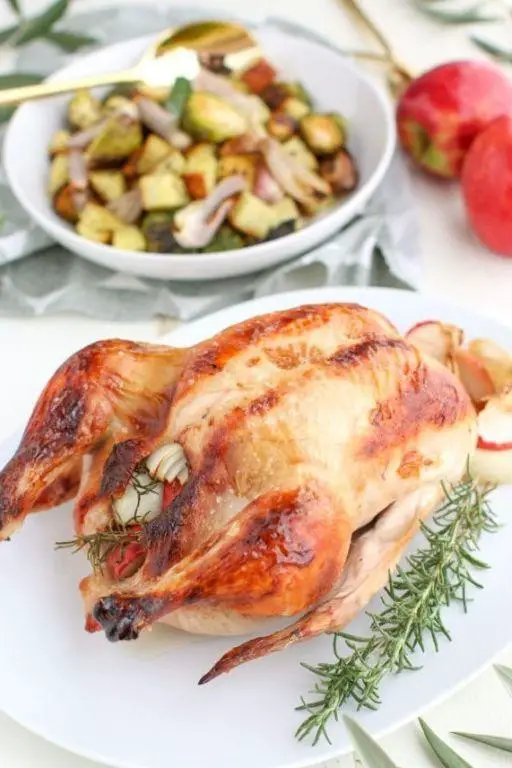
Over the years, I’ve tried countless ways to roast a chicken, but nothing beats the juicy, flavor-packed results of an apple cider brine. It’s a game-changer, especially when you’re craving that perfect balance of sweet and savory with a hint of autumn spice.
Ingredients
- 1 whole chicken (about 4 lbs), preferably organic
- 4 cups fresh apple cider, unfiltered for the best flavor
- 1/4 cup kosher salt, for a clean, crisp brine
- 2 tbsp whole black peppercorns, freshly cracked
- 3 cloves garlic, smashed to release their aromatic oils
- 2 sprigs fresh rosemary, for a piney fragrance
- 2 tbsp unsalted butter, softened to room temperature
Instructions
- In a large pot, combine the apple cider, kosher salt, black peppercorns, garlic, and rosemary. Bring to a boil over high heat, then remove from heat and let cool to room temperature.
- Submerge the whole chicken in the cooled brine, ensuring it’s fully covered. Refrigerate for 12 to 24 hours, turning once halfway through for even flavor penetration.
- Preheat your oven to 375°F (190°C). Remove the chicken from the brine, pat dry with paper towels, and discard the brine.
- Rub the softened butter all over the chicken, including under the skin for maximum moisture and flavor.
- Place the chicken breast-side up on a rack in a roasting pan. Roast for 1 hour and 15 minutes, or until the internal temperature reaches 165°F (74°C) at the thickest part of the thigh.
- Let the chicken rest for 10 minutes before carving to allow the juices to redistribute.
Delightfully tender and infused with the subtle sweetness of apple cider, this chicken is a showstopper. Serve it alongside roasted root vegetables or a crisp apple slaw for a meal that’s as beautiful as it is delicious.
Smoky Brined Chicken Legs

Yesterday, I found myself staring at a pack of chicken legs in my fridge, pondering how to turn them into something extraordinary. That’s when the idea of smoky brined chicken legs struck me, a dish that promises to deliver juicy, flavorful meat with a tantalizing smoky crust.
Ingredients
- 4 large, bone-in chicken legs
- 1/4 cup kosher salt
- 1/4 cup brown sugar, packed
- 2 tbsp smoked paprika
- 1 tbsp garlic powder
- 1 tbsp onion powder
- 1 tsp freshly ground black pepper
- 4 cups cold water
- 2 cups applewood chips, soaked
Instructions
- In a large bowl, whisk together kosher salt, brown sugar, smoked paprika, garlic powder, onion powder, and black pepper with cold water until fully dissolved to create the brine.
- Submerge the chicken legs in the brine, ensuring they’re fully covered. Cover the bowl and refrigerate for at least 4 hours, or overnight for deeper flavor.
- Preheat your smoker to 225°F. While heating, drain the chicken legs and pat them dry with paper towels to ensure a good smoke adherence.
- Place the soaked applewood chips in the smoker box or directly on the coals for that essential smoky flavor.
- Arrange the chicken legs on the smoker rack, leaving space between them for even smoking. Smoke for 2.5 to 3 hours, or until the internal temperature reaches 165°F.
- Let the chicken legs rest for 10 minutes before serving to allow the juices to redistribute.
My kitchen was filled with the irresistible aroma of smoky, savory chicken, and the first bite confirmed it was worth the wait. The meat was incredibly tender, with a perfect balance of smokiness and sweetness from the brine. Serve these legs with a side of coleslaw or atop a pile of creamy mashed potatoes for a meal that’s sure to impress.
Orange and Rosemary Brined Chicken
Perfectly juicy and aromatic, this Orange and Rosemary Brined Chicken has become a staple in my kitchen, especially during the summer months when I crave something that’s both refreshing and comforting. The combination of citrus and herbs not only tenderizes the chicken but also infuses it with flavors that remind me of sunny afternoons in my grandmother’s garden.
Ingredients
- 1 gallon cold water
- 1 cup kosher salt
- 1/2 cup granulated sugar
- 4 large, juicy oranges, sliced
- 6 sprigs fresh rosemary, slightly crushed to release oils
- 4 cloves garlic, smashed
- 1 tablespoon whole black peppercorns
- 1 whole chicken (about 4 pounds), preferably organic
- 2 tablespoons rich extra virgin olive oil
- 1 teaspoon finely ground black pepper
Instructions
- In a large pot, combine cold water, kosher salt, and granulated sugar, stirring until completely dissolved.
- Add sliced oranges, crushed rosemary sprigs, smashed garlic cloves, and whole black peppercorns to the brine, mixing well to combine.
- Submerge the whole chicken in the brine, ensuring it’s fully covered. Refrigerate for 12 to 24 hours for maximum flavor infusion.
- Preheat your oven to 375°F (190°C). Remove the chicken from the brine, pat dry with paper towels, and let it sit at room temperature for 30 minutes.
- Rub the chicken all over with extra virgin olive oil and sprinkle with finely ground black pepper.
- Place the chicken on a rack in a roasting pan, breast side up. Roast for about 1 hour and 15 minutes, or until the internal temperature reaches 165°F (74°C) at the thickest part of the thigh.
- Let the chicken rest for 10 minutes before carving to allow the juices to redistribute.
Flavorful and succulent, this Orange and Rosemary Brined Chicken boasts a crispy skin and moist interior, with the citrus and herb notes shining through beautifully. Serve it alongside a crisp salad or roasted vegetables for a meal that’s as vibrant as it is satisfying.
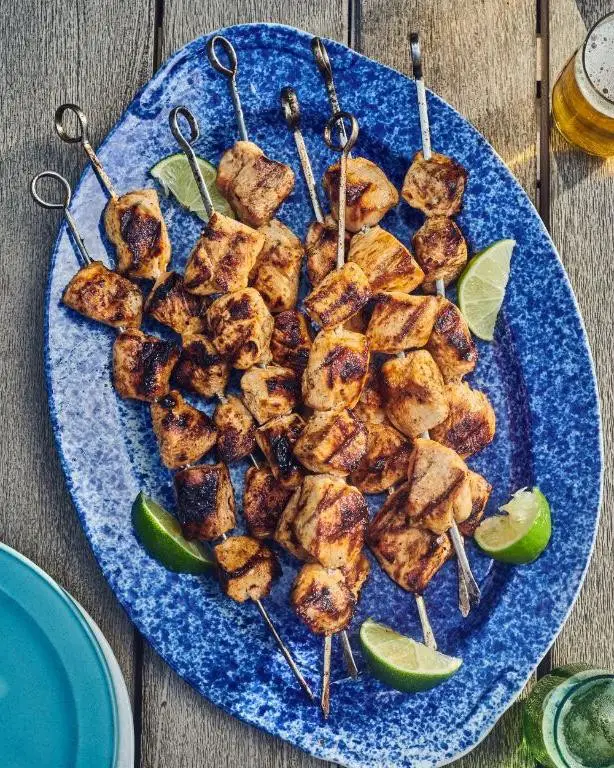
Honey Brined Chicken Skewers

Perfect for those summer evenings when the grill is calling your name, these Honey Brined Chicken Skewers are a game-changer. I stumbled upon the magic of brining during a backyard BBQ mishap last year, and now, it’s my secret weapon for juicy, flavorful chicken every time.
Ingredients
- 1 cup pure, golden honey
- 1/4 cup coarse sea salt
- 4 cups cold, crisp water
- 2 lbs boneless, skinless chicken thighs, cut into 1-inch chunks
- 2 tbsp vibrant, freshly squeezed lemon juice
- 1 tbsp aromatic, minced garlic
- 1 tsp smoky paprika
- 1/2 tsp finely ground black pepper
- 2 tbsp rich extra virgin olive oil
Instructions
- In a large, non-reactive bowl, whisk together honey, sea salt, and water until the salt dissolves completely.
- Add chicken chunks to the brine, ensuring they’re fully submerged. Cover and refrigerate for exactly 4 hours for optimal flavor and tenderness.
- After brining, drain and pat the chicken dry with paper towels to ensure a good sear.
- In a small bowl, mix lemon juice, minced garlic, paprika, and black pepper to create a marinade.
- Toss the dried chicken pieces in the marinade until evenly coated, then let sit for 30 minutes at room temperature.
- Thread the marinated chicken onto skewers, leaving a little space between each piece for even cooking.
- Preheat your grill to a medium-high heat of 375°F, brushing the grates with olive oil to prevent sticking.
- Grill the skewers for 5-6 minutes per side, or until the chicken reaches an internal temperature of 165°F and has beautiful grill marks.
- Let the skewers rest for 5 minutes before serving to allow the juices to redistribute.
Zesty and succulent, these skewers boast a perfect balance of sweet and smoky flavors. Serve them over a bed of fluffy quinoa or alongside a crisp, garden-fresh salad for a meal that’s as vibrant as it is delicious.
Balsamic Brined Chicken Wings

My kitchen smells like a gourmet bistro right now, all thanks to these Balsamic Brined Chicken Wings I’ve been obsessing over. There’s something about the tangy sweetness of balsamic vinegar that transforms ordinary wings into a finger-licking masterpiece.
Ingredients
- 2 lbs of plump, fresh chicken wings
- 1 cup of aged balsamic vinegar, with its deep, complex sweetness
- 1/4 cup of coarse sea salt, for that perfect brine
- 2 tbsp of golden honey, to balance the acidity
- 3 cloves of garlic, minced to release their pungent aroma
- 1 tsp of crushed red pepper flakes, for a subtle heat
- 1/2 cup of rich extra virgin olive oil, for marinating
- Freshly ground black pepper, to taste
Instructions
- In a large bowl, whisk together the balsamic vinegar, sea salt, honey, minced garlic, red pepper flakes, and olive oil until the salt is completely dissolved.
- Add the chicken wings to the bowl, ensuring each piece is fully submerged in the brine. Cover and refrigerate for at least 4 hours, or overnight for deeper flavor.
- Preheat your oven to 400°F (200°C) and line a baking sheet with parchment paper for easy cleanup.
- Remove the wings from the brine, letting any excess drip off, and arrange them on the prepared baking sheet in a single layer.
- Bake for 25 minutes, then flip each wing carefully to ensure even cooking and bake for another 20 minutes, or until the skin is crispy and golden brown.
- Let the wings rest for 5 minutes before serving to allow the juices to redistribute, ensuring every bite is moist and flavorful.
Last night, these wings were the star of my dinner table, with their crispy exterior giving way to succulent, flavorful meat. Try serving them with a side of creamy blue cheese dressing and crisp celery sticks for a classic combo that never disappoints.
Soy Sauce Brined Chicken Thighs
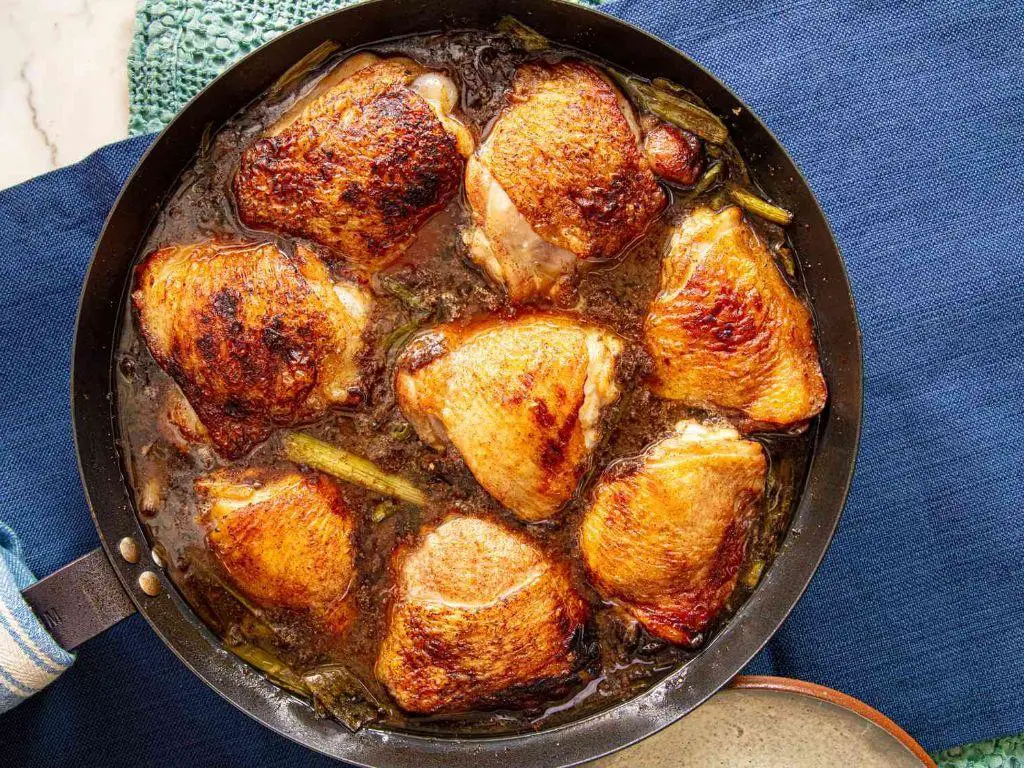
Craving something savory and succulent for dinner tonight? I recently stumbled upon this soy sauce brined chicken thighs recipe during a lazy Sunday experiment, and it’s quickly become a weeknight staple in my house. The brine infuses the chicken with an umami-packed flavor that’s simply irresistible.
Ingredients
- 4 bone-in, skin-on chicken thighs (about 2 pounds), look for plump and juicy thighs
- 1/2 cup soy sauce, preferably a rich, aged variety for depth of flavor
- 1/4 cup honey, for a touch of sweetness
- 2 cloves garlic, minced, to add a pungent kick
- 1 tbsp fresh ginger, grated, for a spicy, aromatic note
- 2 cups cold water, to dilute the brine
- 1 tbsp vegetable oil, for a crisp, golden skin
Instructions
- In a large bowl, whisk together the soy sauce, honey, minced garlic, and grated ginger until the honey is fully dissolved.
- Add the cold water to the bowl and stir to combine, creating a well-balanced brine.
- Submerge the chicken thighs in the brine, ensuring they’re fully covered. Cover the bowl with plastic wrap and refrigerate for at least 4 hours, or overnight for deeper flavor. Tip: Brining overnight yields the most flavorful results.
- Preheat your oven to 375°F (190°C) and heat the vegetable oil in a large oven-safe skillet over medium-high heat.
- Remove the chicken thighs from the brine, letting excess drip off, and pat dry with paper towels. Tip: Dry skin ensures a crispier finish.
- Place the chicken thighs skin-side down in the hot skillet and sear for 5-7 minutes, until the skin is golden brown and crispy.
- Flip the chicken thighs and transfer the skillet to the preheated oven. Bake for 20-25 minutes, until the internal temperature reaches 165°F (74°C). Tip: Use a meat thermometer for perfect doneness every time.
- Let the chicken rest for 5 minutes before serving to allow the juices to redistribute.
Just out of the oven, these chicken thighs boast a crispy skin with a juicy, flavorful interior that pairs wonderfully with steamed rice or a fresh salad. The soy sauce brine not only seasons the meat throughout but also tenderizes it, making every bite a delight.
Jalapeno Brined Chicken Breast
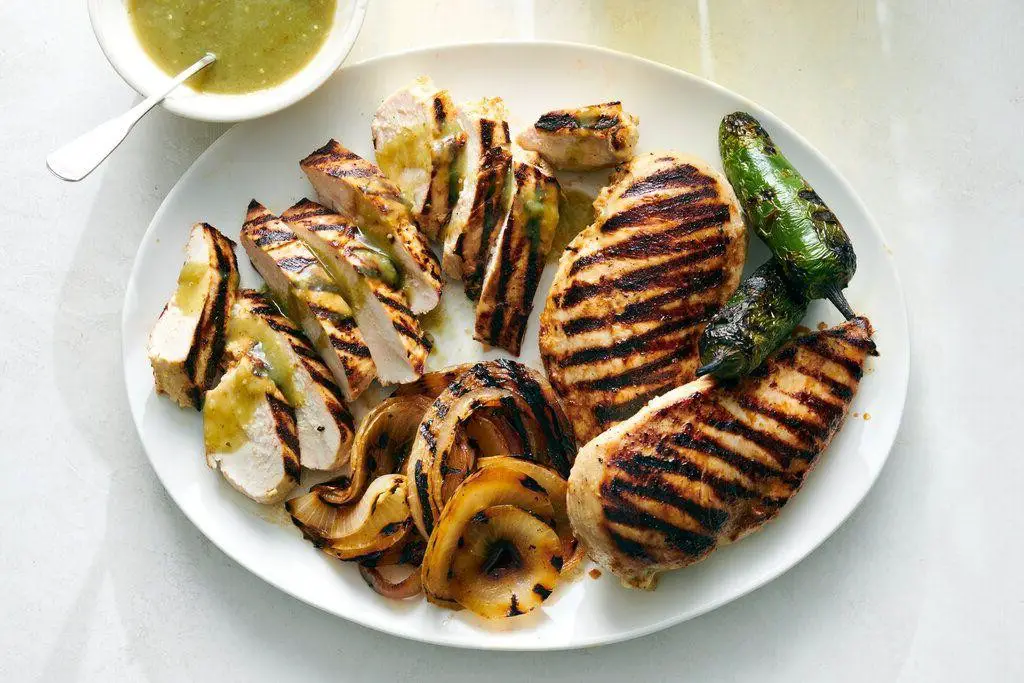
Zesty flavors and a bit of heat have always been my go-to when it comes to spicing up weeknight dinners, and this Jalapeno Brined Chicken Breast recipe is no exception. It’s a dish that brings back memories of summer BBQs and the irresistible aroma of grilled chicken wafting through the air.
Ingredients
- 4 boneless, skinless chicken breasts (about 1.5 lbs), preferably organic
- 2 cups cold water, filtered for purity
- 1/4 cup kosher salt, for a clean brine
- 2 tbsp granulated sugar, to balance the heat
- 2 fresh jalapenos, thinly sliced for a vibrant kick
- 2 cloves garlic, minced for depth
- 1 tbsp whole black peppercorns, for a subtle spice
- 1 tbsp rich extra virgin olive oil, for searing
Instructions
- In a large bowl, combine cold water, kosher salt, and granulated sugar, stirring until fully dissolved to create the brine.
- Add the chicken breasts, jalapenos, minced garlic, and black peppercorns to the brine, ensuring the chicken is fully submerged. Cover and refrigerate for exactly 1 hour for optimal flavor infusion.
- After brining, remove the chicken from the liquid and pat dry with paper towels to ensure a perfect sear.
- Heat extra virgin olive oil in a large skillet over medium-high heat until shimmering, about 2 minutes.
- Place the chicken breasts in the skillet, searing for 5-6 minutes on each side or until the internal temperature reaches 165°F, ensuring juicy, fully cooked meat.
- Let the chicken rest for 5 minutes before slicing to retain all its succulent juices.
Just imagine the juicy tenderness of each bite, with a delightful heat that lingers just enough to keep you coming back for more. Serve it sliced over a crisp salad or alongside roasted sweet potatoes for a meal that’s as colorful as it is flavorful.
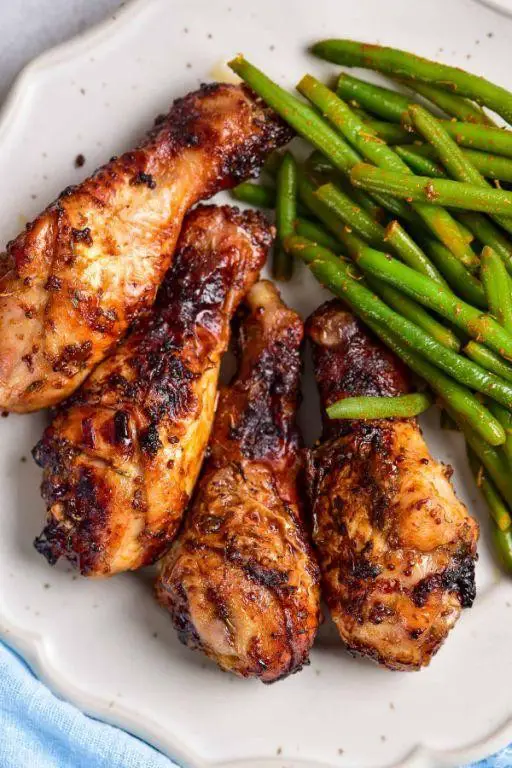
Brown Sugar Brined Chicken Drumsticks

Perfectly juicy and packed with flavor, these Brown Sugar Brined Chicken Drumsticks are a game-changer for your weeknight dinners. I stumbled upon this recipe during a summer BBQ at a friend’s house, and let me tell you, the caramelized crust with a hint of sweetness had me hooked from the first bite.
Ingredients
- 8 chicken drumsticks, skin-on for that crispy finish
- 1/2 cup dark brown sugar, packed for a deep molasses flavor
- 1/4 cup kosher salt, to draw out moisture and enhance juiciness
- 4 cups cold water, to dissolve the brine
- 2 tbsp apple cider vinegar, for a slight tang
- 1 tbsp smoked paprika, adding a subtle smokiness
- 1 tsp garlic powder, for that aromatic kick
- 1/2 tsp cayenne pepper, just enough to warm the palate
Instructions
- In a large bowl, whisk together cold water, dark brown sugar, kosher salt, and apple cider vinegar until fully dissolved to create the brine.
- Submerge the chicken drumsticks in the brine, ensuring they’re fully covered. Cover the bowl and refrigerate for at least 4 hours, or overnight for maximum flavor penetration.
- Preheat your oven to 375°F (190°C) and line a baking sheet with parchment paper for easy cleanup.
- Remove the drumsticks from the brine, pat them dry with paper towels to ensure a crispy skin, and discard the brine.
- In a small bowl, mix smoked paprika, garlic powder, and cayenne pepper. Evenly rub this spice mixture over each drumstick.
- Arrange the drumsticks on the prepared baking sheet, leaving space between each for even cooking.
- Bake for 35-40 minutes, or until the skin is golden brown and crispy, and the internal temperature reaches 165°F (74°C) when checked with a meat thermometer.
- Let the drumsticks rest for 5 minutes before serving to allow the juices to redistribute.
With a perfect balance of sweetness and spice, these drumsticks boast a crispy exterior while remaining incredibly moist inside. Serve them alongside a cool cucumber salad or over a bed of fluffy jasmine rice to soak up all the delicious juices.
Pineapple Brined Whole Chicken

Zesty and full of flavor, this Pineapple Brined Whole Chicken recipe is a game-changer for your Sunday dinner routine. I stumbled upon this method during a summer BBQ mishap, and now it’s my go-to for juicy, flavorful chicken every time.
Ingredients
- 1 whole chicken (about 4 lbs), preferably organic
- 4 cups fresh pineapple juice, vibrant and tangy
- 1/2 cup kosher salt, coarse and flaky
- 1/4 cup brown sugar, packed and molasses-rich
- 2 tbsp whole black peppercorns, aromatic and bold
- 4 garlic cloves, smashed and fragrant
- 2 sprigs fresh rosemary, woody and piney
- 2 tbsp unsalted butter, creamy and golden
Instructions
- In a large pot, combine pineapple juice, kosher salt, brown sugar, black peppercorns, garlic, and rosemary. Bring to a boil over high heat, stirring until salt and sugar dissolve completely, about 5 minutes.
- Remove the brine from heat and let it cool to room temperature, then chill in the refrigerator until it’s completely cold, about 2 hours.
- Submerge the whole chicken in the cold brine, ensuring it’s fully covered. Refrigerate for 12 to 24 hours, turning the chicken once halfway through for even brining.
- Preheat your oven to 375°F (190°C). Remove the chicken from the brine, pat dry with paper towels, and discard the brine.
- Place the chicken on a rack in a roasting pan. Rub the skin with unsalted butter for a golden, crispy finish.
- Roast in the preheated oven until the internal temperature reaches 165°F (74°C) at the thickest part of the thigh, about 1 hour and 30 minutes.
- Let the chicken rest for 15 minutes before carving to allow the juices to redistribute.
Rich in flavor with a hint of tropical sweetness, this chicken boasts a crispy skin and succulent meat. Serve it alongside a fresh mango salsa for an extra burst of summer vibes.
Mustard Brined Chicken Legs
Kicking off the grilling season with something that’s been a game-changer in my kitchen: mustard brined chicken legs. There’s something about the tangy, savory depth mustard brings to the table that turns ordinary chicken into a mouthwatering masterpiece. I stumbled upon this method during a summer cookout mishap, and it’s been my go-to ever since.
Ingredients
- 4 large chicken legs, skin-on for that crispy finish
- 1/4 cup coarse kosher salt, for the perfect brine
- 1/2 cup Dijon mustard, smooth and tangy
- 2 tbsp honey, for a subtle sweetness
- 4 cloves garlic, minced to release their aromatic punch
- 1 tsp smoked paprika, adding a hint of warmth
- 2 cups cold water, to balance the brine
- 1 tbsp freshly ground black pepper, for a bit of heat
Instructions
- In a large bowl, whisk together the cold water, coarse kosher salt, Dijon mustard, honey, minced garlic, smoked paprika, and freshly ground black pepper until the salt is completely dissolved.
- Submerge the chicken legs in the brine, ensuring they’re fully covered. Cover the bowl with plastic wrap and refrigerate for at least 4 hours, or overnight for deeper flavor. Tip: The longer you brine, the more flavorful the chicken.
- Preheat your grill to a medium-high heat of 375°F, aiming for those perfect grill marks.
- Remove the chicken legs from the brine, letting any excess drip off. Discard the brine.
- Place the chicken legs on the grill, skin side down first. Grill for about 7 minutes per side, or until the internal temperature reaches 165°F. Tip: Avoid flipping too often to get that crispy skin.
- Let the chicken rest for 5 minutes before serving. Tip: Resting allows the juices to redistribute, ensuring every bite is juicy.
Delightfully crispy on the outside and impossibly juicy inside, these mustard brined chicken legs are a testament to the magic of a good brine. Serve them alongside a crisp salad or over a bed of creamy mashed potatoes for a meal that’s anything but ordinary.
Chili Lime Brined Chicken Skewers
Craving something that packs a punch of flavor and brings a little zest to your dinner routine? I recently stumbled upon this chili lime brined chicken skewers recipe during a summer BBQ at a friend’s place, and let me tell you, it was love at first bite. The perfect balance of spicy and tangy, with a juiciness that only a good brine can deliver, it’s become a staple in my grilling repertoire.
Ingredients
- 1.5 lbs of boneless, skinless chicken thighs, cut into 1-inch pieces
- 1/4 cup of fresh lime juice, squeezed from juicy, ripe limes
- 2 tbsp of chili powder, for that deep, smoky heat
- 1 tbsp of honey, for a touch of natural sweetness
- 2 cloves of garlic, minced to release their pungent aroma
- 1 tsp of sea salt, to enhance all the flavors
- 1/2 cup of cold water, to balance the acidity
- Wooden skewers, soaked in water for 30 minutes to prevent burning
Instructions
- In a large bowl, whisk together the lime juice, chili powder, honey, minced garlic, and sea salt until the honey is fully dissolved.
- Gradually add the cold water to the mixture, stirring continuously to combine all the ingredients evenly.
- Add the chicken pieces to the brine, ensuring each piece is fully submerged. Cover and refrigerate for at least 2 hours, or overnight for deeper flavor penetration.
- Preheat your grill to a medium-high heat of 375°F, ensuring the grates are clean and lightly oiled to prevent sticking.
- Thread the marinated chicken pieces onto the soaked wooden skewers, leaving a small space between each piece for even cooking.
- Grill the skewers for 6-8 minutes on each side, or until the chicken reaches an internal temperature of 165°F and has beautiful grill marks.
- Let the skewers rest for 5 minutes before serving to allow the juices to redistribute, ensuring every bite is moist and flavorful.
Ready to dive into these skewers? The chicken comes out incredibly tender with a vibrant chili lime crust that’s just begging to be paired with a cool, creamy avocado dip or a crisp, refreshing salad. Trust me, your taste buds will thank you.
Ginger Brined Chicken Wings

Over the years, I’ve experimented with countless chicken wing recipes, but nothing quite compares to the zesty kick and juicy tenderness of ginger brined wings. It’s a game-changer for any gathering, and today, I’m sharing my foolproof method to achieve that perfect balance of flavor and crunch.
Ingredients
- 2 lbs of fresh, plump chicken wings
- 4 cups of cold, filtered water
- 1/4 cup of coarse kosher salt
- 1/4 cup of granulated sugar
- 1/4 cup of freshly grated ginger, with its pungent, spicy aroma
- 2 cloves of garlic, finely minced for a sharp, aromatic punch
- 1 tbsp of whole black peppercorns, slightly crushed to release their earthy warmth
- 1/2 cup of apple cider vinegar, for a subtle tang
- 2 tbsp of high-smoke-point vegetable oil, for crispy skin
Instructions
- In a large pot, combine cold water, kosher salt, sugar, grated ginger, minced garlic, black peppercorns, and apple cider vinegar. Stir until the salt and sugar are completely dissolved.
- Submerge the chicken wings in the brine, ensuring they’re fully covered. Cover the pot and refrigerate for at least 4 hours, or overnight for deeper flavor penetration.
- Preheat your oven to 400°F (204°C) and line a baking sheet with parchment paper for easy cleanup.
- Remove the wings from the brine, pat them dry with paper towels to ensure crispiness, and toss them lightly with vegetable oil.
- Arrange the wings on the prepared baking sheet in a single layer, leaving space between each for even cooking.
- Bake for 45-50 minutes, flipping halfway through, until the wings are golden brown and the skin is irresistibly crispy.
- Let the wings rest for 5 minutes before serving to allow the juices to redistribute, ensuring every bite is moist and flavorful.
The ginger brine infuses the wings with a subtle heat and sweetness, while the high-heat baking locks in moisture for a tender interior. Serve these wings with a side of cool, creamy ranch or a bold, spicy aioli to complement their vibrant flavors.
Conclusion
Savory delights await in our roundup of 18 brining recipes that promise to elevate your chicken dishes to new heights. Whether you’re a seasoned chef or a curious cook, these recipes are your ticket to juicy, flavorful meals. We’d love to hear which ones become your favorites—drop us a comment and don’t forget to share the love on Pinterest!

Michael Johnson is the founder of Pan Mastery, Inspired by his blacksmith grandfather’s legacy has a deep appreciation for hand-crafted pots and pans, he provides invaluable guides, reviews, and recipes to enhance your culinary journey.