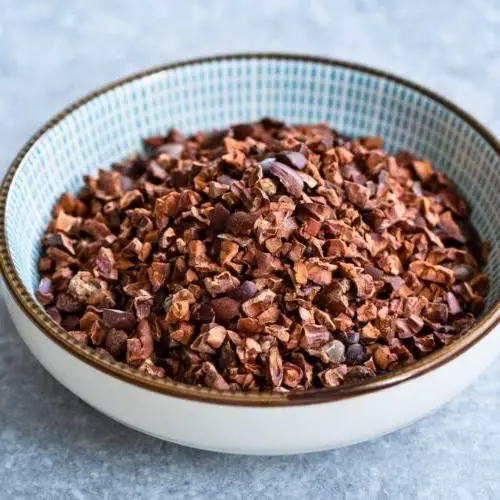
Craving a chocolatey twist to your cooking? You’re in for a treat! Our roundup of 18 Delicious Cacao Nibs Recipes is a treasure trove for chocolate lovers looking to sprinkle some magic into their meals. From breakfast to dessert, these recipes promise to delight your taste buds with the rich, crunchy goodness of cacao nibs. Dive in and discover your next favorite chocolate-infused creation!
Chocolate Cacao Nibs Banana Bread
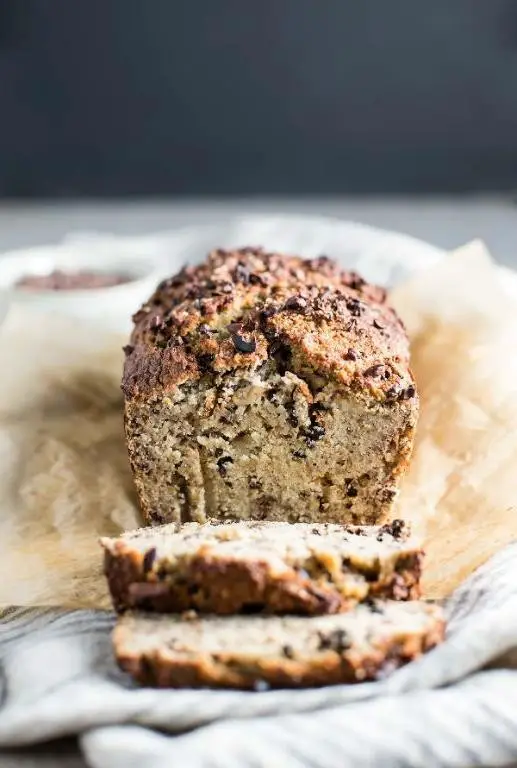
Evenings like these call for something warm, something that fills the kitchen with a scent so inviting it feels like a hug. This chocolate cacao nibs banana bread is just that—a tender, moist loaf with little bursts of bitterness from the cacao nibs, making each bite interesting.
Ingredients
- 1 1/2 cups all-purpose flour
- 1 tsp baking soda
- 1/4 tsp salt
- 3/4 cup granulated sugar
- 1/2 cup unsalted butter, melted
- 2 large eggs
- 3 ripe bananas, mashed
- 1/2 cup cacao nibs
Instructions
- Preheat the oven to 350°F (175°C). Grease a 9×5-inch loaf pan and set aside.
- In a medium bowl, whisk together 1 1/2 cups all-purpose flour, 1 tsp baking soda, and 1/4 tsp salt.
- In a large bowl, mix 3/4 cup granulated sugar and 1/2 cup melted unsalted butter until well combined.
- Add 2 large eggs to the sugar mixture, one at a time, mixing well after each addition.
- Fold in 3 mashed ripe bananas until the mixture is smooth.
- Gradually add the dry ingredients to the wet ingredients, stirring just until combined. Tip: Overmixing can lead to a tough bread.
- Gently fold in 1/2 cup cacao nibs. Tip: Reserve a few nibs to sprinkle on top before baking for extra crunch.
- Pour the batter into the prepared loaf pan and smooth the top with a spatula.
- Bake for 50-60 minutes, or until a toothpick inserted into the center comes out clean. Tip: If the top browns too quickly, cover loosely with aluminum foil.
- Allow the bread to cool in the pan for 10 minutes, then transfer to a wire rack to cool completely.
Soft crumb meets the subtle crunch of cacao nibs in this banana bread, a contrast that’s as delightful as it is unexpected. Serve it warm with a dollop of whipped cream or toasted with a smear of almond butter for a morning treat.
Vegan Cacao Nibs Energy Balls
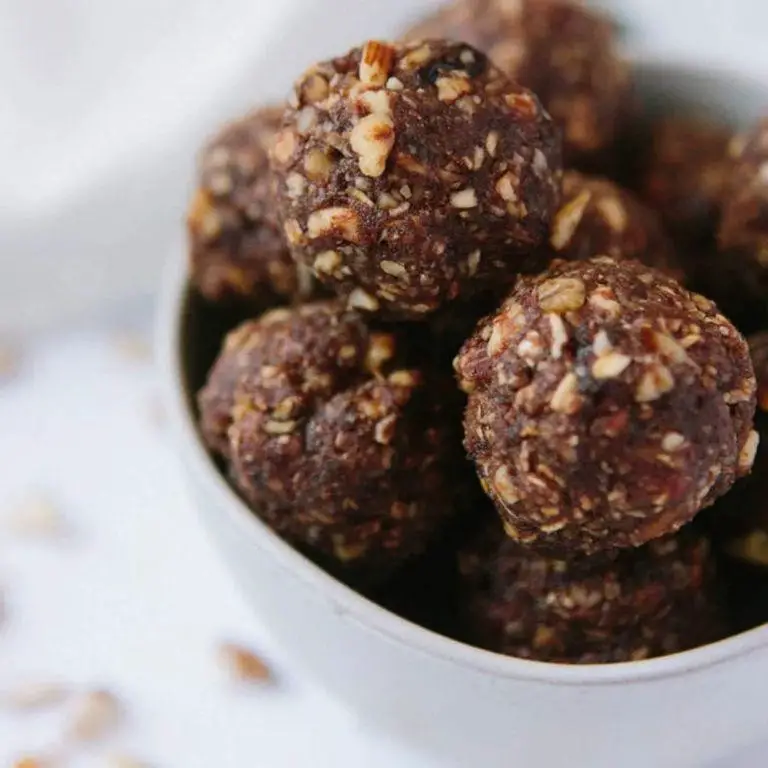
Evenings like these call for something simple yet nourishing, a treat that whispers of comfort and energy without weighing you down. These vegan cacao nibs energy balls are just that—a little bite of joy, packed with the goodness of nature and the subtle crunch of cacao.
Ingredients
- 1 cup dates, pitted
- 1/2 cup almond butter
- 1/4 cup cacao nibs
- 1/4 cup shredded coconut
- 2 tbsp maple syrup
- 1 tsp vanilla extract
- 1/2 tsp sea salt
Instructions
- In a food processor, combine 1 cup dates, 1/2 cup almond butter, 2 tbsp maple syrup, 1 tsp vanilla extract, and 1/2 tsp sea salt. Process on high for 30 seconds, or until the mixture forms a sticky dough.
- Add 1/4 cup cacao nibs and 1/4 cup shredded coconut to the food processor. Pulse 5-7 times, just until the nibs and coconut are evenly distributed throughout the dough.
- Using a tablespoon, scoop out portions of the dough and roll them into balls between your palms. If the dough sticks to your hands, lightly wet them with water.
- Place the rolled balls on a baking sheet lined with parchment paper. Chill in the refrigerator for at least 30 minutes to firm up.
- Once chilled, transfer the energy balls to an airtight container. Store in the refrigerator for up to 2 weeks.
Fresh from the fridge, these energy balls offer a delightful contrast between the creamy interior and the crunchy cacao nibs. Enjoy them as a quick breakfast on the go, or pair with a cup of herbal tea for a mindful afternoon pause.
Cacao Nibs and Almond Butter Smoothie
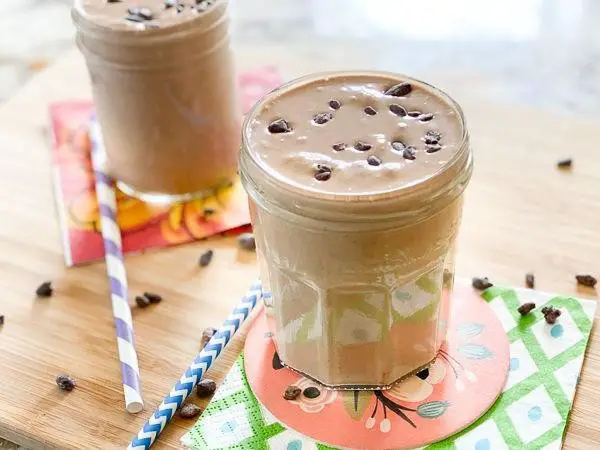
Evenings like these call for something soothing, a blend that whispers of comfort and vitality. This cacao nibs and almond butter smoothie is that quiet companion, offering a rich tapestry of flavors and textures to savor slowly.
Ingredients
- 1 cup unsweetened almond milk
- 2 tbsp almond butter
- 1 tbsp cacao nibs
- 1 frozen banana, sliced
- 1 tsp honey
- 1/2 tsp vanilla extract
- 1/4 tsp cinnamon
- 1 cup ice cubes
Instructions
- Pour 1 cup unsweetened almond milk into a blender.
- Add 2 tbsp almond butter and 1 tbsp cacao nibs to the blender.
- Place 1 sliced frozen banana into the blender for natural sweetness and creaminess.
- Drizzle in 1 tsp honey and 1/2 tsp vanilla extract for depth of flavor.
- Sprinkle 1/4 tsp cinnamon over the ingredients for a warm spice note.
- Add 1 cup ice cubes to the blender to chill and thicken the smoothie.
- Blend on high speed for 45 seconds, or until the mixture is completely smooth and uniform. Tip: For a thicker smoothie, add more ice cubes one at a time until desired consistency is reached.
- Stop the blender and scrape down the sides with a spatula to ensure all ingredients are fully incorporated. Tip: This step guarantees no chunks are left behind for a perfectly smooth texture.
- Blend again for 10-15 seconds to achieve a silky finish. Tip: Over-blending can incorporate too much air, making the smoothie frothy rather than creamy.
- Pour the smoothie into a tall glass and serve immediately.
How the smoothie feels like a velvet embrace, with the cacao nibs adding a subtle crunch against the creamy backdrop. Drizzle a little extra almond butter on top or sprinkle additional cacao nibs for an elegant touch and an extra layer of flavor.
Dark Chocolate Cacao Nibs Cookies
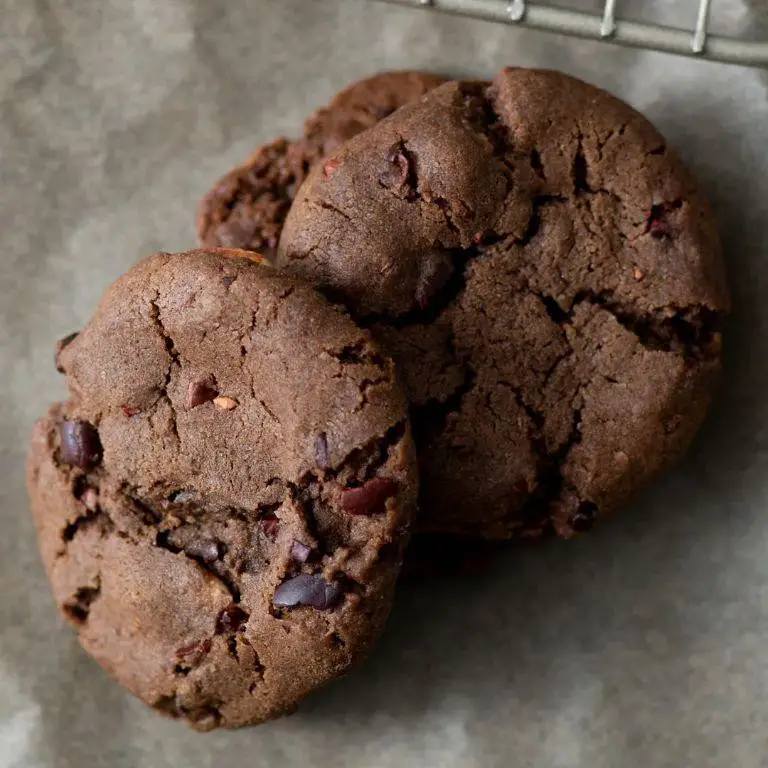
Yearning for a moment of quiet indulgence, these dark chocolate cacao nibs cookies offer a rich escape. Their deep, bittersweet flavor pairs perfectly with a slow afternoon and a cup of your favorite brew.
Ingredients
- 1 cup all-purpose flour
- 1/2 cup unsweetened cocoa powder
- 1/2 tsp baking soda
- 1/4 tsp salt
- 1/2 cup unsalted butter, softened
- 3/4 cup granulated sugar
- 1 large egg
- 1 tsp vanilla extract
- 1/2 cup dark chocolate cacao nibs
Instructions
- Preheat your oven to 350°F (175°C) and line a baking sheet with parchment paper.
- In a medium bowl, whisk together 1 cup all-purpose flour, 1/2 cup unsweetened cocoa powder, 1/2 tsp baking soda, and 1/4 tsp salt until well combined.
- In a large bowl, beat 1/2 cup softened unsalted butter and 3/4 cup granulated sugar together until light and fluffy, about 2 minutes.
- Add 1 large egg and 1 tsp vanilla extract to the butter mixture, beating until fully incorporated.
- Gradually mix the dry ingredients into the wet ingredients until just combined, being careful not to overmix.
- Fold in 1/2 cup dark chocolate cacao nibs until evenly distributed throughout the dough.
- Using a tablespoon, scoop the dough and roll into balls. Place them on the prepared baking sheet, spacing about 2 inches apart.
- Bake for 10-12 minutes, or until the edges are set but the centers are still soft. For a chewier cookie, bake for the lesser time.
- Allow the cookies to cool on the baking sheet for 5 minutes before transferring to a wire rack to cool completely.
Gently biting into these cookies reveals a crisp exterior giving way to a tender, fudgy center. The cacao nibs add a delightful crunch and a burst of intense chocolate flavor, making them an elegant addition to any dessert platter or a thoughtful homemade gift.
Cacao Nibs Granola Bars
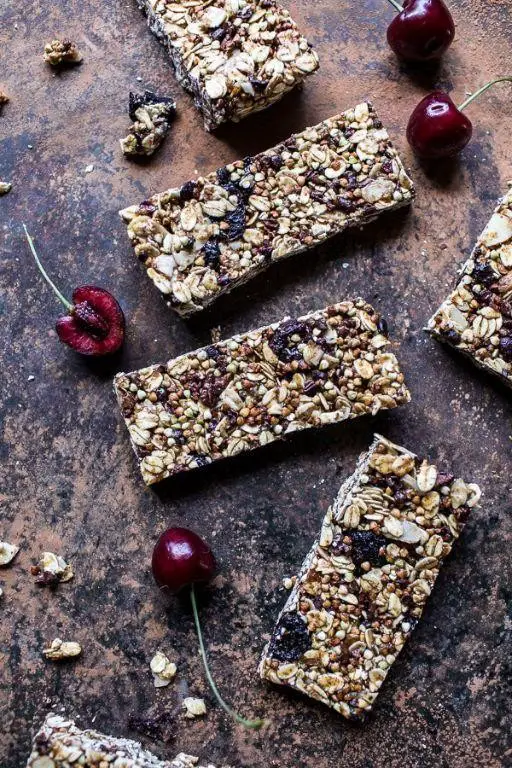
Sometimes, the simplest combinations bring the most comfort, like these cacao nibs granola bars that whisper of mornings spent in quiet kitchens, where the aroma of toasted oats and sweet honey fills the air.
Ingredients
- 2 cups rolled oats
- 1/2 cup almond butter
- 1/3 cup honey
- 1/4 cup cacao nibs
- 1/4 cup chopped almonds
- 1 tsp vanilla extract
- 1/2 tsp sea salt
Instructions
- Preheat your oven to 350°F and line an 8×8 inch baking pan with parchment paper, leaving some overhang for easy removal.
- Spread the rolled oats evenly on a baking sheet and toast in the preheated oven for 10 minutes, stirring halfway through, until golden and fragrant.
- In a medium saucepan over low heat, warm the almond butter and honey together, stirring constantly until smoothly combined, about 3 minutes.
- Remove the saucepan from heat and stir in the vanilla extract and sea salt, blending thoroughly.
- Transfer the toasted oats to a large mixing bowl and add the cacao nibs and chopped almonds, tossing to distribute evenly.
- Pour the warm almond butter mixture over the dry ingredients, stirring until everything is well coated and starts to clump together.
- Press the mixture firmly into the prepared baking pan, using the back of a spoon or your hands to create an even, compact layer.
- Chill in the refrigerator for at least 2 hours, or until set, before lifting out of the pan and cutting into bars.
Nowhere does the crunch of almonds meet the bitter charm of cacao nibs so harmoniously, offering a texture that’s both hearty and refined. Enjoy these bars as a quick breakfast or a thoughtful snack, perhaps alongside a cup of strong black coffee to highlight their deep flavors.
Raw Cacao Nibs Chocolate Truffles
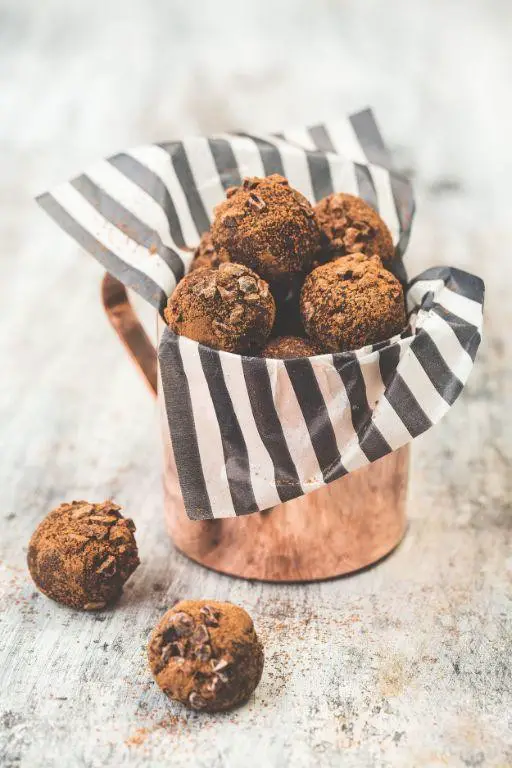
Now, as the quiet hum of the evening settles in, let’s turn our attention to a simple yet profound pleasure: Raw Cacao Nibs Chocolate Truffles. These little gems, with their deep, earthy tones and a whisper of sweetness, are a testament to the beauty of minimalism in baking.
Ingredients
- 1 cup raw cacao nibs
- 1/2 cup coconut oil, melted
- 1/4 cup maple syrup
- 1 tsp vanilla extract
- 1/4 tsp sea salt
- 1/2 cup shredded coconut, for coating
Instructions
- In a food processor, blend 1 cup raw cacao nibs until they reach a fine powder consistency, about 2 minutes.
- Add 1/2 cup melted coconut oil, 1/4 cup maple syrup, 1 tsp vanilla extract, and 1/4 tsp sea salt to the cacao powder. Blend until the mixture is smooth and homogenous, scraping down the sides as needed.
- Transfer the mixture to a bowl and refrigerate for 30 minutes, or until firm enough to handle. Tip: Chilling the mixture ensures easier shaping.
- Using a small spoon or a melon baller, scoop out portions of the mixture and roll into 1-inch balls between your palms. Tip: If the mixture sticks, lightly oil your hands with coconut oil.
- Roll each truffle in 1/2 cup shredded coconut until fully coated. Tip: For a varied texture, press the coconut gently into the truffles.
- Arrange the truffles on a parchment-lined tray and refrigerate for another 30 minutes to set.
Beneath their rustic exterior, these truffles reveal a velvety heart, rich with the untamed essence of cacao. Serve them alongside a cup of herbal tea, or as a bold contrast to the sweetness of fresh berries.
Cacao Nibs Pancakes with Maple Syrup
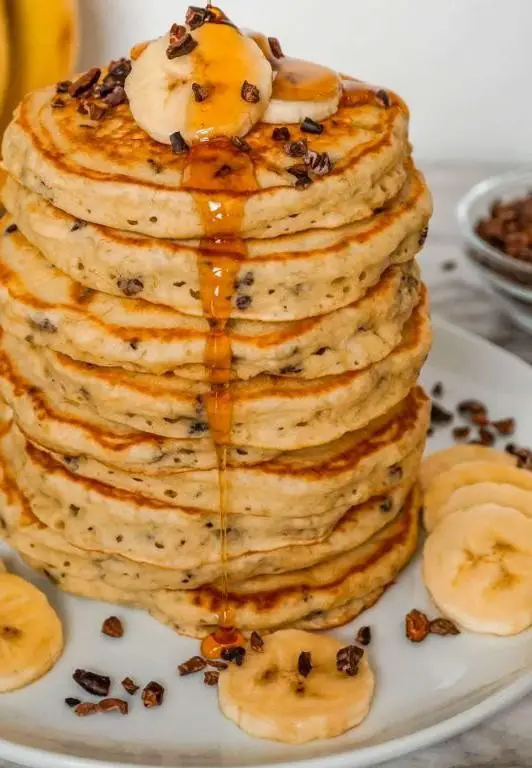
Remembering the quiet mornings of my childhood, I often find myself craving the simple joy of pancakes, but with a twist that speaks to the adult me. Cacao nibs pancakes with maple syrup offer that perfect blend of nostalgia and sophistication, a dish that feels both familiar and excitingly new.
Ingredients
- 1 cup all-purpose flour
- 2 tbsp sugar
- 1 tsp baking powder
- 1/2 tsp salt
- 1 cup milk
- 1 large egg
- 2 tbsp unsalted butter, melted
- 1/4 cup cacao nibs
- Maple syrup, for serving
Instructions
- In a large bowl, whisk together 1 cup all-purpose flour, 2 tbsp sugar, 1 tsp baking powder, and 1/2 tsp salt until well combined.
- In another bowl, beat 1 large egg, then mix in 1 cup milk and 2 tbsp melted unsalted butter.
- Pour the wet ingredients into the dry ingredients, stirring gently until just combined. Tip: Overmixing can lead to tough pancakes.
- Fold in 1/4 cup cacao nibs gently into the batter.
- Heat a non-stick skillet over medium heat (350°F) and lightly grease it with butter or cooking spray.
- Pour 1/4 cup of batter onto the skillet for each pancake. Cook until bubbles form on the surface and the edges look set, about 2-3 minutes.
- Flip the pancakes carefully and cook for another 1-2 minutes until golden brown. Tip: Adjust the heat if the pancakes are browning too quickly.
- Serve warm with maple syrup. Tip: For an extra touch, sprinkle a few more cacao nibs on top for crunch.
Light and fluffy with a delightful crunch from the cacao nibs, these pancakes are a textural dream. The bitterness of the nibs balances the sweetness of the maple syrup beautifully, making each bite a complex flavor experience. Try serving them with a dollop of whipped cream and fresh berries for a colorful breakfast plate.
Homemade Cacao Nibs Ice Cream
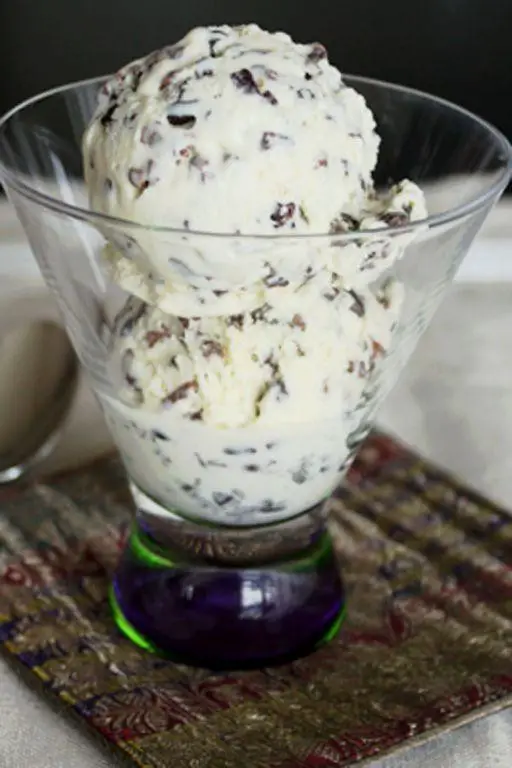
Creating this homemade cacao nibs ice cream feels like uncovering a hidden treasure, where each spoonful reveals the rich, earthy tones of cacao, perfectly balanced with the creamy sweetness of the base. It’s a simple pleasure that invites you to slow down and savor the moment.
Ingredients
- 2 cups heavy cream
- 1 cup whole milk
- 3/4 cup granulated sugar
- 1/4 cup cacao nibs
- 1 tsp vanilla extract
- 1/4 tsp salt
Instructions
- In a medium saucepan, combine 2 cups heavy cream, 1 cup whole milk, and 3/4 cup granulated sugar over medium heat. Stir until the sugar dissolves completely, about 5 minutes.
- Remove the saucepan from heat. Stir in 1 tsp vanilla extract and 1/4 tsp salt until well combined.
- Pour the mixture into a large bowl. Cover and refrigerate until completely chilled, at least 4 hours or overnight for best results.
- Once chilled, pour the mixture into an ice cream maker. Churn according to the manufacturer’s instructions, usually about 20-25 minutes, until the ice cream reaches a soft-serve consistency.
- Gently fold in 1/4 cup cacao nibs during the last 2 minutes of churning to evenly distribute them throughout the ice cream.
- Transfer the ice cream to a freezer-safe container. Cover and freeze for at least 2 hours, or until firm.
You’ll find the texture luxuriously creamy, with the cacao nibs adding a delightful crunch and a burst of deep chocolate flavor. Try serving it with a drizzle of honey or alongside a warm brownie for an indulgent treat.
Cacao Nibs and Coconut Yogurt Parfait
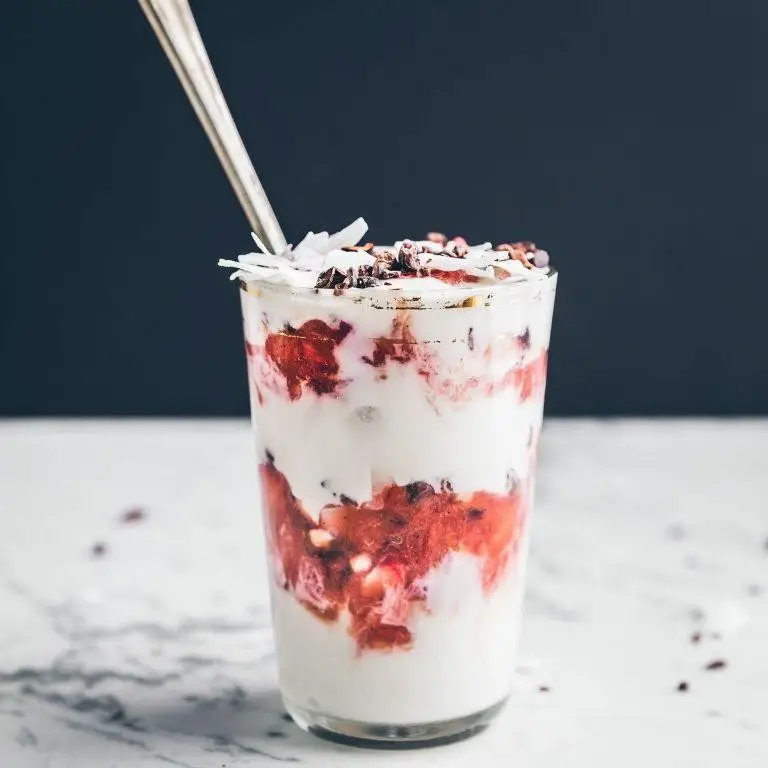
Today, as the soft morning light filters through the kitchen window, I find myself drawn to the simplicity and richness of combining cacao nibs with coconut yogurt. This parfait, a layering of textures and flavors, feels like a quiet morning ritual, a moment to savor before the day unfolds.
Ingredients
- 1 cup coconut yogurt
- 2 tbsp cacao nibs
- 1 tbsp honey
- 1/2 cup granola
- 1/4 cup fresh berries
Instructions
- In a clear glass, layer 1/4 cup of coconut yogurt at the bottom for a smooth base.
- Sprinkle 1 tbsp of cacao nibs evenly over the yogurt for a crunchy texture.
- Drizzle 1/2 tbsp honey over the cacao nibs to add a subtle sweetness.
- Add another 1/4 cup of coconut yogurt, gently spreading it to cover the previous layer.
- Top with 1/2 cup granola, pressing lightly to ensure it sticks to the yogurt.
- Finish with the remaining 1/4 cup coconut yogurt, smoothing the top with the back of a spoon.
- Garnish with 1 tbsp cacao nibs and 1/4 cup fresh berries for a vibrant contrast.
- Chill in the refrigerator for 15 minutes to allow the flavors to meld together.
Delightfully, the parfait emerges with layers that promise a journey from creamy to crunchy, from sweet to tart. The cacao nibs offer a bold contrast to the mellow coconut yogurt, while the berries add a fresh, juicy pop. Serve it in a mason jar for a portable breakfast or a thoughtful afternoon treat.
Spiced Cacao Nibs Hot Chocolate

Gently, the warmth of the kitchen wraps around you as you prepare to embark on a comforting culinary journey. This spiced cacao nibs hot chocolate is not just a drink; it’s a hug in a mug, a moment of solace in the hustle of everyday life.
Ingredients
- 2 cups whole milk
- 1/4 cup cacao nibs
- 1/4 tsp ground cinnamon
- 1/8 tsp ground nutmeg
- 1 tbsp honey
- 1/2 tsp vanilla extract
- Pinch of sea salt
Instructions
- In a small saucepan, heat the whole milk over medium heat until it begins to steam, about 3-4 minutes. Stir occasionally to prevent a skin from forming.
- Add the cacao nibs, ground cinnamon, and ground nutmeg to the steaming milk. Reduce the heat to low and let the mixture steep for 5 minutes, stirring occasionally to infuse the flavors.
- Strain the mixture through a fine-mesh sieve into a clean saucepan, pressing on the cacao nibs to extract all the liquid. Discard the solids.
- Return the strained liquid to the stove over low heat. Stir in the honey, vanilla extract, and a pinch of sea salt until fully dissolved and the mixture is heated through, about 2 minutes.
- Pour the hot chocolate into your favorite mug and serve immediately. For an extra touch, garnish with a sprinkle of cacao nibs or a cinnamon stick.
As you take the first sip, the rich, velvety texture and the deep, spiced chocolate flavor envelop your senses. Consider serving it with a side of shortbread cookies for dipping, transforming this simple drink into a decadent treat.
Cacao Nibs and Peanut Butter Oatmeal
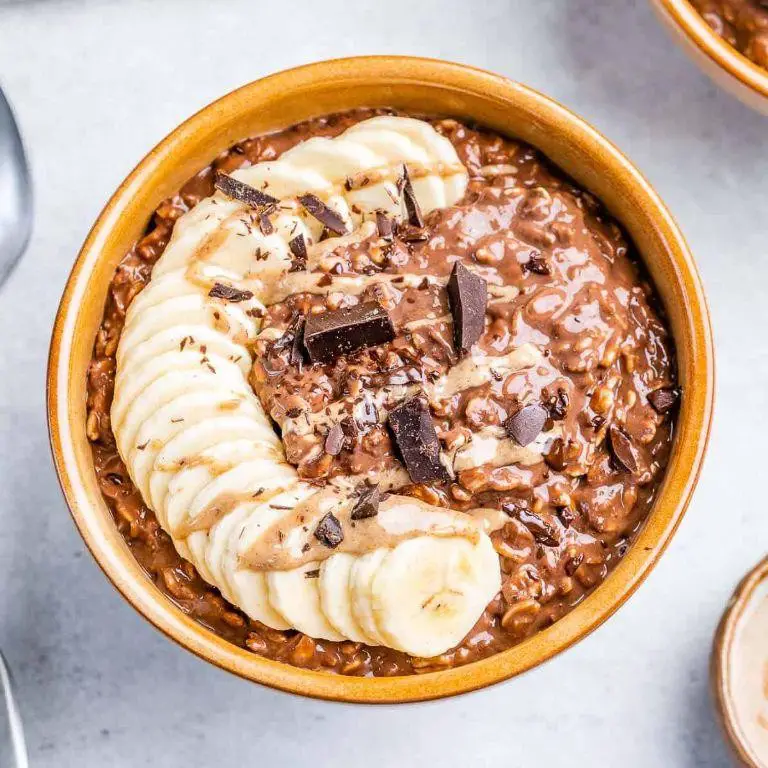
Dawn breaks softly, and with it comes the craving for something warm, comforting, yet subtly adventurous for breakfast. This cacao nibs and peanut butter oatmeal is just that—a humble bowl turned extraordinary with rich, nutty depths and a hint of chocolatey crunch.
Ingredients
- 1 cup rolled oats
- 2 cups water
- 1/4 tsp salt
- 2 tbsp peanut butter
- 1 tbsp cacao nibs
- 1 tbsp honey
- 1/2 tsp vanilla extract
Instructions
- In a medium saucepan, bring 2 cups of water to a boil over high heat.
- Add 1 cup of rolled oats and 1/4 tsp salt to the boiling water, then reduce the heat to medium-low.
- Simmer the oats for 5 minutes, stirring occasionally to prevent sticking. Tip: For creamier oatmeal, stir more frequently.
- Remove the saucepan from the heat and let it sit, covered, for 2 minutes to thicken.
- Stir in 2 tbsp peanut butter, 1 tbsp honey, and 1/2 tsp vanilla extract until fully incorporated. Tip: If the peanut butter is too thick, warm it slightly for easier mixing.
- Divide the oatmeal into bowls and sprinkle 1 tbsp cacao nibs on top. Tip: For an extra flavor boost, toast the cacao nibs lightly before sprinkling.
Each spoonful offers a delightful contrast between the creamy oatmeal and the crunchy cacao nibs, with the peanut butter lending a comforting richness. Serve it with a drizzle of extra honey or a splash of milk for a touch of sweetness and creaminess.
Chocolate Cacao Nibs Avocado Mousse
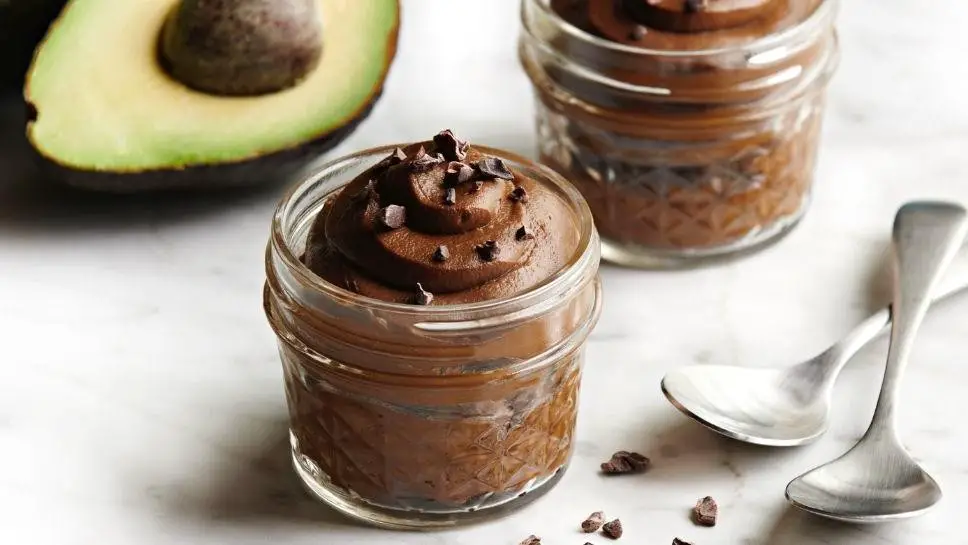
Falling into the rhythm of a quiet kitchen morning, I find myself reaching for ingredients that speak to both comfort and a touch of indulgence. This chocolate cacao nibs avocado mousse is a whisper of sweetness against the backdrop of a bustling life, a reminder that simplicity often holds the deepest flavors.
Ingredients
- 2 ripe avocados
- 1/4 cup cocoa powder
- 1/4 cup maple syrup
- 1 tsp vanilla extract
- 1/4 cup cacao nibs
- 1/2 cup coconut milk
- 1 pinch sea salt
Instructions
- Cut the avocados in half, remove the pits, and scoop the flesh into a blender.
- Add the cocoa powder, maple syrup, vanilla extract, and sea salt to the blender.
- Pour in the coconut milk and blend on high speed for 1 minute, or until the mixture is completely smooth. Tip: Scrape down the sides of the blender halfway through to ensure all ingredients are fully incorporated.
- Transfer the mousse to a serving bowl and gently fold in the cacao nibs with a spatula. Tip: Reserve a few nibs to sprinkle on top for added texture and visual appeal.
- Chill the mousse in the refrigerator for at least 30 minutes before serving. Tip: Cover the bowl with plastic wrap touching the surface of the mousse to prevent a skin from forming.
This mousse carries the lush, velvety texture of the avocados, elevated by the crunch of cacao nibs and the deep richness of cocoa. Try serving it in small glasses layered with fresh berries for a dessert that feels both elegant and effortlessly simple.
Cacao Nibs Infused Coffee
Dawn breaks softly, and with it comes the quiet ritual of brewing a cup that’s both familiar and novel. Today, we’re blending the robust warmth of coffee with the subtle, earthy crunch of cacao nibs, a pairing that invites contemplation with every sip.
Ingredients
- 1 cup water
- 2 tbsp coarsely ground coffee
- 1 tbsp cacao nibs
- 1 cup milk (optional)
- 1 tbsp honey (optional)
Instructions
- Bring 1 cup of water to a boil in a small saucepan over medium-high heat, reaching exactly 212°F.
- Add 2 tbsp of coarsely ground coffee and 1 tbsp of cacao nibs to a French press.
- Pour the boiling water over the coffee and cacao nibs, ensuring all grounds are saturated. Tip: Stir gently to release the flavors.
- Let the mixture steep for 4 minutes for optimal extraction. Tip: Cover the French press to retain heat.
- Press the plunger down slowly to separate the grounds from the liquid.
- Heat 1 cup of milk in a saucepan until it reaches 150°F, if using. Tip: Use a thermometer to avoid scalding.
- Pour the infused coffee into a cup, adding heated milk and 1 tbsp of honey if desired, stirring to combine.
Velvety and rich, this cacao nibs infused coffee offers a delightful contrast between the smoothness of the brew and the crunchy texture of the nibs. Serve it alongside a piece of dark chocolate to enhance the cocoa notes, or enjoy it as is, letting the quiet morning envelop you.
Cacao Nibs and Raspberry Chia Pudding
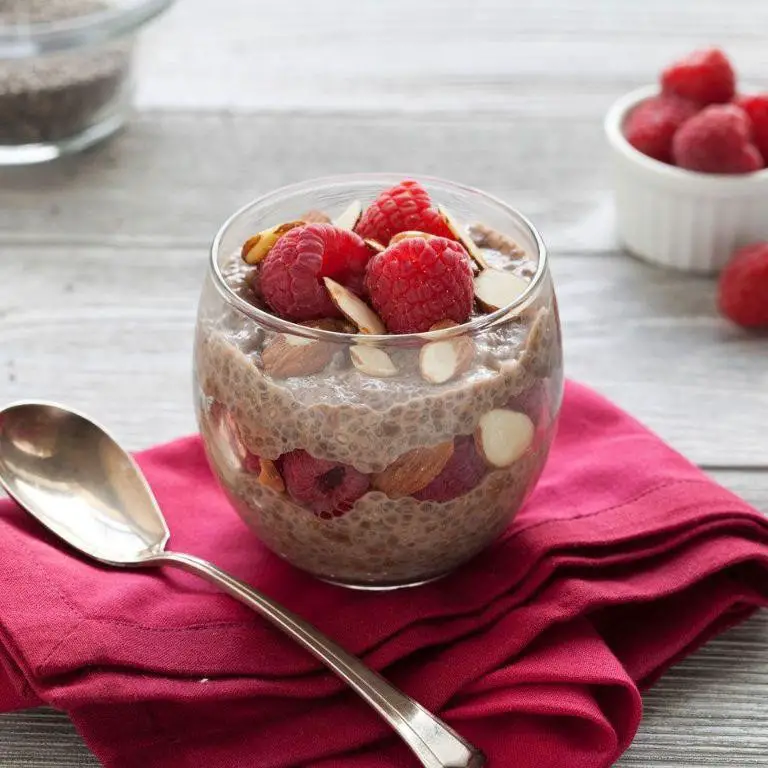
Gently, the morning light filters through the kitchen window, casting a soft glow on the counter where a bowl of cacao nibs and raspberries sits, waiting to transform into something magical. This Cacao Nibs and Raspberry Chia Pudding is a testament to the beauty of simple ingredients coming together to create a dish that’s both nourishing and indulgent.
Ingredients
- 1 cup almond milk
- 3 tbsp chia seeds
- 1 tbsp maple syrup
- 1/2 cup raspberries
- 2 tbsp cacao nibs
Instructions
- In a medium bowl, combine 1 cup almond milk, 3 tbsp chia seeds, and 1 tbsp maple syrup. Whisk thoroughly to prevent clumping.
- Let the mixture sit for 5 minutes, then whisk again to ensure the chia seeds are evenly distributed.
- Cover the bowl with plastic wrap and refrigerate for at least 4 hours, or overnight, until the mixture thickens to a pudding-like consistency.
- Gently fold in 1/2 cup raspberries and 2 tbsp cacao nibs into the chia pudding, reserving a few for garnish.
- Divide the pudding into two serving bowls and top with the reserved raspberries and cacao nibs.
Zesty and rich, this pudding offers a delightful contrast between the creamy chia base and the crunchy cacao nibs. Serve it in clear glasses to showcase the vibrant layers, or enjoy it as a serene breakfast in bed.
Gluten-Free Cacao Nibs Brownies
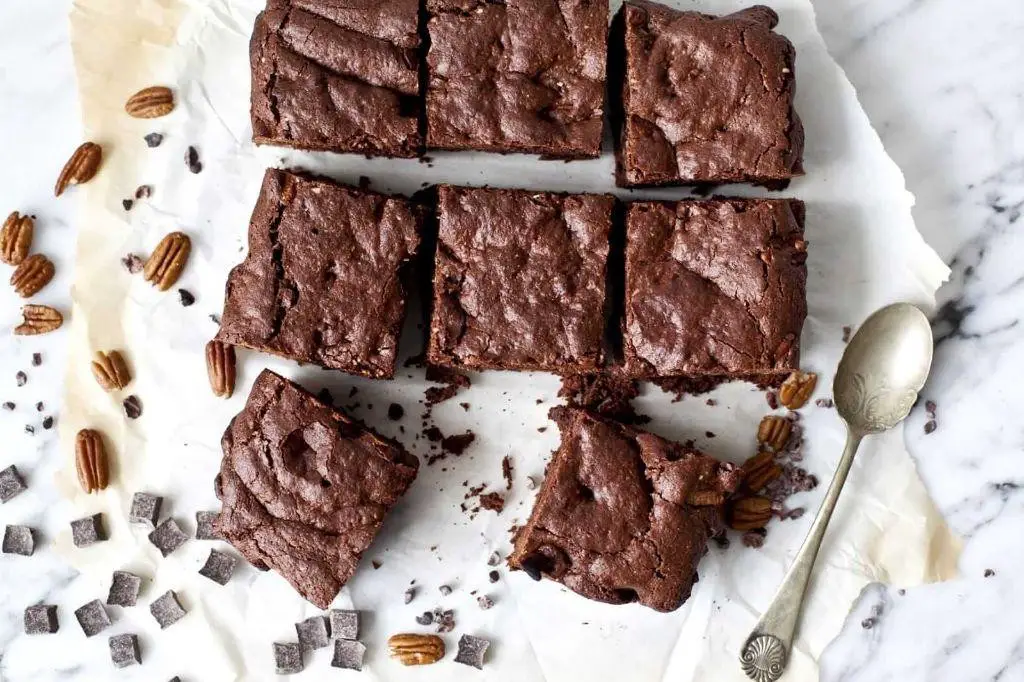
Zestfully embracing the quiet of the kitchen, today we explore a recipe that marries the rich, earthy tones of cacao with the comforting embrace of a brownie, all while keeping it gluten-free. It’s a moment to slow down, to measure each ingredient with care, and to savor the process as much as the outcome.
Ingredients
- 1 cup almond flour
- 1/2 cup coconut sugar
- 1/4 cup cacao nibs
- 1/4 cup coconut oil, melted
- 2 large eggs
- 1 tsp vanilla extract
- 1/2 tsp baking powder
- 1/4 tsp sea salt
Instructions
- Preheat your oven to 350°F and line an 8×8 inch baking pan with parchment paper, leaving some overhang for easy removal.
- In a large bowl, whisk together the almond flour, coconut sugar, baking powder, and sea salt until well combined.
- Add the melted coconut oil, eggs, and vanilla extract to the dry ingredients, stirring until the batter is smooth and uniform. Tip: Ensure all ingredients are at room temperature to avoid the coconut oil solidifying.
- Gently fold in the cacao nibs, distributing them evenly throughout the batter. Tip: For an extra crunch, reserve a few nibs to sprinkle on top before baking.
- Pour the batter into the prepared pan, smoothing the top with a spatula. If reserved, sprinkle the remaining cacao nibs over the surface.
- Bake for 20-25 minutes, or until the edges are set and a toothpick inserted into the center comes out mostly clean. Tip: Don’t overbake; the brownies will continue to set as they cool.
- Allow the brownies to cool in the pan for at least 10 minutes before lifting them out using the parchment overhang. Cool completely on a wire rack before slicing.
Unwrapping the parchment reveals brownies with a crackly top and a fudgy center, each bite punctuated by the crunch of cacao nibs. Serve them slightly warm with a dollop of coconut whipped cream for a decadent twist.
Cacao Nibs and Hazelnut Spread
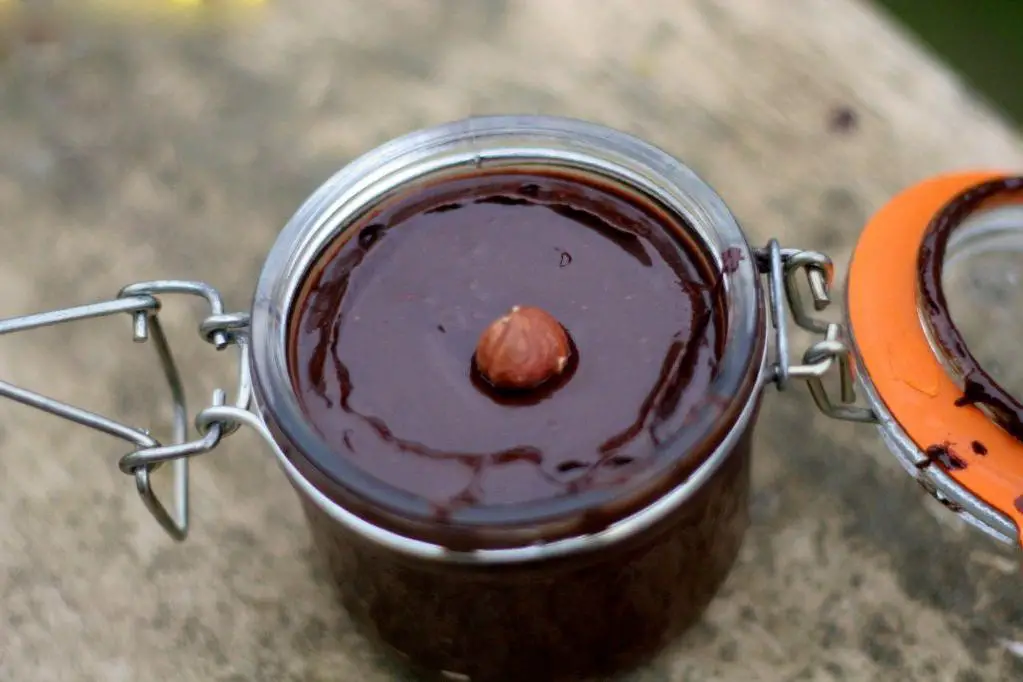
Years have passed since I first stumbled upon the rustic charm of combining cacao nibs with hazelnuts, a pairing that whispers of ancient forests and the quiet joy of discovery. Today, I share this spread, a testament to the beauty of simplicity and the depth of flavor that comes from patience.
Ingredients
- 1 cup hazelnuts
- 1/2 cup cacao nibs
- 1/4 cup honey
- 1/4 tsp sea salt
- 2 tbsp coconut oil, melted
- 1 tsp vanilla extract
Instructions
- Preheat your oven to 350°F. Spread the hazelnuts on a baking sheet in a single layer.
- Roast the hazelnuts for 10-12 minutes, until their skins crack and they turn a deep golden brown. Tip: Stir them halfway through to ensure even roasting.
- Let the hazelnuts cool for 5 minutes, then rub them between a clean kitchen towel to remove the skins. Don’t worry if some skins remain; they add texture.
- In a food processor, blend the hazelnuts until they form a smooth butter, about 5 minutes. Scrape down the sides as needed.
- Add the cacao nibs, honey, sea salt, coconut oil, and vanilla extract to the hazelnut butter. Process until the mixture is uniformly combined, about 2 minutes. Tip: For a smoother spread, process longer; for crunchier, less.
- Transfer the spread to a jar and let it set at room temperature for 1 hour before serving. Tip: If the mixture is too thick, warm it slightly and stir in a teaspoon of coconut oil to loosen.
Now, the spread is ready, with a texture that dances between creamy and crunchy, a flavor that balances the earthiness of cacao with the sweetness of honey. Try it swirled into morning oatmeal or as a bold companion to ripe strawberries.
Cacao Nibs Topped Acai Bowl
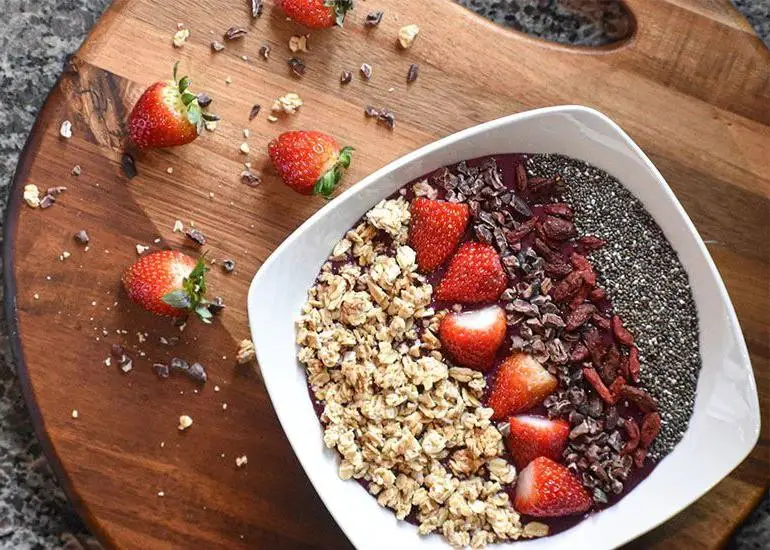
Dappled sunlight filters through the kitchen window as I ponder the simplicity and richness of combining acai with the subtle crunch of cacao nibs, a pairing that feels both indulgent and nourishing.
Ingredients
- 1 cup frozen acai puree
- 1/2 cup almond milk
- 1 tbsp honey
- 1/2 cup granola
- 1/4 cup cacao nibs
- 1/2 banana, sliced
Instructions
- In a blender, combine 1 cup frozen acai puree and 1/2 cup almond milk. Blend on high for 30 seconds until smooth.
- Add 1 tbsp honey to the blender and pulse for 10 seconds to incorporate. Tip: For a thicker consistency, add less almond milk.
- Pour the acai mixture into a bowl. Tip: Swirl the mixture with a spoon for a visually appealing presentation.
- Sprinkle 1/2 cup granola evenly over the acai mixture.
- Top with 1/4 cup cacao nibs and 1/2 banana, sliced. Tip: For an extra crunch, toast the cacao nibs lightly before sprinkling.
Kindly savor the contrast between the creamy acai and the crunchy cacao nibs, a harmony of textures that dances on the palate. Serve it in a hollowed-out coconut for a tropical twist that elevates this bowl from breakfast to an experience.
Cacao Nibs and Orange Zest Scones
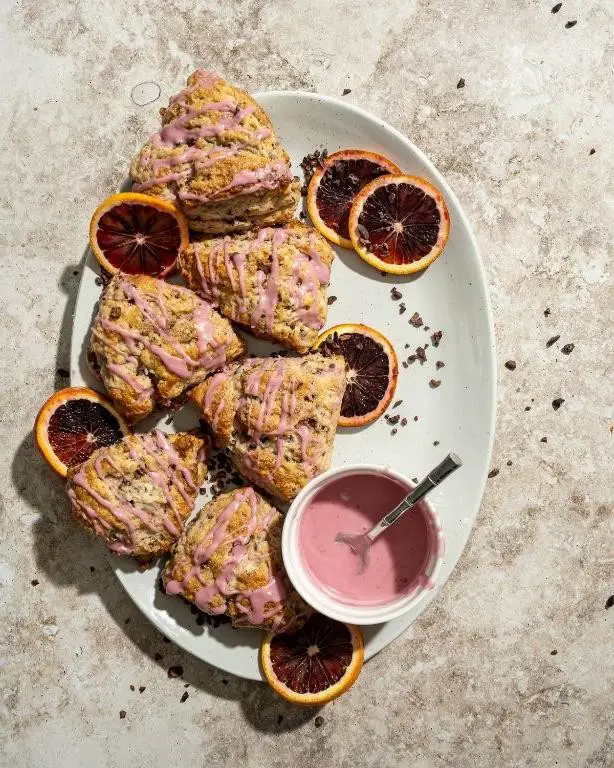
Yesterday, as the morning light filtered through my kitchen window, I found myself reaching for the cacao nibs and a fresh orange, inspired to create something that marries the bold with the bright.
Ingredients
- 2 cups all-purpose flour
- 1/3 cup granulated sugar
- 1 tbsp baking powder
- 1/2 tsp salt
- 1/2 cup unsalted butter, cold and cubed
- 1/2 cup heavy cream
- 1 large egg
- 1 tsp vanilla extract
- 1/4 cup cacao nibs
- 2 tbsp orange zest
Instructions
- Preheat your oven to 400°F and line a baking sheet with parchment paper.
- In a large bowl, whisk together the flour, sugar, baking powder, and salt.
- Add the cold, cubed butter to the dry ingredients. Use your fingertips to rub the butter into the flour until the mixture resembles coarse crumbs. Tip: Keep the butter cold for flakier scones.
- In a separate bowl, whisk together the heavy cream, egg, and vanilla extract.
- Pour the wet ingredients into the dry ingredients and stir until just combined. Tip: Overmixing leads to tough scones.
- Gently fold in the cacao nibs and orange zest until evenly distributed throughout the dough.
- Turn the dough out onto a lightly floured surface and pat into a 1-inch thick circle.
- Cut the dough into 8 wedges and transfer to the prepared baking sheet.
- Bake for 15-18 minutes, or until the scones are golden brown and a toothpick inserted into the center comes out clean. Tip: Rotate the baking sheet halfway through for even browning.
- Allow the scones to cool on the baking sheet for 5 minutes before transferring to a wire rack.
Just out of the oven, these scones offer a delightful contrast between the crunchy cacao nibs and the fragrant orange zest. Serve them warm with a dollop of clotted cream or a drizzle of honey for an extra touch of sweetness.
Conclusion
Just like that, we’ve explored 18 irresistible ways to enjoy cacao nibs, from breakfast to dessert! Whether you’re a seasoned chef or a curious newbie, there’s a recipe here to spark your chocolate-loving heart. We’d love to hear which ones you try—drop a comment with your favorites and don’t forget to share the love (and this article) on Pinterest. Happy cooking!

Michael Johnson is the founder of Pan Mastery, Inspired by his blacksmith grandfather’s legacy has a deep appreciation for hand-crafted pots and pans, he provides invaluable guides, reviews, and recipes to enhance your culinary journey.