Just imagine the sizzle of a perfectly seared steak or the golden crust of a cornbread, all thanks to your trusty cast iron skillet. Whether you’re whipping up quick weeknight dinners or indulging in seasonal comfort food, these 18 delicious recipes are your year-round ticket to flavor-packed meals. Ready to transform your cooking game? Let’s dive into these cast iron classics that promise to delight in every season.
Cast Iron Skillet Pizza
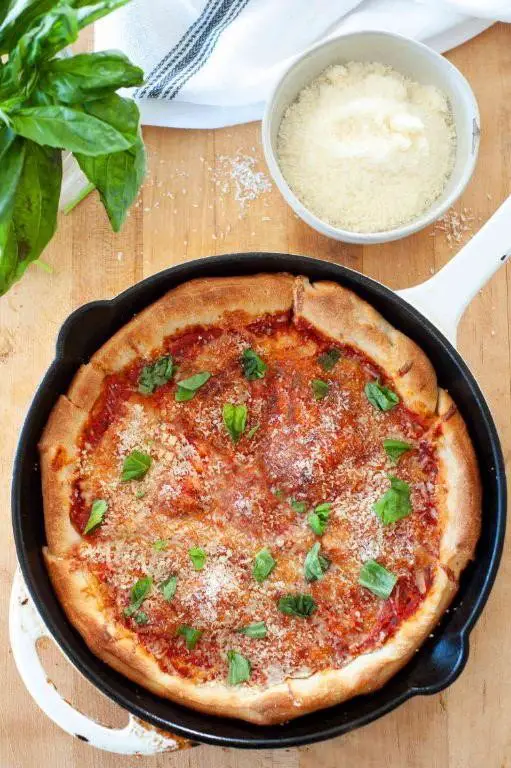
Cast iron skillet pizza brings the rustic charm of a wood-fired oven right into your kitchen, with a crust that’s irresistibly crispy on the outside and tender within. Crafting this dish feels like a quiet celebration of simplicity and flavor, a moment to savor the process as much as the result.
Ingredients
- 1 1/2 cups all-purpose flour
- 1/2 tsp salt
- 1/2 tsp sugar
- 1/2 tbsp active dry yeast
- 1/2 cup warm water (110°F)
- 1 tbsp olive oil
- 1/2 cup tomato sauce
- 1 1/2 cups shredded mozzarella cheese
- 1/4 cup grated Parmesan cheese
- 1/2 tsp dried oregano
- 1/4 tsp red pepper flakes
Instructions
- In a large bowl, combine flour, salt, and sugar. Stir to mix evenly.
- Dissolve yeast in warm water (110°F) and let sit for 5 minutes until frothy.
- Add yeast mixture and olive oil to the dry ingredients. Stir until a dough forms.
- Knead the dough on a floured surface for 5 minutes until smooth and elastic.
- Place dough in a greased bowl, cover, and let rise in a warm place for 1 hour or until doubled in size.
- Preheat oven to 450°F with a cast iron skillet inside for 30 minutes.
- Punch down the dough and stretch it to fit the skillet. Press dough evenly into the hot skillet.
- Spread tomato sauce over the dough, leaving a 1/2-inch border. Sprinkle with mozzarella, Parmesan, oregano, and red pepper flakes.
- Bake for 15-20 minutes until the crust is golden and the cheese is bubbly and slightly browned.
- Let the pizza cool in the skillet for 5 minutes before slicing.
Only the edges crisp up beautifully, while the center stays wonderfully chewy, a perfect canvas for the tangy tomato sauce and melty cheeses. Serve it straight from the skillet, perhaps with a drizzle of olive oil or a sprinkle of fresh basil, to elevate the experience.
Classic Cast Iron Cornbread
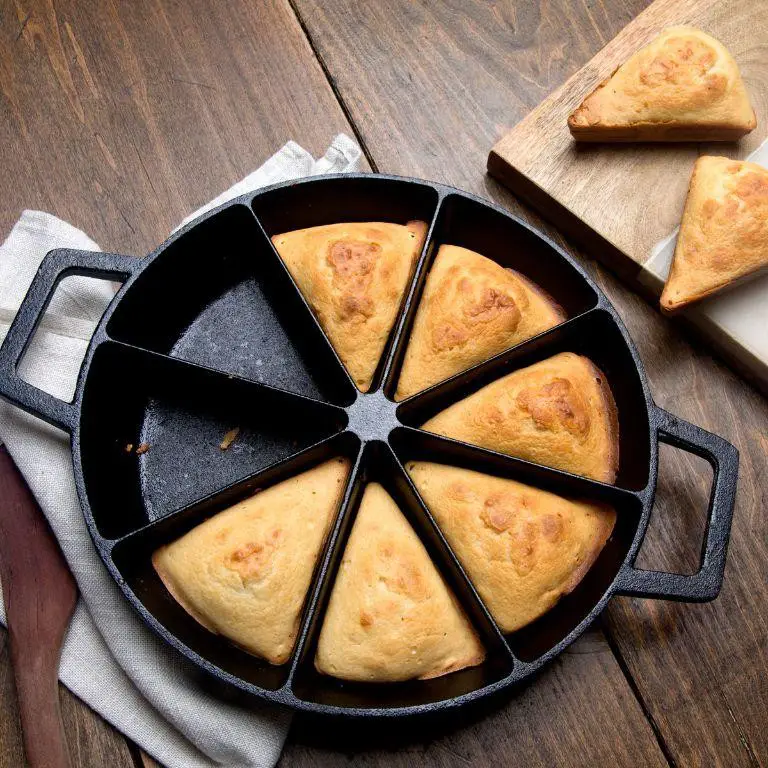
Sometimes, the simplest dishes carry the weight of memories, like the golden crust of a cast iron cornbread, whispering tales of shared meals and quiet mornings.
Ingredients
- 1 cup cornmeal
- 1 cup all-purpose flour
- 1/4 cup granulated sugar
- 1 tbsp baking powder
- 1/2 tsp salt
- 1 cup whole milk
- 1 large egg
- 1/4 cup unsalted butter, melted
Instructions
- Preheat your oven to 425°F and place a 10-inch cast iron skillet inside to heat.
- In a large bowl, whisk together 1 cup cornmeal, 1 cup all-purpose flour, 1/4 cup granulated sugar, 1 tbsp baking powder, and 1/2 tsp salt.
- In another bowl, beat 1 large egg, then stir in 1 cup whole milk and 1/4 cup melted unsalted butter.
- Pour the wet ingredients into the dry ingredients, stirring just until combined. Tip: Overmixing can lead to dense cornbread.
- Carefully remove the hot skillet from the oven and swirl a tablespoon of butter to coat the bottom and sides.
- Pour the batter into the skillet, smoothing the top with a spatula. Tip: The sizzle as the batter hits the skillet ensures a crispy crust.
- Bake for 20-25 minutes, until the top is golden and a toothpick inserted in the center comes out clean. Tip: For an extra golden top, broil for the last 1-2 minutes, watching closely.
Crumbly yet moist, this cornbread sings with a buttery richness, perfect alongside a bowl of chili or drizzled with honey for a sweet contrast.
Cast Iron Seared Steak
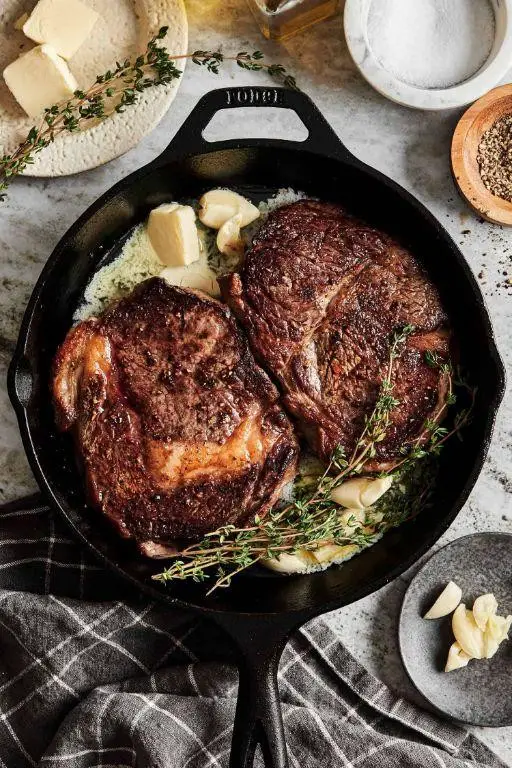
Evening light filters through the kitchen window, casting a warm glow on the counter where a thick, marbled steak rests, waiting to transform under the heat of a cast iron skillet. This moment, simple yet profound, is where patience meets passion, yielding a dish that’s both rustic and refined.
Ingredients
- 1 1.5 lb ribeye steak
- 2 tbsp unsalted butter
- 1 tbsp olive oil
- 1 tsp kosher salt
- 1/2 tsp freshly ground black pepper
- 2 cloves garlic, crushed
- 2 sprigs fresh thyme
Instructions
- Remove the steak from the refrigerator 30 minutes before cooking to bring it to room temperature, ensuring even cooking.
- Heat a cast iron skillet over medium-high heat for 5 minutes until it’s smoking hot, a crucial step for achieving a perfect sear.
- Pat the steak dry with paper towels, then season both sides evenly with salt and pepper.
- Add olive oil to the skillet, then place the steak in the center. Cook undisturbed for 4 minutes to form a deep brown crust.
- Flip the steak, add butter, garlic, and thyme to the skillet. Baste the steak with the melted butter for 3 minutes for added flavor.
- Use a meat thermometer to check for doneness: 120°F for rare, 130°F for medium-rare, or 140°F for medium. Remove the steak from the skillet once it reaches your desired temperature.
- Let the steak rest on a cutting board for 10 minutes before slicing, allowing the juices to redistribute.
Juicy and richly flavored, this cast iron seared steak boasts a caramelized crust that gives way to a tender, pink center. Serve it sliced over a bed of arugula with a drizzle of the skillet’s buttery juices, or alongside roasted potatoes for a hearty meal.
Cast Iron Apple Crisp
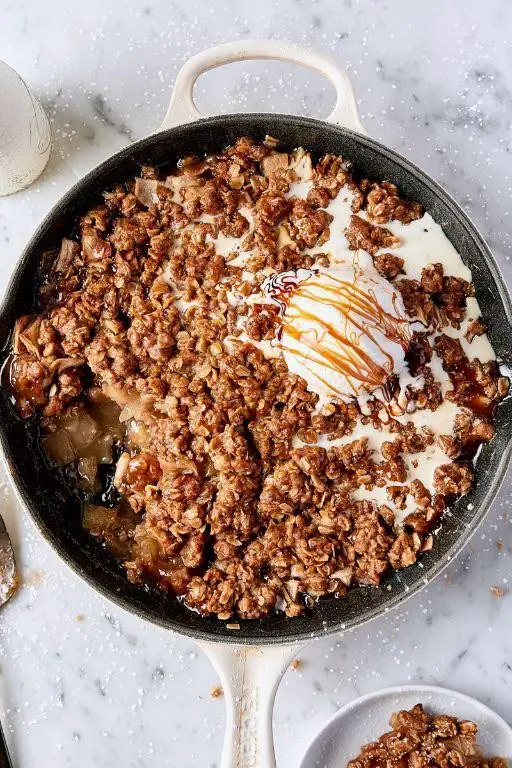
On a quiet evening, when the air carries a hint of autumn’s approach, there’s nothing quite like the warmth of a cast iron apple crisp baking in the oven. The melding of tart apples and sweet, crumbly topping is a simple pleasure that feels like home.
Ingredients
- 4 cups apples, peeled and sliced
- 1/2 cup granulated sugar
- 1 tsp ground cinnamon
- 1/4 tsp ground nutmeg
- 1 cup all-purpose flour
- 1 cup rolled oats
- 1/2 cup brown sugar
- 1/2 cup unsalted butter, cold and cubed
- 1/4 tsp salt
Instructions
- Preheat the oven to 375°F (190°C).
- In a large bowl, combine the apples, granulated sugar, cinnamon, and nutmeg. Toss gently to coat the apples evenly.
- Transfer the apple mixture to a 10-inch cast iron skillet, spreading it out evenly.
- In the same bowl, mix the flour, oats, brown sugar, and salt. Add the cubed butter and use your fingers to work it into the dry ingredients until the mixture resembles coarse crumbs.
- Sprinkle the topping evenly over the apples in the skillet.
- Bake for 35-40 minutes, or until the topping is golden brown and the apples are bubbling around the edges.
- Let the crisp cool for 10 minutes before serving to allow the juices to thicken slightly.
Kindly savor the contrast between the crisp, buttery topping and the tender, spiced apples beneath. For an extra touch of indulgence, serve warm with a scoop of vanilla ice cream melting over the top.
Cast Iron Chicken Thighs with Garlic and Herbs
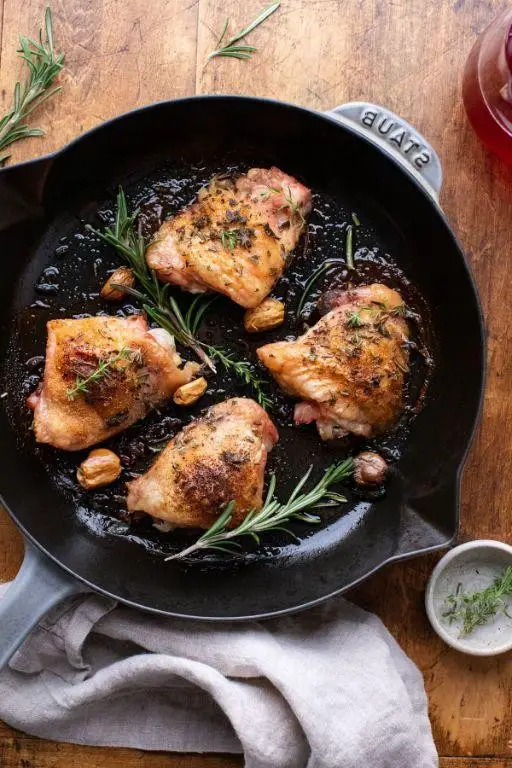
There’s something deeply comforting about the sizzle of chicken thighs in a cast iron skillet, a sound that promises a meal both hearty and nuanced. The garlic and herbs meld into a fragrant backdrop, turning a simple dish into a moment of quiet celebration.
Ingredients
- 4 chicken thighs, bone-in, skin-on
- 2 tbsp olive oil
- 4 cloves garlic, minced
- 1 tbsp fresh rosemary, chopped
- 1 tbsp fresh thyme, chopped
- 1/2 tsp salt
- 1/4 tsp black pepper
Instructions
- Preheat your oven to 375°F to ensure even cooking and a crispy skin.
- Season the chicken thighs evenly with salt and pepper, pressing the seasoning into the skin for maximum flavor.
- Heat olive oil in a cast iron skillet over medium-high heat until shimmering, about 2 minutes, to prevent sticking.
- Place the chicken thighs skin-side down in the skillet, cooking undisturbed for 5 minutes to achieve a golden-brown crust.
- Flip the chicken thighs and add minced garlic, rosemary, and thyme around them, stirring the herbs and garlic gently to infuse the oil without burning.
- Transfer the skillet to the preheated oven and bake for 25 minutes, or until the internal temperature reaches 165°F.
- Let the chicken rest for 5 minutes before serving to allow the juices to redistribute, ensuring moist meat.
Succulent and richly flavored, these chicken thighs boast a crispy skin that gives way to tender, herb-infused meat. Serve them atop a bed of creamy polenta or alongside roasted vegetables for a meal that feels both rustic and refined.
Cast Iron Dutch Baby Pancake
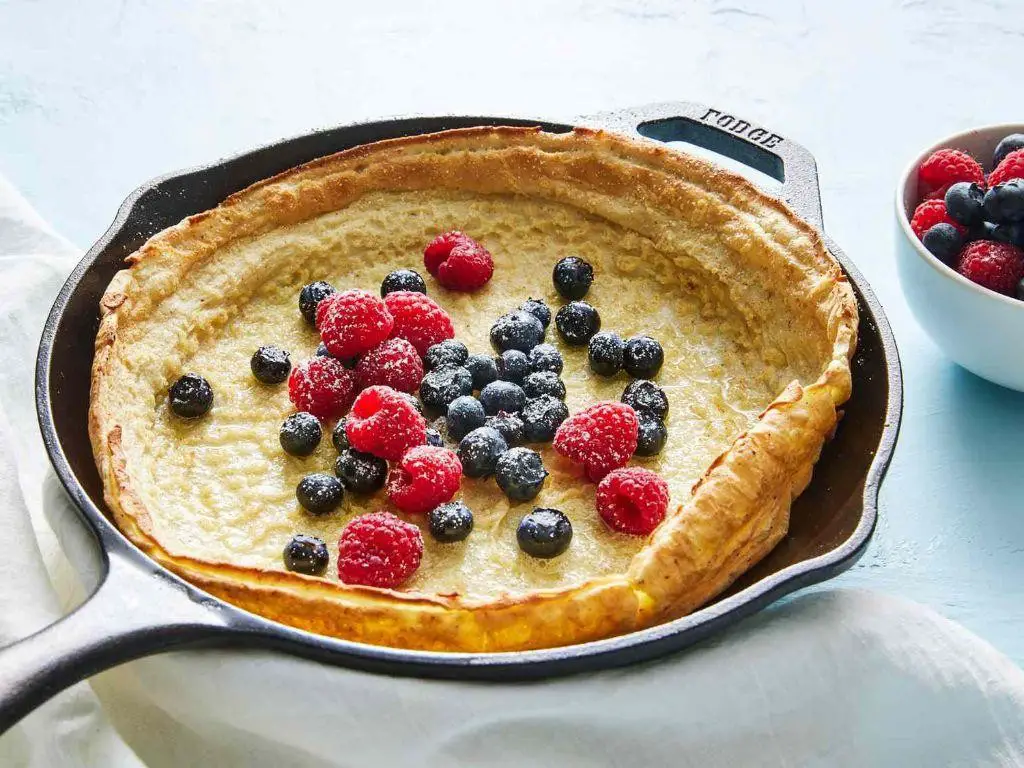
Just like the first light of dawn, a Cast Iron Dutch Baby Pancake rises in the oven, its edges golden and crisp, while the center remains tender and custardy. This simple yet majestic dish is a testament to the beauty of baking with minimal ingredients, offering a comforting start to any day.
Ingredients
- 3/4 cup all-purpose flour
- 1 tbsp granulated sugar
- 1/2 tsp salt
- 3 large eggs
- 3/4 cup whole milk
- 2 tbsp unsalted butter
- 1/2 tsp vanilla extract
Instructions
- Preheat the oven to 425°F with a 10-inch cast iron skillet inside to heat up.
- In a medium bowl, whisk together 3/4 cup all-purpose flour, 1 tbsp granulated sugar, and 1/2 tsp salt until well combined.
- Add 3 large eggs, 3/4 cup whole milk, and 1/2 tsp vanilla extract to the dry ingredients, whisking until the batter is smooth and free of lumps.
- Carefully remove the hot skillet from the oven and add 2 tbsp unsalted butter, swirling until melted and the skillet is evenly coated.
- Pour the batter into the skillet and immediately return it to the oven.
- Bake for 20-25 minutes, or until the pancake is puffed and golden brown around the edges.
- Remove from the oven and let it sit for a minute before slicing to serve.
Here, the pancake’s edges are delightfully crisp, giving way to a soft, eggy center that’s subtly sweet. Serve it with a dusting of powdered sugar and fresh berries for a breakfast that feels both indulgent and wholesome.
Cast Iron Roasted Vegetables
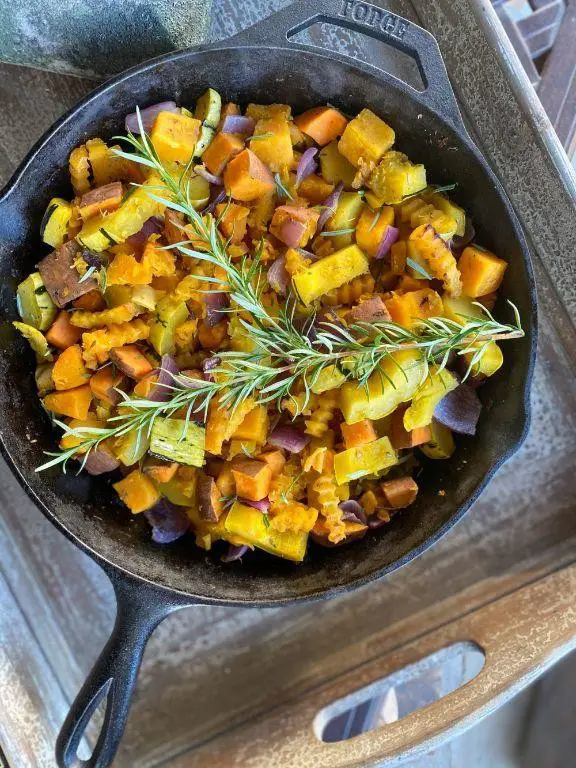
Kindly imagine the warmth of your kitchen, the cast iron skillet waiting patiently on the stove, and the vibrant colors of fresh vegetables about to transform into a dish that’s as nourishing as it is comforting.
Ingredients
- 2 cups Brussels sprouts, halved
- 1 cup carrots, sliced into 1-inch pieces
- 1 cup sweet potatoes, cubed
- 2 tbsp olive oil
- 1 tsp salt
- 1/2 tsp black pepper
- 1/2 tsp garlic powder
Instructions
- Preheat your oven to 400°F (204°C) to ensure it’s perfectly heated for roasting.
- In a large bowl, combine the Brussels sprouts, carrots, and sweet potatoes. Drizzle with olive oil and sprinkle with salt, black pepper, and garlic powder. Toss gently to coat every piece evenly.
- Transfer the vegetables to a cast iron skillet, spreading them out in a single layer to allow for even roasting.
- Place the skillet in the preheated oven and roast for 25 minutes. Halfway through, give the vegetables a gentle stir to promote uniform browning.
- After 25 minutes, check for doneness. The vegetables should be tender and caramelized at the edges. If needed, roast for an additional 5 minutes.
- Remove the skillet from the oven and let the vegetables rest for 2 minutes before serving to enhance their flavors.
Each bite offers a delightful contrast between the caramelized edges and the tender interiors, a testament to the magic of cast iron cooking. Consider serving these roasted vegetables over a bed of quinoa or alongside a creamy tahini sauce for an extra layer of flavor.
Cast Iron Chocolate Chip Cookie

Years have passed since I first discovered the joy of baking a cast iron chocolate chip cookie, a dessert that feels like a warm hug on a chilly evening. Its edges crisp to perfection while the center remains blissfully gooey, a testament to the magic of cast iron cooking.
Ingredients
- 1 cup unsalted butter, melted
- 1 cup granulated sugar
- 1 cup packed brown sugar
- 2 large eggs
- 2 tsp vanilla extract
- 3 cups all-purpose flour
- 1 tsp baking soda
- 1/2 tsp baking powder
- 1 tsp salt
- 2 cups semisweet chocolate chips
Instructions
- Preheat your oven to 375°F and lightly grease a 10-inch cast iron skillet with butter.
- In a large bowl, whisk together the melted butter, granulated sugar, and brown sugar until smooth.
- Add the eggs one at a time, whisking well after each addition, then stir in the vanilla extract.
- In a separate bowl, sift together the flour, baking soda, baking powder, and salt to ensure even distribution.
- Gradually fold the dry ingredients into the wet mixture, being careful not to overmix, which can lead to tough cookies.
- Gently stir in the chocolate chips until evenly distributed throughout the dough.
- Press the dough evenly into the prepared skillet, smoothing the top with a spatula for an even bake.
- Bake for 25-30 minutes, or until the edges are golden brown but the center is still slightly soft.
- Let the cookie cool in the skillet for 10 minutes before slicing to allow it to set properly.
Vividly rich and comforting, this cast iron chocolate chip cookie offers a delightful contrast of textures. Serve it warm with a scoop of vanilla ice cream for an indulgent twist, or enjoy it as is, letting the melted chocolate chips speak for themselves.
Cast Iron Pork Chops with Apples
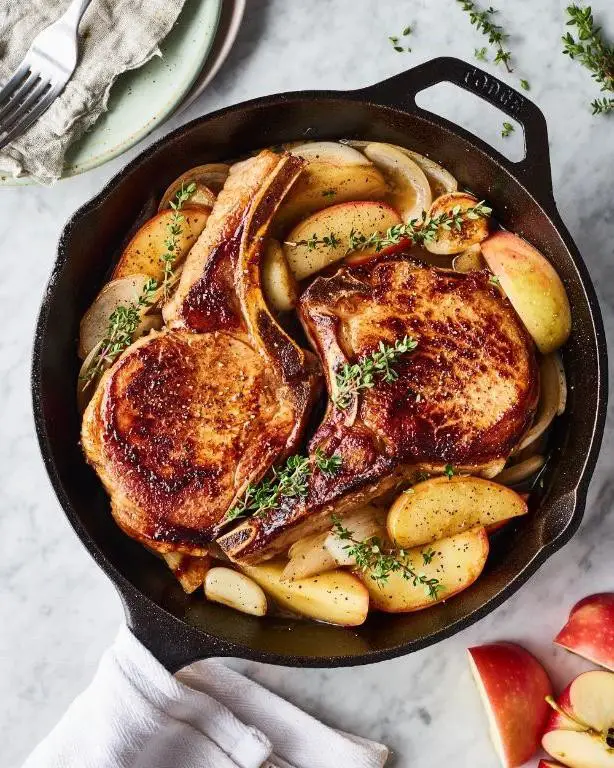
Venturing into the kitchen on a quiet evening, the sizzle of pork chops in a cast iron skillet becomes a comforting soundtrack. This dish, with its harmonious blend of savory and sweet, invites a moment of pause, a gentle reminder of the simple pleasures found in cooking.
Ingredients
- 4 bone-in pork chops, 1 inch thick
- 2 tbsp olive oil
- 1 tsp salt
- 1/2 tsp black pepper
- 2 apples, cored and sliced into 1/2-inch wedges
- 1 tbsp butter
- 1/2 cup chicken broth
- 1 tbsp fresh thyme leaves
Instructions
- Preheat your cast iron skillet over medium-high heat for 5 minutes until hot.
- Season both sides of the pork chops with salt and pepper.
- Add olive oil to the skillet, then place the pork chops in. Sear for 3 minutes on each side until golden brown. Tip: Do not move the chops while searing to ensure a perfect crust.
- Remove the pork chops from the skillet and set aside on a plate.
- In the same skillet, add butter and apple slices. Cook for 2 minutes until slightly softened.
- Pour in chicken broth and scrape the bottom of the skillet to deglaze, incorporating any browned bits.
- Return the pork chops to the skillet, nestling them among the apples. Sprinkle with thyme leaves.
- Cover the skillet and reduce heat to low. Simmer for 10 minutes, or until the pork reaches an internal temperature of 145°F. Tip: Use a meat thermometer for accuracy.
- Let the pork chops rest for 5 minutes before serving. Tip: Resting allows the juices to redistribute, ensuring moist chops.
Golden and glistening, the pork chops emerge tender, their richness cut by the sweet-tart apples. Serve atop a mound of creamy mashed potatoes or with a side of roasted Brussels sprouts for a meal that feels both rustic and refined.
Cast Iron Shrimp Boil
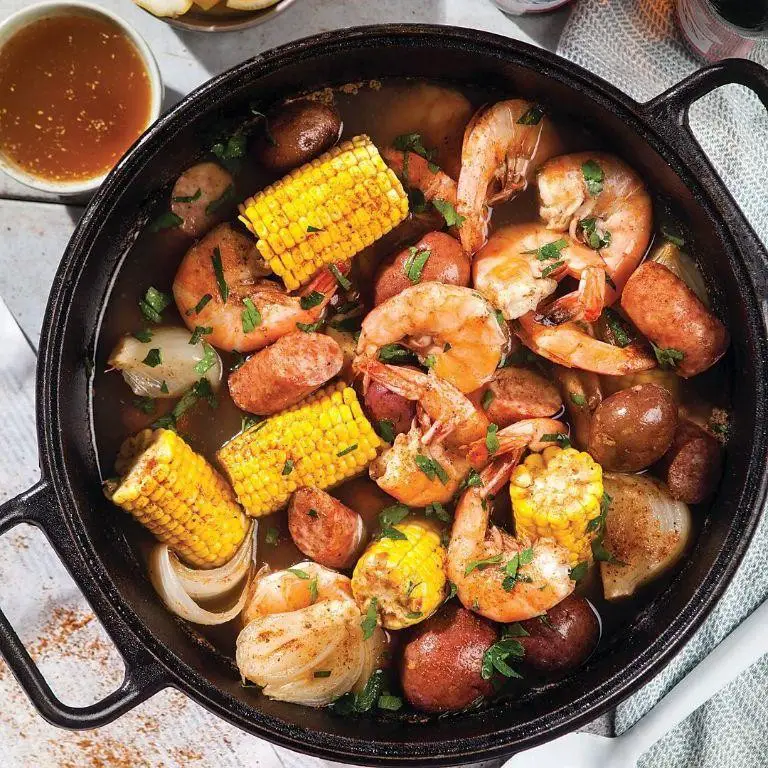
Sometimes, the simplest meals bring the most comfort, especially when they’re shared. This cast iron shrimp boil is a testament to that, a dish that marries the rustic charm of a seafood boil with the convenience of your trusty cast iron skillet.
Ingredients
- 1 lb large shrimp, peeled and deveined
- 2 ears corn, halved
- 1 lb small red potatoes, halved
- 1/2 cup unsalted butter
- 2 tbsp Old Bay seasoning
- 1 lemon, sliced
- 1/4 cup chopped parsley
- 2 cloves garlic, minced
- 1/2 cup chicken broth
Instructions
- Preheat your oven to 400°F to ensure it’s ready for the skillet.
- In a large cast iron skillet, melt the butter over medium heat, then add the garlic, cooking until fragrant, about 1 minute.
- Add the potatoes and corn to the skillet, stirring to coat them in the butter mixture, then pour in the chicken broth.
- Sprinkle the Old Bay seasoning evenly over the potatoes and corn, then arrange the lemon slices on top.
- Cover the skillet with aluminum foil and bake for 20 minutes, allowing the potatoes to begin softening.
- Remove the skillet from the oven, carefully take off the foil, and add the shrimp, stirring gently to mix.
- Return the skillet to the oven, uncovered, and bake for an additional 5-7 minutes, or until the shrimp are pink and opaque.
- Garnish with chopped parsley before serving.
Buttery and bright, this dish offers a delightful contrast between the tender shrimp and the hearty potatoes. Serve it straight from the skillet for a communal dining experience that’s as enjoyable to share as it is to eat.
Cast Iron Banana Bread
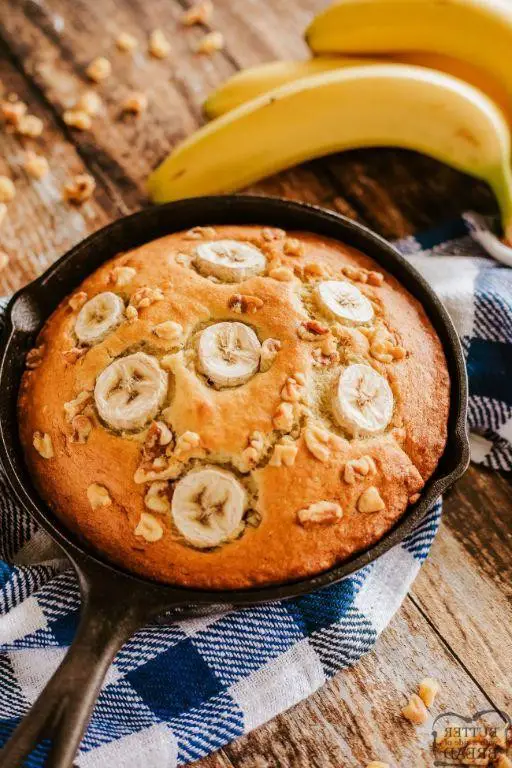
Zephyrs of warm, sweet aroma fill the kitchen as the cast iron cradles the batter, transforming it into something golden and tender. This banana bread, with its rustic charm, whispers of home and the simple joy of baking.
Ingredients
- 1 1/2 cups all-purpose flour
- 1 tsp baking soda
- 1/4 tsp salt
- 3/4 cup granulated sugar
- 1/2 cup unsalted butter, melted
- 2 large eggs
- 3 ripe bananas, mashed
- 1 tsp vanilla extract
- 1/2 cup walnuts, chopped
Instructions
- Preheat the oven to 350°F and lightly grease a 10-inch cast iron skillet.
- In a medium bowl, whisk together 1 1/2 cups all-purpose flour, 1 tsp baking soda, and 1/4 tsp salt.
- In a large bowl, mix 3/4 cup granulated sugar and 1/2 cup melted unsalted butter until smooth.
- Beat in 2 large eggs, one at a time, then stir in 3 mashed ripe bananas and 1 tsp vanilla extract.
- Gradually fold the dry ingredients into the wet mixture until just combined, then gently stir in 1/2 cup chopped walnuts.
- Pour the batter into the prepared skillet, smoothing the top with a spatula.
- Bake for 45-50 minutes, or until a toothpick inserted into the center comes out clean.
- Let the bread cool in the skillet for 10 minutes before transferring to a wire rack to cool completely.
Unassuming yet utterly comforting, this banana bread boasts a moist crumb and a caramelized crust. Serve it warm with a dollop of whipped cream or a drizzle of honey for an extra touch of indulgence.
Cast Iron Beef and Broccoli Stir Fry
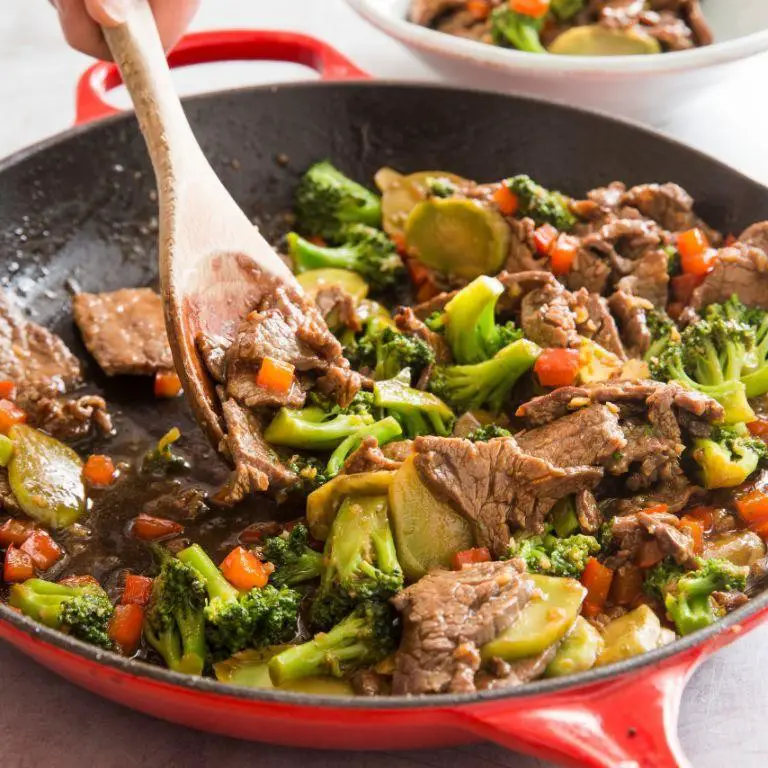
Kneading through the memories of bustling weeknights, this dish emerges as a comforting embrace, marrying the robustness of beef with the tender crispness of broccoli, all harmonized in a cast iron’s embrace.
Ingredients
- 1 lb beef sirloin, thinly sliced
- 2 cups broccoli florets
- 2 tbsp vegetable oil
- 3 cloves garlic, minced
- 1/2 cup soy sauce
- 1/4 cup brown sugar
- 1/2 tsp ginger, grated
- 1 tbsp cornstarch
- 1/4 cup water
Instructions
- Heat 1 tbsp vegetable oil in a cast iron skillet over medium-high heat until shimmering, about 2 minutes.
- Add the thinly sliced beef sirloin to the skillet, spreading evenly. Cook for 3 minutes without stirring to allow a sear, then stir and cook for another 2 minutes until browned. Tip: Avoid overcrowding the skillet to ensure proper searing.
- Remove the beef from the skillet and set aside on a plate.
- In the same skillet, add the remaining 1 tbsp vegetable oil and heat over medium heat. Add the minced garlic and grated ginger, sautéing for 30 seconds until fragrant.
- Add the broccoli florets to the skillet, stirring to coat with the oil. Cook for 4 minutes, stirring occasionally, until the broccoli is bright green and slightly tender. Tip: For extra crispness, cover the skillet for the last minute of cooking.
- In a small bowl, whisk together the soy sauce, brown sugar, cornstarch, and water until smooth. Pour the sauce over the broccoli in the skillet, stirring to combine.
- Return the cooked beef to the skillet, stirring to coat with the sauce. Cook for an additional 2 minutes, until the sauce has thickened and everything is well combined. Tip: If the sauce thickens too quickly, add a tablespoon of water to reach the desired consistency.
- Remove from heat and let stand for 2 minutes before serving.
Rich in flavor, the beef remains succulent against the slight crunch of broccoli, all enveloped in a glossy, savory-sweet sauce. Serve it over a bed of steamed rice or alongside a crisp salad for a balanced meal.
Cast Iron Blueberry Cobbler
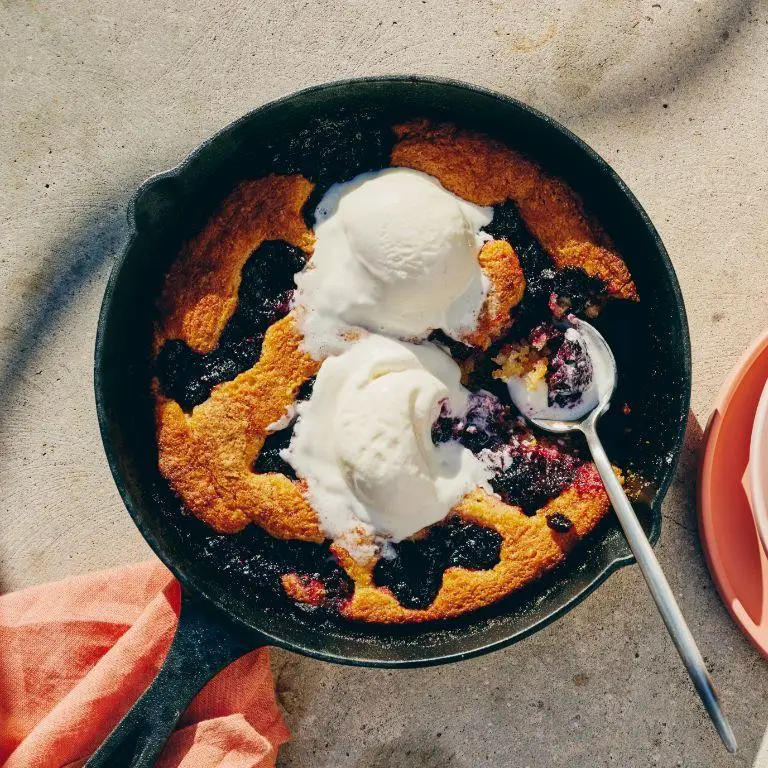
Perhaps there’s no simpler joy than the warm, bubbling embrace of a homemade cobbler, especially when it’s cradled in the sturdy arms of a cast iron skillet. This blueberry cobbler, with its golden, biscuit-like topping and juicy, vibrant filling, is a testament to the beauty of rustic desserts.
Ingredients
- 4 cups fresh blueberries
- 1 cup granulated sugar
- 1 tbsp lemon juice
- 1 tsp vanilla extract
- 1 cup all-purpose flour
- 1 tsp baking powder
- 1/4 tsp salt
- 1/2 cup unsalted butter, melted
- 1/2 cup milk
Instructions
- Preheat your oven to 375°F (190°C) to ensure it’s ready for baking.
- In a large bowl, gently toss the blueberries with 1/2 cup of sugar, lemon juice, and vanilla extract until evenly coated.
- Transfer the blueberry mixture to a 10-inch cast iron skillet, spreading it out evenly.
- In another bowl, whisk together the flour, remaining 1/2 cup of sugar, baking powder, and salt.
- Stir in the melted butter and milk into the dry ingredients until just combined, being careful not to overmix.
- Drop spoonfuls of the batter over the blueberries, covering as much of the surface as possible.
- Bake for 35-40 minutes, or until the topping is golden brown and the blueberries are bubbling around the edges.
- Let the cobbler cool for at least 10 minutes before serving to allow the juices to thicken slightly.
Fresh from the oven, this cobbler offers a delightful contrast between the crisp, buttery topping and the soft, syrupy blueberries beneath. Serve it warm with a scoop of vanilla ice cream for a comforting dessert that feels like home.
Cast Iron Garlic Parmesan Knots
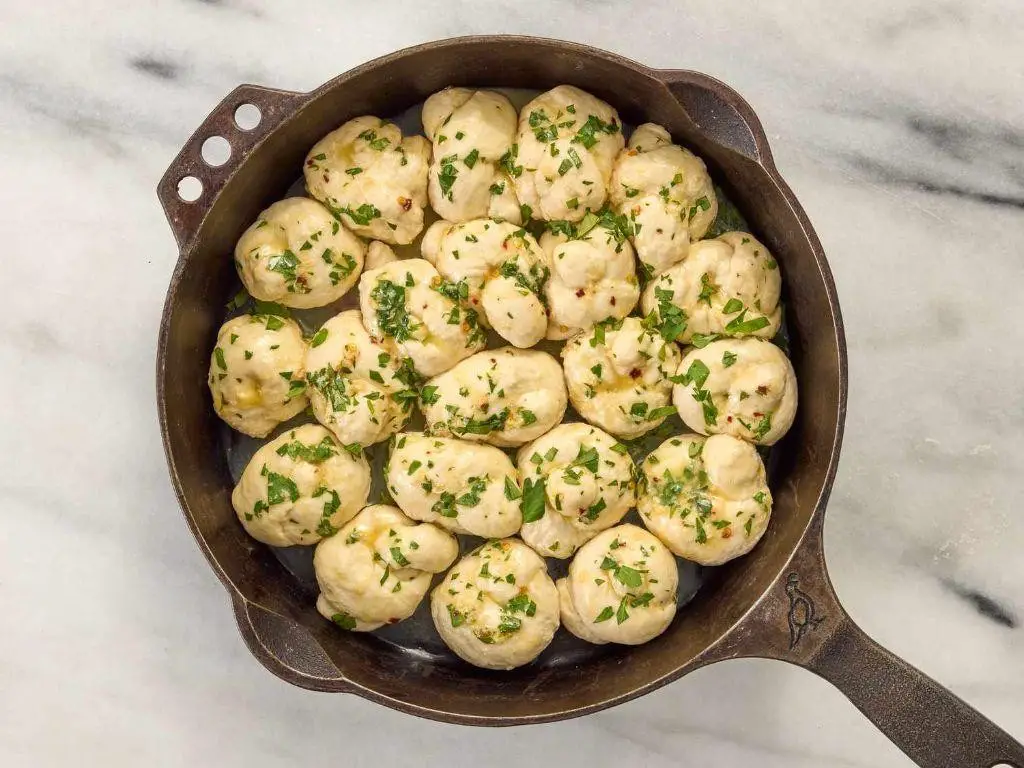
Sometimes, the simplest ingredients come together to create something unexpectedly magical, like these Cast Iron Garlic Parmesan Knots. Soft, buttery, and infused with the rich flavors of garlic and Parmesan, they’re a humble yet irresistible treat that feels like a warm hug.
Ingredients
- 1 cup warm water (110°F)
- 2 1/4 tsp active dry yeast
- 1 tbsp granulated sugar
- 2 1/2 cups all-purpose flour
- 1 tsp salt
- 2 tbsp unsalted butter, melted
- 3 cloves garlic, minced
- 1/4 cup grated Parmesan cheese
- 1 tbsp olive oil
- 1/2 tsp dried parsley
Instructions
- In a large bowl, combine warm water, yeast, and sugar. Let sit for 5 minutes until frothy.
- Add flour and salt to the yeast mixture, stirring until a dough forms.
- Turn dough onto a floured surface and knead for 5 minutes until smooth and elastic.
- Place dough in a greased bowl, cover with a towel, and let rise in a warm place for 1 hour until doubled in size.
- Preheat oven to 375°F and lightly grease a cast iron skillet.
- Divide dough into 12 equal pieces, rolling each into a 6-inch rope and tying into a knot.
- Arrange knots in the skillet, cover, and let rise for 20 minutes.
- Brush knots with melted butter and bake for 15 minutes until golden brown.
- In a small bowl, mix minced garlic, Parmesan, olive oil, and parsley. Brush over warm knots.
- Return to oven for 5 minutes until cheese is melted and fragrant.
The knots emerge with a crisp exterior giving way to a tender, fluffy interior, each bite bursting with garlicky goodness. Serve them straight from the skillet for a rustic touch, or alongside a marinara dip for an extra layer of flavor.
Cast Iron Honey Glazed Carrots
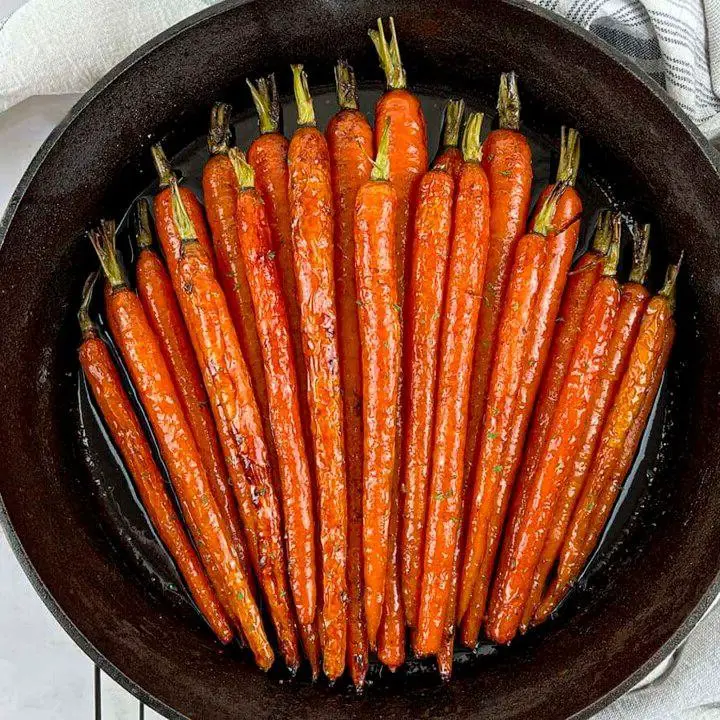
Wandering through the farmer’s market this morning, the vibrant hues of fresh carrots caught my eye, inspiring a simple yet deeply flavorful side dish. The cast iron skillet, a trusty companion in my kitchen, seemed the perfect vessel to transform these humble roots into something golden and glazed, with a touch of honey sweetness.
Ingredients
- 1 lb carrots, peeled and trimmed
- 2 tbsp unsalted butter
- 2 tbsp honey
- 1/2 tsp salt
- 1/4 tsp black pepper
- 1/4 cup water
Instructions
- Preheat your cast iron skillet over medium heat for 5 minutes to ensure even cooking.
- Add 2 tbsp unsalted butter to the skillet, allowing it to melt and coat the bottom evenly.
- Place 1 lb peeled and trimmed carrots in the skillet, arranging them in a single layer for optimal browning.
- Sprinkle 1/2 tsp salt and 1/4 tsp black pepper over the carrots, tossing gently to coat.
- Cook the carrots for 5 minutes without stirring to allow a golden crust to form, then stir and continue cooking for another 5 minutes.
- Add 1/4 cup water to the skillet, covering immediately to steam the carrots for 3 minutes until slightly tender.
- Remove the lid, drizzle 2 tbsp honey over the carrots, and stir to coat evenly. Cook for an additional 2 minutes until the glaze thickens and the carrots are caramelized.
- Transfer the carrots to a serving dish, scraping any remaining glaze from the skillet to drizzle over the top.
Just out of the skillet, these carrots boast a perfect balance of tender and crisp, with the honey glaze lending a glossy finish and a whisper of sweetness. Serve them alongside a roasted chicken or fold into a grain bowl for a pop of color and flavor that delights the senses.
Cast Iron Jalapeno Cornbread
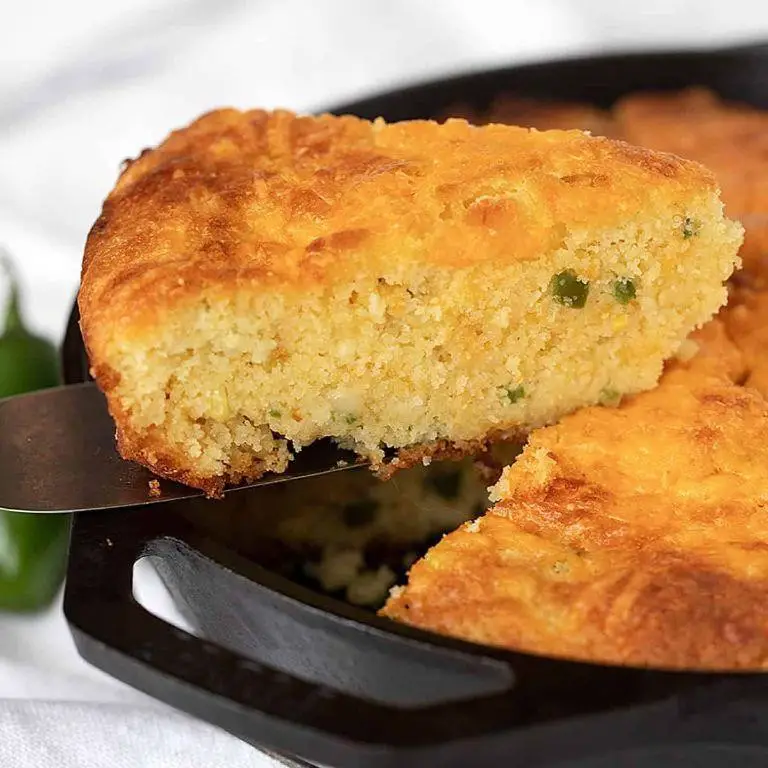
Venturing into the heart of comfort food, this recipe brings a spicy twist to a classic favorite, perfect for those moments when you crave warmth with a kick. The cast iron skillet not only ensures a beautifully golden crust but also keeps the cornbread moist and tender inside.
Ingredients
- 1 cup cornmeal
- 1 cup all-purpose flour
- 1 tbsp baking powder
- 1/2 tsp salt
- 1 cup milk
- 1/4 cup honey
- 1 large egg
- 1/4 cup unsalted butter, melted
- 2 jalapenos, finely diced
- 1/2 cup shredded cheddar cheese
Instructions
- Preheat your oven to 400°F and place a 10-inch cast iron skillet inside to heat.
- In a large bowl, whisk together 1 cup cornmeal, 1 cup all-purpose flour, 1 tbsp baking powder, and 1/2 tsp salt.
- In another bowl, mix 1 cup milk, 1/4 cup honey, 1 large egg, and 1/4 cup melted unsalted butter until well combined.
- Pour the wet ingredients into the dry ingredients, stirring just until combined. Overmixing can lead to dense cornbread.
- Carefully remove the hot skillet from the oven and lightly grease it with butter or oil.
- Fold 2 finely diced jalapenos and 1/2 cup shredded cheddar cheese into the batter, then pour into the prepared skillet.
- Bake for 20-25 minutes, or until the top is golden and a toothpick inserted in the center comes out clean.
- Let the cornbread cool in the skillet for 5 minutes before slicing to allow it to set properly.
Unbelievably moist with a crisp exterior, this cornbread strikes a delightful balance between sweet and spicy. Serve it warm with a dollop of honey butter or alongside a bowl of chili for a comforting meal.
Cast Iron Lemon Garlic Salmon
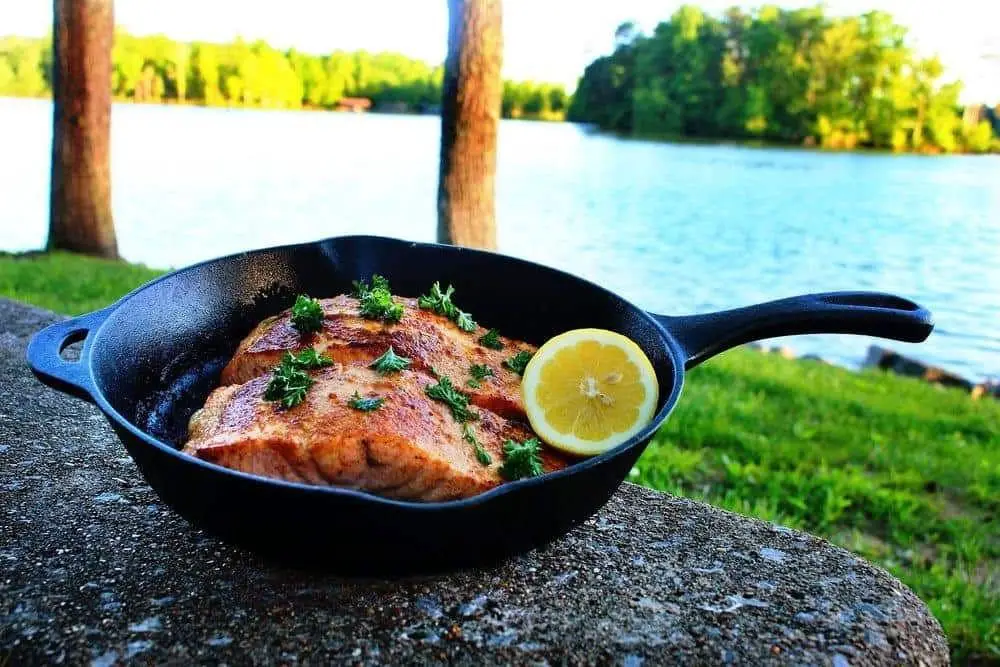
Calmly, as the morning light filters through the kitchen window, the thought of preparing a meal that feels both nourishing and indulgent comes to mind. Cast iron lemon garlic salmon, with its vibrant flavors and simple elegance, seems like the perfect choice for a reflective cooking session.
Ingredients
- 1.5 lbs salmon fillet
- 2 tbsp olive oil
- 3 cloves garlic, minced
- 1 lemon, thinly sliced
- 1 tsp salt
- 1/2 tsp black pepper
- 1/4 cup fresh parsley, chopped
Instructions
- Preheat your cast iron skillet over medium heat for 5 minutes to ensure even cooking.
- Pat the salmon fillet dry with paper towels to remove excess moisture, which helps achieve a better sear.
- Drizzle olive oil over the salmon, then season both sides with salt and black pepper.
- Place the salmon skin-side down in the skillet, cooking for 4 minutes without moving to get a crispy skin.
- Flip the salmon carefully, then add minced garlic and lemon slices around the fillet, cooking for another 4 minutes.
- Sprinkle chopped parsley over the salmon during the last minute of cooking for a fresh flavor boost.
- Remove the skillet from heat and let the salmon rest for 2 minutes before serving to allow the juices to redistribute.
With its perfectly crispy skin and tender, flaky interior, this salmon is a delight. The bright acidity of the lemon and the aromatic garlic create a harmonious balance, making it ideal served over a bed of quinoa or alongside roasted vegetables for a complete meal.
Cast Iron Mushroom and Spinach Quiche
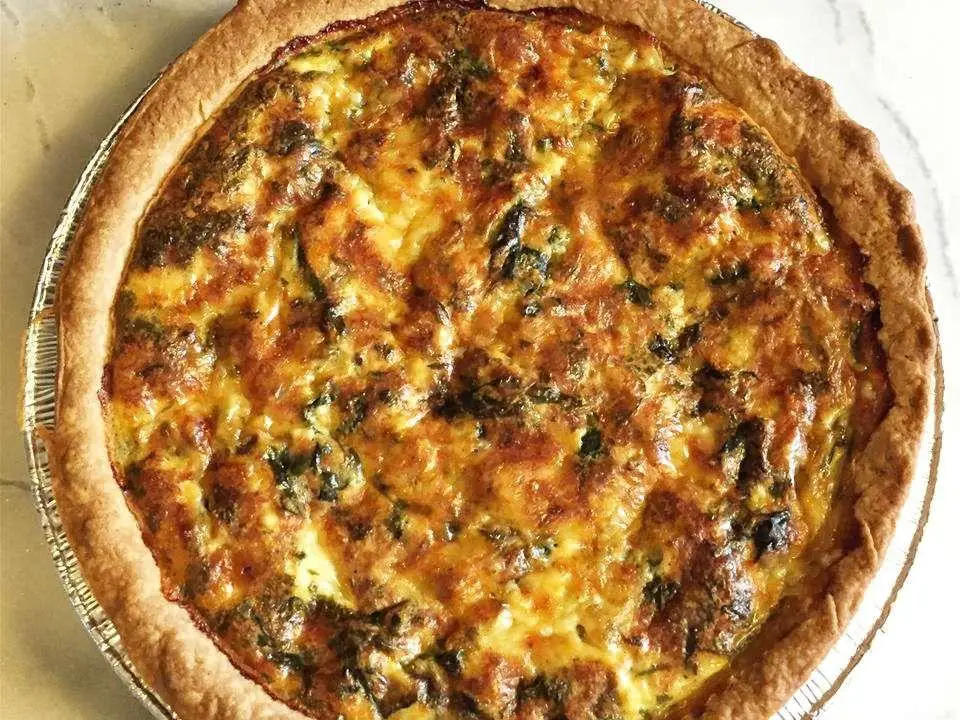
Venturing into the kitchen this quiet morning, I find myself drawn to the comforting embrace of a dish that marries the earthy depth of mushrooms with the tender whisper of spinach, all cradled in the golden, flaky arms of a quiche. It’s a recipe that feels like a gentle nod to the slow, meandering days of early summer.
Ingredients
- 1 9-inch pie crust
- 1 tbsp olive oil
- 1 cup sliced mushrooms
- 2 cups fresh spinach
- 4 large eggs
- 1 cup heavy cream
- 1/2 tsp salt
- 1/4 tsp black pepper
- 1/2 cup shredded Gruyère cheese
Instructions
- Preheat the oven to 375°F (190°C).
- Heat olive oil in a cast iron skillet over medium heat. Add mushrooms and sauté until golden, about 5 minutes.
- Add spinach to the skillet and cook until just wilted, about 2 minutes. Remove from heat and let cool slightly.
- In a large bowl, whisk together eggs, heavy cream, salt, and pepper until smooth.
- Stir the mushroom and spinach mixture into the egg mixture. Fold in Gruyère cheese.
- Pour the mixture into the pie crust, spreading evenly.
- Bake for 35-40 minutes, or until the quiche is set and the top is lightly golden.
- Let the quiche cool for 10 minutes before slicing.
Perfectly balanced between creamy and crisp, this quiche sings with the rustic charm of its cast iron beginnings. Serve it warm, with a side of lightly dressed greens, or let it stand as the star of your next brunch gathering.
Conclusion
Delightful flavors await in every season with these 18 cast iron recipes, perfect for home cooks looking to explore the versatility of their skillet. Whether you’re craving cozy winter meals or fresh summer dishes, there’s something here for everyone. We’d love to hear which recipes become your favorites—drop us a comment below! Don’t forget to share the love by pinning this article on Pinterest for fellow cooking enthusiasts to enjoy.

Michael Johnson is the founder of Pan Mastery, Inspired by his blacksmith grandfather’s legacy has a deep appreciation for hand-crafted pots and pans, he provides invaluable guides, reviews, and recipes to enhance your culinary journey.