Holiday cheer is in the air, and what better way to spread joy than through the magic of Christmas cooking? Whether you’re whipping up a storm for a crowd or crafting cozy meals for your nearest and dearest, our roundup of 20 Delicious Christmas Recipes is your ticket to festive feasting. From timeless classics to creative twists, these dishes are sure to make your celebrations extra special. Let’s dive in!
Roast Turkey with Herb Butter

Turkey day just got a whole lot tastier with this Roast Turkey slathered in herb butter that’s so good, it’ll have your guests forgetting there’s even a side dish. Perfect for those who like their bird juicy, their flavors bold, and their kitchen smelling like a gourmet restaurant.
Ingredients
- 1 whole turkey, 12-14 lbs (thawed if frozen, because ice-cold turkey is a no-go)
- 1 cup unsalted butter, softened (or margarine for the dairy-averse)
- 2 tbsp chopped fresh rosemary (dried works in a pinch, but fresh is chef’s kiss)
- 2 tbsp chopped fresh thyme (see rosemary note)
- 1 tbsp chopped fresh sage (because sage and turkey are BFFs)
- 1 tsp salt (adjust to taste, but don’t be shy)
- 1 tsp black pepper (freshly ground if you’re fancy)
Instructions
- Preheat your oven to 325°F (163°C) – no peeking until it’s ready!
- In a bowl, mix softened butter, rosemary, thyme, sage, salt, and pepper until it’s as blended as a perfect smoothie.
- Pat the turkey dry with paper towels (inside and out) because nobody likes a wet bird.
- Gently loosen the skin over the turkey breast and thighs with your fingers, then spread half of the herb butter underneath the skin for maximum flavor infiltration.
- Rub the remaining butter all over the outside of the turkey, because it deserves a spa day too.
- Place the turkey on a rack in a roasting pan, breast side up, and roast for about 3 to 3.5 hours, or until a meat thermometer reads 165°F (74°C) in the thickest part of the thigh.
- Let the turkey rest for 20 minutes before carving – patience is a virtue, especially when juicy turkey is at stake.
Every bite of this Roast Turkey with Herb Butter is a symphony of juicy, herby goodness, with a skin so crispy it’ll have you fighting over the last piece. Serve it up with a side of drama by carving at the table, or keep it casual and let everyone dig in family-style.
Honey Glazed Ham
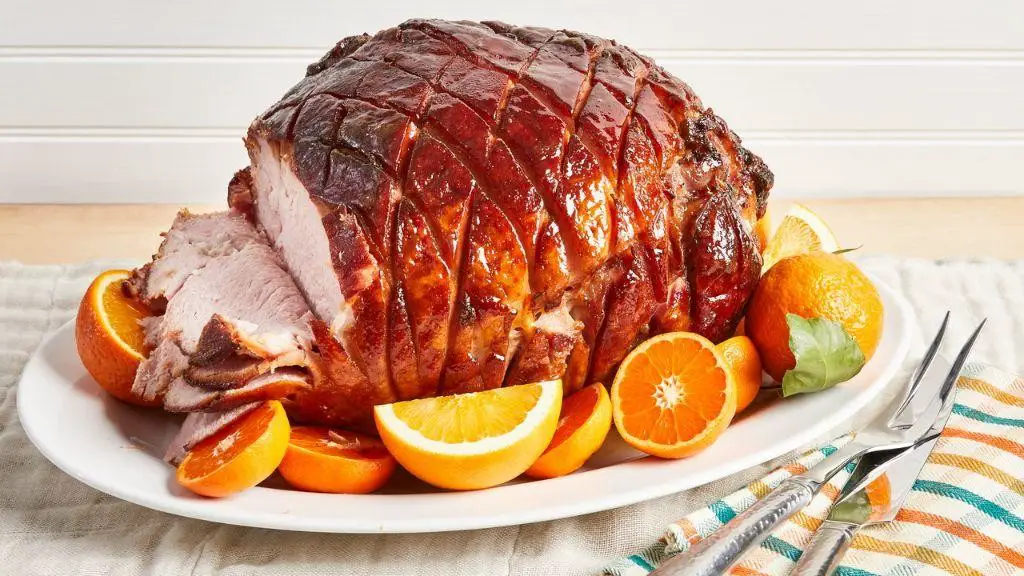
So, you’ve decided to take on the culinary challenge of making a Honey Glazed Ham that’ll have your guests thinking you’ve secretly trained under a gourmet chef. Fear not, for this recipe is as foolproof as it is delicious, promising a perfect balance of sweet and savory with every bite.
Ingredients
- 1 (8-10 lb) fully cooked, bone-in ham (because size does matter when it comes to leftovers)
- 1 cup honey (the stickier, the better for that glossy finish)
- 1/2 cup brown sugar (for that deep, caramelized goodness)
- 1/4 cup Dijon mustard (or yellow mustard if you’re playing it safe)
- 2 tbsp apple cider vinegar (to cut through the sweetness like a boss)
- 1 tsp ground cloves (just a pinch to spice things up)
Instructions
- Preheat your oven to 325°F (because patience is a virtue, especially in baking).
- Place the ham on a rack in a roasting pan, fat side up (this isn’t a drill; the fat side must face the heavens).
- Score the ham in a diamond pattern about 1/2 inch deep (think of it as giving your ham a fancy sweater).
- In a saucepan over medium heat, whisk together honey, brown sugar, Dijon mustard, apple cider vinegar, and ground cloves until smooth (this is where the magic starts).
- Brush half of the glaze over the ham, making sure to get into all those nooks and crannies (glaze it like you mean it).
- Bake for 1.5 hours, brushing with the remaining glaze every 30 minutes (this is your workout for the day).
- Let the ham rest for 15 minutes before slicing (resisting the urge to dive in now will pay off).
Perfectly glazed with a sticky-sweet crust and juicy interior, this ham is a showstopper. Serve it up with a side of roasted veggies or slap it between two slices of bread for the ultimate leftover sandwich. Either way, you’re winning at life.
Classic Beef Wellington

Yikes! If you’re looking to impress at your next dinner party or just treat yourself to something spectacular, this Classic Beef Wellington is your golden ticket. It’s like the James Bond of dishes—suave, sophisticated, and with a bit of a secret (hint: it’s all about that puff pastry).
Ingredients
- 2 lbs beef tenderloin (center-cut, trimmed)
- 2 tbsp Dijon mustard (for that tangy kick)
- 1 lb mushrooms (cremini or button, finely chopped)
- 2 tbsp unsalted butter (because everything’s better with butter)
- 1 sheet puff pastry (thawed, but keep it cool)
- 6 slices prosciutto (thinly sliced, for a salty embrace)
- 1 egg (beaten, for that golden shine)
- Salt and pepper (to taste, but don’t be shy)
Instructions
- Preheat your oven to 425°F (220°C)—no lukewarm efforts here.
- Season the beef tenderloin generously with salt and pepper. Sear it in a hot pan for 2 minutes per side until it’s got a nice crust. Let it cool, then brush with Dijon mustard.
- In the same pan, melt butter over medium heat. Add mushrooms, cooking until they’ve released their moisture and it’s evaporated, about 10 minutes. Season with salt and pepper.
- Lay out a piece of plastic wrap. Arrange the prosciutto slices slightly overlapping on top. Spread the mushroom mixture over the prosciutto, then place the beef in the center. Roll it up tightly using the plastic wrap, and chill for 15 minutes.
- Roll out the puff pastry on a floured surface. Unwrap the beef bundle and place it in the center of the pastry. Fold the pastry over the beef, sealing the edges with egg wash. Brush the outside with more egg wash.
- Bake on a parchment-lined tray for 25-30 minutes until the pastry is golden and puffed. Let it rest for 10 minutes before slicing.
So there you have it—a Beef Wellington that’s crispy on the outside, tender in the middle, and downright show-stopping. Serve it with a side of roasted veggies or a bold red wine, and watch as your dining companions swoon.
Garlic Mashed Potatoes
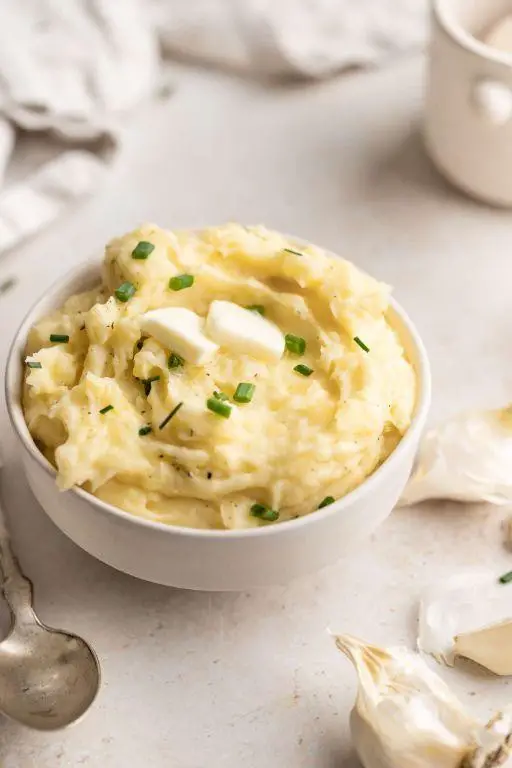
Every forkful of these Garlic Mashed Potatoes is like a fluffy cloud of comfort, with just enough garlic to keep things interesting (and vampires at bay). Perfect for when you need to carb-load like an Olympian or just drown your sorrows in buttery goodness.
Ingredients
- 2 lbs Yukon Gold potatoes (peeled and quartered for quicker cooking)
- 4 cloves garlic (minced, because we’re not vampires)
- 1/2 cup heavy cream (or milk for a lighter version)
- 4 tbsp unsalted butter (because salted is a crime against potatoes)
- 1 tsp salt (adjust to taste, but don’t be shy)
- 1/2 tsp black pepper (freshly ground, please)
Instructions
- Place the quartered potatoes in a large pot and cover with cold water by 1 inch. Bring to a boil over high heat, then reduce to a simmer. Cook for 15-20 minutes, or until the potatoes are fork-tender.
- While the potatoes cook, melt the butter in a small saucepan over medium heat. Add the minced garlic and sauté for 1-2 minutes, just until fragrant. Remove from heat and set aside.
- Drain the potatoes well and return them to the pot. Let them sit for a minute to evaporate any excess moisture.
- Mash the potatoes with a potato masher or ricer until smooth. Tip: For extra fluffy potatoes, don’t overwork them.
- Heat the heavy cream in the microwave for 30 seconds, then gradually mix it into the potatoes along with the garlic butter, salt, and pepper. Tip: Warm cream blends better and keeps the potatoes hot.
- Continue mashing until all ingredients are fully incorporated and the potatoes reach your desired consistency. Tip: If the mash is too thick, add a splash more cream.
Now, these Garlic Mashed Potatoes are so velvety and rich, they might just steal the spotlight from your main dish. Serve them topped with a pat of butter and a sprinkle of chives for a picture-perfect finish, or go rogue and mix in some roasted garlic for an extra punch.
Green Bean Casserole
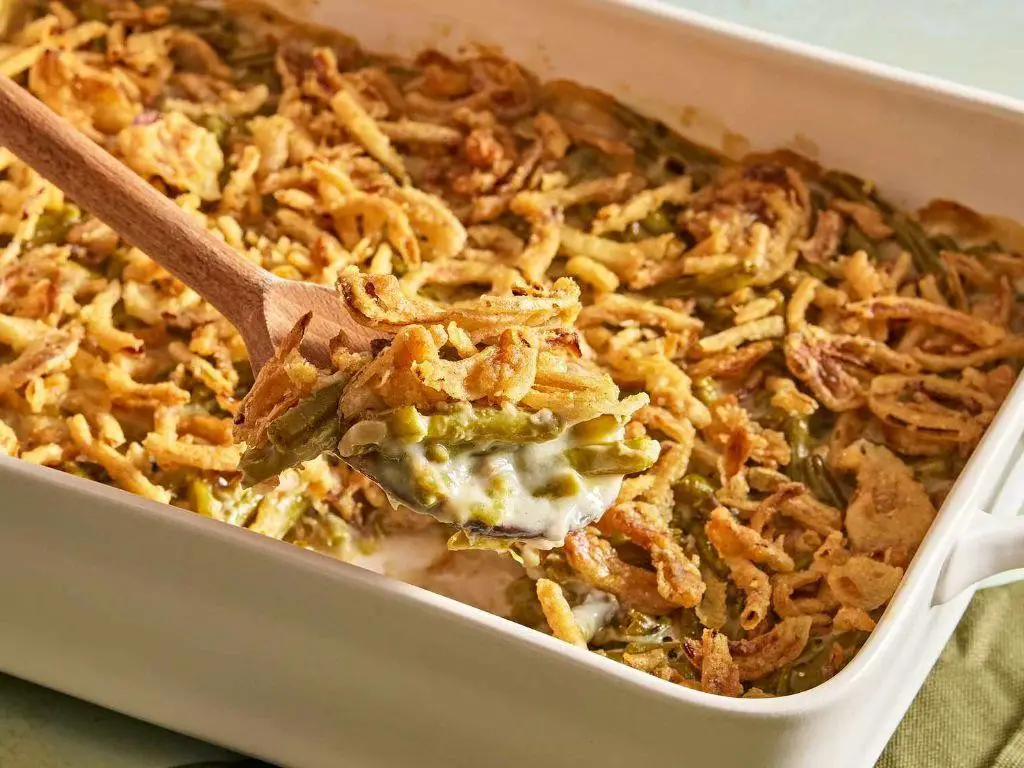
Today’s the day we jazz up those humble green beans into something that’ll have your taste buds doing the cha-cha. Green Bean Casserole isn’t just a side dish; it’s a creamy, crunchy, flavor-packed party on your plate.
Ingredients
- 1 lb fresh green beans, trimmed and halved (or frozen for a shortcut)
- 1 can (10.5 oz) condensed cream of mushroom soup (go for the low-sodium kind if you’re watching salt)
- 1/2 cup milk (whole milk makes it extra creamy)
- 1 tsp soy sauce (a dash more if you’re feeling adventurous)
- 1/8 tsp black pepper (because every dish needs a little kick)
- 1 1/3 cups French fried onions (the more, the merrier)
Instructions
- Preheat your oven to 350°F (175°C) – no peeking until it’s fully heated!
- In a large mixing bowl, whisk together the cream of mushroom soup, milk, soy sauce, and black pepper until smooth. Tip: A fork works wonders here for breaking up any soup lumps.
- Add the green beans to the bowl and toss until they’re evenly coated with the soup mixture. Tip: If using frozen green beans, no need to thaw – they’ll cook perfectly in the oven.
- Transfer the mixture to a 1 1/2-quart baking dish, spreading it out evenly. Tip: A glass dish gives you a sneak peek at the bubbling goodness.
- Sprinkle the French fried onions evenly over the top. Yes, it’s okay to sneak a few – we won’t tell.
- Bake for 25-30 minutes, or until the casserole is bubbling around the edges and the onions are golden brown. Tip: For extra crunch, broil for the last 2 minutes, but watch closely to avoid burning.
Unbelievably easy, right? This casserole comes out with a velvety center, a crispy top, and green beans that are just tender enough to hold their own. Serve it straight from the oven when it’s at its most dramatic – steam rising, onions crackling – and watch it disappear before your eyes.
Roasted Brussels Sprouts with Bacon
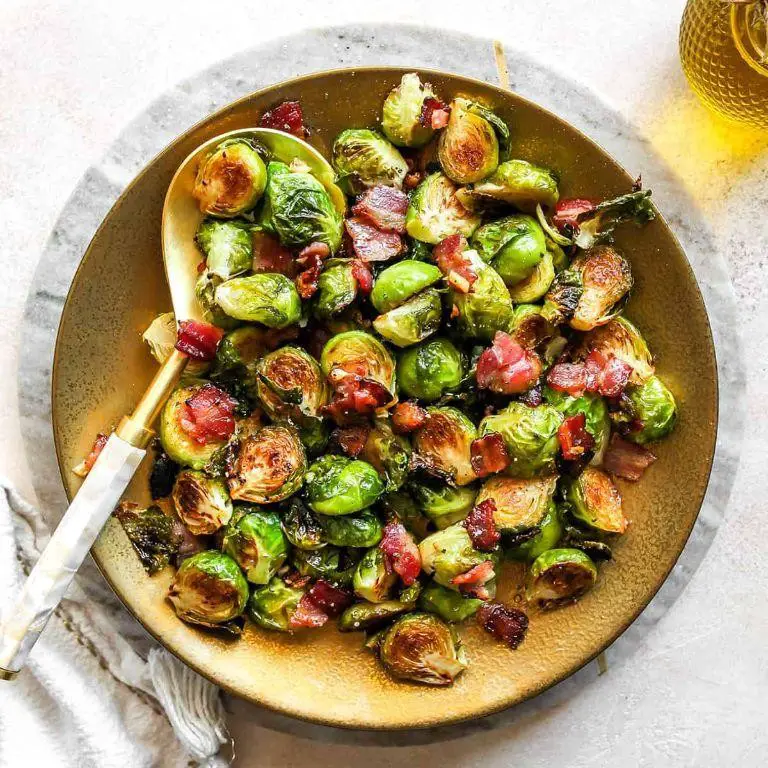
Ready to turn those often-overlooked Brussels sprouts into the star of your dinner table? Let’s toss them with some crispy bacon and a dash of love to create a dish that’ll make even the skeptics ask for seconds.
Ingredients
- 1 lb Brussels sprouts, trimmed and halved (smaller ones can stay whole)
- 4 slices thick-cut bacon, chopped (because everything’s better with bacon)
- 2 tbsp olive oil (or any neutral oil you have on hand)
- 1/2 tsp salt (adjust to taste, but don’t be shy)
- 1/4 tsp black pepper (freshly ground if you’re feeling fancy)
- 1 tbsp maple syrup (for a sweet surprise)
Instructions
- Preheat your oven to 400°F (200°C) – no peeking until it’s hot!
- On a baking sheet, toss the Brussels sprouts with olive oil, salt, and pepper until they’re evenly coated. Tip: Spread them out in a single layer for maximum crispiness.
- Scatter the chopped bacon over the sprouts. Yes, it’s as glorious as it sounds.
- Roast in the preheated oven for 20 minutes, then give everything a good stir. Tip: This is the perfect time to sneak a piece of bacon – for quality control, of course.
- Drizzle the maple syrup over the top and roast for another 10 minutes, or until the sprouts are tender and the bacon is crispy. Tip: Keep an eye out during the last few minutes to prevent any bacon casualties.
Unbelievably crispy on the outside, tender on the inside, and packed with a smoky-sweet flavor that’s downright addictive. Serve these beauties straight from the oven, or get creative by topping them with a fried egg for a breakfast twist.
Cranberry Sauce with Orange Zest
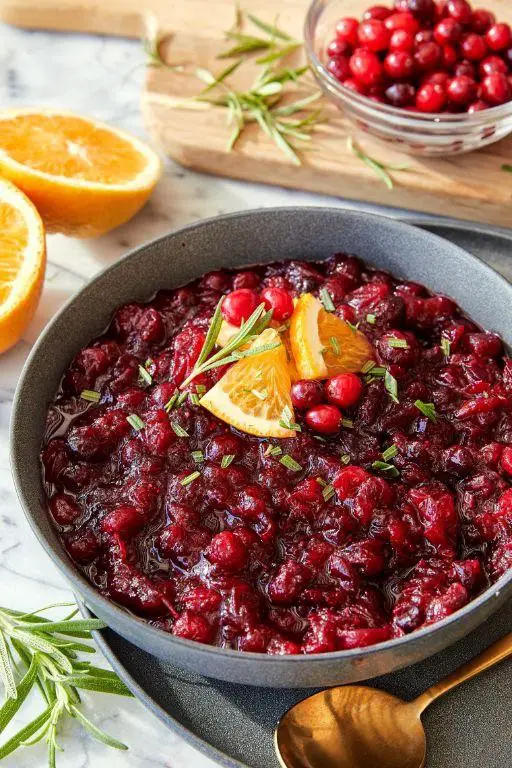
Let’s face it, cranberry sauce is the underdog of holiday sides—until now. With a zesty twist of orange, this recipe transforms the humble condiment into a show-stopping star that’ll have your guests begging for the recipe.
Ingredients
- 12 oz fresh cranberries (or frozen, but fresh is best for texture)
- 1 cup granulated sugar (adjust to taste if you prefer less sweet)
- 1/2 cup water (just enough to get things bubbling)
- 1 tbsp orange zest (the secret weapon for brightness)
- 1/4 tsp salt (to balance the sweetness)
Instructions
- In a medium saucepan, combine cranberries, sugar, water, and salt. Stir to mix.
- Bring the mixture to a boil over medium-high heat, then reduce to a simmer. Watch for the cranberries to pop—about 10 minutes—stirring occasionally.
- Once most cranberries have burst, remove from heat and stir in the orange zest. Tip: The zest adds a fragrant punch, so don’t skip it!
- Let the sauce cool to room temperature; it will thicken as it cools. Tip: For a smoother sauce, press through a fine mesh sieve.
- Transfer to a serving bowl and refrigerate until ready to serve. Tip: Make it a day ahead to let the flavors meld beautifully.
A spoonful of this cranberry sauce is like a burst of holiday cheer—tangy, sweet, and with just the right amount of zest. Serve it alongside your turkey, or get creative by swirling it into yogurt or spreading it on toast for a festive breakfast twist.
Pumpkin Pie with Whipped Cream
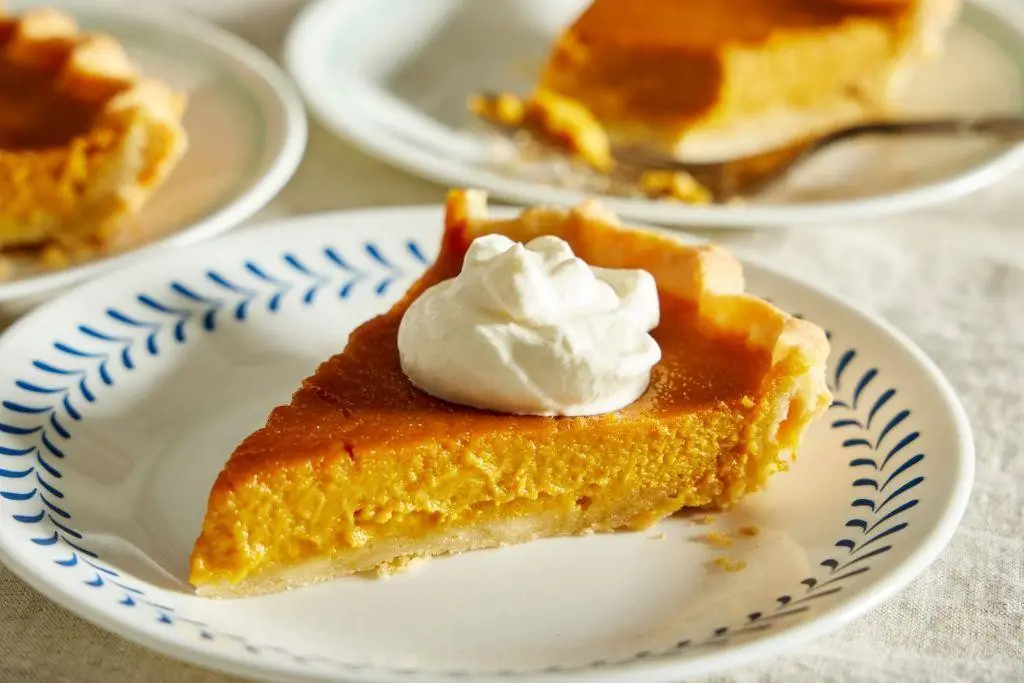
Gather ’round, pie enthusiasts and pumpkin lovers alike, because we’re about to dive into a dessert that’s as essential to fall as forgetting where you put your favorite sweater. This pumpkin pie with whipped cream is the cozy hug your taste buds have been dreaming of, and the best part? It’s ridiculously easy to make.
Ingredients
- 1 15-ounce can pumpkin puree (not pumpkin pie filling)
- 3/4 cup granulated sugar (adjust to sweetness preference)
- 1/2 teaspoon salt (enhances all the flavors)
- 1 teaspoon ground cinnamon (the more, the merrier)
- 1/2 teaspoon ground ginger (for a little kick)
- 1/4 teaspoon ground cloves (just a pinch goes a long way)
- 2 large eggs (room temperature blends better)
- 1 cup evaporated milk (for that creamy texture)
- 1 unbaked 9-inch pie crust (homemade or store-bought, no judgment here)
- 1 cup heavy cream (chilled, for the whipped cream)
- 2 tablespoons powdered sugar (for sweetening the whipped cream)
- 1 teaspoon vanilla extract (because vanilla makes everything better)
Instructions
- Preheat your oven to 425°F (220°C). A hot oven is key to a perfectly set pie.
- In a large bowl, whisk together the pumpkin puree, sugar, salt, cinnamon, ginger, and cloves until smooth. Tip: Taste the mixture and adjust spices if needed.
- Beat in the eggs one at a time, then gradually stir in the evaporated milk until fully incorporated. Tip: Don’t overmix to keep the filling light.
- Pour the filling into the unbaked pie crust. Smooth the top with a spatula for an even bake.
- Bake at 425°F for 15 minutes, then reduce the temperature to 350°F (175°C) and continue baking for 40-50 minutes, or until a knife inserted near the center comes out clean. Tip: Shield the crust edges with foil if they start browning too quickly.
- Let the pie cool on a wire rack for at least 2 hours. It’ll continue to set as it cools.
- For the whipped cream, beat the heavy cream, powdered sugar, and vanilla extract on high speed until stiff peaks form. Tip: Chill your bowl and beaters for quicker whipping.
- Serve the pie with a generous dollop of whipped cream on top.
Delight in the silky smooth texture of the pie, where the spices dance perfectly with the creamy pumpkin filling. For an extra festive touch, sprinkle a little cinnamon on top of the whipped cream or serve with a side of caramel sauce for dipping.
Peppermint Chocolate Cookies
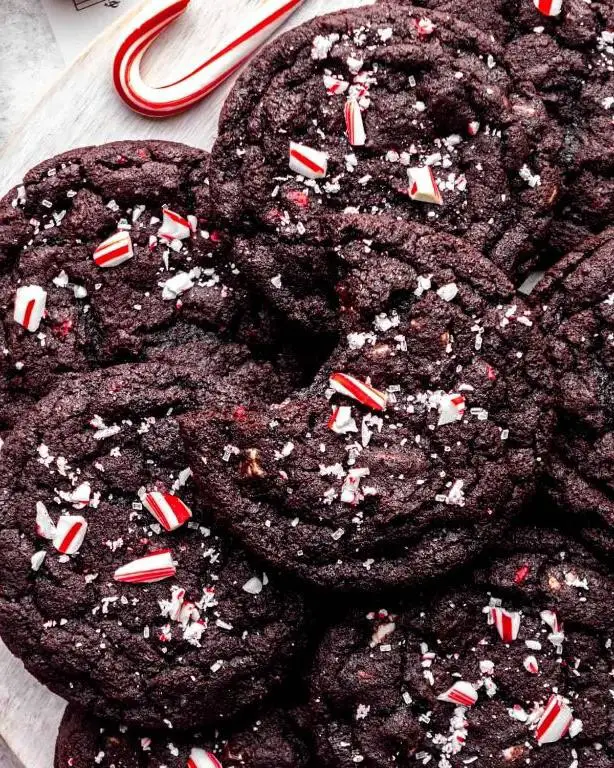
Now, who said cookies can’t be festive and fancy at the same time? These Peppermint Chocolate Cookies are here to prove the naysayers wrong, combining the cool kick of peppermint with the rich, decadent embrace of chocolate. Perfect for holiday gatherings or when you’re just feeling extra, these cookies are a bite-sized celebration.
Ingredients
- 1 cup all-purpose flour (for a lighter texture, sift it)
- 1/2 cup unsweetened cocoa powder (the darker, the better)
- 1/2 tsp baking soda (freshness matters)
- 1/4 tsp salt (balances the sweetness)
- 1/2 cup unsalted butter, softened (room temp is key)
- 3/4 cup granulated sugar (for that perfect crunch)
- 1 large egg (bring to room temp for even mixing)
- 1 tsp peppermint extract (adjust to taste)
- 1/2 cup crushed peppermint candies (for that festive crunch)
- 1 cup semi-sweet chocolate chips (because more chocolate is always better)
Instructions
- Preheat your oven to 350°F (175°C) and line a baking sheet with parchment paper.
- In a medium bowl, whisk together the flour, cocoa powder, baking soda, and salt. Tip: Sifting the dry ingredients prevents lumps.
- In a large bowl, beat the softened butter and granulated sugar until light and fluffy, about 2 minutes. Tip: Don’t rush this step; it’s crucial for texture.
- Add the egg and peppermint extract to the butter mixture, beating until fully incorporated.
- Gradually mix in the dry ingredients until just combined. Tip: Overmixing leads to tough cookies.
- Fold in the crushed peppermint candies and chocolate chips.
- Drop tablespoon-sized balls of dough onto the prepared baking sheet, spacing them 2 inches apart.
- Bake for 10-12 minutes, or until the edges are set but the centers are still soft. Tip: They’ll firm up as they cool.
- Let the cookies cool on the baking sheet for 5 minutes before transferring to a wire rack.
Absolutely irresistible, these cookies boast a crisp edge with a chewy center, packed with bursts of peppermint and rivers of melted chocolate. Serve them stacked high on a vintage plate for a touch of whimsy, or alongside a glass of cold milk for the ultimate comfort combo.
Gingerbread House

Craving a festive project that doubles as a delicious centerpiece? This gingerbread house is your ticket to holiday glory, combining the joy of baking with the thrill of architecture (edible architecture, that is).
Ingredients
- 3 cups all-purpose flour (spooned and leveled)
- 1/2 cup unsalted butter, softened (or margarine for a dairy-free option)
- 1/2 cup brown sugar, packed (light or dark, depending on your flavor preference)
- 1 tbsp ground ginger (adjust to taste for more or less spice)
- 1 tbsp ground cinnamon (because it’s not gingerbread without it)
- 1/2 tsp baking soda (for that perfect rise)
- 1/2 cup molasses (the secret to deep, rich flavor)
- 1 large egg (room temperature for best results)
- Royal icing (for assembling and decorating, homemade or store-bought)
Instructions
- Preheat your oven to 350°F (175°C) and line baking sheets with parchment paper.
- In a large bowl, cream together the butter and brown sugar until light and fluffy, about 3 minutes. Tip: Scrape down the sides of the bowl to ensure everything is evenly mixed.
- Beat in the egg and molasses until well combined. The mixture should look homogenous and slightly glossy.
- In a separate bowl, whisk together the flour, ginger, cinnamon, and baking soda. Gradually add this to the wet ingredients, mixing until a stiff dough forms. Tip: If the dough feels too sticky, chill it for 30 minutes to make rolling easier.
- Roll out the dough on a lightly floured surface to about 1/4-inch thickness. Cut into shapes for your house’s walls, roof, and any other desired pieces.
- Bake for 10-12 minutes, or until the edges are just starting to darken. Let cool completely on the baking sheets. Tip: For extra crisp edges, leave in the turned-off oven for an additional 5 minutes after baking.
- Once cool, use royal icing to assemble your gingerbread house, holding each piece in place until the icing sets. Decorate as desired with more icing and candies.
Voilà! You’ve just crafted a gingerbread masterpiece that’s as sturdy as it is scrumptious. The spicy-sweet aroma alone is worth the effort, but the real magic happens when you break off a piece and savor the crisp texture and deep molasses flavor. Serve it as a show-stopping dessert at your next holiday gathering, or gift it to someone special—just be prepared for requests to make it an annual tradition.
Eggnog Cheesecake
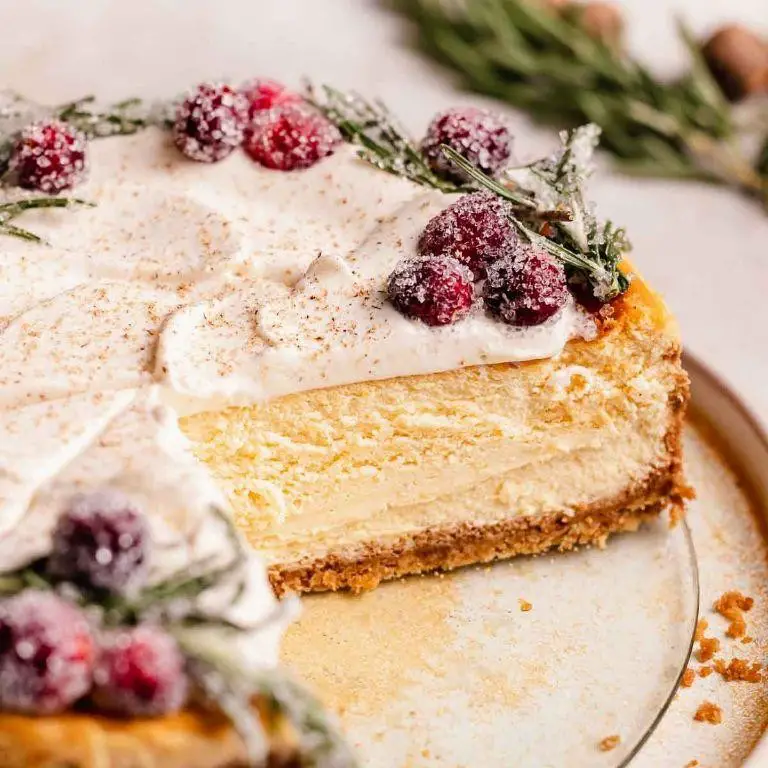
Brace yourselves, dessert lovers, because we’re about to dive fork-first into the creamiest, dreamiest Eggnog Cheesecake you’ve ever laid eyes on. This holiday season, your taste buds are in for a treat that’s as festive as it is delicious.
Ingredients
- 2 cups graham cracker crumbs (store-bought or crush your own for extra love)
- 1/2 cup unsalted butter, melted (because everything’s better with butter)
- 1/4 cup granulated sugar (for that sweet, sweet base)
- 4 packages (8 oz each) cream cheese, softened (room temp is key for smoothness)
- 1 cup granulated sugar (yes, more sugar, we’re not judging)
- 1/4 cup all-purpose flour (the unsung hero of structure)
- 1 cup eggnog (the star of the show, go for the good stuff)
- 4 large eggs (farm-fresh if you’re feeling fancy)
- 1 tsp vanilla extract (pure, for the love of flavor)
- 1/2 tsp ground nutmeg (plus extra for garnish, because we’re extra)
Instructions
- Preheat your oven to 325°F (163°C) and grease a 9-inch springform pan. Trust us, you don’t want to skip the greasing.
- In a bowl, mix graham cracker crumbs, melted butter, and 1/4 cup sugar until it resembles wet sand. Press firmly into the bottom of the pan for a crust that won’t crumble under pressure.
- Beat the cream cheese and 1 cup sugar on medium speed until smooth. Tip: Scrape the bowl often to avoid lumpy disappointments.
- Add flour and mix just until combined. Overmixing is the enemy of fluffy cheesecake.
- Pour in eggnog, eggs, vanilla, and nutmeg, mixing until smooth. The batter should be silky, like your favorite holiday pajamas.
- Pour the filling over the crust and smooth the top. Bake for 55-60 minutes until the edges are set but the center slightly jiggles, like a festive belly laugh.
- Turn off the oven, crack the door, and let the cheesecake cool inside for 1 hour to prevent cracks. Patience is a virtue, especially in cheesecake.
- Chill in the fridge for at least 4 hours, though overnight is better. Good things come to those who wait.
Silky, rich, and bursting with holiday spirit, this Eggnog Cheesecake is a showstopper. Serve it with a dusting of nutmeg or a dollop of whipped cream for that extra ‘wow’ factor at your next gathering.
Mulled Wine

Venture into the cozy embrace of winter with a mug of mulled wine, your liquid hug in a cup that’s as easy to make as it is to love. This spiced sip is the perfect blend of warmth, sweetness, and a hint of citrusy zing—ideal for those nights when you’re pretending to enjoy the cold.
Ingredients
- 1 bottle of red wine (go for something fruity, like a Merlot or Cabernet)
- 1/4 cup honey (or maple syrup for a vegan twist)
- 1 orange, sliced (leave the peel on for extra zest)
- 8 whole cloves (because we’re fancy like that)
- 2 cinnamon sticks (or 1 if you’re not that into cinnamon)
- 1 star anise (optional, but it makes you look like a pro)
- 1/2 cup water (to prevent it from becoming too syrupy)
Instructions
- Pour the red wine into a large pot over medium heat. You’re not boiling it, just warming it up to a happy 160°F—use a thermometer if you’re the precise type.
- Add the honey, orange slices, cloves, cinnamon sticks, star anise, and water to the pot. Stir gently to dissolve the honey, about 2 minutes.
- Let the mixture simmer on low heat for 15 minutes. No lid—we’re letting some of the alcohol evaporate but keeping all the flavors.
- Strain the mulled wine into mugs to remove the spices and orange slices. Or leave them in for a more rustic, ‘I forage for my spices’ vibe.
- Serve immediately. If you’re feeling extra, garnish with a fresh cinnamon stick or an orange slice.
Lusciously warm and spiced, this mulled wine is like a blanket for your insides. Serve it at your next gathering to instantly elevate your host status, or keep it all to yourself—we won’t judge.
Christmas Pudding with Brandy Sauce
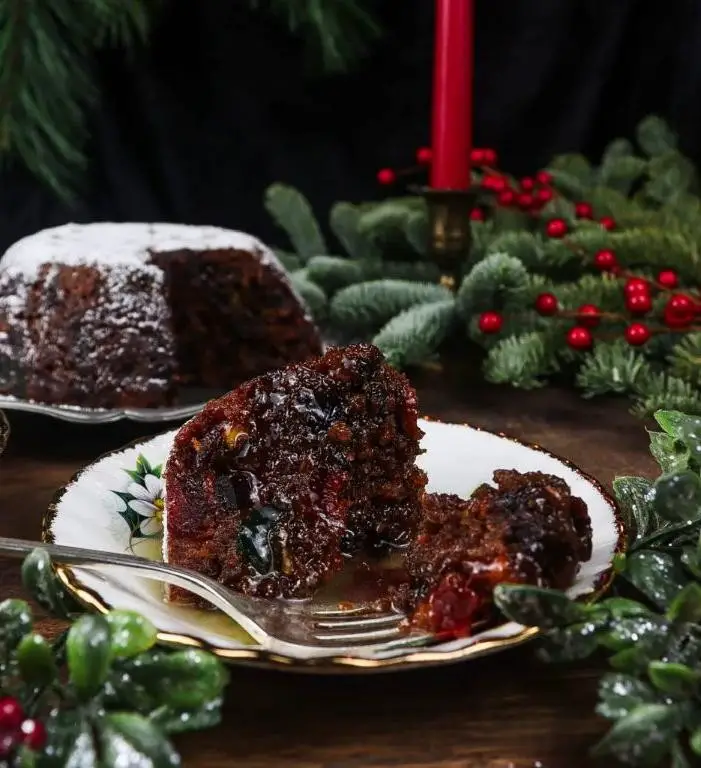
Brace yourselves, festive foodies, because we’re about to dive into a dessert that’s as rich in tradition as it is in flavor—Christmas Pudding with Brandy Sauce. This isn’t just any pudding; it’s a boozy, spiced masterpiece that’ll have your guests singing carols of praise.
Ingredients
- 1 cup all-purpose flour (for a lighter touch, sift it!)
- 1 cup breadcrumbs (freshly made adds a nice texture)
- 1 cup suet or butter (cold, diced)
- 1 cup dark brown sugar (pack it like you mean it)
- 2 cups mixed dried fruits (soak in brandy for extra flavor)
- 2 large eggs (room temperature blends better)
- 1 tsp mixed spice (or pumpkin pie spice in a pinch)
- 1/2 cup brandy (plus extra for serving)
- 1/2 cup milk (whole milk for richness)
Instructions
- In a large bowl, mix flour, breadcrumbs, suet, sugar, and mixed spice until well combined.
- Stir in the soaked dried fruits, ensuring they’re evenly distributed throughout the mixture.
- Beat the eggs with milk and brandy, then gradually add to the dry ingredients, mixing until the batter is sticky but manageable.
- Grease a 2-pint pudding basin and pour in the mixture, pressing down to eliminate any air pockets.
- Cover the basin with a double layer of parchment paper and foil, securing with string to create a tight seal.
- Steam the pudding for 5-6 hours in a large pot filled with boiling water halfway up the basin, checking occasionally to top up water.
- Once cooked, remove the pudding from the pot and let it cool slightly before turning it out onto a serving plate.
- For the brandy sauce, gently heat 1/2 cup brandy with 1/2 cup sugar until dissolved, then simmer until slightly thickened.
- Serve the pudding warm with the brandy sauce drizzled over the top, and if you’re feeling extra, flambé it for a show-stopping finish.
Who knew tradition could taste this good? The pudding is moist, rich, and packed with fruity, spicy flavors that meld beautifully with the silky brandy sauce. Try serving it with a scoop of vanilla ice cream for a cool contrast to the warm, boozy goodness.
Yule Log Cake
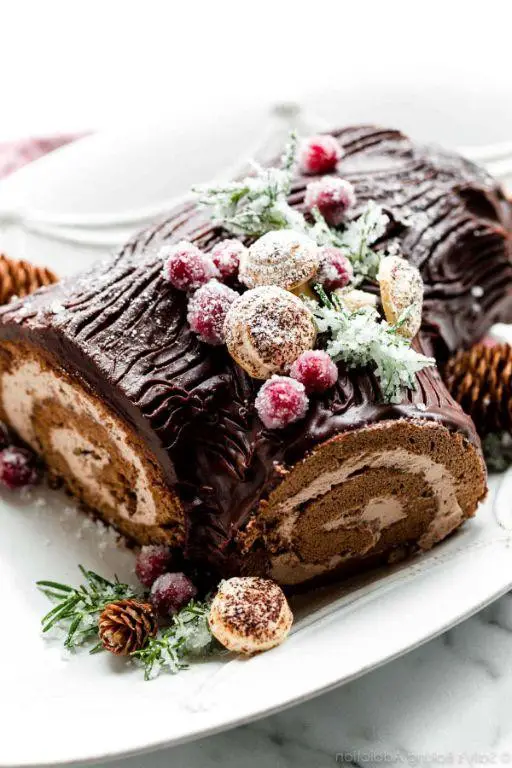
So, you’ve decided to tackle the Yule Log Cake, the showstopper of holiday desserts that’s as fun to make as it is to devour. This whimsical cake, resembling a rustic log, is your ticket to becoming the star of any festive gathering—just don’t blame us when everyone asks for seconds!
Ingredients
- 4 large eggs (room temperature for best results)
- 3/4 cup granulated sugar (for that sweet, sweet perfection)
- 1/2 cup all-purpose flour (sifted, unless you enjoy lumps)
- 1/4 cup cocoa powder (the darker, the better for that rich flavor)
- 1 tsp vanilla extract (or almond for a twist)
- 1/2 tsp salt (because even desserts need balance)
- 1 cup heavy cream (chilled, because fluffiness is key)
- 2 tbsp powdered sugar (for dusting, or to pretend it’s snow)
Instructions
- Preheat your oven to 350°F (175°C) and line a 10×15 inch jelly roll pan with parchment paper, because nobody likes a sticky situation.
- In a large bowl, beat the eggs and granulated sugar on high speed for about 5 minutes, until the mixture is pale and thick. This is your arm workout for the day.
- Gently fold in the sifted flour, cocoa powder, vanilla extract, and salt with a spatula, being careful not to deflate the mixture. Think of it as a cloud you don’t want to rain on.
- Pour the batter into the prepared pan, spreading it evenly with a spatula. Bake for 12-15 minutes, until the cake springs back when lightly touched. No peeking!
- While the cake is still warm, roll it up with the parchment paper inside from the short end. Let it cool completely rolled up. This is where the magic (and the shape) happens.
- Whip the heavy cream until stiff peaks form, then unroll the cake, spread the cream evenly, and roll it back up without the parchment. Chill for at least an hour to set.
- Dust with powdered sugar before serving to mimic a snowy log. For extra pizzazz, add chocolate shavings or holly decorations.
Perfectly moist with a rich chocolate flavor, this Yule Log Cake is a festive masterpiece that’s as delightful to slice into as it is to eat. Serve it as the centerpiece of your holiday table, or sneak a slice for breakfast—we won’t tell.
Snowball Cookies
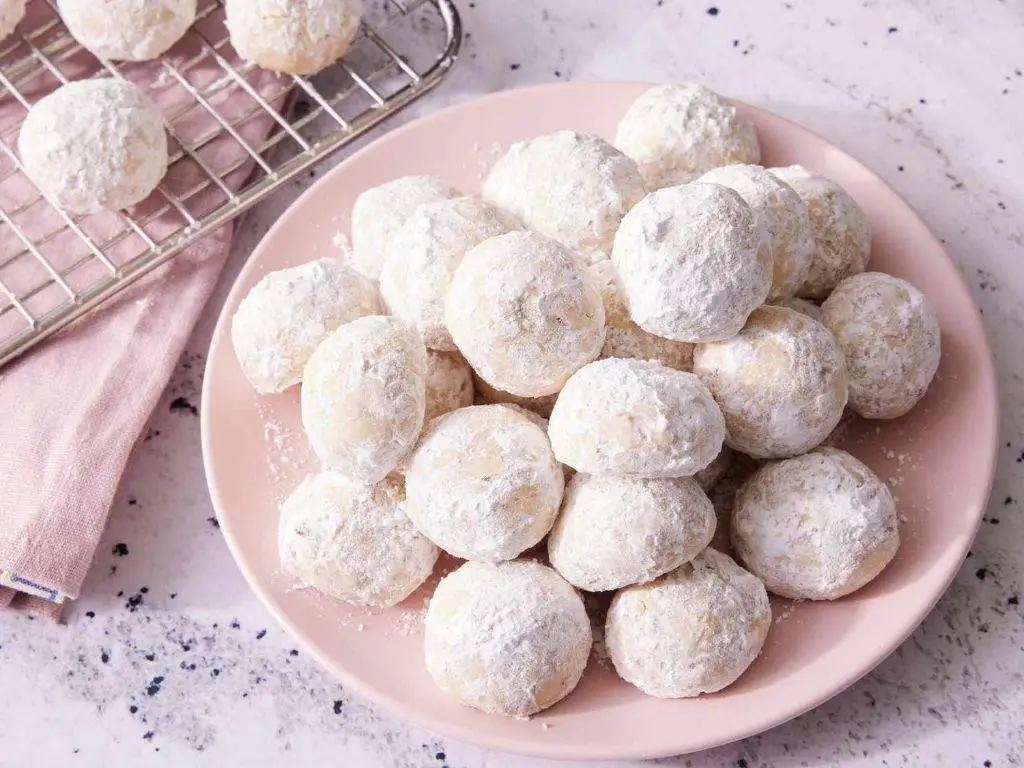
Fancy a bite-sized treat that’s as fun to make as it is to devour? Snowball cookies are the whimsical, melt-in-your-mouth delights that’ll have you rolling in dough—literally! Perfect for holiday gifting or just because, these buttery bites are a no-fuss recipe with maximum payoff.
Ingredients
- 1 cup unsalted butter, softened (room temp is key for easy mixing)
- 1/2 cup powdered sugar, plus extra for dusting (because more sugar is always better)
- 2 tsp vanilla extract (the good stuff makes a difference)
- 2 1/4 cups all-purpose flour (spoon and level to avoid dense cookies)
- 3/4 cup finely chopped nuts (walnuts or pecans add a nice crunch)
- 1/4 tsp salt (balances the sweetness like a charm)
Instructions
- Preheat your oven to 350°F (175°C) and line a baking sheet with parchment paper. No sticking, no stress.
- In a large bowl, cream together the softened butter and powdered sugar until light and fluffy. This is where the magic starts.
- Mix in the vanilla extract, then gradually add the flour and salt, stirring until just combined. Overmixing is the enemy of tender cookies.
- Fold in the chopped nuts until evenly distributed. They’re not just for texture; they’re flavor bombs.
- Roll the dough into 1-inch balls and place them on the prepared baking sheet. Pro tip: use a cookie scoop for uniform size and less mess.
- Bake for 12-15 minutes, or until the bottoms are just golden. They won’t brown much, so don’t overbake.
- Let the cookies cool on the sheet for 5 minutes, then roll them in powdered sugar while still warm. This creates that iconic snowy look.
- Once completely cool, give them another sugar roll for extra sparkle. Because why not?
These snowball cookies are the epitome of buttery, nutty perfection with a texture that crumbles at the slightest touch. Serve them piled high on a vintage plate for a festive touch, or sneak a few into your pocket for a secret snack—we won’t tell.
Hot Chocolate with Marshmallows

There’s nothing quite like wrapping your hands around a steaming mug of hot chocolate on a chilly evening—unless, of course, it’s topped with a fluffy cloud of marshmallows that slowly melt into gooey perfection.
Ingredients
- 2 cups whole milk (for extra creaminess, or substitute with your favorite milk alternative)
- 1/4 cup unsweetened cocoa powder (the darker, the richer)
- 1/4 cup granulated sugar (adjust to taste if you’re not into too much sweetness)
- 1/2 tsp vanilla extract (the secret weapon for depth of flavor)
- A pinch of salt (to balance the sweetness)
- 1/2 cup mini marshmallows (or go big with large ones for dramatic effect)
Instructions
- In a small saucepan, combine the milk, cocoa powder, sugar, and salt over medium heat. Whisk constantly to avoid any cocoa lumps from forming.
- Heat the mixture until it’s steaming hot but not boiling, about 3-5 minutes. Tip: Keep an eye on the temperature; boiling can make the milk taste scorched.
- Remove the saucepan from the heat and stir in the vanilla extract. This is when the magic happens, so don’t skip it!
- Pour the hot chocolate into your favorite mug, leaving a little room at the top for the marshmallows.
- Top with marshmallows. For an extra touch, lightly toast them with a kitchen torch for a smores-like experience.
As you take that first sip, you’ll notice the velvety texture of the chocolate, perfectly balanced with the sweetness of the marshmallows. Try serving it with a cinnamon stick stirrer for a hint of spice that’ll make your taste buds dance.
Apple Cider Donuts
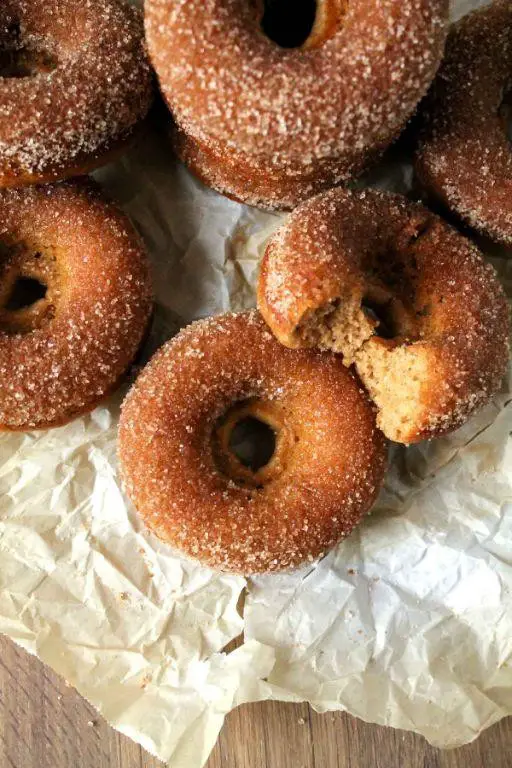
Buckle up, buttercups, because we’re diving fork-first into the world of Apple Cider Donuts – where autumn flavors and sugar-coated joy collide in a way that’ll make your taste buds throw a party. These little rings of happiness are the edible equivalent of a cozy sweater, but let’s be real, they’re way more delicious.
Ingredients
- 2 cups apple cider (reduce to 1/2 cup for concentrated flavor)
- 3 1/2 cups all-purpose flour (spooned and leveled)
- 2 tsp baking powder (for that perfect rise)
- 1 tsp baking soda (the silent hero of fluffiness)
- 1/2 tsp cinnamon (or more, because why not?)
- 1/4 tsp nutmeg (a little goes a long way)
- 1/2 cup granulated sugar (for sweetness that sings)
- 1/2 cup brown sugar (for depth and moisture)
- 1/2 cup buttermilk (tangy goodness)
- 2 large eggs (room temperature is key)
- 4 tbsp unsalted butter, melted (because butter makes everything better)
- 1 tsp vanilla extract (the flavor booster)
- Vegetable oil for frying (or any neutral oil with a high smoke point)
- 1/2 cup granulated sugar + 1 tbsp cinnamon for coating (the crowning glory)
Instructions
- In a saucepan over medium heat, reduce the apple cider from 2 cups to 1/2 cup, about 20-25 minutes, stirring occasionally. Let it cool. (Tip: This step intensifies the apple flavor, so don’t skip it!)
- In a large bowl, whisk together flour, baking powder, baking soda, cinnamon, and nutmeg. Set aside.
- In another bowl, mix granulated sugar, brown sugar, buttermilk, eggs, melted butter, vanilla extract, and the reduced apple cider until well combined.
- Gradually add the dry ingredients to the wet ingredients, stirring until just combined. (Tip: Overmixing leads to tough donuts, so be gentle.)
- Cover the dough and chill for at least 1 hour. This makes it easier to handle.
- On a floured surface, roll out the dough to 1/2-inch thickness. Use a donut cutter to cut out donuts and holes.
- Heat oil in a deep fryer or large pot to 375°F. Fry donuts in batches, about 1 minute per side, until golden brown. (Tip: Keep an eye on the temperature; too hot and they’ll burn, too cool and they’ll be greasy.)
- Drain on paper towels, then while still warm, roll in the cinnamon-sugar mixture.
These donuts are a masterpiece of crispy edges, tender middles, and a cinnamon-sugar hug that’ll have you reaching for seconds. Try serving them with a side of cold apple cider for the ultimate fall experience – it’s like a hug from the inside out.
Baked Brie with Cranberries
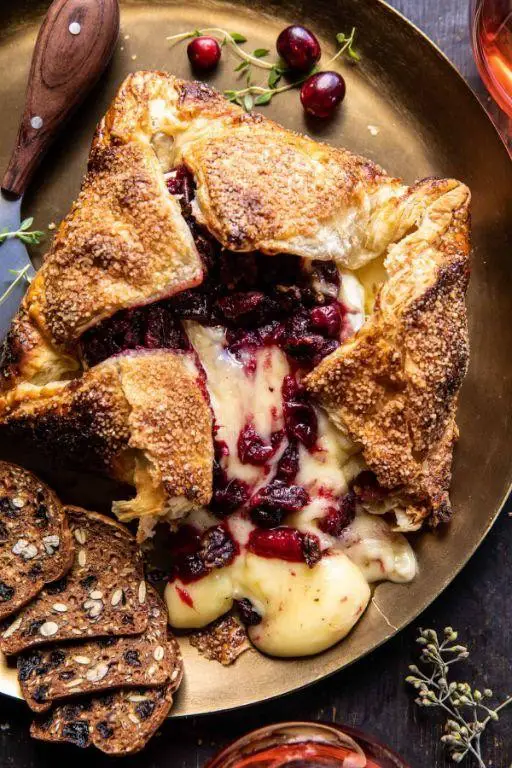
Yum, is there anything more decadently delightful than pulling apart a gooey, melty wheel of baked brie? We think not. Especially when it’s crowned with a tangy-sweet cranberry compote that’s basically a party in your mouth. Let’s get this cheesy masterpiece rolling!
Ingredients
- 1 wheel of brie (8 oz) – keep the rind on for that perfect melt
- 1/2 cup cranberry sauce – homemade or store-bought, we won’t judge
- 1/4 cup chopped walnuts – for that crunchy contrast
- 1 tbsp honey – because a little sweetness never hurt nobody
- 1 sprig of rosemary – optional, but oh so fancy
Instructions
- Preheat your oven to 350°F (175°C) – no rushing perfection here.
- Place the brie wheel on a parchment-lined baking sheet – easy cleanup is a chef’s best friend.
- Top the brie evenly with cranberry sauce, then sprinkle with walnuts – think of it as decorating your cheesy canvas.
- Drizzle honey over the top – this is the golden touch.
- Bake for 15-20 minutes, until the brie is soft to the touch but not oozing out – patience is key.
- Garnish with rosemary if using – because we eat with our eyes first.
Lusciously creamy with a hint of crunch and a burst of berry, this baked brie is your ticket to appetizer heaven. Serve it with crusty bread or apple slices for a sweet and savory symphony that’ll have everyone coming back for more.
Spiced Nuts
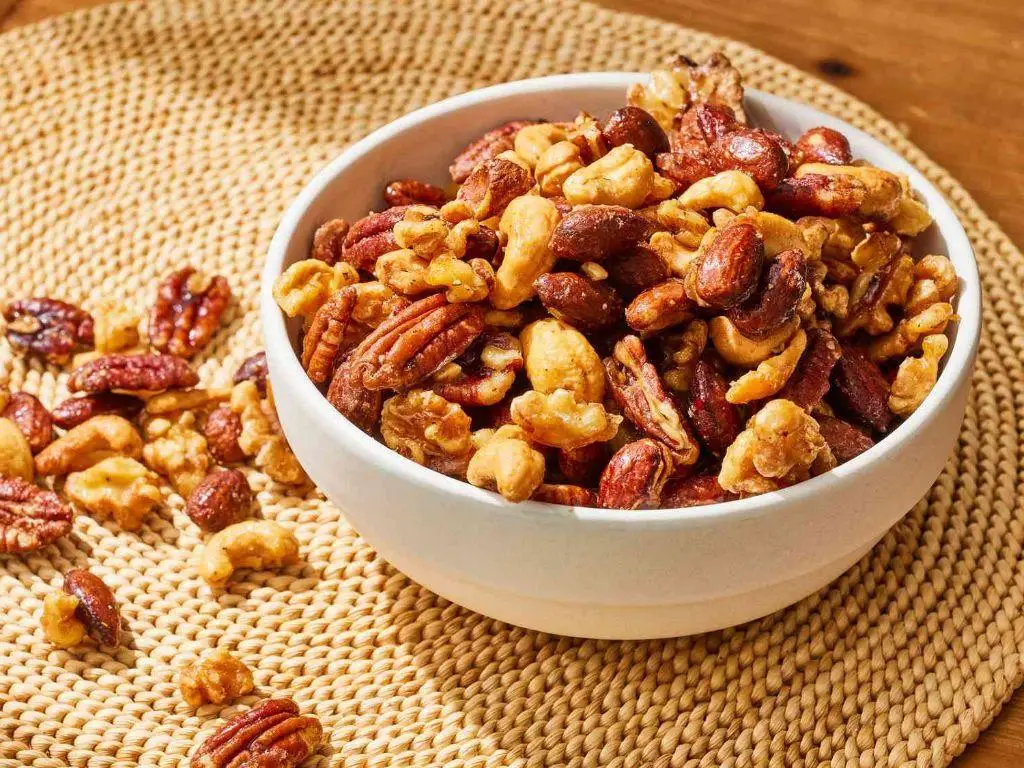
Zesty and zippy, these spiced nuts are the snack you never knew you needed—until now. Perfect for munching during movie nights or impressing guests at your next gathering, they’re a crunchy, flavor-packed delight that’s surprisingly simple to whip up.
Ingredients
- 2 cups mixed nuts (almonds, cashews, and pecans work great for variety)
- 1 tbsp olive oil (or any neutral oil for a lighter taste)
- 1 tbsp honey (for a touch of sweetness, adjust to taste)
- 1 tsp smoked paprika (adds a smoky depth, but regular paprika works too)
- 1/2 tsp cayenne pepper (for heat, scale back if you’re spice-shy)
- 1/2 tsp sea salt (flaky salt adds nice texture)
- 1/4 tsp ground cinnamon (a whisper of warmth)
Instructions
- Preheat your oven to 300°F (150°C) and line a baking sheet with parchment paper for easy cleanup.
- In a large bowl, toss the mixed nuts with olive oil until evenly coated. This ensures every nut gets perfectly spiced.
- Drizzle honey over the nuts and toss again. The honey helps the spices stick and adds a subtle sweetness.
- Sprinkle smoked paprika, cayenne pepper, sea salt, and ground cinnamon over the nuts. Toss thoroughly to distribute the spices evenly.
- Spread the nuts in a single layer on the prepared baking sheet. This promotes even roasting and prevents steaming.
- Bake for 15-20 minutes, stirring halfway through, until the nuts are golden and fragrant. Keep an eye on them to avoid burning.
- Let the nuts cool completely on the baking sheet. They’ll crisp up as they cool, so patience is key here.
Delightfully crunchy with a kick, these spiced nuts are a symphony of sweet, smoky, and spicy flavors. Serve them in a fancy bowl for guests or stash them in your desk drawer for a secret snack attack—no judgment here.
Christmas Morning Breakfast Casserole
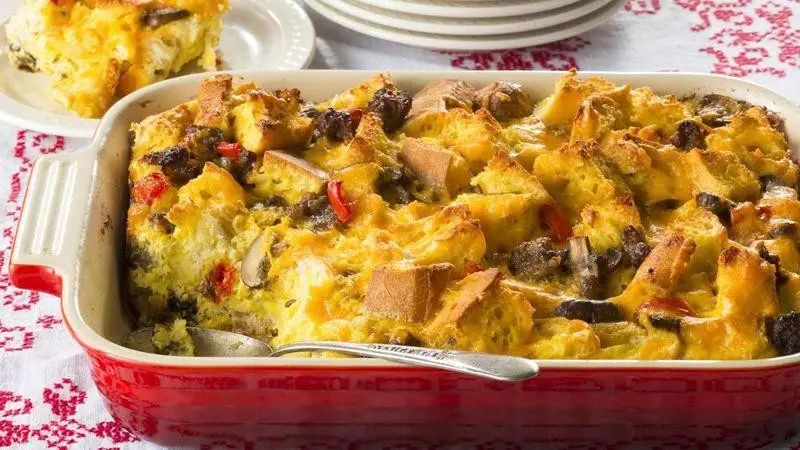
Ho-ho-hold onto your Santa hats, folks, because this Christmas Morning Breakfast Casserole is about to sleigh your taste buds faster than Rudolph on a sugar rush. It’s the ultimate festive fuel to power through present unwrapping and family selfies, all while keeping your kitchen antics merry and bright.
Ingredients
- 6 large eggs (room temperature for fluffier texture)
- 1 cup whole milk (or half-and-half for extra richness)
- 1 tbsp Dijon mustard (adds a tangy kick, adjust to taste)
- 1 tsp salt (because bland breakfasts are a holiday crime)
- 1/2 tsp black pepper (freshly ground for the best flavor)
- 6 cups cubed day-old French bread (stale bread soaks up the custard better)
- 1 1/2 cups shredded sharp cheddar cheese (because cheese is life)
- 1 cup cooked, crumbled breakfast sausage (or bacon for a smoky twist)
- 1/2 cup diced red bell pepper (for a pop of color and crunch)
- 1/4 cup chopped green onions (garnish to impress)
Instructions
- Preheat your oven to 350°F (175°C) and grease a 9×13-inch baking dish. This ensures your casserole doesn’t stick more than your in-laws to the couch.
- In a large bowl, whisk together the eggs, milk, Dijon mustard, salt, and pepper until fully combined. Tip: A fork works wonders if you’re whisk-less.
- Add the cubed French bread to the bowl, gently pressing down to ensure every piece gets soaked in the egg mixture. Let it sit for 10 minutes, giving the bread time to become custard’s best friend.
- Stir in the shredded cheddar cheese, cooked sausage, and diced red bell pepper, distributing evenly. Tip: Reserve a handful of cheese for a golden, cheesy top layer.
- Pour the mixture into the prepared baking dish and sprinkle the reserved cheese on top. Bake for 35-40 minutes, or until the center is set and the top is golden brown. Tip: A knife inserted in the center should come out clean.
- Let the casserole cool for 5 minutes before garnishing with chopped green onions. This brief rest makes slicing easier and prevents third-degree tongue burns.
This casserole emerges from the oven like a holiday hero—golden, cheesy, and packed with layers of flavor that’ll have your family singing carols of praise. Serve it with a side of spicy Bloody Marys to really get the party started, or keep it kid-friendly with hot cocoa. Either way, it’s a Christmas morning game-changer.
Conclusion
Happy holidays, home cooks! This roundup of 20 Delicious Christmas Recipes is your ticket to a festive feast that’ll dazzle your loved ones. From savory mains to sweet treats, there’s something for every taste. Don’t forget to try these recipes, share your favorites in the comments, and pin this article on Pinterest to spread the holiday cheer. Wishing you a season filled with joy and delicious bites!

Michael Johnson is the founder of Pan Mastery, Inspired by his blacksmith grandfather’s legacy has a deep appreciation for hand-crafted pots and pans, he provides invaluable guides, reviews, and recipes to enhance your culinary journey.