Oh, the magic of cooking in a clay pot! There’s something truly special about the way it locks in flavors, creating dishes that are bursting with taste and nostalgia. Whether you’re in the mood for quick weeknight dinners, seasonal delights, or hearty comfort food, these 18 clay pot recipes are sure to inspire your next culinary adventure. Let’s dive into a world where every meal feels like a celebration!
Clay Pot Chicken with Mushrooms
Sometimes, the best meals come from the simplest ingredients, and this Clay Pot Chicken with Mushrooms is no exception. I remember the first time I made this dish; it was a chilly evening, and the aroma filling my kitchen was nothing short of magical.
Ingredients
- 2 cups of sliced mushrooms (I love using cremini for their earthy flavor)
- 1.5 lbs of chicken thighs, bone-in and skin-on (trust me, the skin adds so much flavor)
- 3 tbsp of extra virgin olive oil (my go-to for almost everything)
- 1 cup of chicken broth (homemade if you have it)
- 2 cloves of garlic, minced (because garlic makes everything better)
- 1 tsp of dried thyme (fresh is great, but dried works perfectly here)
- Salt and pepper to taste (I’m generous with the pepper)
Instructions
- Preheat your oven to 375°F. This ensures even cooking and a beautifully browned chicken skin.
- Heat the olive oil in a large, oven-safe skillet over medium heat. Adding the oil to a cold pan helps prevent burning.
- Season the chicken thighs generously with salt and pepper, then place them skin-side down in the skillet. Cook for 5-7 minutes until the skin is golden and crispy. Flipping them too soon can cause the skin to stick, so patience is key.
- Remove the chicken and set aside. In the same skillet, add the mushrooms and garlic, sautéing until the mushrooms are soft and golden, about 5 minutes. This step builds layers of flavor.
- Return the chicken to the skillet, nestling it among the mushrooms. Pour in the chicken broth and sprinkle with thyme. The broth should come about halfway up the chicken for perfect braising.
- Cover the skillet with a lid or foil and transfer to the oven. Bake for 25 minutes, then uncover and bake for an additional 10 minutes to crisp up the skin.
- Let the dish rest for 5 minutes before serving. This allows the juices to redistribute, ensuring moist chicken.
Delightfully tender chicken with mushrooms that have soaked up all the savory juices, this dish is a comfort food dream. Serve it over a bed of creamy polenta or with crusty bread to soak up every last bit of flavor.
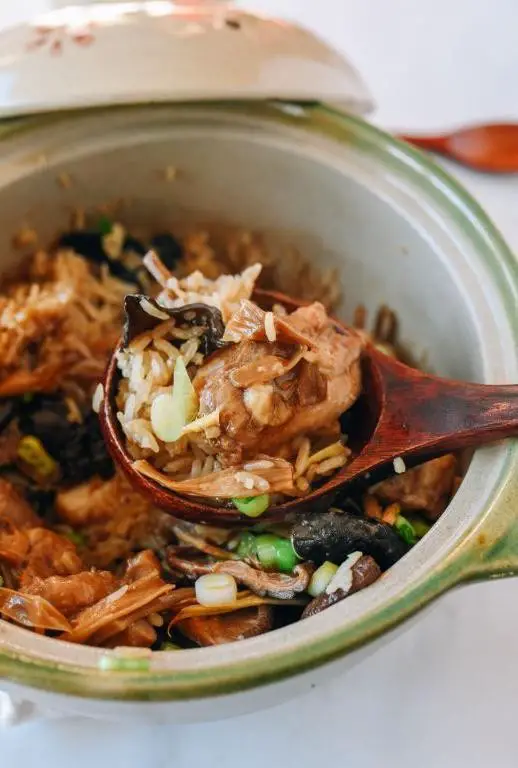
Clay Pot Rice with Chinese Sausage

Every time I think about comfort food, my mind instantly goes to the aromatic and hearty Clay Pot Rice with Chinese Sausage. It’s a dish that reminds me of chilly evenings and the joy of sharing a meal with loved ones, straight from the pot to the table.
Ingredients
- 2 cups jasmine rice (I always rinse mine until the water runs clear to get that perfect texture)
- 1 cup Chinese sausage, sliced (the sweet and smoky flavor is irreplaceable)
- 2 tbsp vegetable oil (for that golden crust at the bottom)
- 3 cups water (adjust based on your rice’s absorption rate)
- 1 tbsp soy sauce (I opt for low sodium to control the saltiness)
- 1 tsp sesame oil (a drizzle at the end elevates the dish)
- 2 green onions, chopped (for a fresh crunch)
Instructions
- Heat the vegetable oil in a clay pot over medium heat until shimmering, about 2 minutes.
- Add the sliced Chinese sausage and sauté until slightly caramelized, around 3 minutes, stirring occasionally.
- Stir in the rinsed jasmine rice, ensuring each grain is coated with oil, for about 1 minute.
- Pour in the water and soy sauce, then bring the mixture to a boil. Tip: Resist stirring to prevent the rice from becoming mushy.
- Once boiling, reduce the heat to low, cover the pot, and let it simmer for 15 minutes. Tip: Listen for a faint crackling sound, indicating the rice is forming a crust.
- Turn off the heat and let the pot sit, covered, for another 10 minutes to steam. Tip: This step is crucial for achieving the perfect texture.
- Drizzle with sesame oil and sprinkle chopped green onions before serving.
Ladling out the rice reveals a beautiful contrast between the fluffy top layer and the crispy bottom. The Chinese sausage adds a sweet depth, making each bite a delightful experience. Try serving it with a side of pickled vegetables for an extra tangy kick.
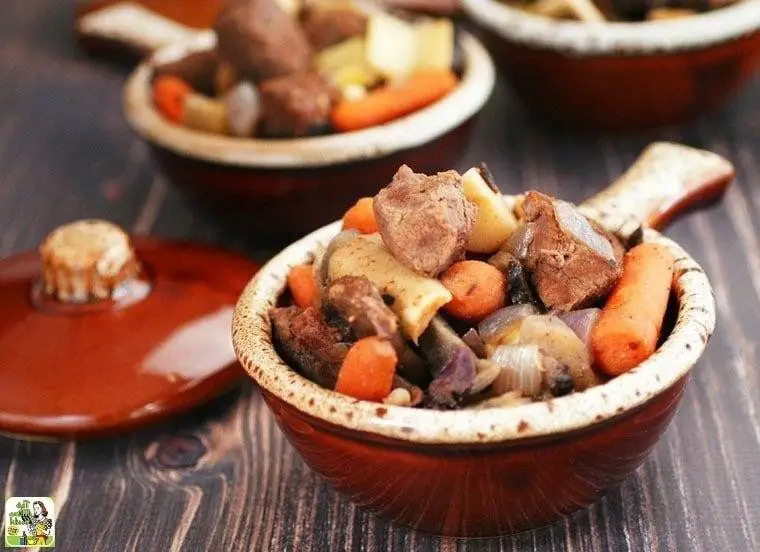
Clay Pot Beef Stew
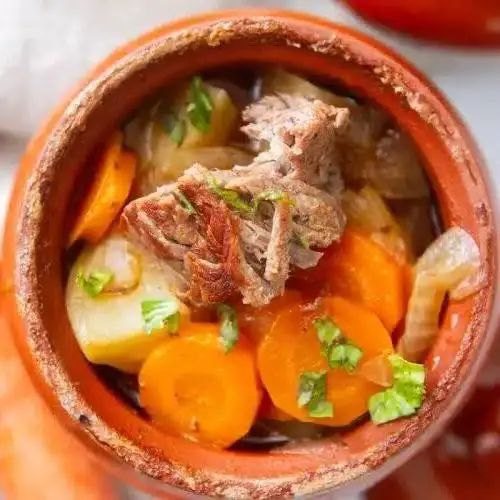
Kind of like a warm hug on a chilly evening, this Clay Pot Beef Stew has been my go-to comfort dish ever since I stumbled upon the recipe during a weekend getaway in the countryside. There’s something magical about the way the beef tenderizes and the flavors meld together in the clay pot, creating a dish that’s both hearty and deeply satisfying.
Ingredients
- 2 lbs beef chuck, cut into 1-inch cubes (I find that the marbling in chuck adds incredible flavor)
- 2 tbsp extra virgin olive oil (my go-to for its fruity notes)
- 1 large onion, diced (yellow onions work best for their sweetness)
- 3 carrots, peeled and sliced into 1-inch pieces (they add a lovely color and sweetness)
- 3 cloves garlic, minced (because what’s a stew without garlic?)
- 2 cups beef broth (homemade if you have it, but store-bought works in a pinch)
- 1 cup red wine (a robust Cabernet Sauvignon is my preference here)
- 2 tbsp tomato paste (it adds depth and richness to the stew)
- 1 tsp dried thyme (a little goes a long way)
- Salt and freshly ground black pepper (to taste, but don’t be shy)
Instructions
- Preheat your oven to 325°F (163°C). A low and slow cook is key to tender beef.
- Heat the olive oil in a large clay pot over medium-high heat. Browning the beef well here is crucial for flavor, so don’t rush it.
- Add the beef cubes in batches, ensuring not to overcrowd the pot, and brown on all sides. This should take about 5-7 minutes per batch.
- Remove the beef and set aside. In the same pot, add the onion and carrots, sautéing until the onion is translucent, about 5 minutes.
- Stir in the garlic and cook for another minute until fragrant. Tip: Garlic burns easily, so keep an eye on it.
- Return the beef to the pot. Add the beef broth, red wine, tomato paste, and thyme, stirring to combine.
- Bring the mixture to a simmer, then cover the pot and transfer it to the preheated oven. Cook for 2.5 to 3 hours, or until the beef is fork-tender.
- Season with salt and pepper to taste before serving. Tip: Letting the stew sit for 10 minutes off the heat allows the flavors to meld even more.
Serve this stew over a bed of creamy mashed potatoes or with a slice of crusty bread to soak up all the delicious juices. The beef should be melt-in-your-mouth tender, and the sauce rich and deeply flavored, with the wine and tomato paste adding a beautiful complexity. Simply put, it’s comfort in a bowl.
Clay Pot Lamb Shanks with Herbs
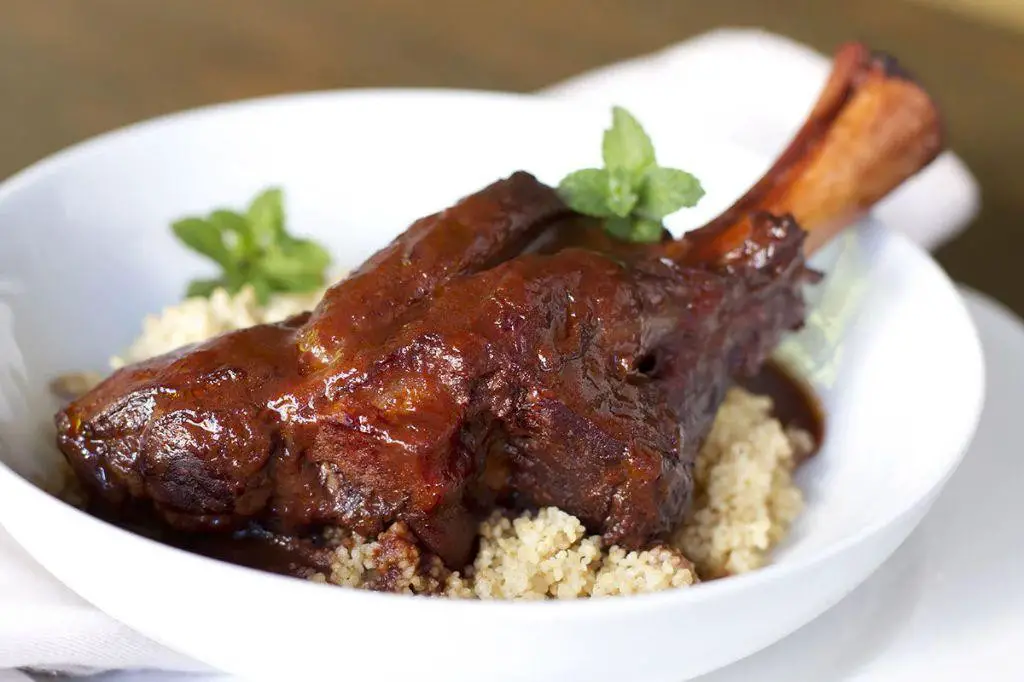
Unbelievably tender and packed with flavor, these Clay Pot Lamb Shanks with Herbs have become my go-to comfort dish during the chilly evenings. I remember the first time I tried this recipe; the aroma that filled my kitchen was nothing short of magical, promising a meal that’s as nourishing as it is delicious.
Ingredients
- 2 lamb shanks (about 1 lb each) – I find that the meat falls off the bone more easily when they’re this size.
- 2 tbsp extra virgin olive oil – my kitchen staple for that rich, fruity depth.
- 1 cup red wine – a bold Cabernet Sauvignon works wonders here.
- 4 garlic cloves, minced – because more garlic is always better.
- 1 tbsp fresh rosemary, chopped – it’s worth growing your own for that punch of freshness.
- 1 tbsp fresh thyme leaves – ditto on the freshness note.
- 2 cups beef stock – homemade if you’ve got it, for that extra layer of flavor.
- Salt and freshly ground black pepper – to season, but we’ll be specific about quantities in the steps.
Instructions
- Preheat your oven to 325°F. A slow and low roast is key for tender lamb.
- Season the lamb shanks generously with salt and pepper on all sides. This is your first layer of flavor, so don’t skimp.
- Heat the olive oil in a large, oven-proof clay pot over medium-high heat. Once hot, add the lamb shanks and sear until golden brown on all sides, about 3-4 minutes per side. Tip: Don’t rush the searing; it’s crucial for depth of flavor.
- Remove the lamb shanks and set aside. In the same pot, add the minced garlic, rosemary, and thyme, sautéing for about 1 minute until fragrant. Tip: Keep the heat medium to avoid burning the garlic.
- Pour in the red wine to deglaze the pot, scraping up any browned bits from the bottom. Let it simmer for 2 minutes to reduce slightly.
- Return the lamb shanks to the pot and add the beef stock. The liquid should come about halfway up the sides of the lamb. Tip: If it’s too much, you can always reduce it later, but too little and your lamb might dry out.
- Cover the pot with its lid and transfer to the preheated oven. Roast for 2.5 to 3 hours, until the meat is fork-tender.
- Once done, let the lamb shanks rest in the pot for 10 minutes before serving. This allows the juices to redistribute.
Perfectly tender, the lamb shanks are a dream to pull apart, with the herbs and wine creating a sauce that’s rich and deeply flavorful. Serve them over a bed of creamy polenta or mashed potatoes to soak up every last drop of that delicious sauce.
Clay Pot Fish with Ginger and Scallions

Sometimes, the simplest dishes bring the most comfort, and that’s exactly what this Clay Pot Fish with Ginger and Scallions does for me. It’s a dish that reminds me of cozy family dinners, where the aroma of ginger and scallions fills the air, promising something deliciously wholesome.
Ingredients
- 1 lb white fish fillets (I love using cod for its flaky texture)
- 2 tbsp soy sauce (I always go for the low-sodium version to control the saltiness)
- 1 tbsp sesame oil (the aroma is just unbeatable)
- 1 inch ginger, julienned (fresh ginger makes all the difference)
- 3 scallions, cut into 2-inch pieces (the green parts add a nice crunch)
- 1/2 cup water (to create the perfect steam)
- 1 tbsp vegetable oil (for that slight crisp on the fish)
Instructions
- Heat the vegetable oil in a clay pot over medium heat until shimmering, about 2 minutes.
- Add the ginger and scallions, sautéing until fragrant, roughly 1 minute. This releases their flavors beautifully.
- Place the fish fillets in the pot, ensuring they’re not overlapping for even cooking.
- Pour in the soy sauce and sesame oil around the fish, not directly on top, to distribute the flavors evenly.
- Add the water to the pot, then cover with a lid to let the fish steam for 8-10 minutes. Tip: Resist the urge to peek; keeping the lid on ensures a moist cooking environment.
- After 8 minutes, check the fish. It should flake easily with a fork. If not, give it another minute or two.
- Once done, remove from heat and let it sit covered for 2 minutes. This allows the fish to absorb all the wonderful flavors.
Flaky, tender, and infused with the aromatic duo of ginger and scallions, this dish is a testament to how minimal ingredients can create maximum flavor. Serve it over a bed of steamed rice to soak up the delicious sauce, or alongside some stir-fried greens for a complete meal.
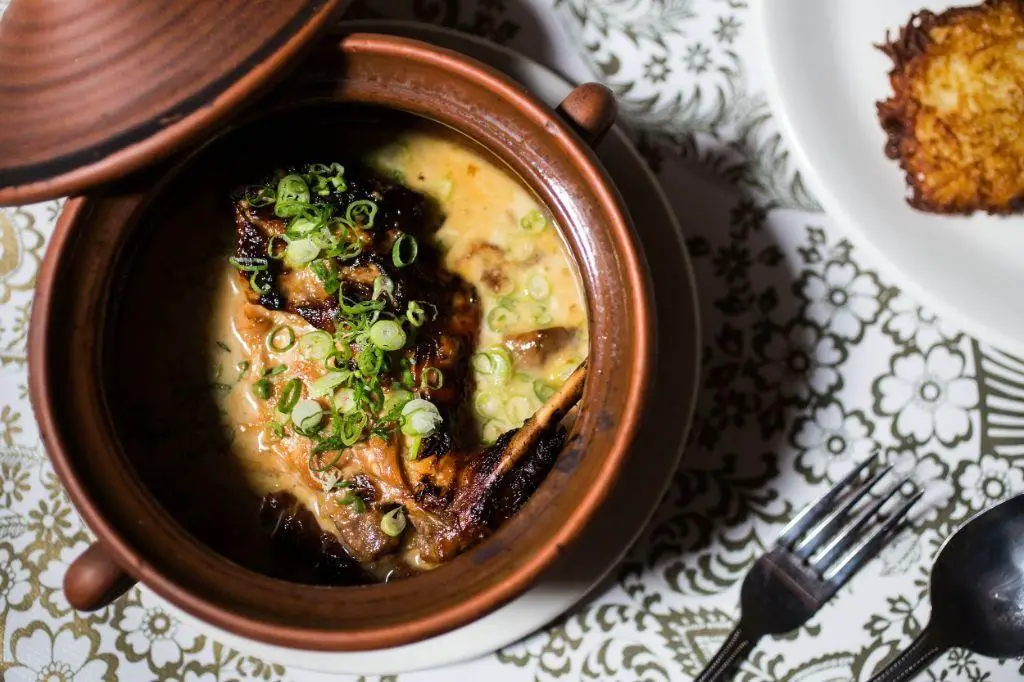
Clay Pot Pork Belly with Soy Sauce
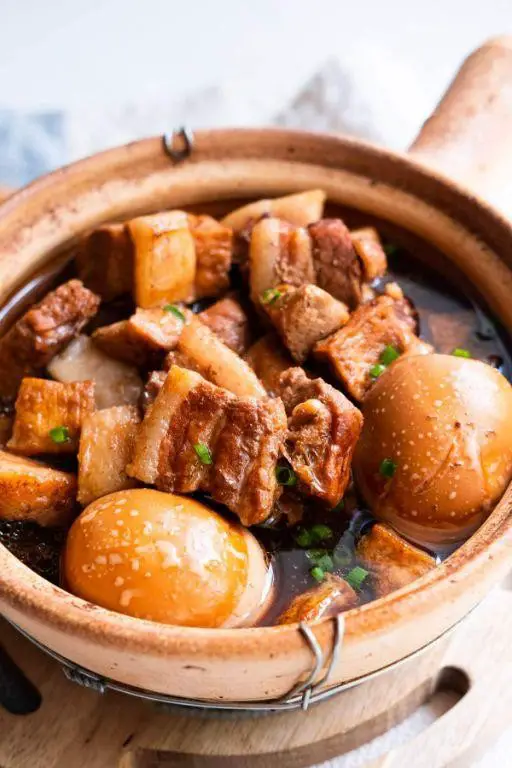
Just last week, I found myself craving something deeply savory and comforting, a dish that would remind me of home. That’s when I decided to whip up this Clay Pot Pork Belly with Soy Sauce, a recipe that never fails to warm the soul and satisfy those umami cravings.
Ingredients
- 1.5 lbs pork belly, cut into 1-inch pieces (I like to leave the skin on for extra texture)
- 1/4 cup soy sauce (I swear by Kikkoman for its depth of flavor)
- 2 tbsp brown sugar (for that perfect caramelization)
- 3 cloves garlic, minced (because more garlic is always better)
- 1 inch ginger, sliced (fresh ginger makes all the difference)
- 1 cup water (to keep everything juicy)
- 2 green onions, chopped (for a fresh finish)
Instructions
- Heat a clay pot over medium heat and add the pork belly pieces. Cook until they’re lightly browned on all sides, about 5 minutes. Tip: Don’t overcrowd the pot to ensure even browning.
- Add the minced garlic and sliced ginger to the pot, stirring for about 30 seconds until fragrant. Tip: This is the moment your kitchen will start smelling amazing.
- Pour in the soy sauce and sprinkle the brown sugar over the pork. Stir well to coat every piece evenly.
- Add 1 cup of water to the pot, then bring the mixture to a boil. Once boiling, reduce the heat to low and simmer covered for 45 minutes. Tip: Check occasionally to make sure there’s enough liquid to prevent burning.
- After 45 minutes, remove the lid and increase the heat to medium-high. Let the sauce reduce and thicken for about 10 minutes, stirring occasionally.
- Garnish with chopped green onions before serving.
Lusciously tender and rich with the deep flavors of soy and caramelized sugar, this pork belly is a showstopper. Serve it over a bed of steamed rice to soak up all that glorious sauce, or alongside some crisp veggies for contrast.
Clay Pot Tofu with Mixed Vegetables
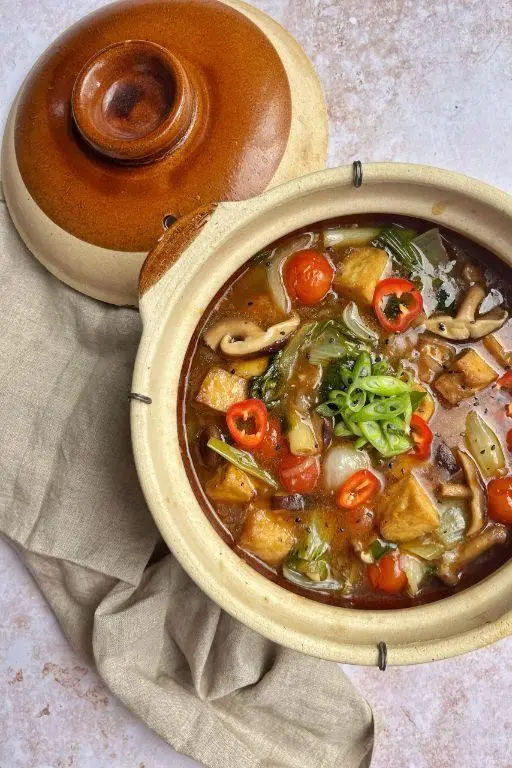
Yesterday, I found myself craving something hearty yet healthy, and that’s when I decided to whip up my favorite Clay Pot Tofu with Mixed Vegetables. It’s a dish that never fails to comfort me, especially on days when I’m looking for a quick, nutritious meal that doesn’t skimp on flavor.
Ingredients
- 1 block (14 oz) firm tofu, pressed and cubed – I’ve learned that pressing tofu for at least 15 minutes makes all the difference in texture.
- 2 tbsp extra virgin olive oil – my go-to for its fruity notes.
- 1 cup mixed vegetables (bell peppers, carrots, and snap peas) – I love the color and crunch they add.
- 2 cloves garlic, minced – because what’s a stir-fry without garlic?
- 1 tbsp soy sauce – for that umami kick.
- 1/2 cup vegetable broth – to keep everything moist and flavorful.
- 1 tsp cornstarch dissolved in 2 tbsp water – my secret for a glossy sauce.
Instructions
- Heat the olive oil in a clay pot or heavy skillet over medium heat until shimmering, about 2 minutes.
- Add the cubed tofu and cook until golden on all sides, about 5 minutes. Tip: Don’t stir too often to get a nice crust.
- Throw in the minced garlic and sauté for 30 seconds until fragrant.
- Add the mixed vegetables and stir-fry for 3 minutes until they’re just tender but still crisp.
- Pour in the soy sauce and vegetable broth, bringing the mixture to a simmer.
- Stir in the cornstarch slurry and cook for another 2 minutes until the sauce thickens. Tip: The sauce should coat the back of a spoon.
- Remove from heat and let it sit for a minute. Tip: This allows the flavors to meld beautifully.
My favorite part about this dish is the contrast between the crispy tofu and the tender-crisp vegetables, all coated in a savory sauce. Serve it over a bed of steamed rice or enjoy it as is for a low-carb option.
Clay Pot Duck with Chestnuts
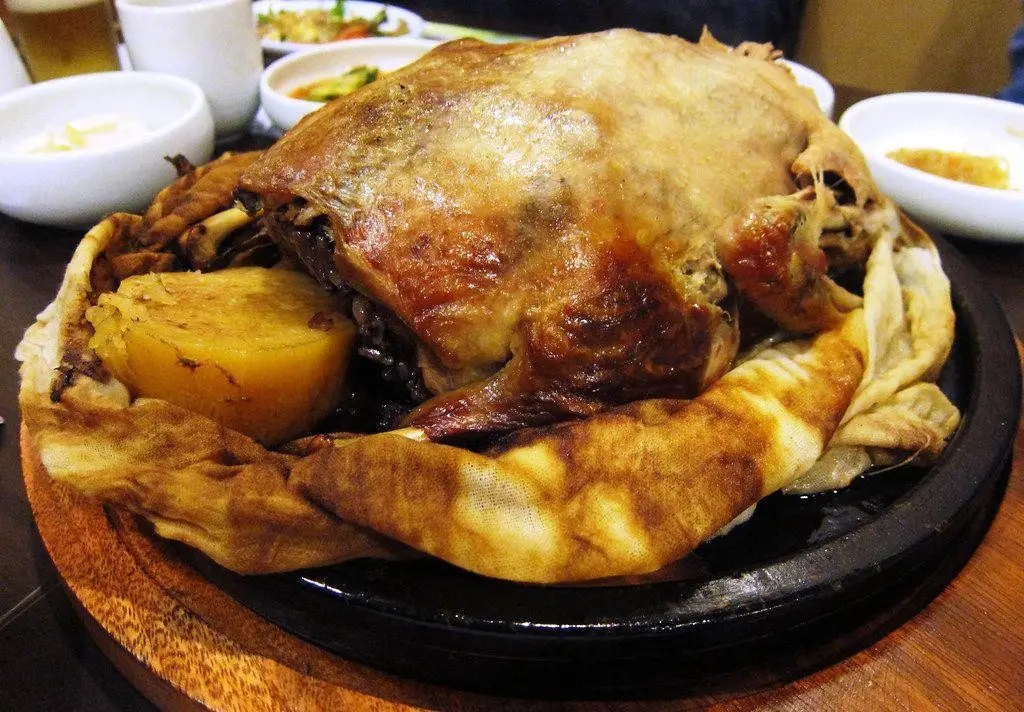
Waking up to the crisp morning air today, I couldn’t help but reminisce about the first time I tried Clay Pot Duck with Chestnuts at a small family-run restaurant in the countryside. The rich, savory flavors and tender duck meat paired with the sweet, nutty chestnuts was a revelation, and I’ve been perfecting my own version ever since.
Ingredients
- 1 whole duck (about 5 lbs), cut into pieces – I find that letting the duck sit at room temperature for about 20 minutes before cooking helps it cook more evenly.
- 2 cups chestnuts, peeled – A little tip: soaking them in warm water for 10 minutes makes peeling a breeze.
- 3 tbsp extra virgin olive oil – My go-to for its fruity notes that complement the duck beautifully.
- 1 cup dry white wine – Adds a lovely depth of flavor; don’t skip it!
- 4 cloves garlic, minced – Because everything’s better with garlic, right?
- 1 tsp salt – Just enough to enhance all the flavors without overpowering.
- 1/2 tsp black pepper – Freshly ground, if you please.
Instructions
- Preheat your oven to 375°F (190°C) to ensure it’s ready when you are.
- Heat the olive oil in a large clay pot over medium heat. Add the duck pieces and brown them on all sides, about 5 minutes per side. This step is crucial for locking in those juices.
- Add the minced garlic to the pot and sauté for about 1 minute, until fragrant. Tip: Keep the heat medium to avoid burning the garlic.
- Pour in the white wine, scraping the bottom of the pot to deglaze and incorporate all those tasty bits.
- Add the chestnuts, salt, and black pepper, stirring gently to combine everything.
- Cover the pot and transfer it to the preheated oven. Bake for 1 hour and 30 minutes, until the duck is tender and the chestnuts are soft. Tip: Resist the urge to peek too often; keeping the lid on ensures moist, flavorful results.
- Remove from the oven and let it rest for 10 minutes before serving. This allows the flavors to meld even more.
You’ll love how the duck turns out incredibly tender, falling off the bone, while the chestnuts soak up all the savory juices, becoming little pockets of sweetness. Serve it over a bed of fluffy jasmine rice to soak up every last drop of that delicious sauce.
Clay Pot Seafood Paella
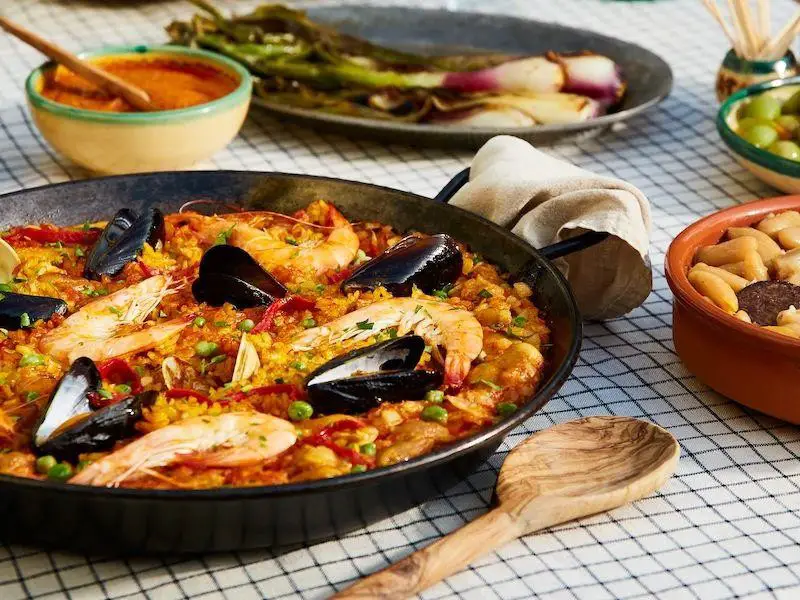
Venturing into the world of paella has always been a thrilling experience for me, especially when it involves the rich, aromatic flavors of seafood cooked in a traditional clay pot. There’s something incredibly satisfying about the way the ingredients meld together, creating a dish that’s as vibrant in taste as it is in color. Today, I’m sharing my take on Clay Pot Seafood Paella, a recipe that’s become a staple in my kitchen for its simplicity and depth of flavor.
Ingredients
- 2 cups Bomba rice – the star of the show, its ability to absorb flavors is unmatched.
- 4 cups seafood stock – I like to make mine fresh, but store-bought works in a pinch.
- 1 lb mixed seafood (shrimp, mussels, squid) – freshness is key here, so I always hit the market early.
- 1 large tomato, grated – it adds a subtle sweetness that balances the dish.
- 1/2 cup extra virgin olive oil – my go-to for its fruity notes.
- 1 tsp smoked paprika – for that essential smoky depth.
- 1 pinch saffron threads – a little goes a long way, but it’s worth every penny.
- 1 medium onion, finely chopped – the foundation of flavor.
- 3 garlic cloves, minced – because what’s paella without garlic?
Instructions
- Heat the olive oil in your clay pot over medium heat until shimmering, about 2 minutes.
- Add the onion and garlic, sautéing until translucent, roughly 5 minutes. Tip: Keep the heat moderate to avoid burning the garlic.
- Stir in the grated tomato and smoked paprika, cooking for another 3 minutes until the mixture thickens slightly.
- Add the Bomba rice, stirring to coat each grain in the oil and tomato mixture, about 2 minutes. Tip: This step is crucial for achieving the perfect paella texture.
- Dissolve the saffron in 1/4 cup of warm seafood stock, then pour it and the remaining stock into the pot. Bring to a boil.
- Arrange the mixed seafood on top of the rice, then reduce the heat to low. Cover and simmer for 20 minutes. Tip: Resist the urge to stir; the socarrat (crispy bottom) is forming.
- Remove from heat and let it rest, covered, for 5 minutes before serving.
Garnishing with fresh parsley adds a pop of color, but the real magic is in the texture—creamy rice with a crispy bottom, paired with perfectly cooked seafood. Serve it straight from the clay pot for an authentic touch that’s sure to impress.
Clay Pot Lentil Soup
On a chilly evening like this, there’s nothing more comforting than a warm bowl of Clay Pot Lentil Soup. It’s a dish that reminds me of my grandmother’s kitchen, where the aroma of spices would fill the air, promising a hearty meal. This recipe is my modern take on that memory, simplified for weeknight dinners but still packed with flavor.
Ingredients
- 1 cup dried green lentils (I always rinse them under cold water to remove any debris)
- 2 tbsp extra virgin olive oil (my go-to for its fruity notes)
- 1 medium onion, diced (yellow onions work best for their sweetness)
- 2 carrots, peeled and chopped (adds a lovely color and sweetness)
- 3 garlic cloves, minced (because more garlic is always better)
- 4 cups vegetable broth (homemade if you have it, but store-bought works fine)
- 1 tsp ground cumin (toasted and ground myself for maximum flavor)
- 1/2 tsp smoked paprika (adds a subtle depth)
- Salt to taste (I start with 1/2 tsp and adjust as needed)
- Fresh parsley for garnish (adds a fresh contrast to the rich soup)
Instructions
- Heat the olive oil in a clay pot or heavy-bottomed pot over medium heat until shimmering.
- Add the diced onion and carrots, sautéing until the onions are translucent and the carrots begin to soften, about 5 minutes.
- Stir in the minced garlic, cumin, and smoked paprika, cooking for another minute until fragrant. Tip: Toasting the spices with the vegetables unlocks their flavors.
- Pour in the rinsed lentils and vegetable broth, bringing the mixture to a boil.
- Reduce the heat to low, cover, and simmer for 25-30 minutes, or until the lentils are tender. Tip: Stir occasionally to prevent sticking.
- Season with salt, starting with 1/2 tsp and adjusting to your preference. Tip: Lentils absorb salt, so it’s better to under-season at first.
- Garnish with fresh parsley before serving.
Perfectly tender lentils in a richly spiced broth make this soup a comforting delight. Serve it with a slice of crusty bread for dipping, or over a bed of quinoa for an extra protein boost.
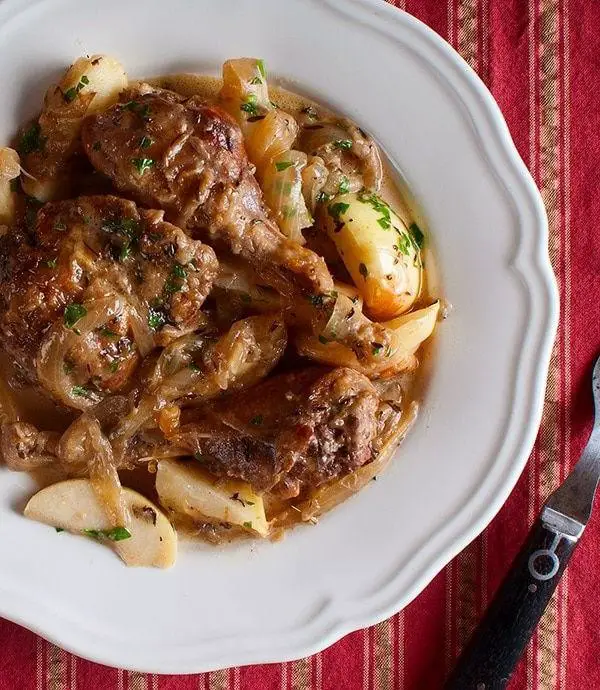
Clay Pot Rabbit with Olives
Last weekend, I stumbled upon a rustic clay pot at a flea market, and it inspired me to recreate my grandmother’s clay pot rabbit with olives—a dish that’s as hearty as it is flavorful. The combination of tender rabbit, briny olives, and aromatic herbs is a testament to the magic of slow cooking.
Ingredients
- 1 whole rabbit, cut into pieces (about 3 lbs) – I find that the legs and thighs offer the most flavor.
- 1 cup pitted green olives – I love the tangy punch they add, but Kalamata olives work great too.
- 2 tbsp extra virgin olive oil – my go-to for its fruity notes.
- 4 garlic cloves, minced – because everything’s better with garlic.
- 1 cup dry white wine – a splash for the pot, and maybe one for the cook.
- 1 tsp dried thyme – it’s amazing how this little herb elevates the dish.
- Salt and freshly ground black pepper – to season, but be generous.
Instructions
- Preheat your oven to 325°F – low and slow is the key here.
- Heat the olive oil in the clay pot over medium heat until shimmering – a quick test is to drop in a garlic clove; if it sizzles, you’re good.
- Add the rabbit pieces and brown them on all sides, about 5 minutes per side – don’t rush this step; the caramelization adds depth.
- Stir in the garlic and thyme, cooking for 1 minute until fragrant – your kitchen should smell amazing by now.
- Pour in the white wine, scraping up any browned bits from the bottom of the pot – those bits are flavor gold.
- Add the olives, then cover the pot and transfer it to the oven. Cook for 1.5 hours, or until the rabbit is fork-tender – patience is a virtue here.
- Season with salt and pepper to taste right before serving – I like to do this at the end to control the saltiness.
Unbelievably tender, the rabbit falls off the bone, mingling beautifully with the olives’ brininess. Serve it over a bed of creamy polenta or with crusty bread to soak up every last drop of the savory sauce.
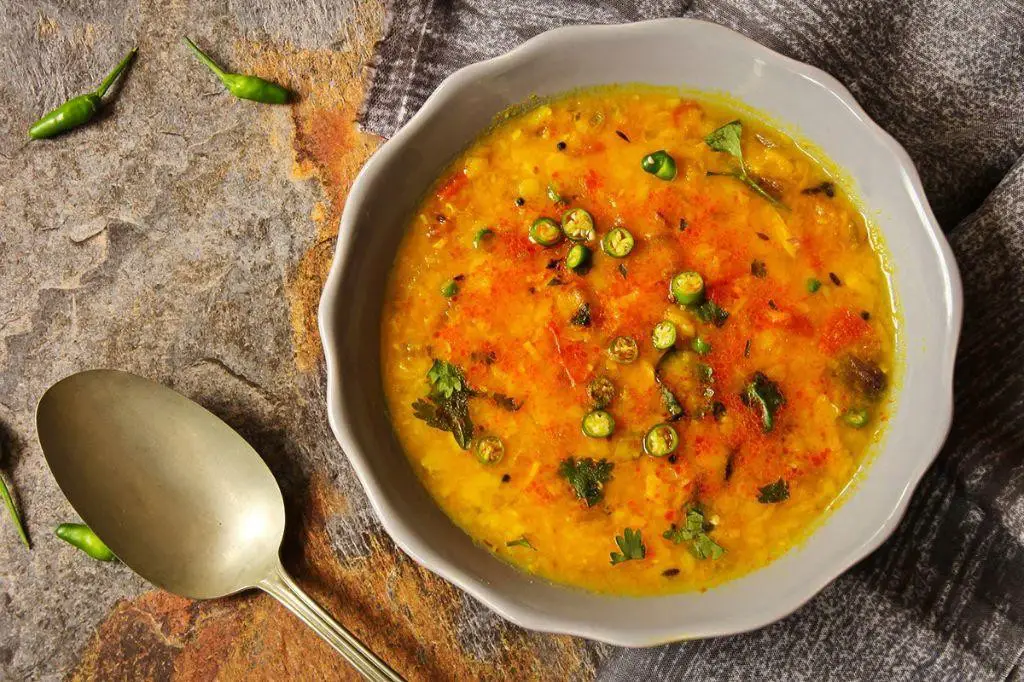
Clay Pot Vegetarian Curry

Yesterday, I stumbled upon the most aromatic Clay Pot Vegetarian Curry at a local farmers’ market, and it inspired me to recreate that magic at home. There’s something about the earthy aroma of spices mingling with fresh vegetables that makes this dish a comforting staple in my kitchen.
Ingredients
- 2 cups coconut milk (I love the creamy texture it adds)
- 1 tbsp extra virgin olive oil (my go-to for its fruity notes)
- 1 cup diced carrots (for a sweet crunch)
- 1 cup chopped bell peppers (I prefer a mix of colors for vibrancy)
- 2 cloves garlic, minced (because garlic makes everything better)
- 1 tbsp curry powder (the heart of the dish)
- 1 tsp turmeric (for that golden hue and health boost)
- 1 cup basmati rice (rinsed until the water runs clear, my little ritual)
Instructions
- Heat the olive oil in a clay pot over medium heat until shimmering, about 2 minutes.
- Add the minced garlic and sauté until fragrant, 30 seconds, stirring constantly to prevent burning.
- Toss in the carrots and bell peppers, cooking until slightly softened, 5 minutes. Tip: Keep the veggies crisp for texture.
- Sprinkle the curry powder and turmeric over the vegetables, stirring to coat evenly, 1 minute. Tip: Toasting the spices releases their flavors.
- Pour in the coconut milk, bringing the mixture to a gentle simmer. Tip: Don’t boil to keep the coconut milk from separating.
- Add the rinsed basmati rice, stirring to combine. Cover and reduce heat to low, cooking until the rice is tender, 20 minutes.
- Remove from heat and let stand, covered, for 5 minutes to allow the flavors to meld.
Serve this curry with a sprinkle of fresh cilantro or a squeeze of lime for an extra zing. The creamy coconut milk paired with the al dente vegetables and fluffy rice makes every bite a delight. Perfect for a cozy night in or to impress at your next potluck.
Clay Pot Pheasant with Apples
Sometimes, the best meals come from the simplest ingredients, and this Clay Pot Pheasant with Apples is no exception. I stumbled upon this recipe during a cozy autumn weekend when I was craving something hearty yet slightly sweet, and it’s been a fall favorite ever since.
Ingredients
- 1 whole pheasant, about 3 lbs (I like to pat it dry with paper towels for a better sear)
- 2 cups apple cider (freshly pressed if you can find it, it makes all the difference)
- 2 large apples, sliced (I prefer Honeycrisp for their sweetness and firmness)
- 1/4 cup extra virgin olive oil (my go-to for richness and flavor)
- 1 tbsp fresh thyme leaves (nothing beats the aroma of fresh herbs)
- 1 tsp salt (I use sea salt for its subtle crunch)
- 1/2 tsp black pepper (freshly ground, please)
Instructions
- Preheat your oven to 350°F (175°C) to ensure it’s ready for the clay pot.
- Heat the olive oil in a large skillet over medium-high heat until shimmering, about 2 minutes.
- Season the pheasant with salt and pepper, then sear in the skillet until golden brown on all sides, about 5 minutes per side. Tip: Don’t rush the sear; it’s key for flavor.
- Transfer the pheasant to a clay pot, arranging the apple slices around it. Tip: Layer the apples evenly to ensure they cook uniformly.
- Pour the apple cider over the pheasant and apples, then sprinkle with thyme leaves. Tip: The cider should come about halfway up the pheasant for perfect braising.
- Cover the clay pot with its lid and bake for 1 hour, or until the pheasant is tender and reaches an internal temperature of 165°F (74°C).
- Let the dish rest for 10 minutes before serving to allow the juices to redistribute.
Clay Pot Pheasant with Apples emerges from the oven with a tantalizing aroma, the meat fall-off-the-bone tender, and the apples perfectly softened yet holding their shape. Serve it over a bed of wild rice or with a side of roasted root vegetables for a meal that’s as beautiful as it is delicious.
Clay Pot Squid with Black Bean Sauce
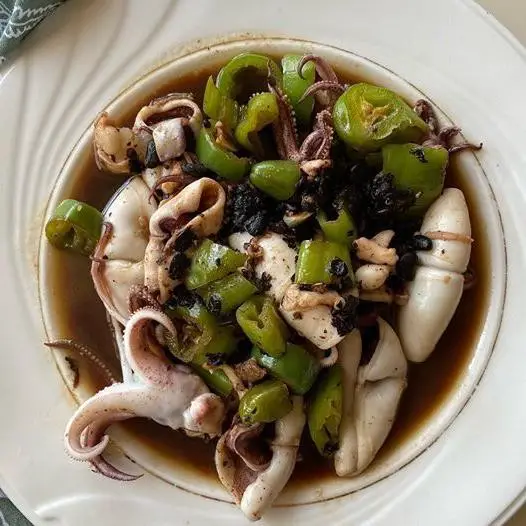
Just last weekend, I found myself craving something savory and slightly exotic, which led me to whip up this Clay Pot Squid with Black Bean Sauce. It’s a dish that reminds me of my first visit to a tiny seaside restaurant where the aroma of garlic and fermented black beans filled the air.
Ingredients
- 1 lb squid, cleaned and sliced into rings (I like to keep the tentacles whole for a fun texture)
- 2 tbsp fermented black beans, rinsed and lightly mashed (they pack a punch, so adjust to your liking)
- 3 cloves garlic, minced (fresh is best here, no compromises)
- 1 inch ginger, julienned (adds a nice zing)
- 1 tbsp soy sauce (I swear by the low-sodium version for better control)
- 1 tsp sugar (just a pinch to balance the flavors)
- 1/2 cup water (filtered makes a difference in taste)
- 2 tbsp vegetable oil (I use avocado oil for its high smoke point)
- 1 red chili, sliced (optional, for those who like it hot)
Instructions
- Heat the vegetable oil in a clay pot over medium heat until shimmering, about 2 minutes.
- Add the garlic and ginger, sautéing until fragrant, roughly 30 seconds. Tip: Don’t let them brown or they’ll turn bitter.
- Stir in the mashed black beans and chili if using, cooking for another minute to release their flavors.
- Add the squid rings and tentacles, tossing quickly to coat with the aromatics. Tip: High heat is key here to avoid rubbery squid.
- Pour in the soy sauce, sugar, and water, bringing the mixture to a simmer. Cover and cook for exactly 3 minutes. Tip: Overcooking squid is a common mistake; set a timer!
- Uncover and give everything a final stir. The sauce should be slightly thickened, clinging to the squid.
Aromatic and tender, this dish is a testament to the magic of simple ingredients. Serve it over steamed rice or alongside crisp vegetables for a meal that’s as vibrant as it is flavorful.
Clay Pot Mussels in White Wine
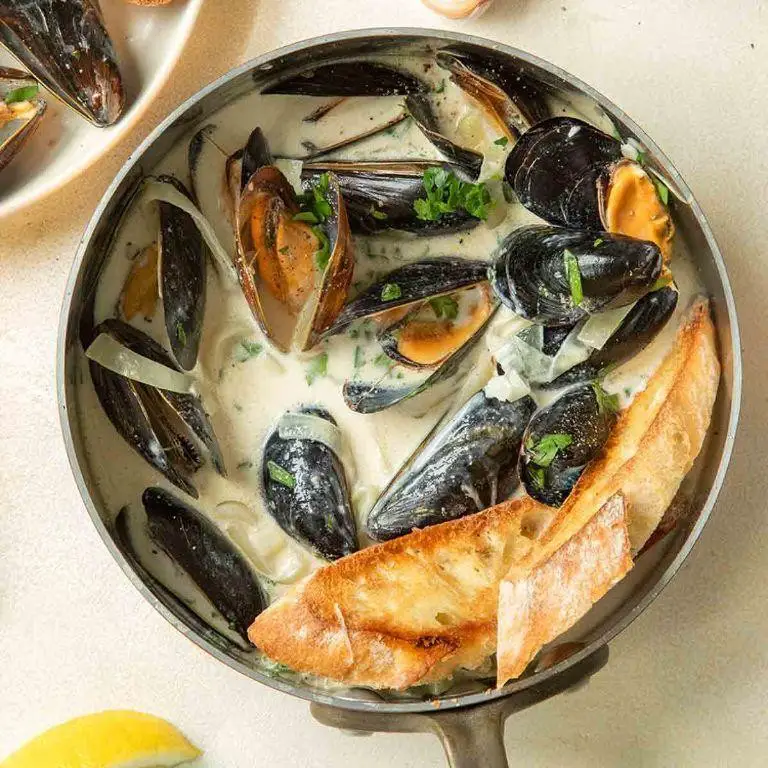
Just last weekend, I found myself craving something both elegant and easy to whip up for a last-minute dinner party. That’s when I remembered this clay pot mussels in white wine recipe—a dish that never fails to impress with its simplicity and depth of flavor.
Ingredients
- 2 lbs fresh mussels, scrubbed and debearded (I always give them a quick soak in cold water to ensure they’re free of grit)
- 1 cup dry white wine (a Sauvignon Blanc works wonders here)
- 3 cloves garlic, minced (because more garlic is always better)
- 2 tbsp extra virgin olive oil (my go-to for its fruity notes)
- 1/4 cup fresh parsley, chopped (for that fresh, herby finish)
- 1/2 tsp red pepper flakes (adjust according to your heat preference)
- 1 tbsp unsalted butter (for a touch of richness)
- Salt to taste (I prefer sea salt for its clean flavor)
Instructions
- Heat the olive oil in a large clay pot over medium heat until shimmering, about 2 minutes.
- Add the minced garlic and red pepper flakes, sautéing until fragrant, roughly 1 minute. Be careful not to burn the garlic.
- Pour in the white wine, bringing it to a simmer. Let it reduce slightly, about 3 minutes, to cook off the alcohol.
- Add the mussels to the pot, covering with a lid. Steam until the mussels open, about 5-7 minutes. Discard any that remain closed.
- Stir in the butter until melted, then sprinkle with chopped parsley and a pinch of salt.
- Serve immediately, ensuring each bowl gets plenty of the aromatic broth.
The mussels should be plump and juicy, swimming in a broth that’s briny, slightly spicy, and rich with the flavor of white wine. I love serving this with a crusty baguette to soak up every last drop of that delicious broth.
Clay Pot Pumpkin Soup

Perfect for those chilly evenings when all you crave is something warm and comforting, this Clay Pot Pumpkin Soup has become my go-to. I remember the first time I tried it; the aroma alone was enough to make me fall in love.
Ingredients
- 2 cups pumpkin puree (homemade or canned, but I swear by homemade for that extra freshness)
- 1 cup heavy cream (it makes the soup luxuriously creamy)
- 2 tbsp extra virgin olive oil (my kitchen staple for almost everything)
- 1 medium onion, diced (I like to chop mine extra fine for a smoother texture)
- 3 cloves garlic, minced (because garlic is life)
- 4 cups vegetable broth (low sodium, so you can control the saltiness)
- 1 tsp ground cinnamon (adds a warm, spicy note)
- Salt and pepper to taste (I start with 1/2 tsp salt and adjust from there)
Instructions
- Heat the olive oil in a large clay pot over medium heat until shimmering, about 2 minutes.
- Add the diced onion and minced garlic, sautéing until the onion is translucent, roughly 5 minutes. Tip: Stir frequently to prevent burning.
- Stir in the pumpkin puree, mixing well with the onions and garlic, and cook for another 3 minutes to deepen the flavors.
- Pour in the vegetable broth, bringing the mixture to a gentle boil. Tip: A slow boil helps meld the flavors better than a rapid one.
- Reduce the heat to low, stir in the heavy cream and ground cinnamon, and simmer for 15 minutes. Tip: Keep the lid slightly ajar to let some steam escape.
- Season with salt and pepper, then blend the soup until smooth using an immersion blender. For a chunkier texture, blend half the soup.
You’ll love the velvety texture and the rich, spiced flavor of this soup. Serve it with a dollop of sour cream and a sprinkle of roasted pumpkin seeds for an extra crunch.
Clay Pot Venison with Juniper Berries
Zesty flavors and hearty meals are what I live for, especially when the weather starts to turn. There’s something about the combination of venison and juniper berries that screams comfort to me, reminding me of a chilly evening spent in the mountains where I first tried this dish.
Ingredients
- 2 lbs venison shoulder, cut into 2-inch cubes (I find that the shoulder has the perfect balance of tenderness and flavor)
- 1 tbsp juniper berries, lightly crushed (their piney aroma is just irresistible)
- 2 cups beef stock (homemade if you have it, but store-bought works in a pinch)
- 1 large onion, diced (I like the sweetness it adds)
- 2 tbsp extra virgin olive oil (my go-to for richness)
- 1 tsp salt (to enhance all those wonderful flavors)
- 1/2 tsp black pepper (freshly ground, if possible)
Instructions
- Preheat your oven to 325°F (163°C) to ensure it’s ready for slow cooking.
- Heat the olive oil in a large clay pot over medium heat until shimmering. Tip: A well-heated pot is key to browning the meat properly.
- Add the venison cubes in batches, browning them on all sides. This should take about 3-4 minutes per batch. Don’t overcrowd the pot to ensure even browning.
- Remove the browned venison and set aside. In the same pot, add the diced onion, cooking until translucent, about 5 minutes.
- Return the venison to the pot, adding the crushed juniper berries, salt, and pepper. Stir to combine.
- Pour in the beef stock, ensuring the venison is just covered. Bring to a simmer. Tip: If the stock doesn’t cover the meat, add a bit of water.
- Cover the pot with its lid and transfer to the preheated oven. Cook for 2.5 hours, or until the venison is fork-tender. Tip: Check halfway through to ensure the liquid hasn’t reduced too much.
- Once done, remove from the oven and let it rest for 10 minutes before serving. Perfect for spooning over mashed potatoes or alongside roasted root vegetables.
Perfectly tender and infused with the unique flavor of juniper berries, this dish is a celebration of rustic, hearty cooking. Serve it with a side of crusty bread to soak up all the delicious juices.
Clay Pot Eggplant with Garlic Sauce
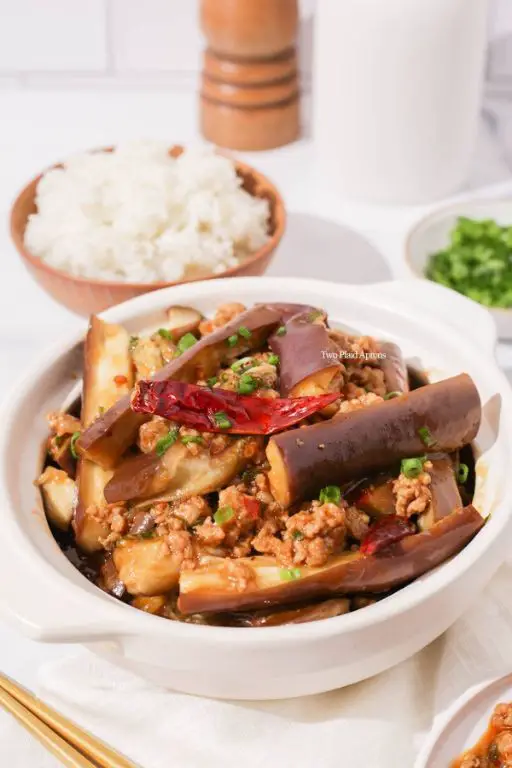
Zesty flavors and a comforting aroma fill my kitchen whenever I whip up this Clay Pot Eggplant with Garlic Sauce. It’s a dish that reminds me of cozy family dinners and the joy of sharing good food. Here’s how I make it, with a few personal twists along the way.
Ingredients
- 2 medium eggplants, cubed (I like to leave the skin on for extra texture)
- 3 tbsp extra virgin olive oil (my go-to for its fruity notes)
- 4 cloves garlic, minced (fresh is best here, trust me)
- 1 tbsp soy sauce (I opt for low-sodium to control the saltiness)
- 1 tsp sugar (just a pinch to balance the flavors)
- 1/2 cup water (room temperature blends better with the sauce)
- 1/2 tsp red pepper flakes (adjust based on your heat preference)
- 1 green onion, sliced (for that fresh, colorful finish)
Instructions
- Heat the olive oil in a clay pot over medium heat until shimmering, about 2 minutes. This ensures the eggplant absorbs the oil properly.
- Add the cubed eggplant and stir to coat with oil. Cook for 5 minutes, stirring occasionally, until the eggplant starts to soften.
- Push the eggplant to one side of the pot and add the minced garlic to the empty space. Sauté for 30 seconds until fragrant, then mix with the eggplant.
- Pour in the soy sauce, sugar, water, and red pepper flakes. Stir well to combine all the ingredients.
- Cover the pot and reduce the heat to low. Simmer for 15 minutes, checking halfway to stir and ensure nothing sticks to the bottom.
- Remove the lid and cook for an additional 5 minutes to thicken the sauce slightly. The eggplant should be tender but not mushy.
- Garnish with sliced green onion before serving. Tip: Letting it sit for 5 minutes off the heat allows the flavors to meld beautifully.
Hearty and flavorful, this dish boasts a silky texture with a punch of garlic and a hint of spice. Serve it over steamed rice or alongside grilled meats for a meal that’s sure to impress.
Conclusion
How delightful it is to explore the versatility and comfort of clay pot cooking with these 18 mouthwatering recipes! Whether you’re hosting a special gathering or simply spicing up weeknight dinners, there’s something here for every occasion. We’d love to hear which dishes become your favorites—drop us a comment below. Loved this roundup? Share the warmth by pinning this article on Pinterest for fellow food enthusiasts to discover!

Michael Johnson is the founder of Pan Mastery, Inspired by his blacksmith grandfather’s legacy has a deep appreciation for hand-crafted pots and pans, he provides invaluable guides, reviews, and recipes to enhance your culinary journey.