Venture into a world where sugar and creativity collide with our ’20 Delicious Crazy Candy Creator Recipes for Sweet Lovers’! Whether you’re a seasoned candy maker or just looking to satisfy your sweet tooth, these recipes promise to add a dash of fun and a burst of flavor to your kitchen adventures. Get ready to dazzle your taste buds and impress your friends with these irresistible treats. Let’s dive in!
Chocolate Peanut Butter Candy Bars
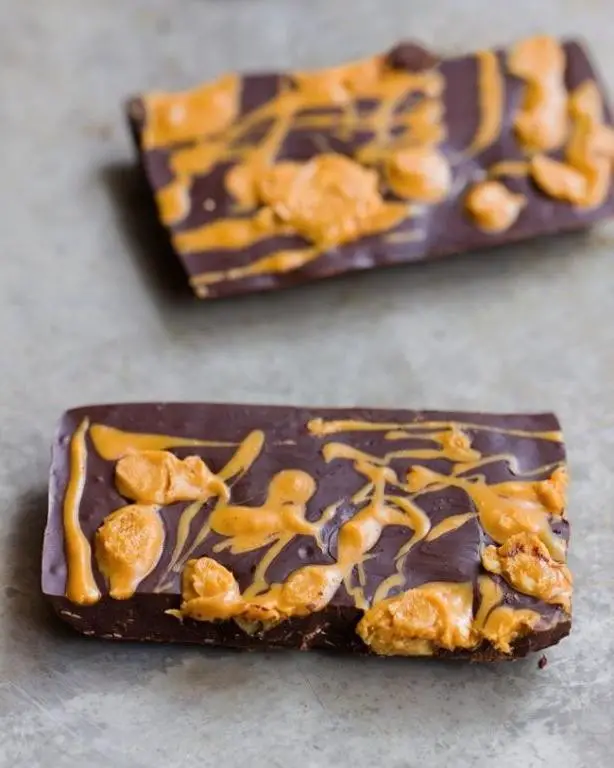
Perfect for when you’re craving something sweet, salty, and downright irresistible, these Chocolate Peanut Butter Candy Bars are your next obsession. Packed with layers of creamy peanut butter and rich chocolate, they’re a no-bake dream come true.
Ingredients
- 1 1/2 cups creamy peanut butter, divided
- 1/2 cup unsalted butter, softened
- 2 cups powdered sugar
- 1 1/2 cups graham cracker crumbs
- 1 1/2 cups semi-sweet chocolate chips
- 1 tbsp coconut oil
Instructions
- Line an 8×8-inch baking dish with parchment paper, leaving an overhang on the sides for easy removal.
- In a large bowl, combine 1 cup peanut butter, softened butter, powdered sugar, and graham cracker crumbs. Mix until fully incorporated. Tip: For a smoother texture, use a hand mixer on low speed.
- Press the mixture firmly into the prepared baking dish, ensuring an even layer. Chill in the refrigerator for 30 minutes to set.
- In a microwave-safe bowl, combine chocolate chips, remaining 1/2 cup peanut butter, and coconut oil. Microwave in 30-second intervals, stirring between each, until fully melted and smooth. Tip: Avoid overheating to prevent the chocolate from seizing.
- Pour the chocolate mixture over the chilled peanut butter layer, spreading evenly with a spatula.
- Return the dish to the refrigerator and chill for at least 2 hours, or until the chocolate layer is firm to the touch. Tip: For clean cuts, use a warm knife to slice the bars.
Rich and decadent, these bars offer a perfect balance of creamy peanut butter and velvety chocolate. Serve them chilled for a firm bite or at room temperature for a softer, more indulgent experience.
Homemade Gummy Bears
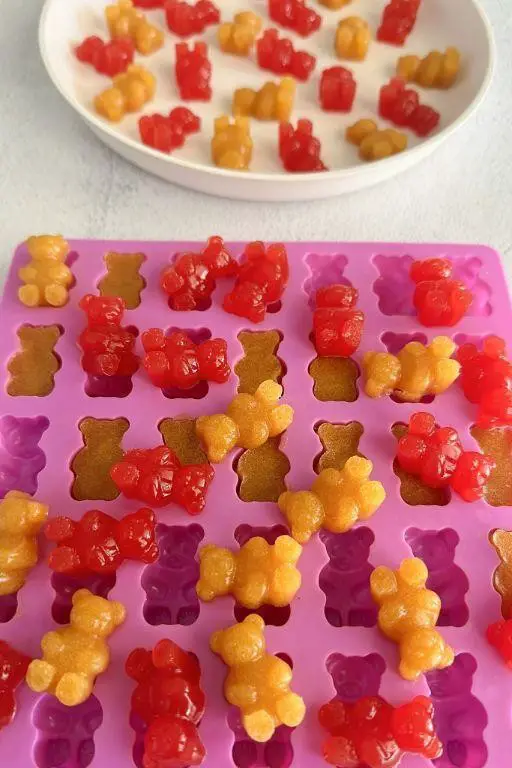
Zesty and fun, these homemade gummy bears are your next kitchen project. Grab your molds and let’s dive into a world of chewy, fruity goodness.
Ingredients
- 1 cup organic fruit juice, no pulp
- 3 tbsp grass-fed gelatin
- 2 tbsp raw honey
- 1 tsp pure vanilla extract
- 1/4 tsp citric acid
Instructions
- In a small saucepan, gently heat 1 cup organic fruit juice over medium-low heat until it reaches 120°F, stirring occasionally.
- Whisk in 3 tbsp grass-fed gelatin, one tablespoon at a time, ensuring each addition is fully dissolved before adding the next to avoid lumps.
- Add 2 tbsp raw honey and 1 tsp pure vanilla extract, stirring continuously until the mixture is smooth and uniform, about 2 minutes.
- Sprinkle in 1/4 tsp citric acid, stirring for an additional 30 seconds to fully incorporate and enhance the fruit flavor.
- Remove the saucepan from heat and carefully pour the mixture into gummy bear molds, using a dropper for precision and to minimize spills.
- Allow the gummies to set at room temperature for 20 minutes, then transfer to the refrigerator for an additional 30 minutes to firm up completely.
- Once set, pop the gummies out of the molds and store in an airtight container in the refrigerator for up to one week.
Fabulously chewy with a bright, tangy kick, these gummy bears are perfect for snacking or as a playful garnish on desserts. Try layering them in a clear glass with yogurt and granola for a visually stunning parfait.
Rainbow Candy Popcorn
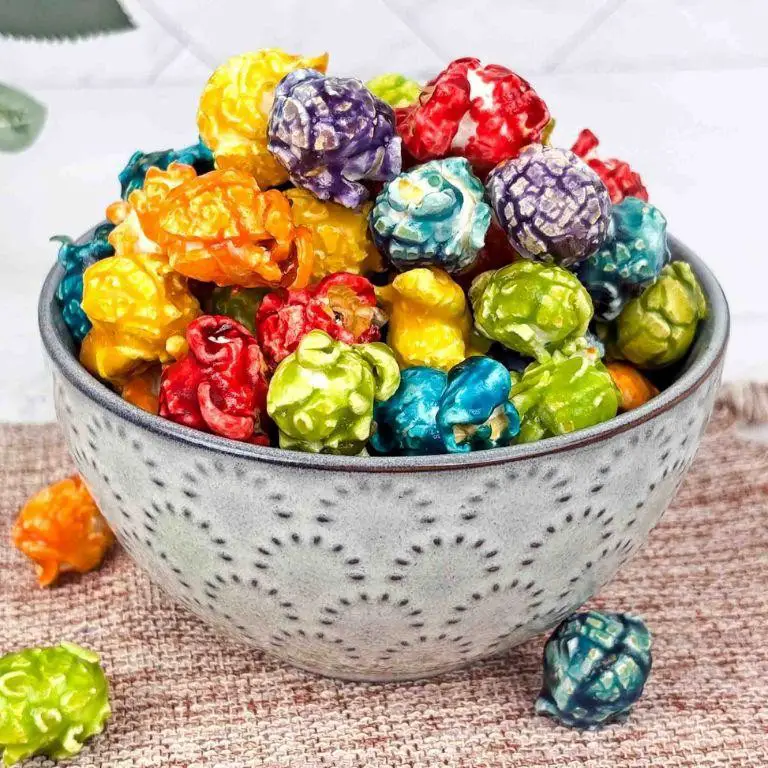
Yes, you need this Rainbow Candy Popcorn in your life—crunchy, colorful, and downright addictive. Perfect for movie nights or when you’re just craving something sweet and fun.
Ingredients
- 1/2 cup clarified butter
- 1 cup granulated sugar
- 1/4 cup light corn syrup
- 1/4 tsp fine sea salt
- 1/2 tsp pure vanilla extract
- 1/4 tsp baking soda
- 8 cups air-popped popcorn
- 1/2 cup assorted candy-coated chocolates
- 1/4 cup rainbow sprinkles
Instructions
- Preheat your oven to 250°F and line a large baking sheet with parchment paper.
- In a medium saucepan over medium heat, combine clarified butter, granulated sugar, light corn syrup, and fine sea salt. Stir continuously until the mixture reaches 300°F on a candy thermometer.
- Remove from heat and quickly stir in pure vanilla extract and baking soda. The mixture will foam slightly—this is normal.
- Immediately pour the hot syrup over the air-popped popcorn in a large bowl. Use a silicone spatula to fold gently until all the popcorn is evenly coated.
- Spread the coated popcorn onto the prepared baking sheet in a single layer. Bake for 45 minutes, stirring every 15 minutes to ensure even cooking.
- Remove from the oven and let cool for 5 minutes. While still warm, sprinkle assorted candy-coated chocolates and rainbow sprinkles over the popcorn, gently tossing to distribute.
- Allow the popcorn to cool completely before breaking into clusters. Store in an airtight container to maintain crunch.
Kick your snack game up a notch with this Rainbow Candy Popcorn—its buttery crunch meets bursts of chocolate and sprinkles in every bite. Serve in colorful paper cones for a party-ready presentation that’s as fun to eat as it is to make.
Sour Patch Grapes
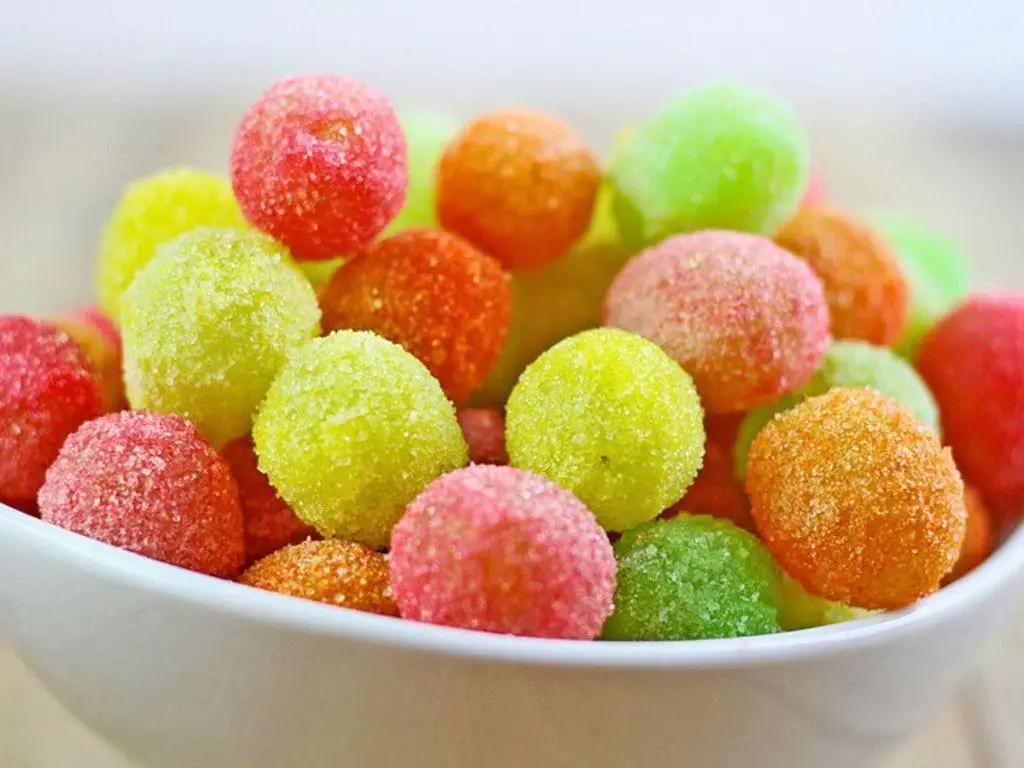
Pucker up for a snack that’s equal parts sweet, sour, and downright addictive. These Sour Patch Grapes are your next obsession, blending juicy fruit with a tangy kick.
Ingredients
- 2 cups seedless green grapes, thoroughly washed and dried
- 1/4 cup freshly squeezed lime juice
- 1/4 cup granulated sugar
- 1 tbsp citric acid
- 1/2 tsp fine sea salt
Instructions
- In a medium mixing bowl, combine the lime juice, granulated sugar, citric acid, and fine sea salt. Whisk until the sugar and salt are completely dissolved.
- Add the dried grapes to the bowl, gently tossing to ensure each grape is evenly coated with the mixture.
- Transfer the grapes to a parchment-lined baking sheet, spreading them out in a single layer to prevent clumping.
- Place the baking sheet in the freezer for at least 2 hours, or until the grapes are frozen solid and the coating is crisp.
- Once frozen, transfer the grapes to an airtight container, separating layers with parchment paper to maintain their individual texture.
Yield a batch of these icy treats for a playful twist on classic sour candy. The grapes retain a juicy burst inside, while the frozen coating delivers a satisfying crunch. Serve them straight from the freezer for a refreshing summer snack or as a unique garnish for cocktails.
Cookie Dough Truffles

Zesty and irresistible, these cookie dough truffles are your next obsession. No baking, no fuss—just pure, edible cookie dough bliss rolled into bite-sized perfection.
Ingredients
- 1 cup all-purpose flour, heat-treated
- 1/2 cup unsalted butter, softened
- 1/2 cup light brown sugar, packed
- 1/4 cup granulated sugar
- 2 tbsp whole milk
- 1 tsp pure vanilla extract
- 1/2 tsp fine sea salt
- 1/2 cup mini chocolate chips
- 8 oz semi-sweet chocolate, finely chopped
- 1 tbsp coconut oil
Instructions
- In a medium bowl, cream together the softened unsalted butter, light brown sugar, and granulated sugar until light and fluffy, about 2 minutes.
- Add the whole milk and pure vanilla extract to the butter mixture, stirring until fully incorporated.
- Gradually mix in the heat-treated all-purpose flour and fine sea salt until a soft dough forms.
- Fold in the mini chocolate chips until evenly distributed throughout the dough.
- Using a small cookie scoop, portion the dough into 1-inch balls and place them on a parchment-lined baking sheet. Chill in the freezer for 30 minutes to firm up.
- In a microwave-safe bowl, melt the semi-sweet chocolate and coconut oil together in 30-second intervals, stirring between each, until smooth.
- Using a fork, dip each chilled dough ball into the melted chocolate, ensuring it’s fully coated. Allow excess chocolate to drip off before returning to the parchment-lined baking sheet.
- Refrigerate the truffles for 15 minutes, or until the chocolate coating is set.
Lusciously creamy with a slight crunch from the chocolate shell, these truffles are a textural dream. Serve them atop a scoop of vanilla bean ice cream for an decadent twist.
Rock Candy Sticks
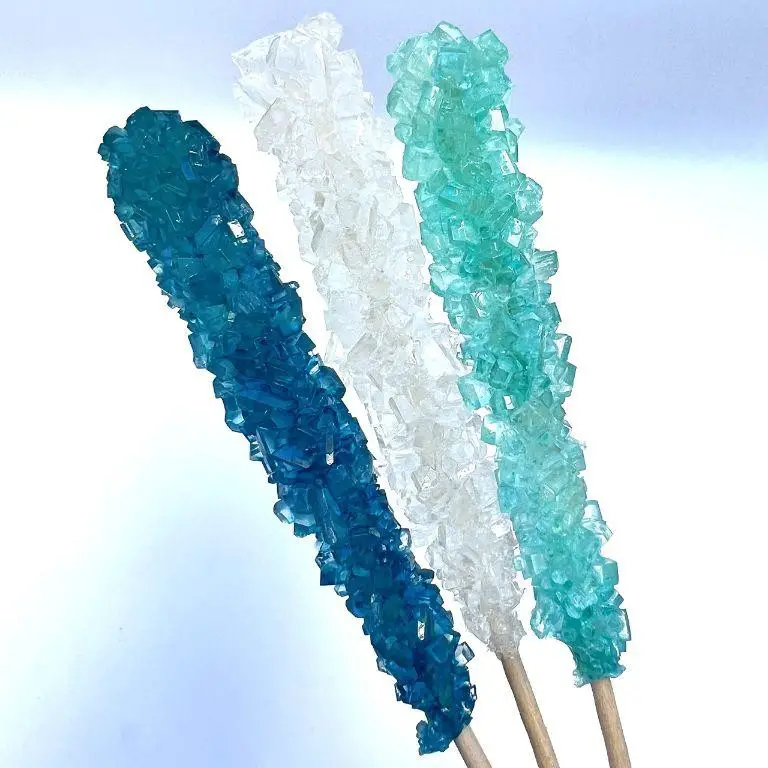
Rock candy sticks are the ultimate DIY sweet treat—**transform** simple sugar into dazzling, crunchy crystals with this foolproof recipe.
Ingredients
- 2 cups granulated sugar
- 1 cup distilled water
- 1/4 tsp cream of tartar
- Food-grade flavoring oil (e.g., peppermint, orange)
- Liquid food coloring (optional)
- Wooden skewers or sticks
- Clothespins
Instructions
- **Combine** sugar, water, and cream of tartar in a medium saucepan over medium heat. Stir until sugar dissolves completely.
- **Increase** heat to high and bring the mixture to a boil without stirring. Use a candy thermometer to monitor until it reaches 300°F (hard crack stage).
- **Remove** from heat and let sit for 5 minutes to reduce bubbling. Add flavoring oil and food coloring, stirring gently to incorporate.
- **Prepare** sticks by wetting them slightly and rolling in granulated sugar to encourage crystal growth. Let dry for 5 minutes.
- **Pour** the syrup into tall, heatproof jars. Carefully place the prepared sticks into the syrup, using clothespins to secure them upright and centered.
- **Allow** the jars to sit undisturbed at room temperature for 7-10 days. Crystals will form gradually on the sticks.
- **Break** any surface crystals with a knife after 24 hours to ensure the syrup remains accessible for further crystal growth.
- **Remove** the rock candy sticks once desired crystal size is achieved. Let them dry on parchment paper for 1 hour before serving.
The result? **Shimmering**, glass-like sticks with a satisfying crunch and intense flavor. Serve them as edible stirrers in cocktails or wrap individually for sweet party favors.
Fruit Leather Roll-Ups
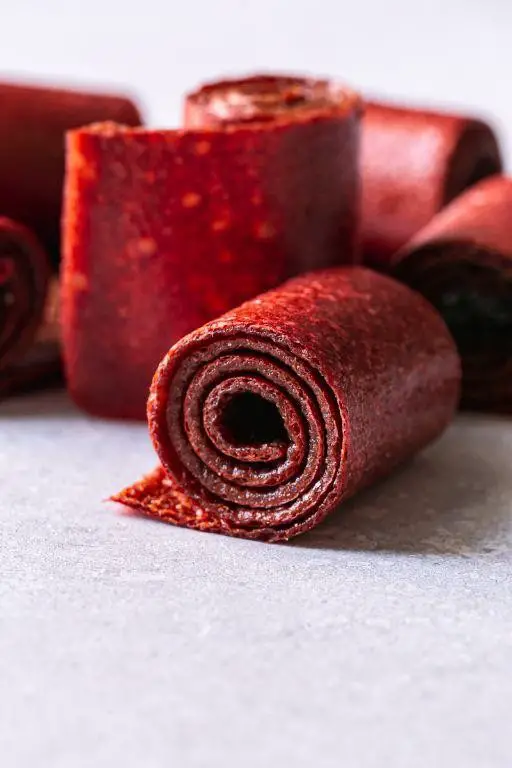
Viral in every kitchen, these Fruit Leather Roll-Ups are your go-to snack for a burst of natural sweetness. No fuss, all flavor—let’s roll.
Ingredients
- 2 cups organic ripe strawberries, hulled and pureed
- 1 cup organic ripe mango, peeled and pureed
- 1 tbsp fresh lemon juice
- 1 tbsp raw honey
- 1/2 tsp pure vanilla extract
Instructions
- Preheat your oven to 170°F and line a baking sheet with a silicone mat or parchment paper.
- In a medium bowl, combine the strawberry puree, mango puree, lemon juice, honey, and vanilla extract. Whisk until fully incorporated.
- Pour the mixture onto the prepared baking sheet, spreading it evenly with a spatula to about 1/8-inch thickness.
- Bake for 4-6 hours, or until the fruit leather is no longer sticky to the touch but still pliable. Tip: Rotate the baking sheet halfway through for even drying.
- Remove from the oven and let cool for 10 minutes. Tip: If the edges are too dry, trim them off with scissors for a uniform texture.
- Cut into strips and roll them up tightly. Tip: For easier rolling, use a piece of parchment paper to help roll without sticking.
Chewy with a tangy-sweet punch, these roll-ups are perfect for lunchboxes or as a post-workout treat. Try layering different fruit purees before baking for a striped effect.
Caramel Apple Lollipops
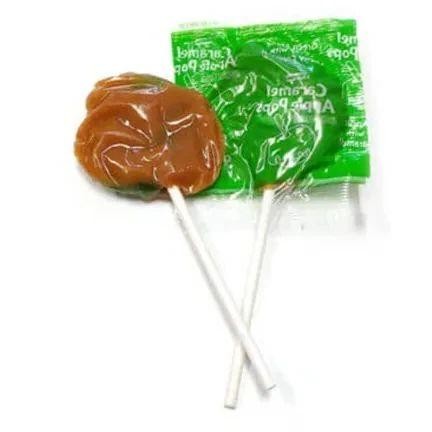
Make your taste buds dance with these irresistible Caramel Apple Lollipops—perfect for snacking or gifting. Melt, dip, and twist your way to a sweet treat that’s as fun to make as it is to eat.
Ingredients
- 1 cup granulated sugar
- 1/2 cup light corn syrup
- 1/4 cup water
- 1/2 teaspoon pure vanilla extract
- 1/4 teaspoon citric acid
- 6 medium Granny Smith apples, washed and dried
- 6 lollipop sticks
- 1/2 cup high-quality caramel sauce, warmed
- 1/4 cup crushed roasted almonds
Instructions
- Combine granulated sugar, light corn syrup, and water in a heavy-bottomed saucepan over medium heat. Stir until sugar dissolves.
- Attach a candy thermometer to the saucepan. Without stirring, cook the mixture to 300°F (hard crack stage), about 10-15 minutes.
- Remove from heat; immediately stir in vanilla extract and citric acid. Tip: Work quickly to prevent the mixture from hardening.
- Insert a lollipop stick into the top of each apple, ensuring it’s secure. Tip: Use a small knife to make a starter hole for easier insertion.
- Dip each apple into the hot sugar mixture, swirling to coat evenly. Allow excess to drip off.
- Place coated apples on a parchment-lined baking sheet. Drizzle with warmed caramel sauce and sprinkle with crushed roasted almonds. Tip: For a smoother finish, tilt the apple while drizzling.
- Let cool completely at room temperature until the coating is hard, about 30 minutes.
Fantastic for fall festivities, these lollipops boast a crunchy shell with a juicy apple center. Serve them upright in a foam block for a stunning centerpiece or wrap individually in cellophane for sweet party favors.
Peppermint Patties

Elevate your dessert game with these homemade Peppermint Patties—crisp, creamy, and bursting with refreshing mint.
Ingredients
- 2 cups powdered sugar, sifted
- 1 1/2 tbsp unsalted butter, softened
- 1/4 tsp pure peppermint extract
- 2 tbsp heavy cream
- 12 oz semisweet chocolate chips
- 1 tbsp coconut oil
Instructions
- In a medium bowl, combine sifted powdered sugar, softened unsalted butter, pure peppermint extract, and heavy cream. Mix until a smooth dough forms.
- Roll the dough into 1-inch balls, then flatten into patties about 1/4-inch thick. Place on a parchment-lined baking sheet and freeze for 30 minutes to firm up.
- In a double boiler, melt semisweet chocolate chips with coconut oil over low heat, stirring constantly until smooth. Tip: Ensure no water gets into the chocolate to prevent seizing.
- Using a fork, dip each peppermint patty into the melted chocolate, coating completely. Let excess chocolate drip off before returning to the parchment-lined baking sheet.
- Chill the coated patties in the refrigerator for at least 1 hour, or until the chocolate is set. Tip: For a glossy finish, temper the chocolate before dipping.
- Serve chilled. Tip: For an extra minty kick, sprinkle crushed candy canes on top before the chocolate sets.
These Peppermint Patties offer a delightful contrast between the crisp chocolate shell and the soft, minty center. Try serving them on a stick for a fun, lollipop-style treat at your next gathering.
Strawberry Cream Cheese Candies
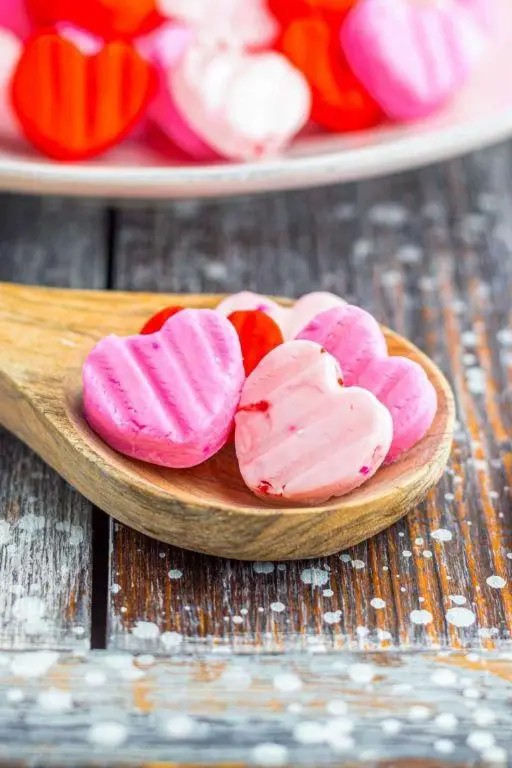
Perfect for summer snacking, these Strawberry Cream Cheese Candies blend juicy sweetness with creamy tang. Whip them up in minutes for a treat that’s as fun to make as it is to eat.
Ingredients
- 8 oz cream cheese, softened to room temperature
- 1/2 cup freeze-dried strawberries, finely ground
- 1/4 cup powdered sugar, sifted
- 1 tsp pure vanilla extract
- 1/2 cup white chocolate chips, melted
- 1 tbsp coconut oil, refined
Instructions
- In a medium bowl, combine the softened cream cheese, ground freeze-dried strawberries, sifted powdered sugar, and vanilla extract. Mix until fully incorporated and smooth.
- Using a small cookie scoop, portion the mixture into 1-inch balls and place them on a parchment-lined baking sheet. Freeze for 15 minutes to firm up.
- While the candies chill, melt the white chocolate chips and refined coconut oil together in a microwave-safe bowl in 30-second intervals, stirring until smooth.
- Dip each chilled cream cheese ball into the melted white chocolate, ensuring full coverage. Use a fork to lift and tap off excess chocolate.
- Return the dipped candies to the parchment-lined sheet. Immediately sprinkle with additional ground freeze-dried strawberries for garnish before the chocolate sets.
- Chill in the refrigerator for 30 minutes, or until the chocolate coating is firm to the touch.
Melt-in-your-mouth creamy centers meet a crisp white chocolate shell in these candies. Serve them chilled on a platter with fresh strawberries for a stunning contrast.
Blueberry Bliss Balls
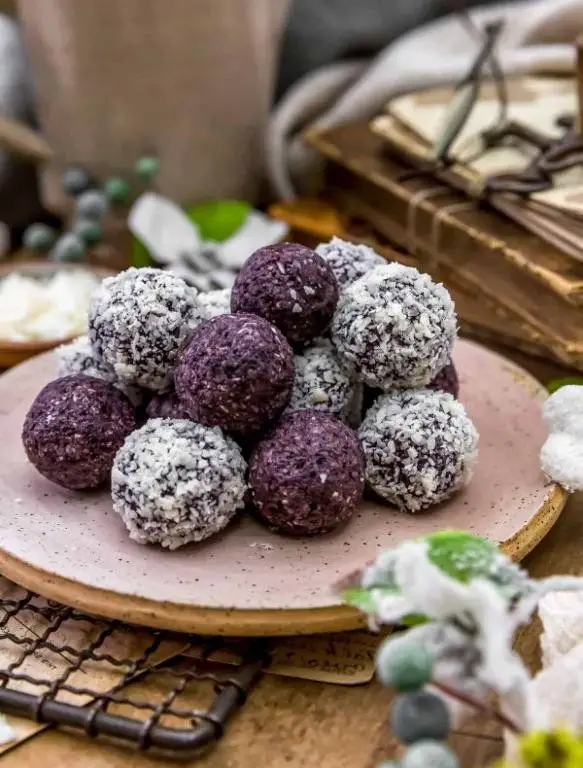
Crush your snack game with these no-bake Blueberry Bliss Balls—packed with antioxidants and ready in minutes.
Ingredients
- 1 cup raw almonds, finely ground
- 1/2 cup dried blueberries, unsweetened
- 1/4 cup almond butter, creamy and unsalted
- 2 tbsp pure maple syrup, grade A
- 1 tsp vanilla extract, pure
- 1/4 tsp sea salt, finely ground
- 1/4 cup unsweetened shredded coconut, for rolling
Instructions
- In a food processor, pulse the raw almonds until finely ground, about 30 seconds.
- Add the dried blueberries, almond butter, maple syrup, vanilla extract, and sea salt to the processor.
- Process the mixture on high until it forms a sticky dough, approximately 1 minute. Tip: Scrape down the sides halfway to ensure even mixing.
- Roll the dough into 1-inch balls using your hands. Tip: Lightly wet your hands to prevent sticking.
- Roll each ball in unsweetened shredded coconut until fully coated. Tip: For extra texture, toast the coconut lightly before rolling.
- Place the bliss balls on a parchment-lined tray and refrigerate for at least 30 minutes to set.
Now these bliss balls boast a chewy texture with a burst of blueberry sweetness, balanced by the richness of almond butter. Serve them chilled for a refreshing treat or pack them for an on-the-go energy boost.
Vanilla Bean Fudge
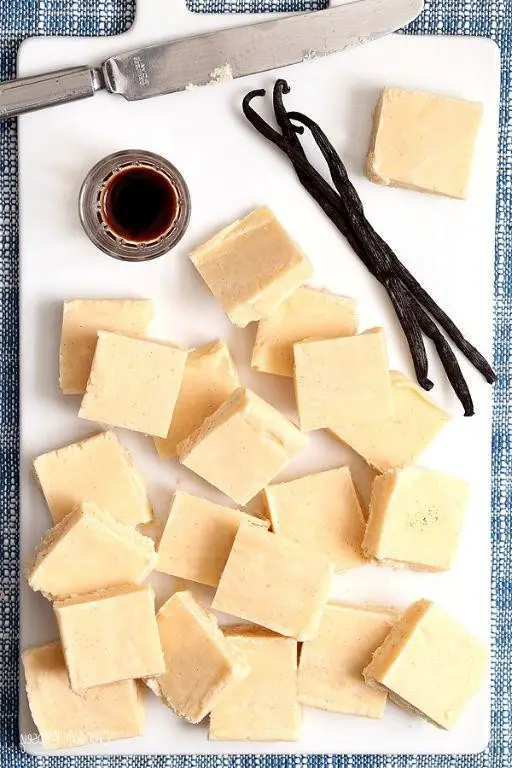
Get ready to whip up a batch of creamy, dreamy Vanilla Bean Fudge that’ll have everyone begging for the recipe. This isn’t just any fudge—it’s a velvety, rich treat with real vanilla bean specks that scream luxury.
Ingredients
- 2 cups granulated sugar
- 1 cup heavy cream
- 1/2 cup unsalted butter, cubed
- 1/4 cup light corn syrup
- 1 vanilla bean, split and seeds scraped
- 1/4 tsp fine sea salt
Instructions
- Line an 8-inch square baking pan with parchment paper, leaving an overhang on all sides for easy removal.
- In a medium saucepan over medium heat, combine sugar, heavy cream, butter, corn syrup, vanilla bean seeds, and salt. Stir until sugar dissolves.
- Attach a candy thermometer to the saucepan. Without stirring, bring mixture to a boil. Cook until thermometer reads 238°F (soft-ball stage), about 10-15 minutes.
- Remove saucepan from heat. Let cool, undisturbed, until temperature drops to 110°F, about 45 minutes.
- Using a wooden spoon, vigorously stir the mixture until it thickens, loses its gloss, and starts to hold its shape, about 10 minutes.
- Quickly pour fudge into prepared pan. Smooth top with an offset spatula. Let set at room temperature for at least 4 hours.
- Using parchment overhang, lift fudge out of pan. Cut into 1-inch squares with a sharp knife.
Absolutely divine, this fudge boasts a melt-in-your-mouth texture with deep vanilla flavor. Serve atop espresso brownies for an indulgent twist or gift in pretty boxes tied with ribbon.
Lemon Drop Candy Cookies
Dive into these zesty Lemon Drop Candy Cookies, where tangy meets sweet in a bite-sized explosion of flavor. Perfect for brightening up any dessert table or as a cheeky midday pick-me-up.
Ingredients
- 1 cup unsalted butter, room temperature
- 1 1/2 cups granulated sugar
- 2 pasture-raised eggs, lightly beaten
- 1 tsp pure vanilla extract
- 2 3/4 cups all-purpose flour
- 1 tsp baking soda
- 1/2 tsp baking powder
- 1/2 tsp sea salt
- 1 cup lemon drop candies, finely crushed
- Zest of 2 lemons
Instructions
- Preheat your oven to 375°F (190°C) and line baking sheets with parchment paper.
- In a large mixing bowl, cream together the unsalted butter and granulated sugar until light and fluffy, about 3 minutes.
- Gradually add the lightly beaten pasture-raised eggs and pure vanilla extract to the butter mixture, mixing until fully incorporated.
- In a separate bowl, whisk together the all-purpose flour, baking soda, baking powder, and sea salt.
- Slowly add the dry ingredients to the wet mixture, mixing just until the dough comes together.
- Fold in the finely crushed lemon drop candies and lemon zest until evenly distributed throughout the dough.
- Using a small cookie scoop, portion the dough onto the prepared baking sheets, spacing them 2 inches apart.
- Bake for 10-12 minutes, or until the edges are lightly golden but the centers are still soft.
- Allow the cookies to cool on the baking sheets for 5 minutes before transferring to a wire rack to cool completely.
These cookies boast a crisp edge with a chewy center, packed with bursts of citrusy lemon candy. Serve them alongside a scoop of vanilla bean ice cream for an irresistible contrast of flavors and textures.
Maple Walnut Candy
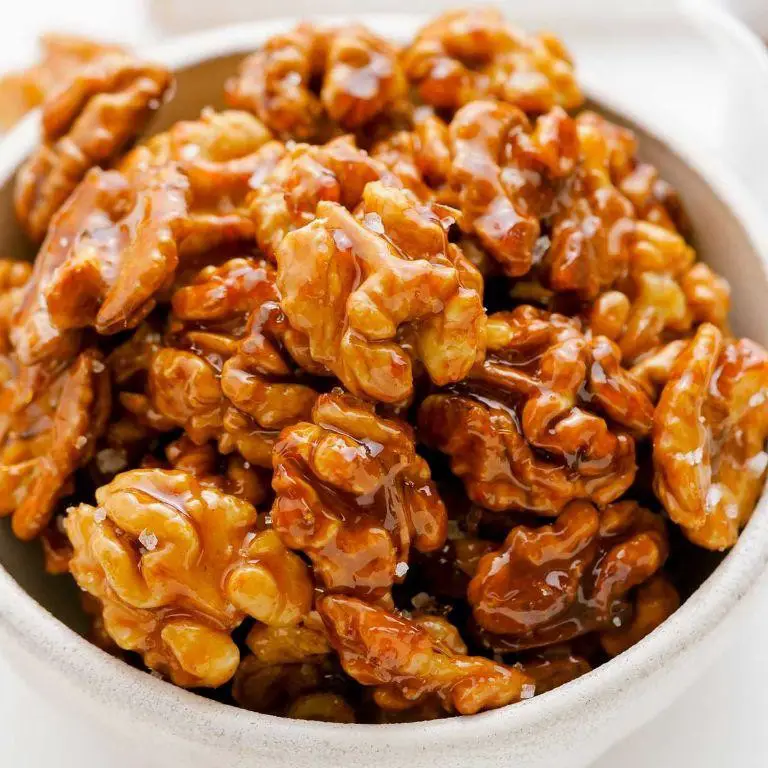
Absolutely irresistible, this Maple Walnut Candy combines the rich depth of pure maple syrup with the crunch of toasted walnuts. A no-fuss treat that’s as easy to make as it is to devour.
Ingredients
- 1 cup pure maple syrup, Grade A
- 1 cup granulated sugar
- 1/2 cup heavy cream
- 2 tbsp unsalted butter
- 1 tsp pure vanilla extract
- 1 1/2 cups walnuts, toasted and roughly chopped
Instructions
- Line a baking sheet with parchment paper and lightly grease with butter.
- In a heavy-bottomed saucepan, combine 1 cup pure maple syrup, 1 cup granulated sugar, and 1/2 cup heavy cream over medium heat. Stir continuously until the sugar dissolves.
- Insert a candy thermometer and cook the mixture to 240°F (soft-ball stage), stirring occasionally to prevent scorching. Tip: Avoid stirring too vigorously to prevent crystallization.
- Remove from heat and quickly stir in 2 tbsp unsalted butter and 1 tsp pure vanilla extract until fully incorporated.
- Fold in 1 1/2 cups toasted and roughly chopped walnuts, ensuring even distribution.
- Pour the mixture onto the prepared baking sheet, spreading it evenly with a spatula. Tip: Work quickly as the candy sets fast.
- Allow to cool completely at room temperature, about 1 hour, before breaking into pieces. Tip: For uniform pieces, score the candy lightly with a knife before it fully sets.
Crunchy walnuts enveloped in a velvety maple caramel create a symphony of textures. Serve these candies atop vanilla ice cream or alongside a sharp cheddar cheese for a sophisticated twist.
Pumpkin Spice Caramels
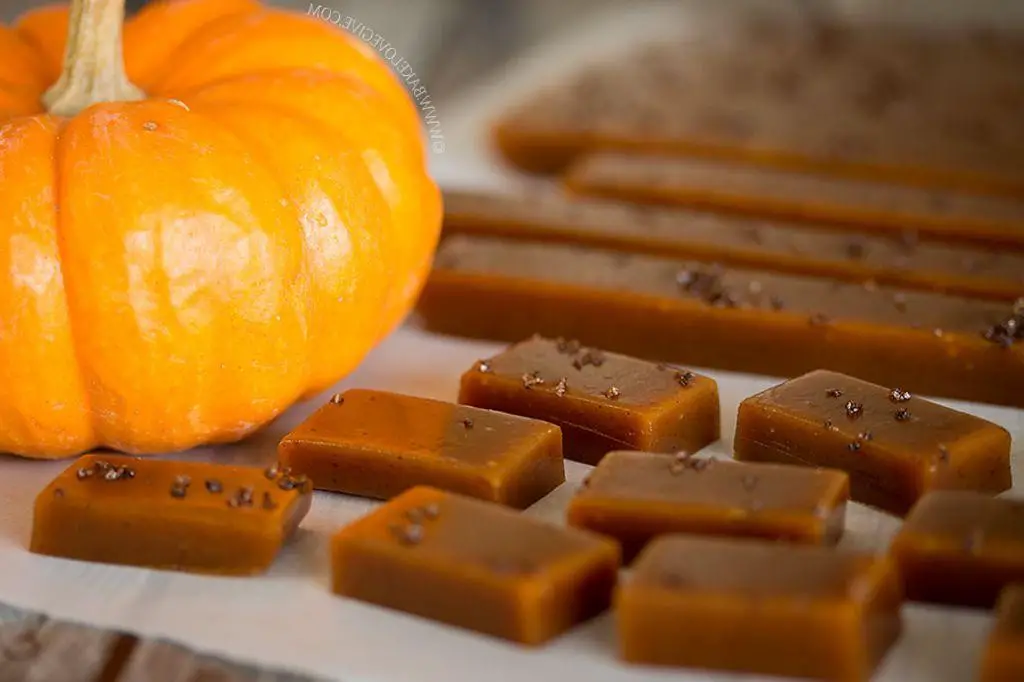
Crave something sweet with a spicy kick? These Pumpkin Spice Caramels blend rich, buttery caramel with warm autumn spices for a treat that’s irresistibly smooth and perfectly chewy.
Ingredients
- 1 cup granulated sugar
- 1/2 cup heavy cream
- 1/4 cup unsalted butter, cubed
- 1/4 cup pumpkin puree
- 1 tsp vanilla extract
- 1/2 tsp ground cinnamon
- 1/4 tsp ground nutmeg
- 1/4 tsp ground ginger
- 1/8 tsp ground cloves
- 1/2 tsp sea salt
Instructions
- Line an 8-inch square baking pan with parchment paper, leaving an overhang on two sides for easy removal.
- In a medium saucepan over medium heat, combine sugar, heavy cream, and butter. Stir constantly until butter melts and sugar dissolves, about 3 minutes.
- Add pumpkin puree, vanilla extract, cinnamon, nutmeg, ginger, cloves, and sea salt. Stir to combine.
- Cook mixture, without stirring, until it reaches 248°F on a candy thermometer (firm-ball stage), about 10-12 minutes.
- Immediately pour caramel into prepared pan. Let cool at room temperature for 2 hours until set.
- Using the parchment overhang, lift caramel out of pan. Cut into 1-inch squares with a sharp, oiled knife.
- Wrap each caramel individually in wax paper for a professional touch.
Oozing with warmth and spice, these caramels offer a velvety texture that melts in your mouth. Serve them alongside a crisp apple salad or as a decadent topping for vanilla ice cream.
Cherry Almond Bark
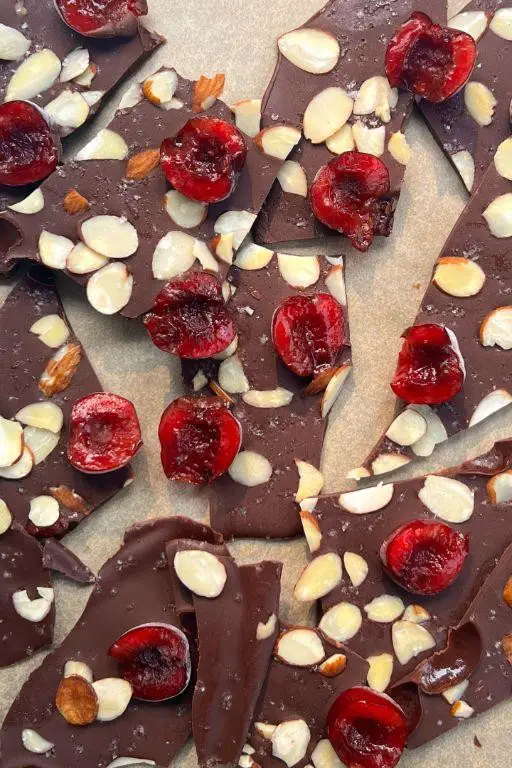
Fancy a sweet, crunchy treat that’s as easy to make as it is to devour? This Cherry Almond Bark combines tart dried cherries and toasted almonds with rich dark chocolate for a dessert that’s effortlessly elegant.
Ingredients
- 12 oz high-quality dark chocolate, finely chopped
- 1/2 cup dried cherries, roughly chopped
- 1/2 cup whole almonds, toasted and roughly chopped
- 1/4 tsp flaky sea salt
Instructions
- Line a baking sheet with parchment paper, ensuring it’s smooth to avoid wrinkles in your bark.
- Place the finely chopped dark chocolate in a heatproof bowl. Set over a saucepan of simmering water (double boiler method), ensuring the bowl doesn’t touch the water. Melt the chocolate, stirring occasionally, until completely smooth, about 5 minutes.
- Remove the bowl from heat. Quickly stir in the dried cherries and toasted almonds until evenly distributed.
- Pour the mixture onto the prepared baking sheet. Use a spatula to spread it into an even layer, about 1/4 inch thick.
- Sprinkle the flaky sea salt evenly over the top while the chocolate is still warm.
- Let the bark set at room temperature until firm, about 2 hours, or speed up the process by placing it in the refrigerator for 30 minutes.
- Once set, break the bark into irregular pieces with your hands or cut with a sharp knife for cleaner edges.
Here’s the deal: this bark boasts a perfect balance of creamy chocolate, chewy cherries, and crunchy almonds, with a hint of salt to elevate all the flavors. Serve it on a cheese board for a sweet contrast or package it prettily for a homemade gift that’s sure to impress.
Coconut Lime Candy Bites
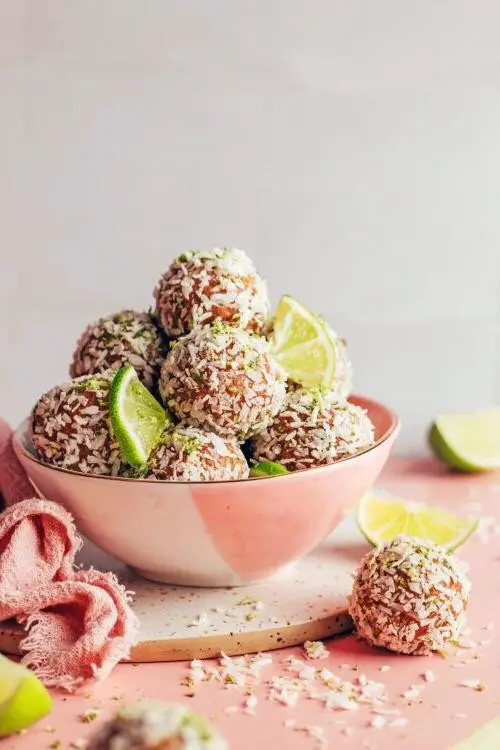
Make these zesty Coconut Lime Candy Bites your next kitchen adventure—quick, no-bake, and bursting with tropical vibes.
Ingredients
- 1 cup unsweetened shredded coconut
- 1/2 cup coconut cream, chilled
- 1/4 cup raw honey
- 2 tbsp freshly squeezed lime juice
- 1 tsp lime zest, finely grated
- 1/2 tsp pure vanilla extract
- 1/4 tsp sea salt
Instructions
- In a medium mixing bowl, combine 1 cup unsweetened shredded coconut, 1/2 cup chilled coconut cream, and 1/4 cup raw honey. Stir until the mixture is uniformly sticky.
- Add 2 tbsp freshly squeezed lime juice, 1 tsp finely grated lime zest, 1/2 tsp pure vanilla extract, and 1/4 tsp sea salt to the bowl. Mix vigorously to incorporate all flavors evenly.
- Using a small cookie scoop, portion the mixture into 1-inch balls. Roll each ball between your palms to smooth the surface. Tip: Wet your hands slightly to prevent sticking.
- Place the balls on a parchment-lined baking sheet. Freeze for 30 minutes to set. Tip: For a firmer texture, extend freezing time to 1 hour.
- Serve chilled. Tip: Roll in additional shredded coconut or drizzle with melted dark chocolate for extra flair.
Oozing with creamy coconut and tangy lime, these bites offer a chewy yet melt-in-your-mouth experience. Perfect as a bright finish to a summer meal or a quick pick-me-up straight from the freezer.
Espresso Chocolate Candies
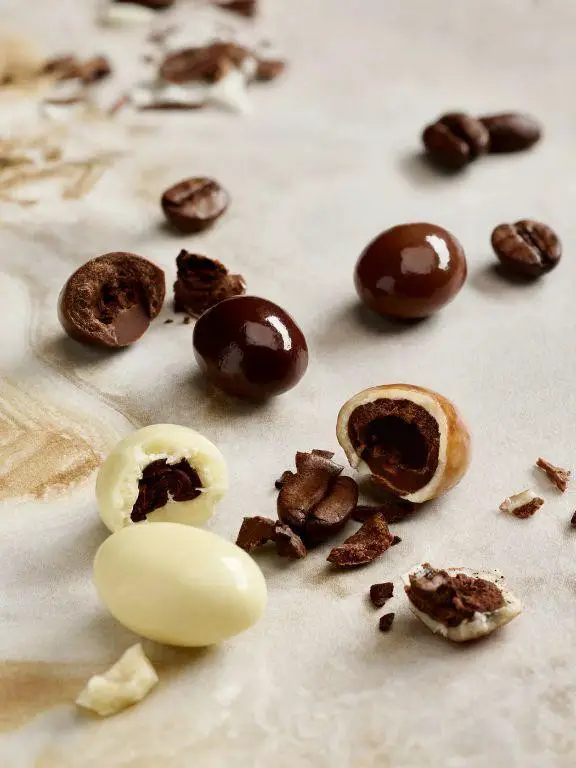
Yield to your sweet tooth with these Espresso Chocolate Candies—bold, bite-sized, and brimming with energy. Perfect for a quick pick-me-up or a sophisticated dessert.
Ingredients
- 1 cup high-quality dark chocolate, finely chopped
- 2 tbsp unsalted butter, clarified
- 1/4 cup heavy cream, warmed to 110°F
- 1 tbsp finely ground espresso beans
- 1/2 tsp pure vanilla extract
- Pinch of sea salt
Instructions
- Line a mini muffin tin with paper liners; set aside.
- In a double boiler over medium heat, melt the dark chocolate and clarified butter together, stirring constantly until smooth, about 5 minutes.
- Remove from heat; whisk in the warmed heavy cream until fully incorporated.
- Stir in the ground espresso beans, vanilla extract, and sea salt until evenly distributed.
- Pour the mixture into the prepared muffin liners, filling each about 3/4 full.
- Chill in the refrigerator for at least 2 hours, or until set.
- Once firm, remove the candies from the liners and serve.
These candies boast a velvety texture with a robust espresso kick, balanced by the deep richness of dark chocolate. Serve them alongside a shot of espresso for an extra caffeine boost or as a decadent garnish on a scoop of vanilla bean ice cream.
Raspberry Rosewater Truffles

Raspberry rosewater truffles are your next obsession. **Whip up** these decadent bites for a luxurious treat that’s as easy to make as it is to devour.
Ingredients
- 1 cup heavy cream, pasteurized
- 12 oz high-quality dark chocolate, finely chopped
- 2 tbsp unsalted butter, clarified
- 1 tsp rosewater, food-grade
- 1/2 cup freeze-dried raspberries, finely ground
- 1/4 cup cocoa powder, Dutch-processed
Instructions
- **Heat** the heavy cream in a small saucepan over medium heat until it reaches a gentle simmer, about 180°F.
- **Place** the chopped chocolate in a heatproof bowl. Pour the hot cream over the chocolate and let it sit for 2 minutes to soften.
- **Whisk** the chocolate and cream together until smooth. **Tip**: Ensure no water gets into the mixture to prevent seizing.
- **Stir** in the clarified butter and rosewater until fully incorporated. **Tip**: Use a spatula for a smoother blend.
- **Cover** the bowl with plastic wrap and refrigerate for 2 hours, or until the mixture is firm enough to scoop.
- **Scoop** tablespoon-sized portions of the mixture and roll into balls. **Tip**: Wear gloves to keep the truffles from melting in your hands.
- **Roll** each truffle in the ground freeze-dried raspberries or cocoa powder until fully coated.
- **Chill** the truffles on a parchment-lined tray for 30 minutes before serving to set the coatings.
**Final touch**: These truffles boast a **silky** chocolate center with a **tangy** raspberry crunch. **Serve** them on a rose petal-lined platter for an Instagram-worthy dessert spread.
Toasted Marshmallow Squares
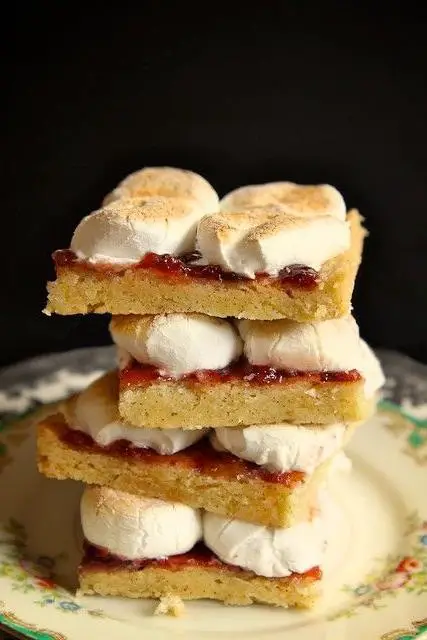
Whip up these Toasted Marshmallow Squares for a gooey, dreamy treat that’s **ridiculously easy** to make and even easier to devour.
Ingredients
- 1 1/2 cups graham cracker crumbs, finely ground
- 1/2 cup unsalted butter, melted and slightly cooled
- 1/4 cup granulated sugar
- 3 cups mini marshmallows, divided
- 1/2 cup dark chocolate chips, premium quality
- 1 tsp vanilla extract, pure
Instructions
- Preheat your oven to 350°F (175°C) and line an 8×8-inch baking pan with parchment paper, leaving an overhang for easy removal.
- In a medium bowl, combine graham cracker crumbs, melted butter, and sugar until the mixture resembles wet sand. Press firmly into the prepared pan to form an even layer.
- Bake the crust for 10 minutes, or until lightly golden. Remove from oven and let cool slightly.
- Evenly sprinkle 2 cups of mini marshmallows over the crust. Return to the oven for 3-4 minutes, just until marshmallows begin to puff.
- Meanwhile, melt chocolate chips with vanilla extract in a double boiler over simmering water, stirring until smooth. Drizzle over the toasted marshmallows.
- Scatter the remaining 1 cup of mini marshmallows on top. Use a kitchen torch to lightly toast the marshmallows for a smoky flavor, or broil for 1-2 minutes, watching closely to prevent burning.
- Let cool completely before lifting out of the pan and cutting into squares.
Enjoy the **crunchy, creamy, chocolatey** layers with a glass of cold milk or crumbled over vanilla ice cream for an extra indulgent dessert.
Conclusion
Mouthwatering doesn’t even begin to cover it! This roundup of 20 Delicious Crazy Candy Creator Recipes is a treasure trove for sweet lovers, offering everything from nostalgic treats to innovative confections. We’d love for you to dive in, try these recipes, and share which ones made your taste buds dance. Don’t forget to pin your favorites and spread the sweetness on Pinterest. Happy candy making!

Michael Johnson is the founder of Pan Mastery, Inspired by his blacksmith grandfather’s legacy has a deep appreciation for hand-crafted pots and pans, he provides invaluable guides, reviews, and recipes to enhance your culinary journey.