Are you ready to transform your dinner routine with some irresistibly crispy baked chicken? Whether you’re craving comfort food on a chilly evening or seeking a quick, wholesome meal for the family, we’ve got you covered. Dive into our roundup of 18 delicious recipes that promise all the crunch without the guilt. Let’s get baking and make every bite count!
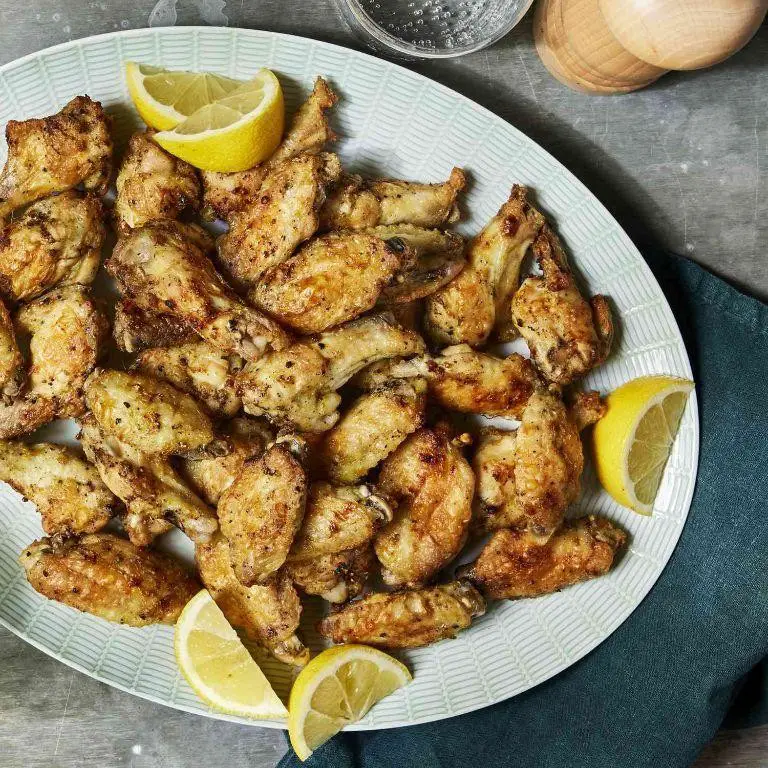
Crispy Baked Chicken Wings

Zesty and zippy, these Crispy Baked Chicken Wings are about to become your new go-to for game day, movie night, or any night you’re craving something deliciously crunchy without the guilt of deep-frying. Let’s dive into the magic of turning simple wings into a crispy, flavor-packed masterpiece.
Ingredients
- 2 lbs chicken wings (I like to keep them whole for that dramatic flair, but feel free to separate them if you’re into neat bites.)
- 2 tbsp baking powder (Not soda! This is the secret to getting that skin crisper than your morning toast.)
- 1 tsp salt (Because seasoning is not just a step; it’s a lifestyle.)
- 1 tsp garlic powder (For that whisper of garlicky goodness in every bite.)
- 1 tsp paprika (Adds a smoky hint and a gorgeous color that’ll make your wings Instagram-worthy.)
- 1/2 tsp black pepper (A little kick to keep things interesting.)
- 1 tbsp olive oil (Extra virgin is my ride or die for that perfect golden finish.)
Instructions
- Preheat your oven to 425°F (220°C). A hot oven is key to crispy wings, so don’t skip this step.
- Pat the chicken wings dry with paper towels. The drier the wings, the crispier they’ll get. This is non-negotiable.
- In a large bowl, toss the wings with baking powder, salt, garlic powder, paprika, and black pepper until evenly coated. The baking powder is the MVP here, working its magic to crisp up the skin.
- Drizzle the olive oil over the wings and toss again to coat. This helps the spices stick and ensures a golden finish.
- Arrange the wings on a wire rack set over a baking sheet. This setup allows air to circulate around the wings, making them crispy all over.
- Bake for 45-50 minutes, flipping halfway through, until the wings are golden brown and crispy. The sound of them sizzling is your cue they’re on the right track.
- Let the wings rest for 5 minutes before serving. This brief pause lets the crust set, ensuring maximum crunch.
Delightfully crispy with a juicy interior, these wings are a textural dream. Serve them with a side of cool ranch or blue cheese dressing, or go bold with a spicy buffalo sauce for that classic kick. Either way, they’re bound to disappear faster than you can say ‘more please.’
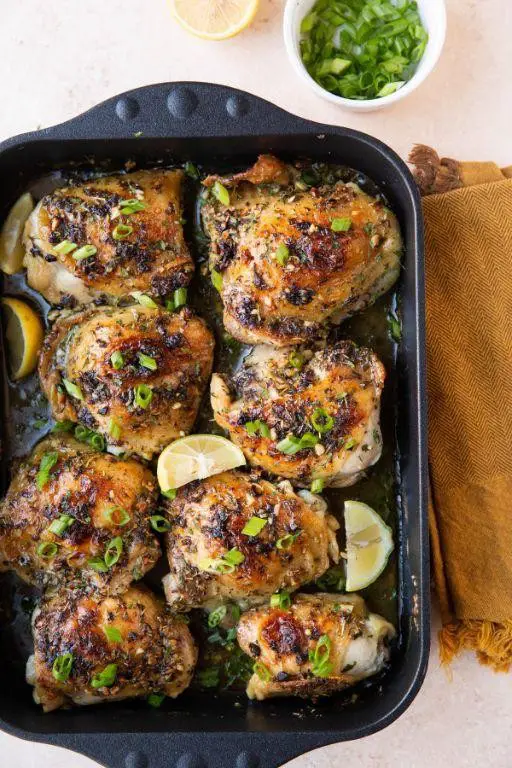
Crispy Baked Chicken Thighs
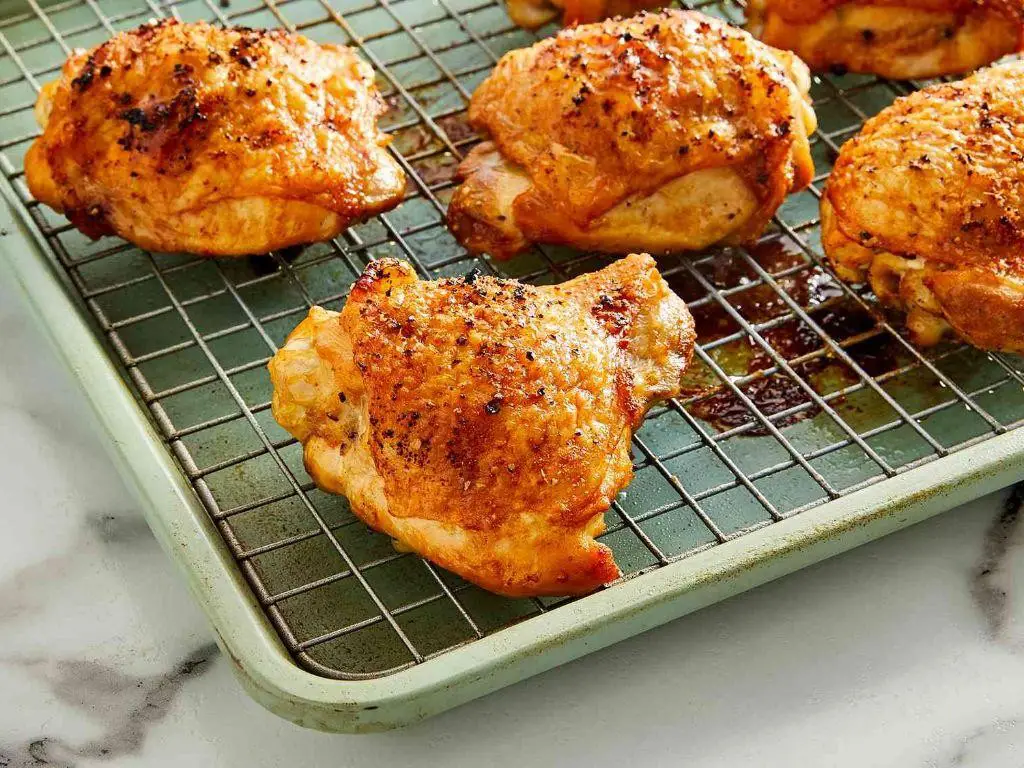
Dive into the world of guilt-free indulgence with these Crispy Baked Chicken Thighs that promise to be the star of your dinner table. Perfectly golden and irresistibly crunchy, they’re a testament to the fact that sometimes, the oven does know best.
Ingredients
- 6 bone-in, skin-on chicken thighs (because let’s be honest, the skin is the best part)
- 2 tbsp extra virgin olive oil (my go-to for that rich, fruity vibe)
- 1 tsp garlic powder (for that punch of flavor without the chopping)
- 1 tsp smoked paprika (because a little smoke never hurt nobody)
- 1/2 tsp salt (I’m generous here, but you do you)
- 1/2 tsp black pepper (freshly ground, if you’re feeling fancy)
Instructions
- Preheat your oven to 400°F (200°C) because we’re not playing around with lukewarm ovens today.
- Pat the chicken thighs dry with paper towels (this is the secret handshake to crispy skin).
- In a small bowl, mix together the olive oil, garlic powder, smoked paprika, salt, and black pepper until it’s as unified as a boy band.
- Rub the spice mix all over the chicken thighs, making sure every nook and cranny is covered like it’s sunscreen at the beach.
- Place the thighs skin-side up on a baking rack set over a baking sheet (this setup is the VIP section for even crisping).
- Bake for 35-40 minutes, or until the skin is golden brown and crispy enough to make a sound when you tap it.
- Let the chicken rest for 5 minutes (this is the cool-down period after their hot oven session).
Serve these thighs on a bed of creamy mashed potatoes or chop them up for a killer salad topper. The skin? It’s the edible equivalent of a standing ovation.
Crispy Baked Chicken Drumsticks
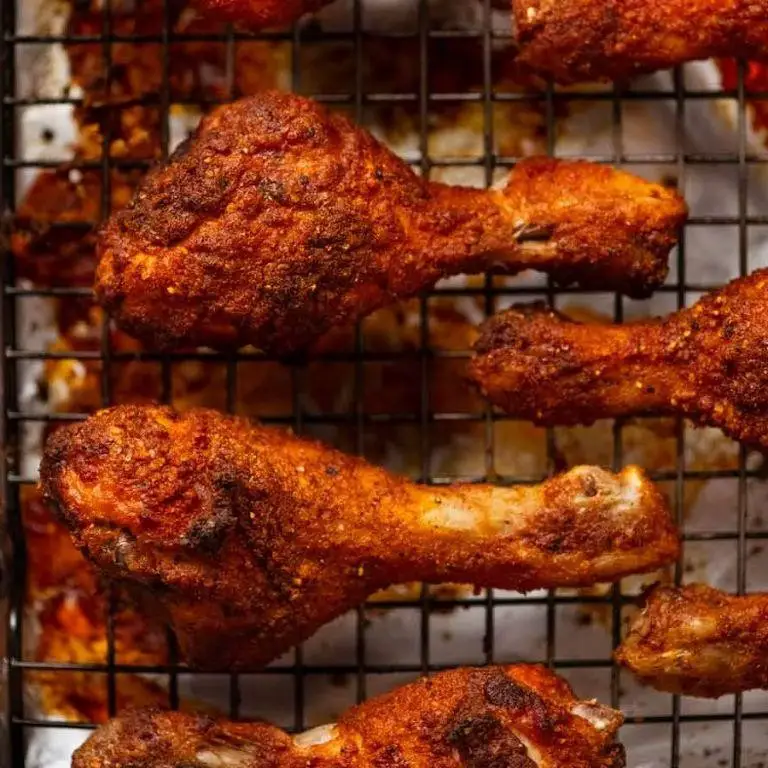
Alright, let’s dive into the world of crispy, juicy, and downright irresistible baked chicken drumsticks that’ll have your taste buds doing a happy dance. Perfect for those who think baking can’t deliver that golden crunch we all crave.
Ingredients
- 8 chicken drumsticks (because who can stop at just one?)
- 2 tbsp extra virgin olive oil (my kitchen MVP for that perfect crisp)
- 1 tsp garlic powder (for that subtle kick)
- 1 tsp smoked paprika (trust me, it’s a game-changer)
- 1/2 tsp salt (to make everything better)
- 1/2 tsp black pepper (freshly ground, if you’re fancy)
Instructions
- Preheat your oven to 400°F (because patience is a virtue, but crispy chicken is a must).
- In a large bowl, toss the drumsticks with olive oil until they’re slicker than a greased pig at a county fair.
- Sprinkle the garlic powder, smoked paprika, salt, and black pepper over the chicken. Mix it like you mean it, ensuring each drumstick is coated in spicy, herby goodness.
- Arrange the drumsticks on a baking sheet lined with parchment paper, giving them some personal space to crisp up evenly.
- Bake for 35-40 minutes, flipping halfway through, until they’re golden brown and the internal temperature hits 165°F (no guessing games here).
- Let them rest for 5 minutes (if you can resist the aroma) to lock in those juices.
Prepare for a symphony of crunch with every bite, the smoky paprika playing lead violin. Serve these bad boys with a side of cool ranch or atop a mountain of fluffy mashed potatoes for a meal that screams comfort with a capital C.
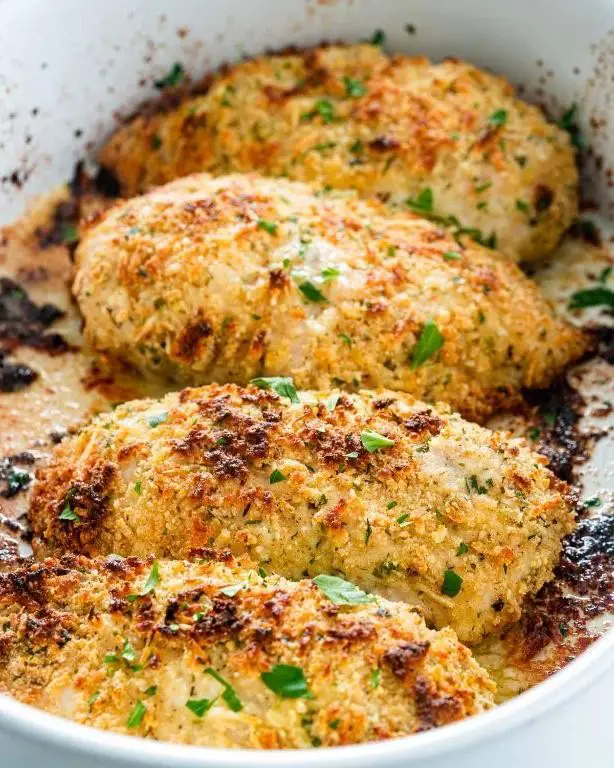
Crispy Baked Chicken Breast

Get ready to meet your new weeknight hero: Crispy Baked Chicken Breast. This dish is so delightfully crunchy on the outside and juicy on the inside, it’ll have you questioning why you ever bothered with takeout.
Ingredients
- 2 boneless, skinless chicken breasts (because who has time for bones?)
- 1/2 cup panko breadcrumbs (the secret to that unbeatable crunch)
- 1/4 cup grated Parmesan cheese (the more, the merrier, I say)
- 1 tsp garlic powder (for that kick of flavor)
- 1 tsp smoked paprika (because regular paprika is just too mainstream)
- 1/2 tsp salt (to make everything taste better)
- 1/4 tsp black pepper (a little spice never hurt anybody)
- 1 egg (I prefer room temp eggs here—they mix better)
- 2 tbsp extra virgin olive oil (my go-to for everything)
Instructions
- Preheat your oven to 400°F (because patience is a virtue, especially when crispy chicken is involved).
- In a shallow bowl, whisk the egg until it’s as smooth as your favorite jazz playlist.
- In another bowl, mix the panko, Parmesan, garlic powder, smoked paprika, salt, and pepper like you’re the DJ of flavor town.
- Dip each chicken breast into the egg, ensuring it’s fully coated—no chicken left behind!
- Then, dredge the chicken in the panko mixture, pressing gently to adhere the crumbs. Think of it as giving your chicken a crunchy coat.
- Place the coated chicken on a baking sheet lined with parchment paper (for easy cleanup, because who likes scrubbing pans?).
- Drizzle the olive oil over the chicken breasts. This is the golden ticket to crispiness.
- Bake for 20-25 minutes, or until the chicken is golden brown and the internal temperature reaches 165°F (safety first, folks).
- Let the chicken rest for 5 minutes before slicing. This keeps all those juicy flavors locked in.
And just like that, you’ve got yourself a plate of golden, crispy chicken that’s bursting with flavor. Serve it atop a fresh salad, alongside some roasted veggies, or just eat it straight off the cutting board—no judgment here.
Crispy Baked Chicken Tenders

Ever had one of those days where you’re craving something crunchy, juicy, and downright delicious without the guilt of deep-frying? Well, buckle up, buttercup, because these Crispy Baked Chicken Tenders are about to rock your world and your taste buds.
Ingredients
- 1.5 lbs chicken tenders (because who has time to cut breasts into strips?)
- 1 cup panko breadcrumbs (the secret to that unbeatable crunch)
- 1/2 cup grated Parmesan cheese (the more, the merrier, I say)
- 1 tsp garlic powder (for that kick we all secretly love)
- 1 tsp paprika (smoked if you’re feeling fancy)
- 1/2 tsp salt (I’m a sea salt fan, but whatever floats your boat)
- 1/4 tsp black pepper (freshly ground, please, for the love of flavor)
- 2 large eggs (room temp is my jam for even coating)
- 1/4 cup all-purpose flour (just enough to get the party started)
- Cooking spray (because we’re baking, not frying, remember?)
Instructions
- Preheat your oven to 400°F (because patience is a virtue, especially in baking).
- Line a baking sheet with parchment paper and give it a light spray with cooking spray (no sticking allowed).
- In a shallow dish, mix together the panko, Parmesan, garlic powder, paprika, salt, and pepper (this is where the magic happens).
- In another dish, beat the eggs like they owe you money (until they’re fully blended).
- Place the flour in a third dish (we’re setting up an assembly line here).
- Dredge each chicken tender in flour (shake off the excess, we’re not making paste).
- Dip the floured tender into the eggs (let the excess drip off, no egg puddles).
- Coat the tender in the panko mixture (press gently to ensure full coverage).
- Place the coated tenders on the prepared baking sheet (give them some personal space).
- Spray the tops lightly with cooking spray (this is the golden ticket to crispiness).
- Bake for 15 minutes, then flip each tender (carefully, they’re hot and precious).
- Bake for another 10-15 minutes until golden brown and crispy (timing may vary, so keep an eye out).
These tenders come out with a crunch that’ll make you forget they’re baked, paired with a juicy interior that’s downright sinful. Try serving them with a side of honey mustard or tucked into a wrap with all the fixings for a meal that’s anything but basic.
Crispy Baked Chicken Parmesan

Kick your dinner up a notch with this Crispy Baked Chicken Parmesan that’s so good, it’ll have you questioning why you ever ordered takeout. Perfectly golden, outrageously crunchy, and smothered in melty cheese, this dish is a weeknight hero dressed in its Sunday best.
Ingredients
- 4 boneless, skinless chicken breasts (because nobody has time for bones on a Tuesday)
- 1 cup all-purpose flour (the trusty sidekick for any breading operation)
- 2 large eggs (I swear by room temp eggs for a smoother dip)
- 1 cup panko breadcrumbs (for that unbeatable crunch)
- 1/2 cup grated Parmesan cheese (the more, the merrier, I say)
- 1 tsp garlic powder (because garlic makes everything better)
- 1 tsp Italian seasoning (a little sprinkle of Italy in your kitchen)
- 1/2 tsp salt (just enough to make the flavors pop)
- 1/4 tsp black pepper (for a gentle kick)
- 2 cups marinara sauce (homemade or your favorite jarred brand)
- 1 cup shredded mozzarella cheese (because cheese is life)
- 2 tbsp extra virgin olive oil (my go-to for baking perfection)
- Fresh basil for garnish (optional, but pretty)
Instructions
- Preheat your oven to 400°F (200°C) and line a baking sheet with parchment paper. Trust me, cleanup is a breeze this way.
- Pound the chicken breasts to an even 1/2-inch thickness. This ensures they cook evenly and stay juicy.
- Set up your breading station: flour in one bowl, beaten eggs in another, and panko mixed with Parmesan, garlic powder, Italian seasoning, salt, and pepper in a third.
- Dredge each chicken breast in flour, shaking off excess, then dip in egg, and finally coat with the panko mixture. Press gently to adhere.
- Heat olive oil on the baking sheet in the oven for 2 minutes, then place the breaded chicken on it. This little trick gives you that golden bottom without frying.
- Bake for 20 minutes, flip, then bake another 10 minutes until golden and crispy.
- Top each breast with marinara sauce and mozzarella, then broil for 2-3 minutes until the cheese is bubbly and slightly browned. Watch closely to avoid a cheese catastrophe.
- Garnish with fresh basil if you’re feeling fancy. Serve over spaghetti or chop it up for a killer sandwich filling.
The first bite reveals a symphony of textures: the shatteringly crisp crust giving way to tender chicken, all swaddled in gooey cheese. Try serving it atop a mountain of garlicky greens for a dish that’s as bold in flavor as it is in personality.
Crispy Baked Chicken Nuggets
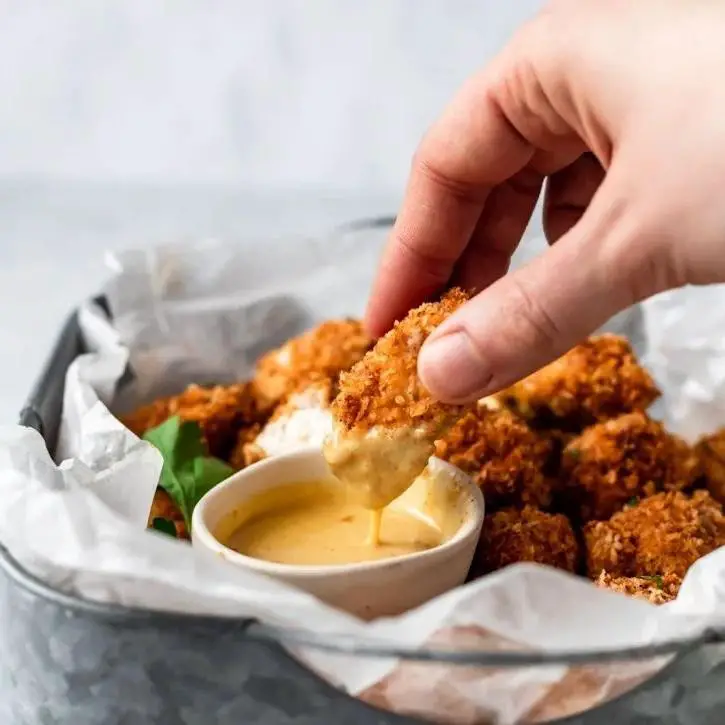
Oh, the joy of biting into something crispy, juicy, and utterly satisfying without the guilt of deep frying! These crispy baked chicken nuggets are here to save your snack time and possibly become your new favorite weeknight hero.
Ingredients
- 1.5 lbs chicken breast, cut into bite-sized pieces (because who has time for uneven cooking?)
- 1 cup panko breadcrumbs (for that unbeatable crunch)
- 1/2 cup grated Parmesan cheese (the secret flavor booster)
- 1 tsp garlic powder (because garlic makes everything better)
- 1 tsp paprika (for a hint of smokiness)
- 1/2 tsp salt (I’m generous here, but you do you)
- 2 large eggs, beaten (room temp eggs blend better, just saying)
- 2 tbsp olive oil (extra virgin is my ride or die)
Instructions
- Preheat your oven to 400°F (200°C) and line a baking sheet with parchment paper. Trust me, cleanup is a breeze this way.
- In a bowl, mix the panko, Parmesan, garlic powder, paprika, and salt. This is where the magic starts.
- Dip each chicken piece into the beaten eggs, then roll it in the panko mixture until fully coated. Pro tip: use one hand for wet and one for dry to avoid breadcrumb fingers.
- Place the coated nuggets on the prepared baking sheet, drizzle with olive oil, and bake for 15 minutes. Flip them halfway through for even crispiness.
- After flipping, bake for another 10-15 minutes or until golden brown and the internal temperature reaches 165°F. No guessing games here.
These nuggets come out with a crunch that’ll make you forget they’re baked, not fried. Serve them with your favorite dip or toss them in a salad for a protein-packed punch. Either way, you’re in for a treat.
Crispy Baked Chicken Legs

Let’s face it, we’ve all been there—staring into the abyss of our fridge, craving something crispy, juicy, and downright delicious without the guilt of deep frying. Enter the hero of our story: crispy baked chicken legs that’ll have you doing a happy dance in your kitchen.
Ingredients
- 4 chicken legs (because who can stop at just one?)
- 2 tbsp extra virgin olive oil (my go-to for that golden crunch)
- 1 tsp garlic powder (for that punch of flavor)
- 1 tsp paprika (smoky or sweet, your call)
- 1/2 tsp salt (I’m generous here, but you do you)
- 1/2 tsp black pepper (freshly ground, if you’re fancy)
Instructions
- Preheat your oven to 400°F (because patience is a virtue, but crispy chicken is a must).
- Pat the chicken legs dry with paper towels (this is the secret to maximum crispiness).
- In a bowl, mix the olive oil, garlic powder, paprika, salt, and pepper (think of it as a flavor party).
- Rub the spice mix all over the chicken legs (get in there, don’t be shy).
- Place the chicken legs on a baking sheet lined with parchment paper (for easy cleanup, because who likes scrubbing?).
- Bake for 35-40 minutes, flipping halfway through, until the skin is golden and crispy (the smell will drive you wild).
- Let them rest for 5 minutes (this is the hardest part, I know).
Mmm, just imagine biting into that crispy skin, revealing the juicy, flavorful meat underneath. Serve these bad boys with a side of creamy coleslaw or dunk them in your favorite sauce for an extra kick. Either way, you’re in for a treat.
Crispy Baked Chicken with Honey Mustard

Craving something that’s crunchier than your last relationship and sweeter than your morning coffee? Let’s dive into making this crispy baked chicken that’s about to become your new obsession, paired with a honey mustard sauce that’ll have you licking your fingers (and maybe the plate).
Ingredients
- 2 lbs chicken thighs (bone-in, skin-on for that unbeatable crunch)
- 1 cup panko breadcrumbs (the secret to getting that golden, crispy armor)
- 1/2 cup grated Parmesan (because cheese makes everything better)
- 1/4 cup honey (local if you’ve got it, for that sweet, sweet karma)
- 2 tbsp Dijon mustard (the tangy yin to honey’s yang)
- 1 tbsp olive oil (extra virgin, like my patience on a Monday morning)
- 1 tsp garlic powder (because garlic is life)
- 1/2 tsp salt (to taste, but let’s be honest, you’ll add more)
- 1/2 tsp black pepper (freshly ground, unless you’re in a rush)
Instructions
- Preheat your oven to 400°F (because we’re not savages—we bake at the right temp).
- In a bowl, mix panko, Parmesan, garlic powder, salt, and pepper. This is your chicken’s new best friend.
- Brush each chicken thigh with olive oil. This isn’t just for show—it helps the crumbs stick and makes everything crispier.
- Dredge each oiled thigh in the panko mixture, pressing gently to ensure it’s fully coated. No naked chicken here!
- Place the coated thighs on a baking sheet lined with parchment paper. Give them space—they’re not into crowding.
- Bake for 35-40 minutes, until the chicken is cooked through and the coating is golden brown. If you’re unsure, a meat thermometer should read 165°F.
- While the chicken bakes, whisk together honey and Dijon mustard in a small bowl. Taste and adjust if you’re feeling fancy.
- Once the chicken is done, let it rest for 5 minutes. This is a good time to practice patience.
- Serve the chicken with the honey mustard sauce on the side or drizzled on top. Because rules are made to be broken.
Perfectly crispy on the outside, juicy on the inside, and that honey mustard? It’s the kind of sauce that could start a cult. Serve this bad boy with a simple salad or roasted veggies to pretend you’re being healthy.
Crispy Baked Chicken with BBQ Sauce
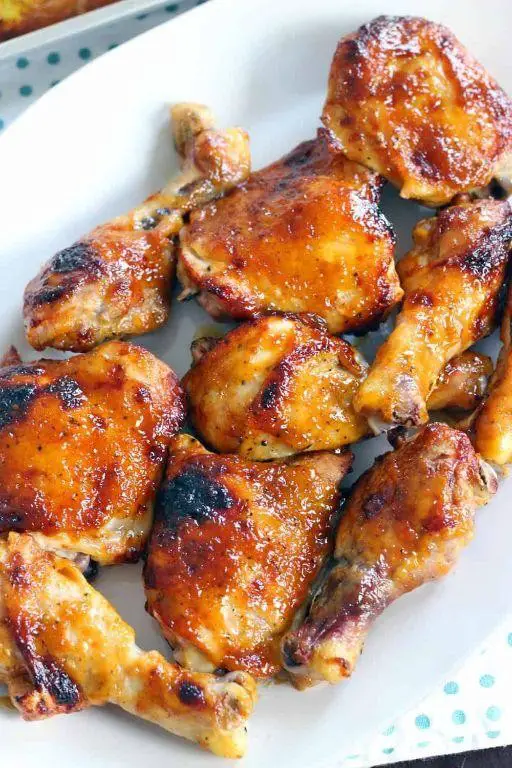
Craving something that’ll make your taste buds do a happy dance? Look no further than this crispy baked chicken slathered in a smoky BBQ sauce that’s so good, it’ll have you licking your fingers clean!
Ingredients
- 4 chicken thighs (bone-in, skin-on for that perfect crunch)
- 1/2 cup BBQ sauce (go for the smoky kind—trust me, it’s a game-changer)
- 1 tbsp olive oil (extra virgin, because we’re fancy like that)
- 1 tsp garlic powder (because everything’s better with garlic)
- 1 tsp smoked paprika (for that extra oomph)
- 1/2 tsp salt (I like to use sea salt for a cleaner taste)
- 1/2 tsp black pepper (freshly ground, please—no dust here)
Instructions
- Preheat your oven to 400°F (200°C). This is where the magic starts, folks.
- In a bowl, mix the olive oil, garlic powder, smoked paprika, salt, and black pepper. This is your chicken’s spa treatment.
- Rub the spice mix all over the chicken thighs. Get in there—no shyness allowed.
- Place the chicken on a baking sheet, skin side up. We’re going for crispy, not soggy.
- Bake for 35 minutes. Tip: Resist the urge to peek. Let that skin crisp up.
- Brush the BBQ sauce over the chicken. Be generous—this isn’t the time to hold back.
- Bake for another 10 minutes. Tip: The sauce should be sticky, not burnt. Watch it like a hawk.
- Let the chicken rest for 5 minutes. Tip: This keeps the juices where they belong—inside the chicken.
Boom! You’ve got yourself chicken that’s crispy on the outside, juicy on the inside, and packed with flavor. Serve it with a side of coleslaw or atop a pile of fluffy mashed potatoes for a meal that’ll have everyone asking for seconds.
Crispy Baked Chicken with Garlic Butter
Picture this: a dish so crispy, so buttery, and so garlicky, it’ll make your taste buds do a happy dance. This crispy baked chicken with garlic butter is the hero your weeknight dinners deserve, and guess what? It’s as easy as pie (but way more delicious).
Ingredients
- 4 chicken thighs (bone-in, skin-on for that irresistible crunch)
- 1/2 cup unsalted butter (because salted butter is a crime in this recipe)
- 4 garlic cloves, minced (fresh is best, but we won’t tell if you cheat with pre-minced)
- 1 tbsp olive oil (extra virgin, because we’re fancy like that)
- 1 tsp salt (the coarser, the better for texture)
- 1/2 tsp black pepper (freshly ground, unless you’re in a pinch)
- 1/2 tsp paprika (for a smoky whisper of flavor)
Instructions
- Preheat your oven to 400°F (200°C) – no cheating, this needs to be precise for the perfect crisp.
- Pat the chicken thighs dry with paper towels (trust me, dry chicken equals crispy skin).
- Rub the chicken with olive oil, then season both sides with salt, pepper, and paprika.
- Place the chicken skin-side up on a baking rack over a baking sheet (this lets the heat circulate for even cooking).
- Bake for 35 minutes – resist the urge to peek, or you’ll let the heat out!
- While the chicken bakes, melt the butter in a small saucepan over low heat, then stir in the minced garlic until fragrant (about 1 minute).
- After 35 minutes, brush the chicken with the garlic butter and bake for another 10 minutes (this is where the magic happens).
- Let the chicken rest for 5 minutes before serving (patience is a virtue, especially with juicy chicken).
Just imagine biting into that golden, crispy skin, with the garlic butter seeping into every nook and cranny. Serve it atop a mountain of mashed potatoes or with a side of roasted veggies for a meal that’s anything but ordinary.
Crispy Baked Chicken with Lemon Pepper
Ready to shake up your dinner routine with a dish that’s as fun to make as it is to eat? Let’s dive into the world of Crispy Baked Chicken with Lemon Pepper, where every bite is a crunchy, zesty adventure that’ll have your taste buds doing a happy dance.
Ingredients
- 4 chicken breasts (because who doesn’t love a good breast?)
- 1 cup panko breadcrumbs (for that unbeatable crunch)
- 1/2 cup grated Parmesan cheese (the secret to golden perfection)
- 2 tbsp lemon pepper seasoning (the star of the show)
- 1/2 cup all-purpose flour (trusty old flour)
- 2 large eggs (I like mine at room temperature for even coating)
- 1/4 cup extra virgin olive oil (my go-to for a reason)
- 1 lemon, sliced (for garnish and that extra zing)
Instructions
- Preheat your oven to 400°F (because precision is key) and line a baking sheet with parchment paper.
- In a shallow dish, mix the panko breadcrumbs and Parmesan cheese. This is where the magic starts.
- In another dish, whisk the eggs until they’re as smooth as your favorite jazz tune.
- Place the flour in a third dish. We’re setting up a breading station that would make any chef proud.
- Dredge each chicken breast in the flour, shaking off any excess like you’re shaking off a bad day.
- Dip the floured chicken into the eggs, letting any excess drip off like gossip.
- Coat the chicken in the panko mixture, pressing gently to ensure every inch is covered in crunchy goodness.
- Place the breaded chicken on the prepared baking sheet and drizzle with olive oil for that golden finish.
- Bake for 25 minutes, or until the chicken is crispy and golden, flipping halfway through for even cooking.
- Garnish with lemon slices before serving to add a pop of color and flavor.
Finally, this dish delivers a symphony of textures and flavors—crispy on the outside, juicy on the inside, with a lemony kick that’s downright addictive. Serve it atop a bed of greens or alongside roasted veggies for a meal that’s as visually appealing as it is delicious.
Crispy Baked Chicken with Ranch Dressing
Ready to dive into a dish that’s crunchier than your last relationship? Let’s talk about turning your average chicken dinner into a crispy, ranch-infused masterpiece that’ll have your taste buds doing backflips.
Ingredients
- 2 lbs chicken thighs (bone-in, skin-on for that unbeatable crunch)
- 1 cup panko breadcrumbs (the secret to getting that golden armor)
- 1/2 cup grated Parmesan cheese (because cheese makes everything better)
- 1 tbsp garlic powder (for a little kick in every bite)
- 1 tsp smoked paprika (adds a smoky whisper to the dish)
- 1/2 cup ranch dressing (homemade or store-bought, no judgment here)
- 2 tbsp olive oil (extra virgin is my ride or die)
- Salt and pepper to taste (but let’s be real, you’ll use more than you think)
Instructions
- Preheat your oven to 400°F (200°C) because we’re about to get crispy.
- In a bowl, mix panko, Parmesan, garlic powder, smoked paprika, salt, and pepper. This is your crunchy coating squad.
- Brush each chicken thigh with ranch dressing. Yes, every nook and cranny needs this love.
- Dredge the ranch-covered chicken in the panko mixture. Press gently to ensure full coverage—no naked chicken allowed.
- Place the chicken on a baking sheet lined with parchment paper. Drizzle with olive oil for that extra crisp factor.
- Bake for 35-40 minutes until the chicken is golden and crispy, and the internal temperature hits 165°F (74°C).
- Let it rest for 5 minutes. I know it’s hard, but patience makes perfect.
Boom! You’ve just made chicken that’s crispy on the outside, juicy on the inside, and packed with ranch flavor. Serve it atop a salad, next to some roasted veggies, or just eat it straight off the tray—we won’t tell.
Crispy Baked Chicken with Spicy Mayo
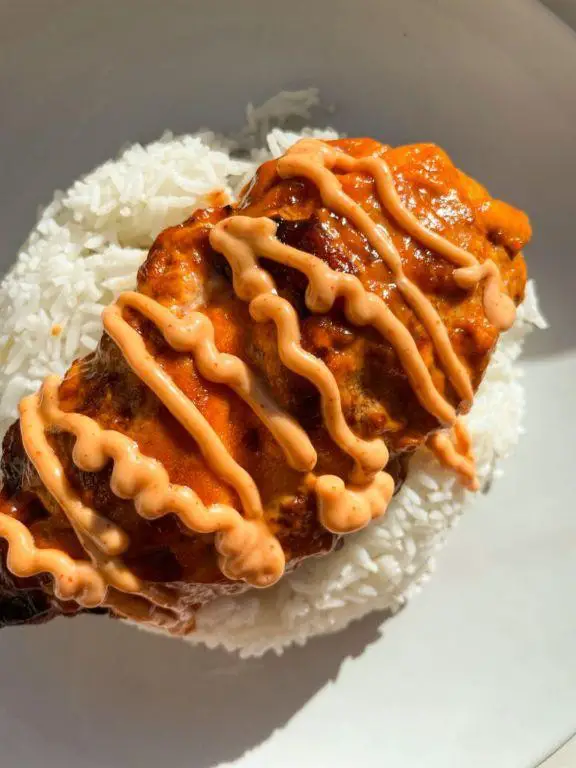
Y’all ready to turn your oven into a magic crisp-maker? This Crispy Baked Chicken with Spicy Mayo is about to become your weeknight hero, delivering all the crunch without the guilt (or the grease fire).
Ingredients
- 2 lbs chicken thighs (bone-in, skin-on for that unbeatable crunch)
- 1 cup panko breadcrumbs (the secret to maximum crispiness)
- 1/2 cup grated parmesan (because cheese makes everything better)
- 1 tbsp smoked paprika (for a smoky whisper of flavor)
- 1 tsp garlic powder (no fresh garlic here, we’re avoiding burnt bits)
- 1/2 cup mayonnaise (Duke’s mayo is my Southern heart’s choice)
- 1 tbsp sriracha (adjust to scare your taste buds just right)
- 1 tbsp lemon juice (freshly squeezed, please, no sad bottled stuff)
Instructions
- Preheat your oven to 400°F (200°C) – no peeking until it’s fully heated!
- In a bowl, mix panko, parmesan, smoked paprika, and garlic powder. This is your crunch armor.
- Pat the chicken thighs dry with paper towels (crucial step for crispiness).
- Dredge each thigh in the panko mixture, pressing gently to adhere. Think of it as applying chicken nail polish.
- Place the chicken on a wire rack over a baking sheet (elevation equals even crisp).
- Bake for 35-40 minutes until golden and the internal temp hits 165°F (74°C).
- While the chicken bakes, whisk mayo, sriracha, and lemon juice in a bowl. Taste and adjust heat as needed.
- Let the chicken rest for 5 minutes (patience, grasshopper).
- Drizzle with spicy mayo or serve on the side for dipping.
Velvety inside, crackly outside, and that spicy mayo? It’s the zesty sidekick this dish deserves. Try stacking it on a slider bun with pickles for a next-level sandwich experience.
Crispy Baked Chicken with Sweet Chili Sauce
Picture this: a Sunday evening, your stomach’s doing the cha-cha for something crispy, juicy, and downright irresistible. Enter our star player, a dish that’s about to make your taste buds throw a party—no invitations needed.
Ingredients
- 2 lbs chicken thighs (bone-in, skin-on for that perfect crisp)
- 1/2 cup sweet chili sauce (the kind that makes you wanna lick the bottle)
- 1 tbsp soy sauce (I’m a low-sodium fan, but you do you)
- 1 tbsp olive oil (extra virgin, because we’re fancy like that)
- 1 tsp garlic powder (because garlic is life)
- 1/2 tsp salt (just enough to make the flavors pop)
- 1/4 tsp black pepper (freshly ground, if you’re feeling extra)
Instructions
- Preheat your oven to 400°F (because good things come to those who wait—and preheat).
- In a bowl, whisk together sweet chili sauce, soy sauce, olive oil, garlic powder, salt, and black pepper. This is your magic potion.
- Pat the chicken thighs dry with paper towels (trust me, dry chicken equals crispy skin).
- Brush both sides of the chicken with the sauce mixture. Don’t be shy; coat it like it’s going out in style.
- Place the chicken on a baking sheet lined with parchment paper (for easy cleanup, because who likes scrubbing?).
- Bake for 35-40 minutes, flipping halfway through, until the skin is crispy and the chicken is cooked through (internal temp should be 165°F).
- Let it rest for 5 minutes (this is the hardest part, I know).
Get ready for a symphony of textures—crispy skin giving way to tender, juicy meat, all wrapped up in a sweet and slightly spicy embrace. Serve it over a bed of fluffy rice or alongside a crisp salad for a meal that’s anything but ordinary.
Crispy Baked Chicken with Herb Crust
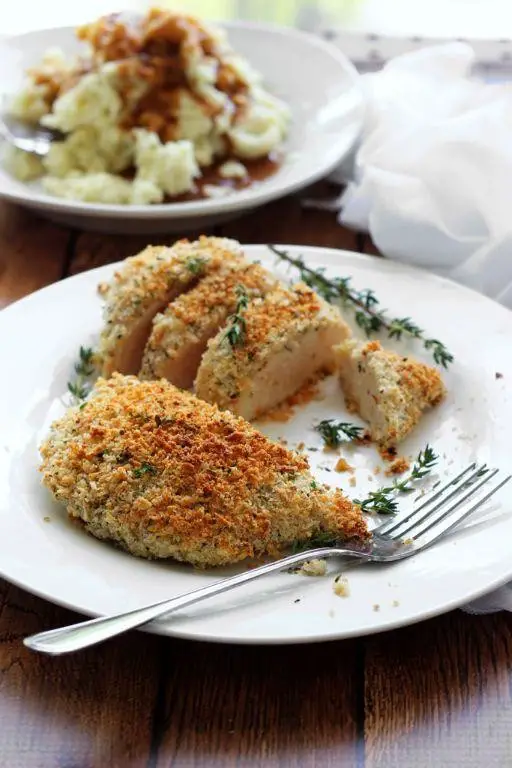
Picture this: a chicken so crispy, so herby, so downright irresistible that your taste buds throw a little party in your mouth. That’s what we’re aiming for with this dish, folks—a no-fuss, all-flavor kind of meal that’ll have you coming back for seconds (and maybe thirds).
Ingredients
- 4 chicken breasts (because thighs are great, but today, we’re keeping it lean)
- 1 cup panko breadcrumbs (the secret to that unbeatable crunch)
- 1/2 cup grated Parmesan (the cheesier, the better, I always say)
- 2 tbsp olive oil (extra virgin, because we’re fancy like that)
- 1 tbsp mixed dried herbs (I’m partial to thyme, rosemary, and oregano)
- 1 tsp garlic powder (for that punch of flavor)
- 1/2 tsp salt (just enough to make everything pop)
- 1/4 tsp black pepper (a little kick never hurt anybody)
- 2 eggs (room temp, because they mix better that way)
Instructions
- Preheat your oven to 400°F (because we’re baking, not frying, but we still want that golden goodness).
- In a bowl, mix the panko, Parmesan, herbs, garlic powder, salt, and pepper. This is where the magic starts.
- In another bowl, beat the eggs. Think of it as the glue for our crispy, herby armor.
- Dip each chicken breast in the eggs, then coat it in the breadcrumb mixture. Press gently to make sure every inch is covered.
- Place the coated chicken on a baking sheet lined with parchment paper. Drizzle with olive oil for that extra crispiness.
- Bake for 25 minutes, or until the chicken is golden brown and the internal temperature reaches 165°F. No guessing games here.
- Let it rest for 5 minutes. Patience is a virtue, especially when it comes to juicy chicken.
Just imagine slicing into that golden crust to reveal the juiciest chicken you’ve ever had. Serve it atop a bed of greens or alongside some roasted veggies for a meal that’s as beautiful as it is delicious.
Crispy Baked Chicken with Panko Breadcrumbs

Ready to transform your chicken game with a crunch that’ll make your taste buds do a happy dance? This crispy baked chicken with panko breadcrumbs is your ticket to flavor town without the guilt of deep frying—because who needs all that oil when you’ve got panko magic?
Ingredients
- 4 boneless, skinless chicken breasts (because nobody likes wrestling with bones mid-meal)
- 1 cup panko breadcrumbs (the crispier, the better—I’m looking at you, Japanese breadcrumbs)
- 1/2 cup grated Parmesan cheese (the powdery kind that clings to your fingers like it’s afraid of the bowl)
- 1 tsp garlic powder (because garlic makes everything better)
- 1 tsp smoked paprika (for that smoky whisper of flavor)
- 1/2 tsp salt (just enough to make the flavors pop)
- 1/4 tsp black pepper (freshly ground, unless you’re in a pinch)
- 2 large eggs (room temp, unless you enjoy the thrill of cold eggs)
- 1 tbsp water (to give the eggs a little spa treatment)
- 1/4 cup all-purpose flour (for that essential crispy coating base)
- Cooking spray (because we’re baking, not swimming in oil)
Instructions
- Preheat your oven to 400°F (because patience is a virtue, especially when crispy chicken is involved).
- Line a baking sheet with parchment paper and give it a light spray with cooking spray—this is your chicken’s golden runway.
- In a shallow dish, mix the panko, Parmesan, garlic powder, smoked paprika, salt, and pepper. This is your crispy coating dream team.
- In another dish, beat the eggs with water until they’re as friendly as a morning hello.
- Place the flour in a third dish. This is your chicken’s first stop on its journey to crispiness.
- Dredge each chicken breast in flour, shaking off the excess like you’re dusting off an old book.
- Dip the floured chicken into the egg mixture, letting any excess drip off like summer rain.
- Coat the chicken in the panko mixture, pressing gently to ensure every nook and cranny is covered. This is where the magic happens.
- Place the coated chicken on the prepared baking sheet and give it a light spray with cooking spray for that golden finish.
- Bake for 20-25 minutes, or until the chicken is golden brown and the internal temperature reaches 165°F—because safety first, deliciousness always.
Perfectly crispy on the outside, juicy on the inside, this chicken is begging to be paired with a zesty aioli or perched atop a fresh salad. Either way, it’s a win-win situation for your dinner plate.
Crispy Baked Chicken with Cornflakes Crust
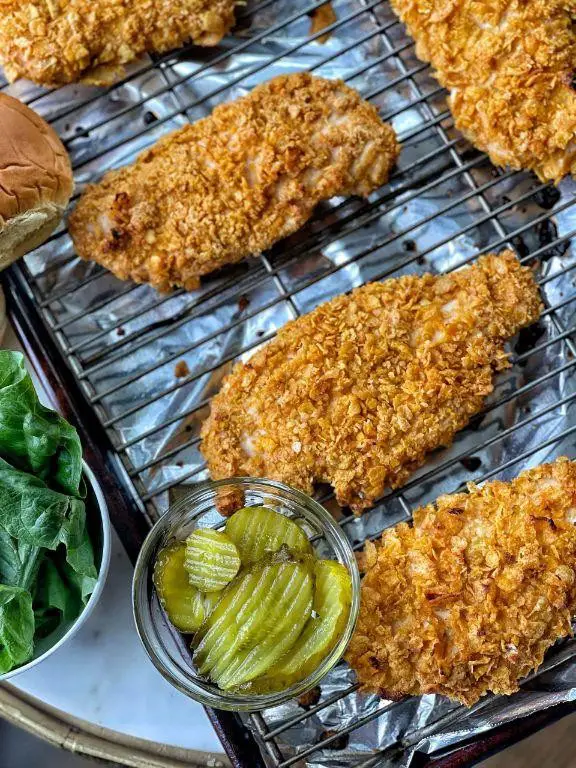
Picture this: a chicken so crispy, so golden, it could win a beauty pageant. That’s what you’re in for with this Cornflakes Crust Chicken—a dish that’s as fun to make as it is to devour.
Ingredients
- 4 boneless, skinless chicken breasts (because who has time for bones?)
- 2 cups cornflakes, crushed (the secret to that irresistible crunch)
- 1/2 cup all-purpose flour (the trusty sidekick)
- 2 large eggs, beaten (room temp eggs here make everything better)
- 1 tsp garlic powder (for that kick)
- 1 tsp paprika (color and flavor, yes please)
- 1/2 tsp salt (just enough to make it sing)
- 1/4 tsp black pepper (a little spice never hurt nobody)
- 1/4 cup melted butter (because butter makes everything better)
Instructions
- Preheat your oven to 375°F (190°C) and line a baking sheet with parchment paper. No sticking, no crying.
- In a shallow dish, mix the crushed cornflakes, garlic powder, paprika, salt, and pepper. This is where the magic starts.
- Place the flour in another dish and the beaten eggs in a third. It’s like a little assembly line of deliciousness.
- Dip each chicken breast first in the flour, shaking off any excess. Then, dunk it in the eggs, letting the excess drip off. Finally, press it into the cornflake mixture, making sure it’s fully coated. Patience here pays off in crunch.
- Place the coated chicken on the prepared baking sheet and drizzle with melted butter. This is the golden ticket to crispiness.
- Bake for 25-30 minutes, or until the chicken is cooked through and the crust is golden brown. No peeking too often—let the oven do its thing.
Crunchy on the outside, juicy on the inside, this chicken is a textural dream. Serve it with a side of honey mustard for dipping, or slice it up over a fresh salad for a meal that’s anything but boring.
Conclusion
These 18 delicious crispy baked chicken recipes offer a treasure trove of flavors to spice up your mealtime. Whether you’re craving something classic or adventurous, there’s a recipe here for every palate. We’d love to hear which one becomes your favorite—drop us a comment below! And if you enjoyed this roundup, don’t forget to share the love on Pinterest. Happy cooking!

Michael Johnson is the founder of Pan Mastery, Inspired by his blacksmith grandfather’s legacy has a deep appreciation for hand-crafted pots and pans, he provides invaluable guides, reviews, and recipes to enhance your culinary journey.