Hop into the spirit of Easter with these 18 delightful and easy-to-make recipes that are perfect for little hands and big smiles! Whether you’re planning a festive brunch or looking for fun treats to brighten up your holiday table, we’ve got you covered with creative ideas that blend simplicity with seasonal charm. Keep scrolling to discover recipes that will make this Easter extra special for your family!
Easter Bunny Pancakes
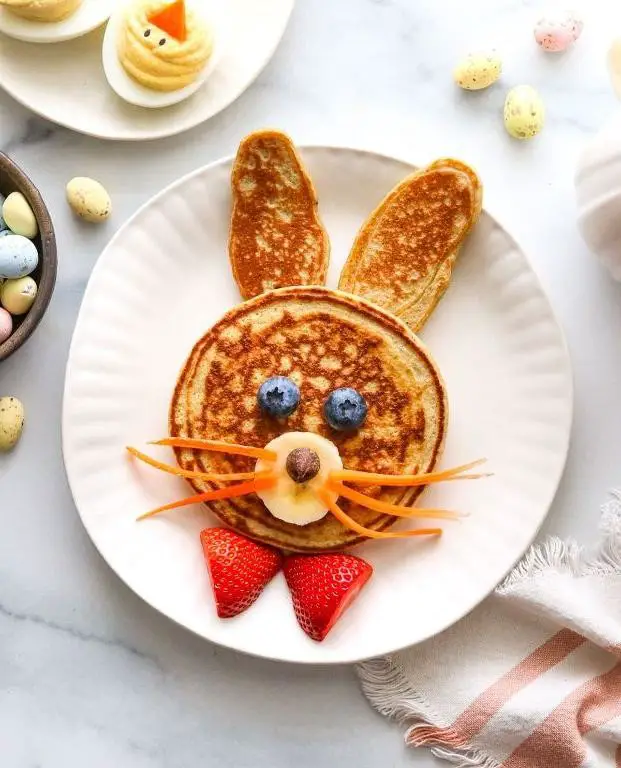
On a morning where the air carries the promise of spring, these Easter Bunny Pancakes emerge as a delightful celebration of the season, blending whimsy with the comfort of a classic breakfast.
Ingredients
- 1 cup all-purpose flour
- 2 tbsp granulated sugar
- 1 tsp baking powder
- 1/2 tsp baking soda
- 1/4 tsp salt
- 3/4 cup buttermilk
- 1/4 cup milk
- 1 large egg
- 2 tbsp unsalted butter, melted
- 1 tsp vanilla extract
- Non-stick cooking spray
- 2 tbsp chocolate chips
- 2 strawberries, sliced
Instructions
- In a large bowl, whisk together 1 cup all-purpose flour, 2 tbsp granulated sugar, 1 tsp baking powder, 1/2 tsp baking soda, and 1/4 tsp salt until well combined.
- In another bowl, mix 3/4 cup buttermilk, 1/4 cup milk, 1 large egg, 2 tbsp melted unsalted butter, and 1 tsp vanilla extract until smooth.
- Pour the wet ingredients into the dry ingredients, stirring gently until just combined. Avoid overmixing to ensure fluffy pancakes.
- Heat a non-stick skillet over medium heat and lightly coat with non-stick cooking spray.
- Pour 1/4 cup of batter onto the skillet for each pancake. Cook until bubbles form on the surface and the edges look set, about 2-3 minutes.
- Flip the pancakes and cook for another 1-2 minutes until golden brown. Tip: Adjust the heat if the pancakes are browning too quickly.
- Transfer the pancakes to a plate. Use chocolate chips for the eyes and nose, and strawberry slices for the ears to create bunny faces. Tip: Let the pancakes cool slightly to prevent the chocolate from melting too quickly.
- Serve immediately. Tip: Drizzle with maple syrup for added sweetness, if desired.
Delightfully fluffy with a tender crumb, these pancakes offer a playful twist on breakfast, with the chocolate and strawberries adding a sweet contrast. Perfect for Easter morning or any day that calls for a touch of whimsy at the table.
Colorful Easter Egg Cookies

Amidst the vibrant celebrations of Easter, these Colorful Easter Egg Cookies emerge as a delightful centerpiece, blending the joy of the season with the art of baking. Their pastel hues and delicate textures invite a moment of sweetness into the springtime festivities.
Ingredients
- 2 cups all-purpose flour
- 1/2 cup granulated sugar
- 1/2 cup unsalted butter, softened
- 1 large egg
- 1 tsp vanilla extract
- 1/2 tsp baking powder
- 1/4 tsp salt
- Assorted food coloring gels
- 1 cup powdered sugar
- 2 tbsp milk
- 1/2 tsp almond extract
Instructions
- Preheat the oven to 350°F and line two baking sheets with parchment paper.
- In a large bowl, cream together the softened butter and granulated sugar until light and fluffy, about 3 minutes.
- Beat in the egg and vanilla extract until fully incorporated.
- Whisk together the flour, baking powder, and salt in a separate bowl, then gradually mix into the wet ingredients to form a dough.
- Divide the dough into four equal portions, tinting each with a different food coloring gel until vibrant.
- Roll each colored dough into a log, then twist two logs together to create a marbled effect before shaping into egg forms.
- Place the cookies on the prepared baking sheets, spacing them 2 inches apart, and bake for 10-12 minutes until just set.
- While the cookies cool, whisk together powdered sugar, milk, and almond extract to create a glaze, then drizzle over the cookies for a glossy finish.
Soft yet slightly crisp, these cookies offer a buttery richness complemented by the subtle sweetness of the glaze. Serve them nestled in a bed of edible grass for an enchanting Easter display.
Chick Deviled Eggs
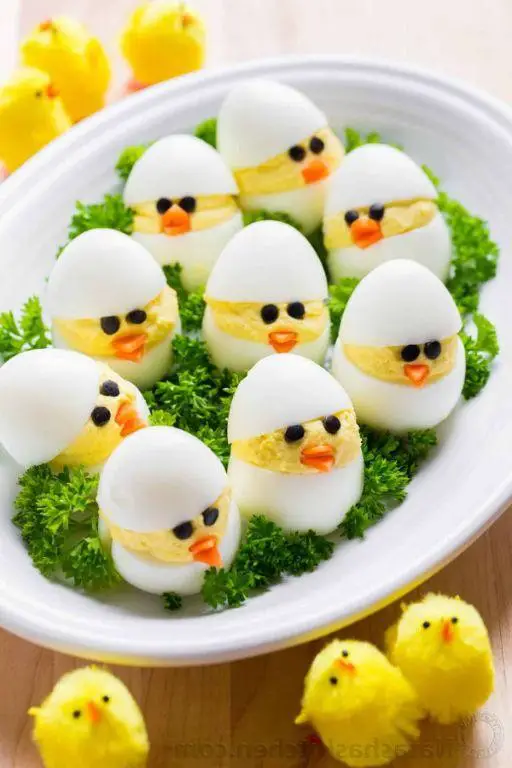
Perfectly poised between simplicity and sophistication, chick deviled eggs offer a delightful twist on the classic appetizer, blending creamy textures with a hint of spice for an unforgettable bite.
Ingredients
- 6 large eggs
- 1/4 cup mayonnaise
- 1 tsp Dijon mustard
- 1/2 tsp white vinegar
- 1/8 tsp salt
- 1/8 tsp paprika
- 1 tbsp finely chopped chives
Instructions
- Place eggs in a single layer in a saucepan and cover with water by 1 inch. Bring to a boil over high heat.
- Once boiling, cover the saucepan and remove from heat. Let stand for 12 minutes for perfectly cooked yolks.
- Transfer eggs to a bowl of ice water to cool for 5 minutes, ensuring easy peeling.
- Peel eggs under cool running water, then slice in half lengthwise. Gently remove yolks and place in a bowl.
- Mash yolks with a fork until smooth. Add mayonnaise, Dijon mustard, white vinegar, and salt, blending until creamy.
- Spoon or pipe the yolk mixture back into the egg white halves. For a professional touch, use a piping bag with a star tip.
- Sprinkle each egg half with paprika and garnish with chopped chives for a pop of color and flavor.
Heirloom serving platters elevate these chick deviled eggs, making them a centerpiece at any gathering. The creamy filling contrasts beautifully with the tender egg whites, while the paprika and chives add a subtle kick and freshness.
Bunny Tail Cheese Balls
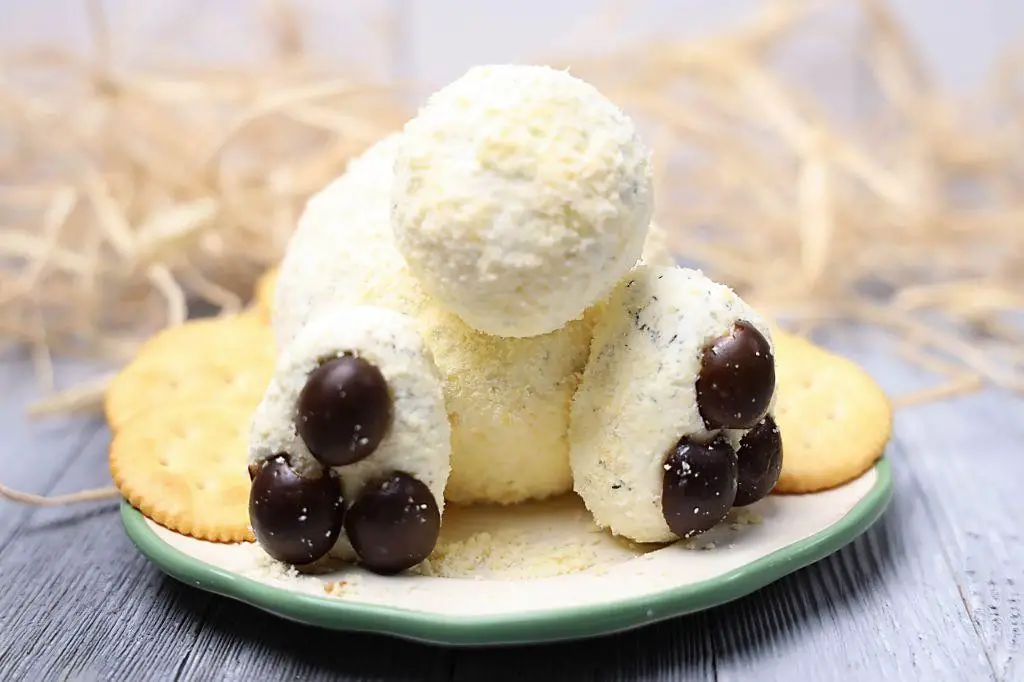
Heralding the arrival of spring with a playful yet sophisticated twist, these Bunny Tail Cheese Balls are a delightful addition to any gathering. Combining creamy textures with a whimsical presentation, they’re sure to captivate both the eyes and the palate.
Ingredients
- 8 oz cream cheese, softened
- 1 cup sharp cheddar cheese, shredded
- 1/2 tsp garlic powder
- 1/2 tsp onion powder
- 1/4 tsp salt
- 1/4 tsp black pepper
- 1 cup unsweetened shredded coconut
- 1 tbsp fresh chives, finely chopped
- 1/2 cup pretzel sticks, broken into small pieces
Instructions
- In a large mixing bowl, combine the softened cream cheese, shredded cheddar cheese, garlic powder, onion powder, salt, and black pepper until well blended.
- Using a small cookie scoop or your hands, form the mixture into 1-inch balls. Tip: For easier handling, lightly oil your hands before shaping the balls.
- Roll each cheese ball in the shredded coconut until fully coated, pressing gently to adhere. Tip: Toast the coconut lightly beforehand for an extra layer of flavor and crunch.
- Insert a small piece of pretzel stick into the top of each cheese ball to resemble a bunny tail. Tip: If the pretzel sticks are too long, break them into smaller, more proportionate pieces.
- Refrigerate the cheese balls for at least 1 hour before serving to allow them to firm up.
Delightfully creamy with a subtle sharpness from the cheddar, these Bunny Tail Cheese Balls offer a satisfying contrast to the sweet coconut coating. Serve them on a bed of fresh greens for an Easter brunch or as a charming appetizer at your next spring soiree.
Easter Basket Cupcakes
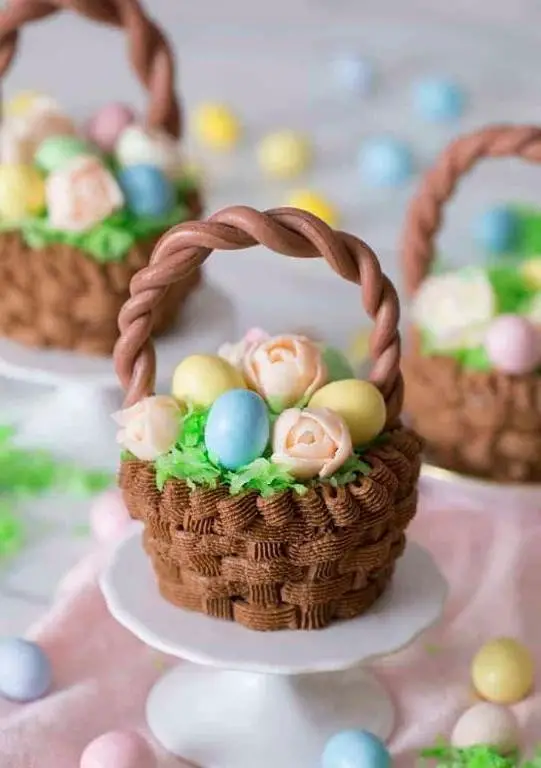
Our Easter Basket Cupcakes are a delightful springtime treat that combines the whimsy of the holiday with the sophistication of a perfectly baked cupcake. Offering a tender crumb and a burst of pastel colors, these cupcakes are sure to be the centerpiece of any Easter gathering.
Ingredients
- 1 1/2 cups all-purpose flour
- 1 cup granulated sugar
- 1/2 cup unsalted butter, softened
- 2 large eggs
- 1/2 cup whole milk
- 1 tsp vanilla extract
- 1 1/2 tsp baking powder
- 1/4 tsp salt
- 1/2 cup pastel-colored candy melts
- 1/4 cup shredded coconut, dyed green
- 12 small chocolate eggs
Instructions
- Preheat the oven to 350°F and line a 12-cup muffin tin with cupcake liners.
- In a large bowl, cream together the butter and sugar until light and fluffy, about 3 minutes.
- Add the eggs one at a time, beating well after each addition, then stir in the vanilla extract.
- In a separate bowl, whisk together the flour, baking powder, and salt.
- Alternately add the dry ingredients and the milk to the butter mixture, beginning and ending with the dry ingredients, mixing just until combined.
- Divide the batter evenly among the prepared muffin cups, filling each about two-thirds full.
- Bake for 18-20 minutes, or until a toothpick inserted into the center comes out clean.
- Allow the cupcakes to cool in the pan for 5 minutes, then transfer to a wire rack to cool completely.
- Melt the candy melts according to package instructions, then drizzle over the cooled cupcakes to create a ‘basket weave’ pattern.
- Sprinkle the dyed coconut over the cupcakes to mimic grass, then place a chocolate egg in the center of each.
Fluffy and moist, these cupcakes offer a delightful contrast between the creamy frosting and the crunchy candy eggs. For an extra touch of elegance, serve them on a tiered stand adorned with fresh spring flowers.
Spring Flower Pretzels
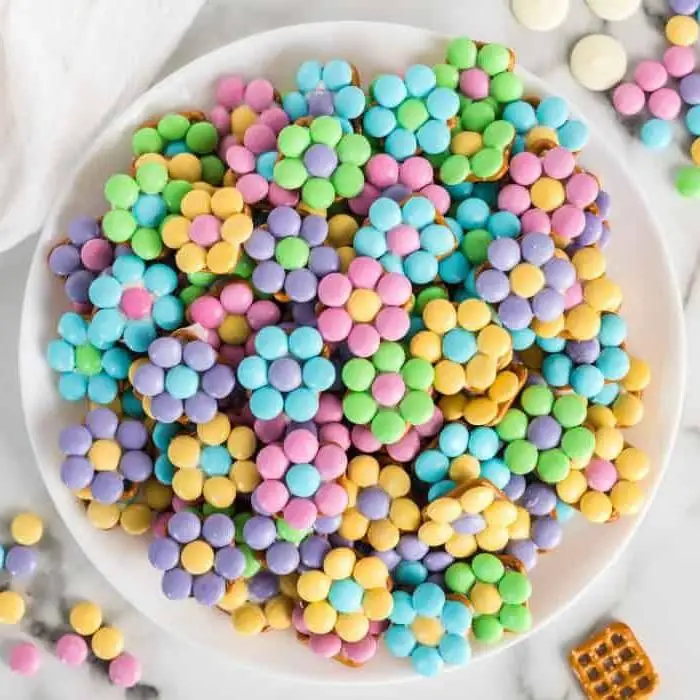
Spring ushers in a season of renewal, and what better way to celebrate than with these delicate Spring Flower Pretzels, a charming twist on the classic snack that combines the salty crunch of pretzels with the sweet, floral notes of spring.
Ingredients
- 1 cup warm water (110°F)
- 1 tbsp active dry yeast
- 1 tsp granulated sugar
- 2.5 cups all-purpose flour
- 1 tsp salt
- 2 tbsp unsalted butter, melted
- 1 egg, beaten
- Coarse sea salt, for sprinkling
Instructions
- In a large bowl, combine 1 cup warm water, 1 tbsp active dry yeast, and 1 tsp granulated sugar. Let sit for 5 minutes until frothy.
- Add 2.5 cups all-purpose flour and 1 tsp salt to the yeast mixture. Stir until a dough forms.
- Knead the dough on a lightly floured surface for 5 minutes until smooth and elastic.
- Place the dough in a greased bowl, cover with a damp towel, and let rise in a warm place for 1 hour until doubled in size.
- Preheat the oven to 425°F and line a baking sheet with parchment paper.
- Divide the dough into 12 equal pieces. Roll each piece into a rope and shape into a flower by forming a loop with one end and twisting the other end around the base.
- Brush each pretzel with 2 tbsp melted unsalted butter and sprinkle with coarse sea salt.
- Bake for 12-15 minutes until golden brown. For extra shine, brush with 1 beaten egg halfway through baking.
Light and airy with a satisfying crunch, these Spring Flower Pretzels are a delightful blend of savory and sweet. Serve them on a floral platter for a garden party or as a whimsical snack that brings a touch of spring to any table.
Carrot Patch Dirt Cups

Kickstarting our culinary journey today, we delve into the whimsical yet sophisticated world of ‘Carrot Patch Dirt Cups’, a delightful dessert that marries the earthy sweetness of carrots with the indulgent creaminess of chocolate, creating a playful yet elegant treat perfect for any occasion.
Ingredients
- 1 cup heavy cream
- 1/2 cup powdered sugar
- 1 tsp vanilla extract
- 1 cup chocolate cookie crumbs
- 1/2 cup finely grated carrots
- 1/4 cup orange juice
- 1 tbsp lemon juice
- 1/2 tsp ground cinnamon
- 1/4 tsp ground nutmeg
- 4 small edible flowers (for garnish)
Instructions
- In a large bowl, whip the heavy cream, powdered sugar, and vanilla extract together until stiff peaks form, about 3 minutes. Tip: Ensure the bowl and beaters are chilled for optimal whipping.
- Gently fold in the chocolate cookie crumbs, grated carrots, orange juice, lemon juice, ground cinnamon, and ground nutmeg until fully incorporated. Tip: For a smoother texture, ensure the carrots are finely grated.
- Divide the mixture evenly among 4 serving cups, smoothing the tops with the back of a spoon. Tip: For an elegant presentation, use transparent cups to showcase the layers.
- Refrigerate the cups for at least 2 hours, or until set. This allows the flavors to meld beautifully.
- Before serving, garnish each cup with an edible flower for a touch of springtime charm.
Offering a harmonious blend of textures from the creamy filling to the crunchy cookie base, these Carrot Patch Dirt Cups are a testament to the joy of dessert. Serve them as a whimsical end to a garden-themed dinner or as a standalone treat that promises to delight both the eyes and the palate.
Easter Chick Rice Krispie Treats
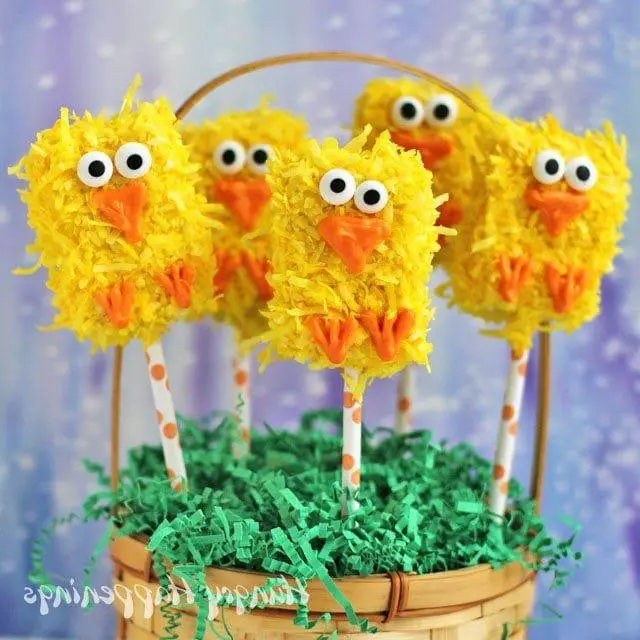
Heralding the arrival of spring, these Easter Chick Rice Krispie Treats are a delightful twist on the classic, combining the nostalgic crunch of Rice Krispies with the playful charm of Easter. Perfect for festive gatherings or a sweet afternoon project with little ones, these treats are as fun to make as they are to eat.
Ingredients
- 3 tbsp unsalted butter
- 10 oz marshmallows
- 6 cups Rice Krispies cereal
- 1 cup yellow candy melts
- 1/4 cup orange candy melts
- 1/4 cup black candy melts
Instructions
- In a large pot, melt 3 tbsp unsalted butter over low heat, ensuring it doesn’t brown.
- Add 10 oz marshmallows to the melted butter, stirring constantly until completely melted and smooth.
- Remove the pot from heat and quickly fold in 6 cups Rice Krispies cereal until evenly coated with the marshmallow mixture.
- While the mixture is still warm, use buttered hands to shape it into small chick shapes, pressing firmly to ensure they hold together.
- Place the shaped treats on a parchment-lined tray and let them cool completely, about 30 minutes.
- Melt 1 cup yellow candy melts according to package instructions, then dip each chick-shaped treat to coat, allowing excess to drip off.
- Before the yellow coating sets, use 1/4 cup orange candy melts to pipe small triangular beaks and 1/4 cup black candy melts for the eyes, using a toothpick for precision.
- Let the treats set at room temperature until the candy coating is firm, about 15 minutes.
Golden and glossy, these Easter Chick Rice Krispie Treats boast a delightful contrast between the crisp cereal and the smooth candy coating. Serve them nestled in a bed of green-tinted coconut for an adorable Easter nest presentation, or simply enjoy their sweet, marshmallowy goodness as is.
Bunny Shaped Sandwiches
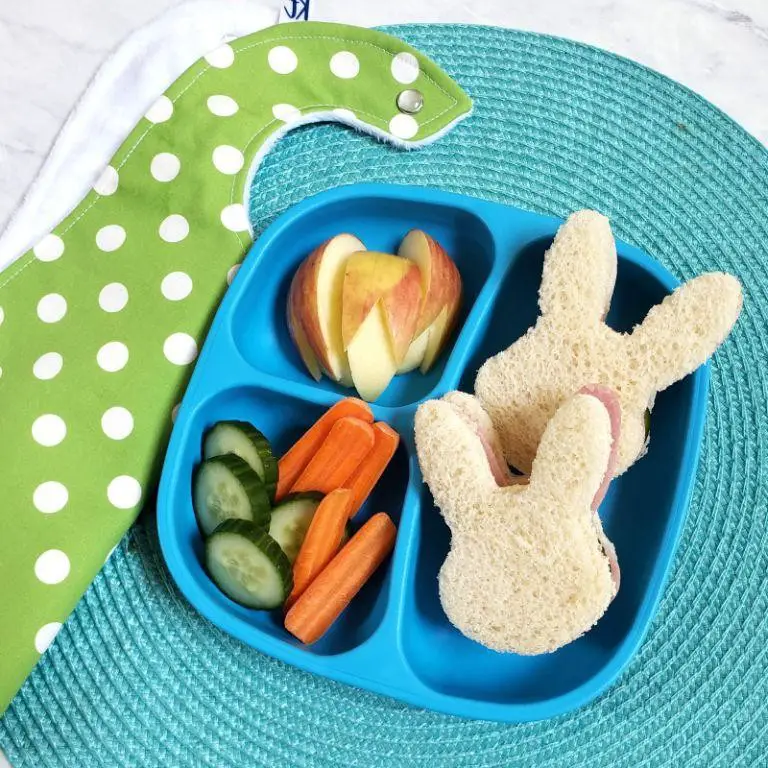
Vibrant and whimsically charming, these Bunny Shaped Sandwiches are a delightful twist on the classic lunchtime staple, perfect for adding a touch of playfulness to your table. Crafted with precision and care, they’re as pleasing to the eye as they are to the palate, offering a creative way to enjoy simple ingredients.
Ingredients
- 2 slices white bread
- 1 tbsp creamy peanut butter
- 1 tbsp strawberry jam
- 1 small banana
- 2 blueberries
- 1 tsp honey
Instructions
- Using a bunny-shaped cookie cutter, press firmly into each slice of bread to create two bunny shapes.
- Spread 1 tbsp of creamy peanut butter evenly on one bunny-shaped bread slice.
- Spread 1 tbsp of strawberry jam evenly on the other bunny-shaped bread slice.
- Peel the small banana and slice it into thin rounds. Arrange the banana slices on top of the peanut butter to create the bunny’s tummy.
- Place two blueberries on the jam-covered slice to serve as the bunny’s eyes.
- Drizzle 1 tsp of honey over the banana slices for a subtle sweetness and shine.
- Carefully press the two bunny-shaped slices together to form a sandwich.
Whimsically adorable and irresistibly tasty, these Bunny Shaped Sandwiches boast a delightful contrast of creamy peanut butter and sweet strawberry jam, with the fresh banana adding a soft, chewy texture. Serve them at your next spring brunch or as a fun surprise in lunchboxes to spark joy in every bite.
Easter Egg Fruit Pizza
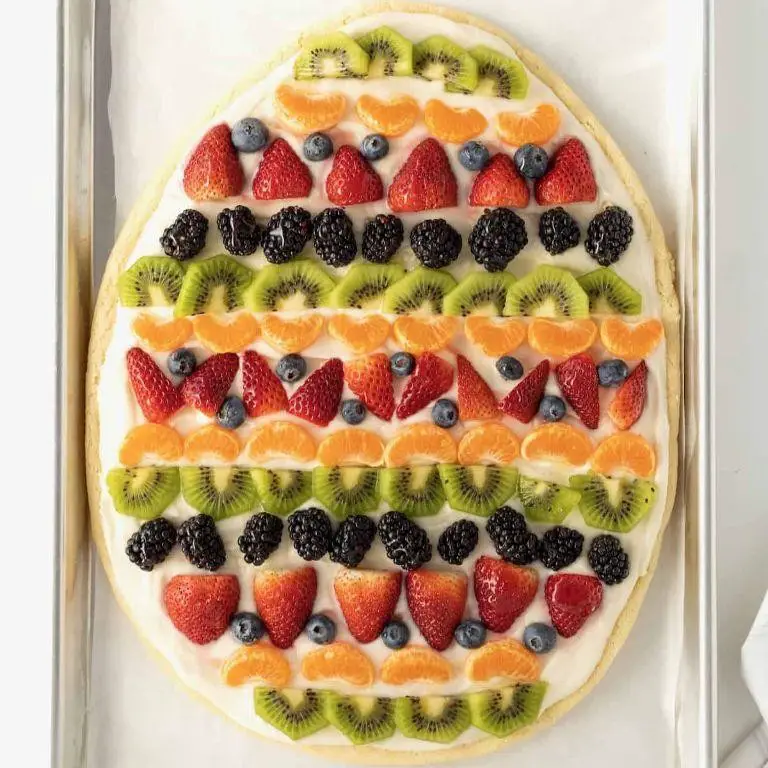
Whimsically blending the vibrant hues of Easter with the fresh, zesty flavors of spring, this Easter Egg Fruit Pizza is a delightful centerpiece that marries the simplicity of sugar cookie crust with the lushness of seasonal fruits. Its playful design invites both the eyes and the palate to a celebration of color and taste, making it a perfect addition to any festive gathering.
Ingredients
- 1 cup unsalted butter, softened
- 1 cup granulated sugar
- 1 large egg
- 1 tsp vanilla extract
- 3 cups all-purpose flour
- 1/2 tsp baking powder
- 1/4 tsp salt
- 8 oz cream cheese, softened
- 1/2 cup powdered sugar
- 1 tsp lemon zest
- 2 cups assorted fruits (strawberries, kiwis, blueberries, etc.), sliced
Instructions
- Preheat the oven to 350°F and line a baking sheet with parchment paper.
- In a large bowl, cream together 1 cup unsalted butter and 1 cup granulated sugar until light and fluffy, about 3 minutes.
- Beat in 1 large egg and 1 tsp vanilla extract until well combined.
- In a separate bowl, whisk together 3 cups all-purpose flour, 1/2 tsp baking powder, and 1/4 tsp salt.
- Gradually add the dry ingredients to the wet ingredients, mixing until a dough forms.
- Roll out the dough on a floured surface to a 1/4-inch thickness and transfer to the prepared baking sheet.
- Bake for 12-15 minutes, or until the edges are lightly golden. Let cool completely.
- In a medium bowl, beat 8 oz cream cheese, 1/2 cup powdered sugar, and 1 tsp lemon zest until smooth.
- Spread the cream cheese mixture evenly over the cooled cookie crust.
- Arrange 2 cups assorted fruits in an Easter egg pattern or as desired over the cream cheese layer.
- Chill for at least 1 hour before serving to allow the flavors to meld.
Fragrant with lemon zest and bursting with the freshness of assorted fruits, this Easter Egg Fruit Pizza offers a delightful contrast between the creamy, tangy topping and the sweet, crumbly cookie base. Serve it chilled, sliced into wedges to reveal the colorful fruit mosaic, for a dessert that’s as beautiful as it is delicious.
Lamb Shaped Cake
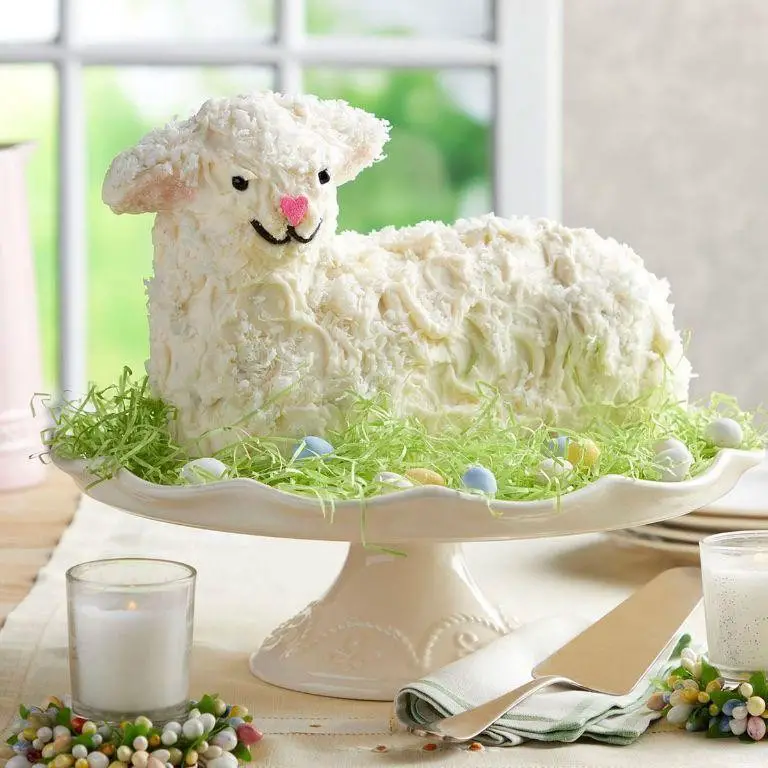
Keen to elevate your baking repertoire with a show-stopping centerpiece? This lamb-shaped cake, a masterpiece of confectionery art, marries the whimsy of festive shapes with the sophistication of a perfectly moist sponge, promising to dazzle at any springtime gathering.
Ingredients
- 3 cups all-purpose flour
- 2 cups granulated sugar
- 1 cup unsalted butter, softened
- 4 large eggs
- 1 cup whole milk
- 1 tbsp vanilla extract
- 2 tsp baking powder
- 1/2 tsp salt
Instructions
- Preheat your oven to 350°F (175°C) and generously grease a lamb-shaped cake pan.
- In a large bowl, cream together 1 cup unsalted butter and 2 cups granulated sugar until light and fluffy, about 3 minutes.
- Add 4 large eggs one at a time, beating well after each addition, then stir in 1 tbsp vanilla extract.
- In a separate bowl, whisk together 3 cups all-purpose flour, 2 tsp baking powder, and 1/2 tsp salt.
- Alternately add the dry ingredients and 1 cup whole milk to the butter mixture, beginning and ending with the dry ingredients, mixing just until combined.
- Pour the batter into the prepared pan, smoothing the top with a spatula for an even bake.
- Bake for 45-50 minutes, or until a toothpick inserted into the center comes out clean.
- Allow the cake to cool in the pan for 10 minutes, then transfer to a wire rack to cool completely.
- Once cooled, decorate as desired with frosting, edible flowers, or a dusting of powdered sugar for a festive touch.
Yielded is a cake with a tender crumb and rich buttery flavor, its lamb shape offering a playful yet elegant presentation. Consider serving slices alongside a dollop of whipped cream and fresh berries for a delightful contrast in textures and flavors.
Easter Nest Chocolate Treats
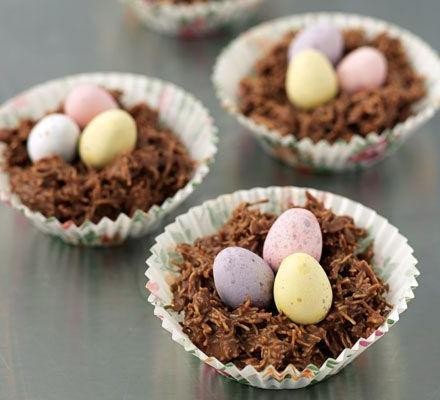
Easter Nest Chocolate Treats bring a touch of whimsy and delight to your springtime celebrations, combining the rich, velvety texture of chocolate with the crisp, airy crunch of chow mein noodles. These adorable confections are not only a feast for the eyes but also a simple, no-bake project that invites creativity and joy into your kitchen.
Ingredients
- 2 cups semi-sweet chocolate chips
- 1 tbsp coconut oil
- 3 cups chow mein noodles
- 1/2 cup mini candy eggs
Instructions
- Line a baking sheet with parchment paper and set aside.
- In a microwave-safe bowl, combine 2 cups semi-sweet chocolate chips and 1 tbsp coconut oil. Microwave on high for 30 seconds, then stir. Repeat in 15-second intervals until fully melted and smooth.
- Tip: To prevent overheating, always stir the chocolate between microwave bursts.
- Gently fold in 3 cups chow mein noodles until evenly coated with the chocolate mixture.
- Using a spoon or your hands, form the mixture into small nests on the prepared baking sheet. Create a slight indentation in the center of each nest to hold the candy eggs.
- Tip: For uniform nests, use a 1/4 cup measure to portion the mixture.
- Place 3-4 mini candy eggs in the center of each nest.
- Refrigerate for at least 30 minutes, or until the chocolate has fully set.
- Tip: For a quicker set, place the nests in the freezer for 15 minutes.
Crunchy, chocolatey, and irresistibly cute, these Easter Nest Chocolate Treats offer a playful contrast of textures and flavors. Serve them as a charming centerpiece at your Easter brunch or package them in clear cellophane bags for delightful party favors.
Peeps S’mores
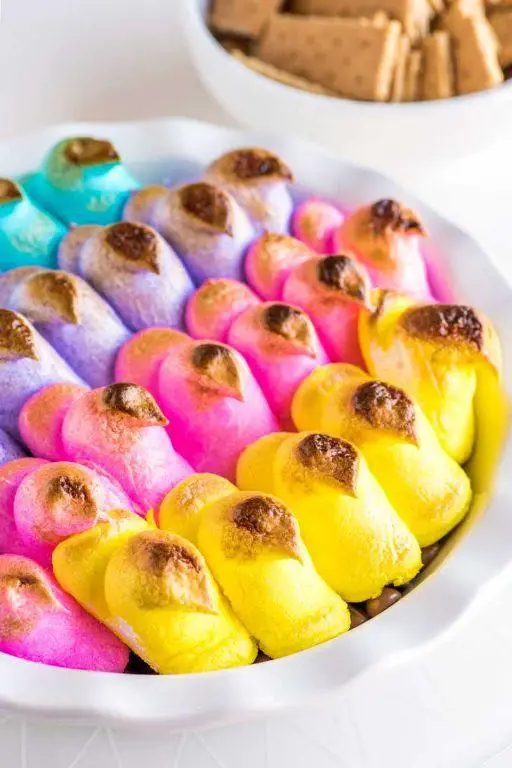
Unveiling a delightful twist on a classic campfire treat, Peeps S’mores combine the nostalgic charm of marshmallow Peeps with the rich, gooey goodness of traditional s’mores. Perfect for spring gatherings or a whimsical dessert, this recipe promises a burst of flavor and fun in every bite.
Ingredients
- 4 graham cracker squares
- 2 milk chocolate bars (1.55 oz each)
- 4 Peeps marshmallow chicks
Instructions
- Preheat your oven to 350°F (175°C) and line a baking sheet with parchment paper for easy cleanup.
- Place 2 graham cracker squares on the prepared baking sheet, then top each with 1 chocolate bar, breaking it to fit if necessary.
- Add 2 Peeps marshmallow chicks on top of each chocolate-covered graham cracker, ensuring they’re centered for even melting.
- Bake in the preheated oven for 3-5 minutes, or until the Peeps are slightly puffed and the chocolate begins to soften. Tip: Watch closely to prevent over-melting.
- Remove from the oven and immediately top each with the remaining graham cracker squares, pressing down gently to sandwich the ingredients together. Tip: Use a spatula to avoid burns from the hot marshmallow.
- Let the s’mores cool for 2 minutes before serving to allow the chocolate to set slightly. Tip: For a decorative touch, drizzle with melted chocolate or sprinkle with crushed graham crackers.
These Peeps S’mores offer a playful contrast of textures, from the crisp graham crackers to the soft, melted marshmallow and smooth chocolate. Serve them at your next outdoor picnic or as a cheerful dessert that’s sure to spark joy and conversation.
Easter Bunny Veggie Tray
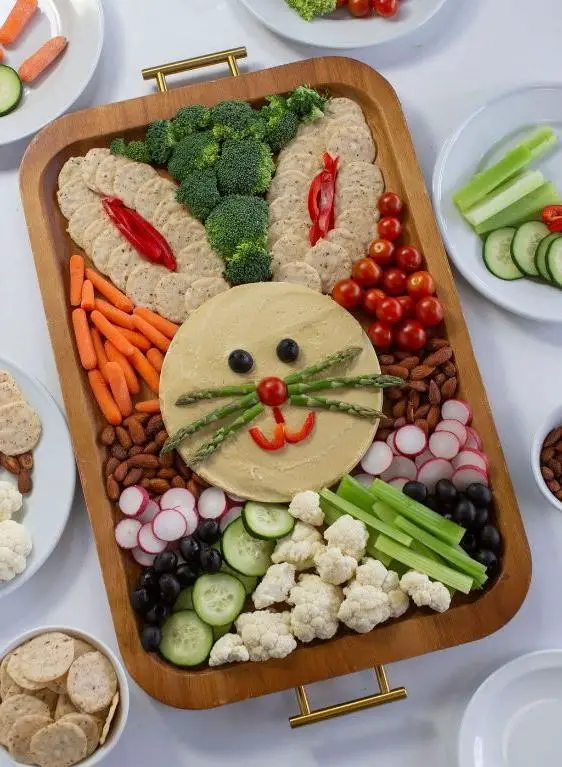
Masterfully blending whimsy and nutrition, the Easter Bunny Veggie Tray is a vibrant centerpiece that delights both the eyes and the palate, perfect for spring gatherings.
Ingredients
- 1 large white cauliflower
- 1 cup cherry tomatoes
- 1 cup baby carrots
- 1 cup broccoli florets
- 1/2 cup black olives
- 1/4 cup ranch dressing
Instructions
- Wash all vegetables thoroughly under cold running water and pat dry with paper towels.
- Cut the cauliflower in half vertically to create the bunny’s face and ears, arranging it on a large serving platter.
- Place cherry tomatoes as the bunny’s nose and eyes, using the black olives sliced in half for the pupils.
- Arrange baby carrots around the face to mimic whiskers, ensuring they’re evenly spaced for a symmetrical look.
- Scatter broccoli florets around the platter to resemble grass, filling in any gaps for a lush presentation.
- Serve the ranch dressing in a small bowl placed at the base of the tray, allowing guests to dip their veggies.
Not only does this tray offer a crisp, fresh texture and a medley of flavors, but it also serves as a playful conversation starter. Consider garnishing with edible flowers for an extra touch of spring elegance.
Resurrection Rolls
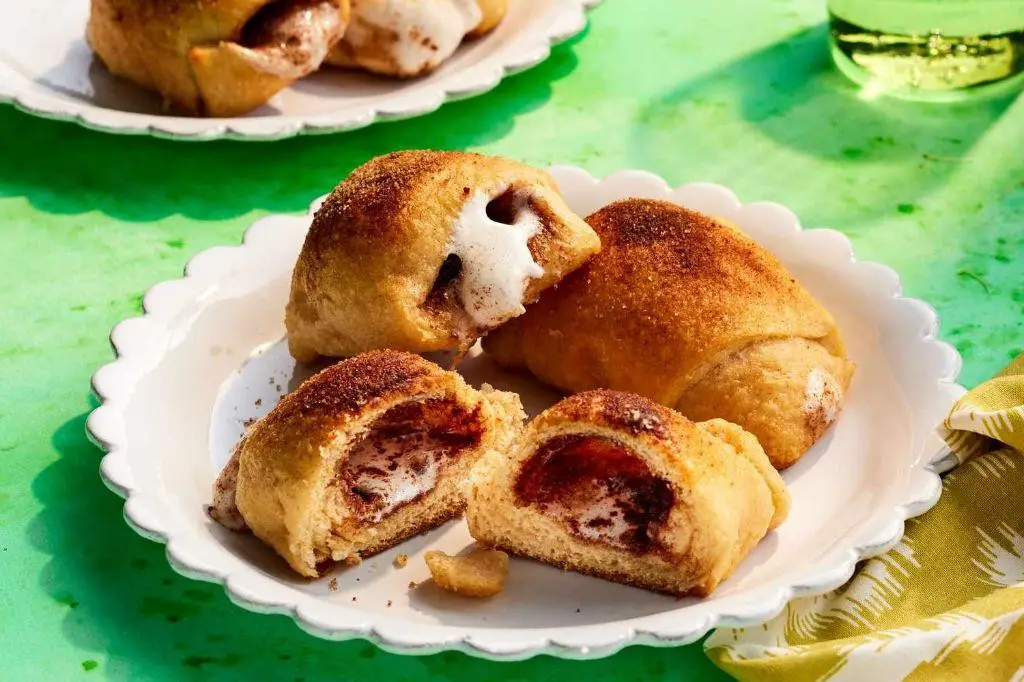
Captivating in both name and nature, Resurrection Rolls are a delightful treat that marries simplicity with symbolism, offering a fluffy, sweet interior encased in a golden, buttery crust. Perfect for Easter or any spring gathering, these rolls are as meaningful as they are delicious, embodying a sense of renewal and joy.
Ingredients
- 1 can (8 oz) refrigerated crescent roll dough
- 8 large marshmallows
- 1/4 cup unsalted butter, melted
- 1/4 cup granulated sugar
- 1 tbsp ground cinnamon
Instructions
- Preheat your oven to 375°F (190°C) and line a baking sheet with parchment paper.
- Unroll the crescent dough and separate it into 8 triangles along the perforated lines.
- In a small bowl, mix together the granulated sugar and cinnamon until well combined.
- Dip each marshmallow into the melted butter, then roll it in the cinnamon-sugar mixture until fully coated.
- Place a coated marshmallow at the wide end of each dough triangle, then carefully roll the dough around the marshmallow, ensuring it’s completely sealed to prevent leakage during baking.
- Brush the outside of each roll with the remaining melted butter and sprinkle with any leftover cinnamon-sugar.
- Arrange the rolls on the prepared baking sheet, spacing them about 2 inches apart.
- Bake for 12-15 minutes, or until the rolls are golden brown and the marshmallow has melted, creating a hollow center.
- Allow the rolls to cool on the baking sheet for 5 minutes before serving to let the filling set slightly.
Delightfully light and airy, Resurrection Rolls offer a surprising burst of sweetness with each bite, the cinnamon-sugar crust providing a delightful contrast to the soft, melted center. Serve them warm alongside a cup of coffee for a comforting breakfast or as a sweet ending to a festive meal.
Easter Egg Hunt Popcorn
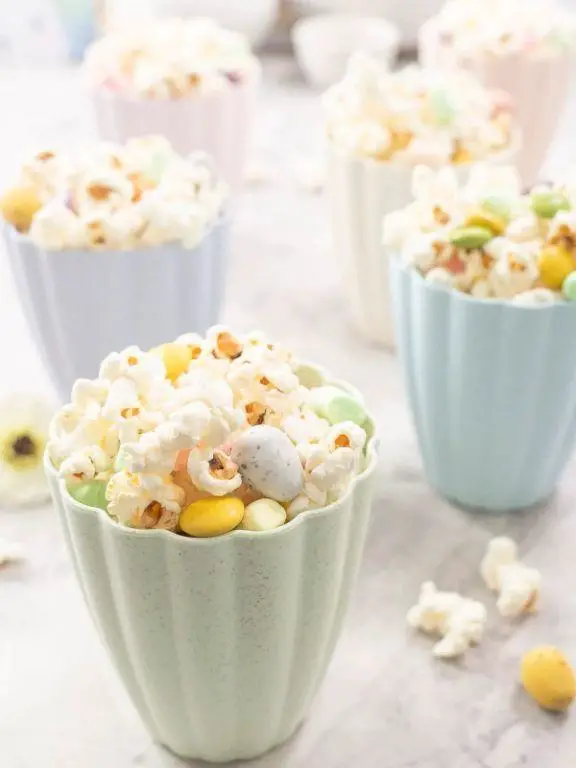
Delightfully festive and irresistibly crunchy, this Easter Egg Hunt Popcorn transforms a simple snack into a celebratory treat. Perfect for gatherings or a sweet family activity, it’s a playful twist on traditional popcorn that’s as fun to make as it is to eat.
Ingredients
- 8 cups popped popcorn
- 1 cup white chocolate chips
- 2 tbsp coconut oil
- 1/2 cup pastel-colored candy-coated chocolates
- 1/4 cup sprinkles
Instructions
- Line a large baking sheet with parchment paper and set aside.
- In a microwave-safe bowl, combine white chocolate chips and coconut oil. Microwave on high for 1 minute, then stir until smooth. If needed, microwave in additional 15-second intervals, stirring each time, until fully melted.
- Pour the melted white chocolate mixture over the popped popcorn, using a rubber spatula to gently fold until evenly coated.
- Spread the coated popcorn onto the prepared baking sheet in an even layer.
- Immediately sprinkle the pastel-colored candy-coated chocolates and sprinkles over the popcorn while the chocolate is still wet.
- Allow the popcorn to set at room temperature for at least 30 minutes, or until the chocolate has hardened.
- Once set, break the popcorn into clusters and serve.
Perfect for Easter celebrations, this popcorn boasts a delightful contrast of textures—crispy, creamy, and crunchy—with a sweet, vanilla-like flavor from the white chocolate. Serve it in colorful bowls or package it in clear cellophane bags tied with ribbon for a charming party favor.
Bunny Ear Donuts
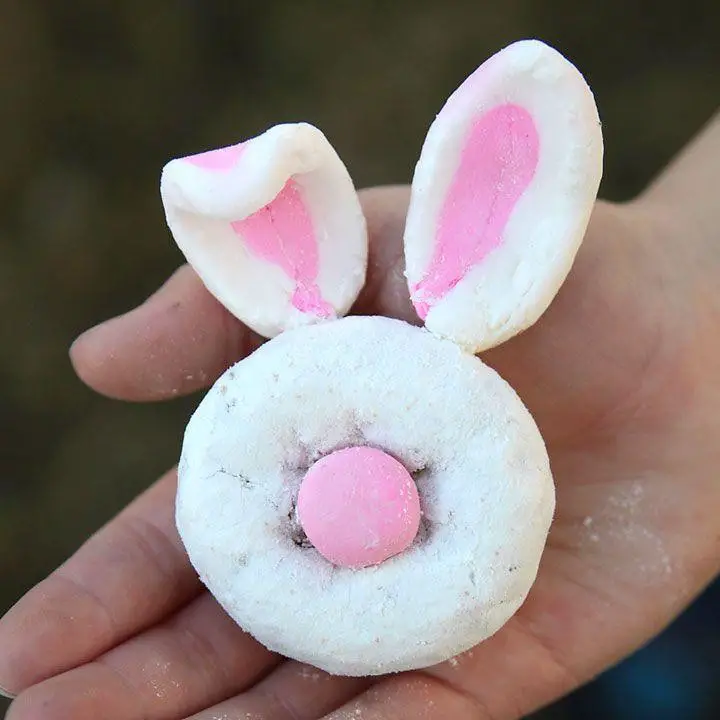
Kickstart your morning with a whimsical twist on a classic treat, our Bunny Ear Donuts are as delightful to behold as they are to devour. These tender, sugar-dusted confections, shaped with playful ears, promise a joyous start to any day, blending simplicity with a dash of charm.
Ingredients
- 2 cups all-purpose flour
- 1/2 cup granulated sugar
- 1 tbsp baking powder
- 1/2 tsp salt
- 3/4 cup whole milk
- 2 large eggs
- 2 tbsp unsalted butter, melted
- 1 tsp vanilla extract
- 1 cup powdered sugar
- 1 tbsp whole milk
- 1/2 tsp vanilla extract
Instructions
- Preheat your oven to 375°F and lightly grease a donut pan.
- In a large bowl, whisk together 2 cups all-purpose flour, 1/2 cup granulated sugar, 1 tbsp baking powder, and 1/2 tsp salt.
- In another bowl, combine 3/4 cup whole milk, 2 large eggs, 2 tbsp melted unsalted butter, and 1 tsp vanilla extract until smooth.
- Gently fold the wet ingredients into the dry ingredients until just combined; avoid overmixing to ensure tender donuts.
- Transfer the batter to a piping bag and fill each donut mold halfway, then pipe two small mounds atop each to form ‘ears’.
- Bake for 10-12 minutes, or until the donuts spring back when lightly touched.
- While the donuts cool, whisk together 1 cup powdered sugar, 1 tbsp whole milk, and 1/2 tsp vanilla extract for the glaze.
- Dip each cooled donut into the glaze, allowing excess to drip off, then set on a wire rack to harden slightly.
Adorned with a sweet glaze and their signature ears, these donuts offer a soft, cake-like texture with a vanilla-kissed flavor. Serve them on a pastel platter for an Easter brunch or as a playful snack that’s sure to spark smiles.
Springtime Butterfly Crackers
Nothing heralds the arrival of spring quite like the delicate crunch of homemade Springtime Butterfly Crackers, a whimsical yet sophisticated snack that marries lightness with a hint of savory charm. Perfect for garden parties or a sunny afternoon treat, these crackers are as delightful to behold as they are to devour.
Ingredients
- 2 cups all-purpose flour
- 1/2 tsp salt
- 1/2 cup unsalted butter, chilled and cubed
- 1/4 cup cold water
- 1 tbsp honey
- 1 egg, beaten
- 1 tbsp sesame seeds
Instructions
- Preheat your oven to 350°F and line a baking sheet with parchment paper.
- In a large bowl, whisk together 2 cups all-purpose flour and 1/2 tsp salt until well combined.
- Add 1/2 cup chilled, cubed unsalted butter to the flour mixture. Use your fingertips to rub the butter into the flour until the mixture resembles coarse crumbs.
- Drizzle in 1/4 cup cold water and 1 tbsp honey, stirring until a dough begins to form. Tip: If the dough feels too dry, add water one teaspoon at a time until it comes together.
- Turn the dough onto a lightly floured surface and knead gently until smooth. Roll out to a 1/8-inch thickness.
- Using a butterfly-shaped cookie cutter, cut out crackers and place them on the prepared baking sheet. Tip: For even baking, ensure the crackers are spaced about 1 inch apart.
- Brush the tops of the crackers with 1 beaten egg and sprinkle with 1 tbsp sesame seeds for a subtle crunch.
- Bake for 12-15 minutes, or until the edges are golden brown. Tip: Rotate the baking sheet halfway through baking for even color.
- Allow the crackers to cool on the baking sheet for 5 minutes before transferring to a wire rack to cool completely.
With their flaky texture and a hint of sweetness from the honey, these Springtime Butterfly Crackers are a versatile companion to cheeses or simply enjoyed on their own. For an extra touch of spring, serve them alongside a vibrant herb-infused dip or a light floral tea.
Conclusion
Bringing joy to your Easter celebrations has never been easier with these 18 fun and kid-friendly recipes! Whether you’re crafting cute treats or whipping up simple delights, there’s something for every little bunny to enjoy. We’d love to hear which recipes made your holiday extra special—drop a comment below and don’t forget to share the fun by pinning this article on Pinterest. Happy cooking and happy Easter!

Michael Johnson is the founder of Pan Mastery, Inspired by his blacksmith grandfather’s legacy has a deep appreciation for hand-crafted pots and pans, he provides invaluable guides, reviews, and recipes to enhance your culinary journey.