Are you ready to elevate your home cooking game with some gourmet flair? Our roundup of 18 Delicious Epicurious Recipes is packed with mouthwatering dishes that blend simplicity with sophistication. Whether you’re craving comfort food with a twist or looking to impress with seasonal favorites, these recipes are your ticket to a culinary adventure. Dive in and discover your next kitchen masterpiece!
Spicy Thai Basil Chicken
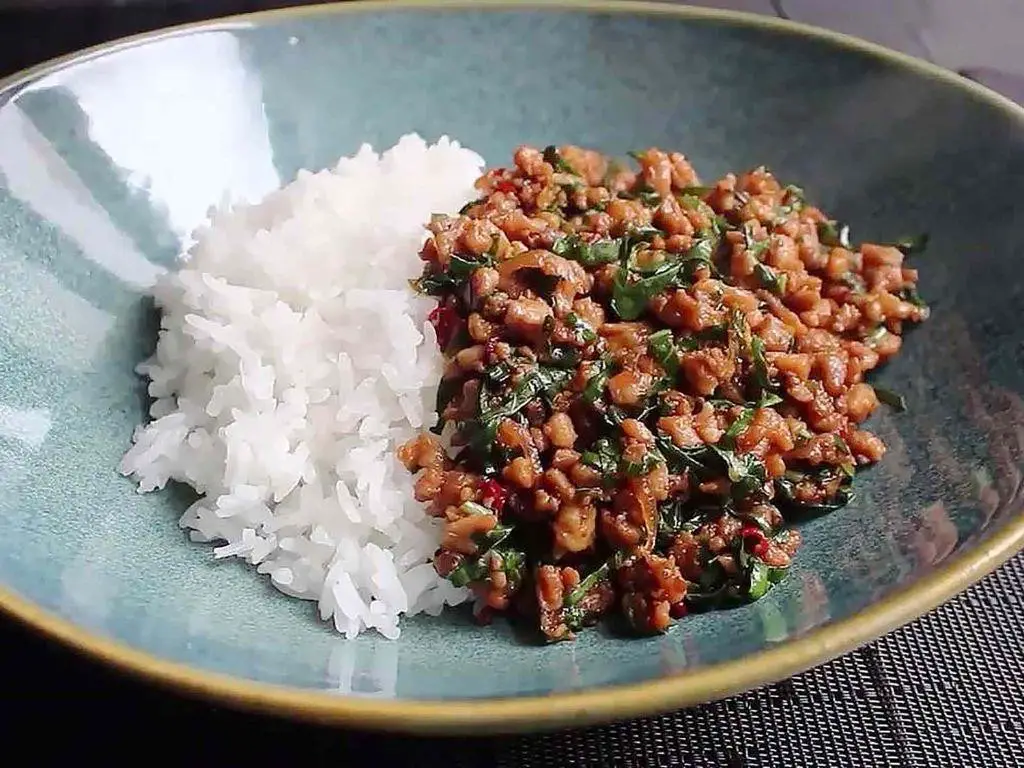
Buckle up for a flavor explosion with this Spicy Thai Basil Chicken—quick, fiery, and packed with aromatic goodness that’ll have you craving seconds.
Ingredients
- 1 lb chicken thighs, sliced thin (breasts work, but thighs stay juicier)
- 3 tbsp vegetable oil (my kitchen staple for high-heat cooking)
- 5 garlic cloves, minced (more is always better, right?)
- 2-3 Thai chilies, sliced (adjust for your heat tolerance)
- 1 cup fresh Thai basil leaves (the star of the show, don’t skip)
- 2 tbsp oyster sauce (adds that umami depth)
- 1 tbsp soy sauce (I opt for low-sodium to control saltiness)
- 1 tsp sugar (just a pinch to balance the heat)
- 1/2 cup bell peppers, sliced (for a crunchy contrast)
Instructions
- Heat oil in a wok or large skillet over medium-high heat until shimmering—about 1 minute.
- Add chicken, spreading it out in a single layer. Let it sear untouched for 2 minutes to get a golden crust.
- Flip chicken pieces, add garlic and chilies. Stir-fry for 30 seconds until fragrant—watch closely to avoid burning.
- Toss in bell peppers, stir-frying for another minute until slightly softened but still crisp.
- Pour in oyster sauce, soy sauce, and sugar. Stir everything together, coating evenly, for about 1 minute.
- Remove from heat, fold in Thai basil until just wilted—its aroma is unreal when fresh.
- Serve immediately over steamed jasmine rice for the ultimate comfort meal.
Juicy, tender chicken meets the bold kick of chilies and the sweet anise hint of basil. Try it with a fried egg on top for extra richness.
Classic Beef Bourguignon
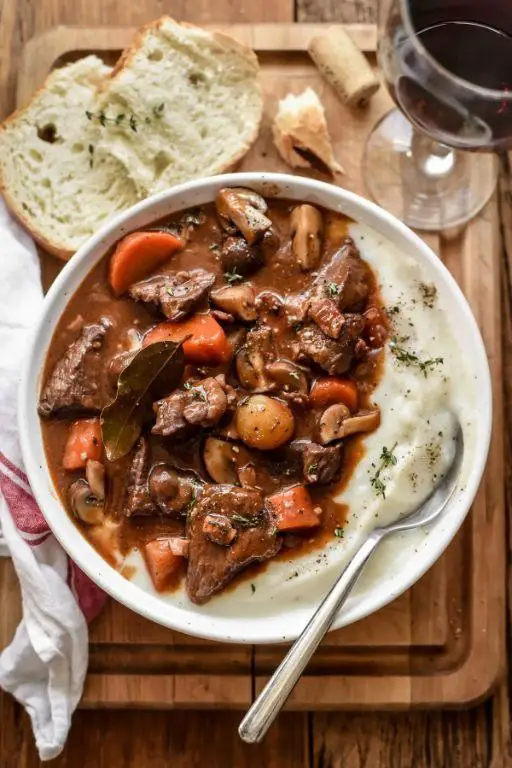
Elevate your dinner game with this Classic Beef Bourguignon—rich, hearty, and packed with flavors that melt in your mouth.
Ingredients
- 2 lbs beef chuck, cut into 2-inch cubes (trust me, bigger chunks stay juicier)
- 1/2 lb bacon, diced (because everything’s better with bacon)
- 1 cup red wine (a bold Cabernet works wonders)
- 2 cups beef stock (homemade if you’ve got it)
- 1/2 lb mushrooms, quartered (baby bellas add a nice earthiness)
- 1 large onion, chopped (yellow for sweetness)
- 2 carrots, sliced (for a pop of color)
- 3 garlic cloves, minced (fresh is best)
- 2 tbsp tomato paste (adds depth)
- 1 tbsp all-purpose flour (for that perfect thicken)
- 2 tbsp olive oil (extra virgin is my go-to)
- 1 tsp thyme (dried is fine, but fresh is heavenly)
- Salt and pepper (season like you mean it)
Instructions
- Preheat your oven to 325°F—low and slow is the key here.
- In a large Dutch oven, heat olive oil over medium heat. Add bacon and cook until crispy, about 5 minutes. Remove and set aside.
- Season beef with salt and pepper. In the same pot, brown beef in batches—don’t crowd the pan! This should take about 5 minutes per batch.
- Remove beef, add onions, carrots, and garlic. Cook until softened, about 5 minutes. Tip: Scrape up those browned bits for extra flavor.
- Stir in tomato paste and flour, cook for 1 minute to remove the raw flour taste.
- Pour in wine and beef stock, bring to a simmer. Add back the beef and bacon, along with thyme. Cover and transfer to the oven.
- Bake for 2 hours, then add mushrooms. Bake for another 30 minutes. Tip: The meat should be fork-tender.
- Skim off any excess fat and adjust seasoning if needed. Tip: Let it sit for 10 minutes before serving—it’ll taste even better.
Perfectly tender beef, a sauce that’s rich and velvety, and veggies that’ve soaked up all the goodness. Serve over mashed potatoes or with crusty bread to sop up every last drop.
Homemade Spinach Ricotta Ravioli
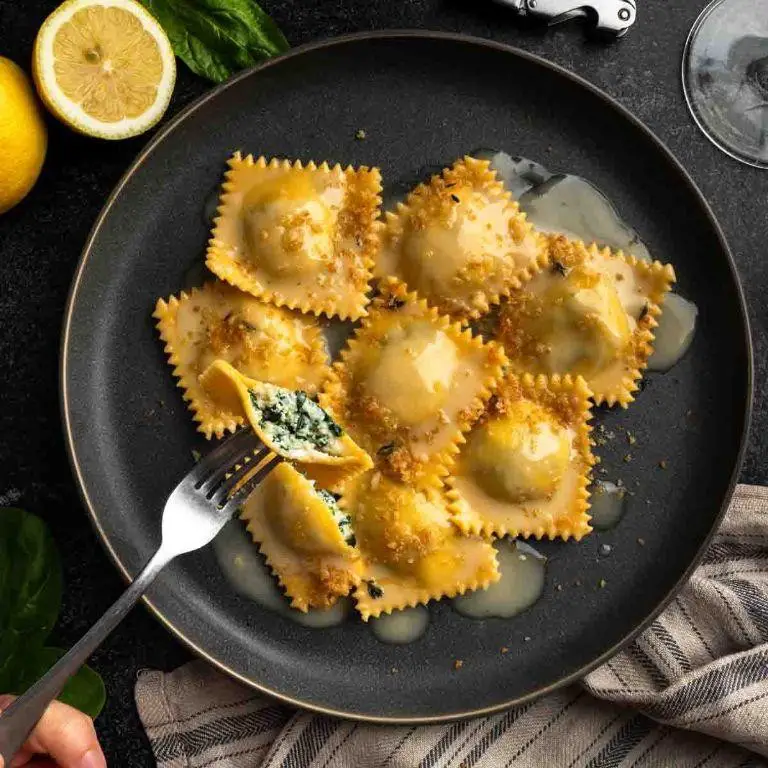
Overwhelm your taste buds with these pillowy pockets of joy—Homemade Spinach Ricotta Ravioli. Perfect for a fancy night in or impressing your foodie friends.
Ingredients
- 2 cups all-purpose flour (I like to sift mine for extra fluffiness)
- 3 large eggs (room temp eggs blend smoother)
- 1 cup ricotta cheese (full-fat for that creamy dreaminess)
- 1 cup chopped spinach (squeeze out all the water, trust me)
- 1/2 tsp salt (because bland pasta is a crime)
- 2 tbsp extra virgin olive oil (my go-to for richness)
- 1/4 cup grated Parmesan (the sharper, the better)
- 1 egg yolk (for that golden seal)
Instructions
- Mix flour and salt on a clean surface, make a well in the center.
- Crack eggs into the well, gradually incorporate flour with a fork.
- Knead dough for 10 mins until smooth, wrap in plastic, rest for 30 mins.
- Blend ricotta, spinach, Parmesan, and olive oil in a bowl.
- Roll dough into thin sheets, spoon filling every 2 inches.
- Brush around filling with egg yolk, place another sheet on top, press to seal.
- Cut into squares with a pasta cutter, boil in salted water for 3-4 mins.
- Serve immediately with a drizzle of olive oil and extra Parmesan.
Silky pasta meets a creamy, herby filling—these ravioli are a texture dream. Try them with a brown butter sage sauce for an autumnal twist.
Decadent Chocolate Lava Cake
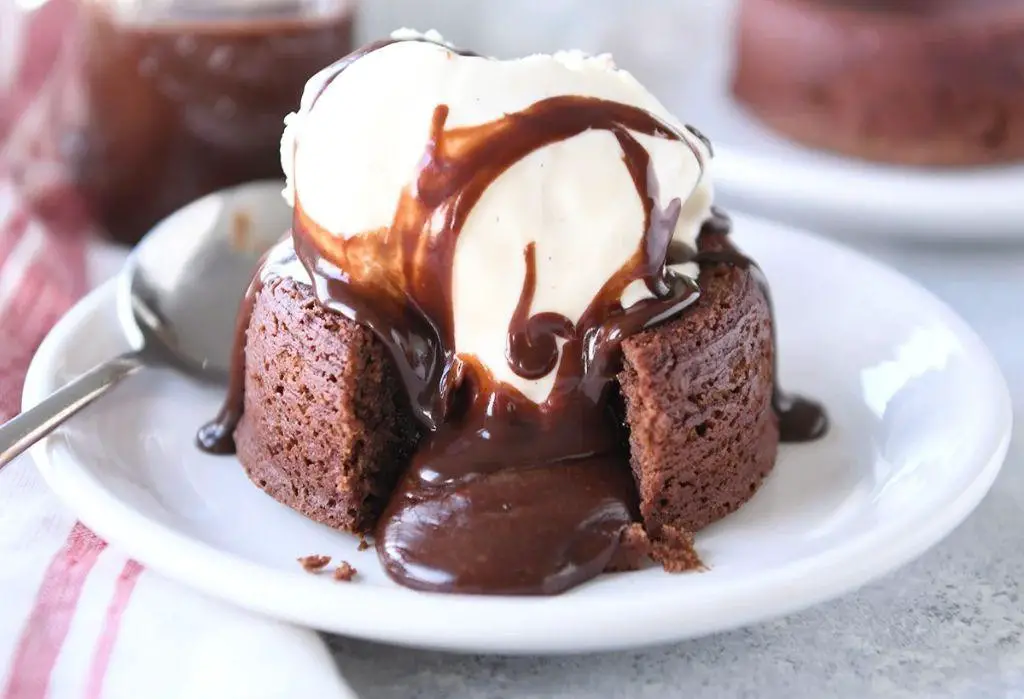
Melt into bliss with this Decadent Chocolate Lava Cake—your fork breaks through a tender exterior to reveal a river of molten chocolate. It’s the ultimate dessert flex, ready in under 30 minutes.
Ingredients
- 1/2 cup unsalted butter (I swear by European-style for richer flavor)
- 4 oz semi-sweet chocolate chips (Guittard is my ride-or-die)
- 1 cup powdered sugar (sifted, unless you enjoy lumpy batter)
- 2 large eggs (room temp, please—cold eggs are the enemy of smooth batter)
- 1 egg yolk (yes, separate it like a pro)
- 1 tsp vanilla extract (the real deal, not imitation)
- 1/2 cup all-purpose flour (spooned and leveled, not packed)
- 1/4 tsp salt (flaky sea salt adds a nice crunch)
Instructions
- Preheat your oven to 425°F—no cheating, this cake needs the heat.
- Butter and lightly flour four 6-oz ramekins. Tip: Use a pastry brush for even butter coverage.
- Melt butter and chocolate in a double boiler, stirring until smooth. Tip: No double boiler? A heatproof bowl over simmering water works.
- Whisk in powdered sugar until fully incorporated.
- Beat in eggs, yolk, and vanilla until the batter glistens.
- Fold in flour and salt just until combined—overmixing is the devil.
- Divide batter among ramekins, filling 3/4 full. Tip: A cookie scoop makes this mess-free.
- Bake for 12-14 minutes until edges are set but centers are jiggly. Visual cue: The top should look like a brownie.
- Let sit for 1 minute, then invert onto plates. Serve immediately—this beauty waits for no one.
The cake’s edges are firm with a delicate crumb, while the center oozes like a chocolate volcano. Pair with a scoop of vanilla bean ice cream for that hot-cold contrast, or go rogue with a sprinkle of flaky salt and a drizzle of caramel.
Fresh Summer Corn Chowder

Yes, it’s that time of year again—when sweet corn takes center stage in our kitchens. This Fresh Summer Corn Chowder? It’s creamy, dreamy, and packed with sunshine in every spoonful.
Ingredients
- 4 cups fresh corn kernels (about 6 ears—trust me, fresh is worth the effort)
- 1 tbsp extra virgin olive oil (my go-to for that perfect sauté)
- 1 medium yellow onion, diced (the sweeter, the better)
- 2 cloves garlic, minced (because what’s a chowder without garlic?)
- 1 red bell pepper, diced (for a pop of color and sweetness)
- 4 cups vegetable broth (homemade if you’ve got it)
- 1 cup heavy cream (for that luxurious texture)
- 1 tsp smoked paprika (a little goes a long way)
- Salt and freshly ground black pepper (to season, but we’ll be specific)
Instructions
- Heat olive oil in a large pot over medium heat until shimmering—about 1 minute.
- Add diced onion and red bell pepper. Sauté until soft, 5 minutes, stirring occasionally.
- Stir in minced garlic and smoked paprika. Cook for 30 seconds until fragrant—don’t let it burn!
- Add corn kernels and vegetable broth. Bring to a boil, then reduce heat to simmer for 15 minutes.
- Using an immersion blender, partially blend the soup for a creamy yet chunky texture. (Tip: Leave some whole kernels for bite.)
- Stir in heavy cream and season with 1 tsp salt and ½ tsp black pepper. Simmer for another 5 minutes.
- Taste and adjust seasoning if needed. (Tip: A dash of lime juice can brighten flavors.)
Enjoy this chowder’s velvety texture and sweet corn flavor, best served with a sprinkle of fresh herbs or a side of crusty bread. Either way, it’s summer in a bowl.
Authentic Italian Margherita Pizza

Just when you thought pizza couldn’t get any better, here comes the Authentic Italian Margherita Pizza—simple, fresh, and bursting with flavor. Let’s dive straight into making this classic.
Ingredients
- 1 1/2 cups all-purpose flour (I swear by King Arthur for that perfect chew)
- 1/2 tsp salt (sea salt adds a nice crunch)
- 1/2 tsp active dry yeast (the tiny powerhouse that makes the magic happen)
- 1/2 cup warm water (about 110°F, just right to wake up the yeast)
- 1 tbsp extra virgin olive oil (my go-to for that rich flavor)
- 1/2 cup San Marzano tomato sauce (the secret to the perfect base)
- 1 cup fresh mozzarella cheese (torn by hand for those gorgeous melts)
- Fresh basil leaves (the more, the merrier)
Instructions
- In a large bowl, mix flour and salt. Make a well in the center.
- Dissolve yeast in warm water, wait 5 minutes until frothy. Pour into the well.
- Add olive oil, mix until a dough forms. Knead on a floured surface for 10 minutes until smooth and elastic.
- Place dough in a greased bowl, cover with a damp cloth, let rise in a warm spot for 1 hour or until doubled.
- Preheat oven to 475°F with a pizza stone inside for that crispy crust.
- Roll out dough on a floured surface to a 12-inch circle. Transfer to a parchment-lined peel.
- Spread tomato sauce evenly, leaving a border for the crust. Top with mozzarella.
- Bake for 10-12 minutes until crust is golden and cheese bubbles.
- Garnish with fresh basil right after baking for that vibrant color and aroma.
Perfectly crisp crust meets gooey cheese and fresh basil in every bite. Try serving with a drizzle of olive oil and a sprinkle of chili flakes for an extra kick.
Savory Mushroom Risotto
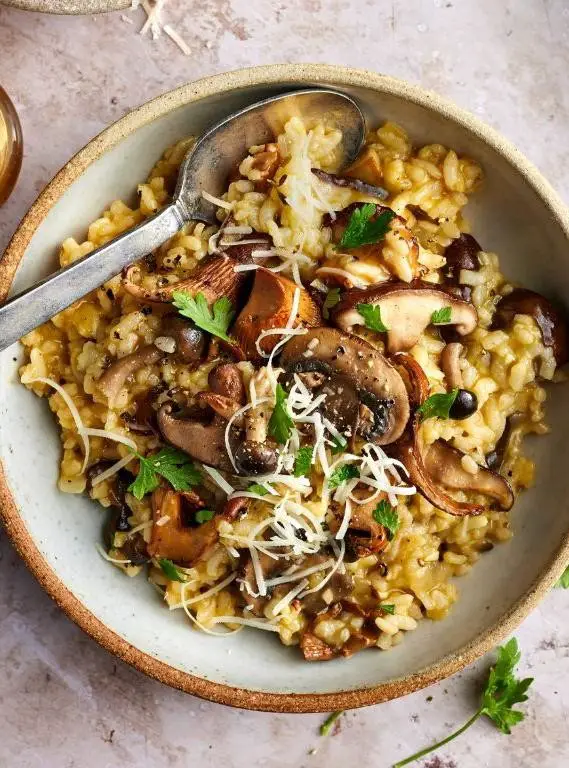
Transform your dinner game with this creamy, dreamy Savory Mushroom Risotto. It’s the ultimate comfort dish that’s surprisingly simple to master.
Ingredients
- 1 1/2 cups Arborio rice – the star of the show, non-negotiable for that perfect chew.
- 4 cups chicken stock – keep it warm on the stove for seamless absorption.
- 1/2 cup dry white wine – a splash for depth, Chardonnay works wonders.
- 8 oz cremini mushrooms, sliced – their earthy flavor is key, baby bellas are a great sub.
- 1 small onion, finely diced – the unsung hero of flavor bases.
- 3 tbsp unsalted butter – divided, because butter makes everything better.
- 2 tbsp extra virgin olive oil – my go-to for that golden onion start.
- 1/2 cup grated Parmesan cheese – freshly grated, please, for that sharp finish.
- 2 cloves garlic, minced – because garlic is life.
- Salt and freshly ground black pepper – to season at every layer.
Instructions
- Heat olive oil and 1 tbsp butter in a large pan over medium heat until butter melts.
- Add diced onion, cook until translucent, about 5 minutes – patience here builds flavor.
- Stir in mushrooms and garlic, cook until mushrooms are golden, about 8 minutes. Tip: Don’t crowd the pan for the best sear.
- Add Arborio rice, toast for 2 minutes until slightly translucent at the edges.
- Pour in white wine, stir until fully absorbed, about 1 minute.
- Begin adding warm chicken stock, 1/2 cup at a time, stirring constantly until absorbed before adding more. Tip: Keep the heat at a steady medium to avoid scorching.
- Continue adding stock and stirring until rice is al dente and mixture is creamy, about 18-20 minutes total.
- Remove from heat, stir in remaining 2 tbsp butter and Parmesan. Season with salt and pepper. Tip: Let it rest for 2 minutes off the heat for maximum creaminess.
Outcome: This risotto is luxuriously creamy with a satisfying bite, packed with umami from the mushrooms. Serve it straight from the pan for that authentic Italian trattoria vibe, or top with a fried egg for a brunch twist.
Juicy Grilled Lemon Herb Chicken
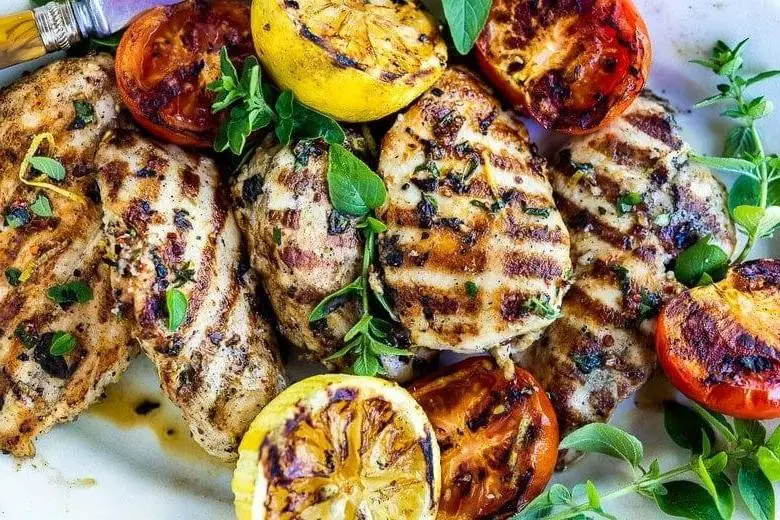
Here’s how to make grilled lemon herb chicken that’s bursting with flavor and juiciness. Hit the grill and let’s get started!
Ingredients
- 4 boneless, skinless chicken breasts (I like them about 1 inch thick for even cooking)
- 1/4 cup extra virgin olive oil (my go-to for its fruity notes)
- 3 tbsp fresh lemon juice (squeeze it fresh, trust me)
- 2 tbsp minced garlic (because more garlic is always better)
- 1 tbsp chopped fresh rosemary (it’s worth growing your own)
- 1 tbsp chopped fresh thyme (ditto on the fresh herbs)
- 1 tsp salt (I use sea salt for a cleaner taste)
- 1/2 tsp black pepper (freshly ground makes all the difference)
Instructions
- In a large bowl, whisk together olive oil, lemon juice, garlic, rosemary, thyme, salt, and pepper.
- Add chicken breasts to the bowl, turning to coat. Let marinate at room temp for 30 minutes (this ensures even flavor penetration).
- Preheat your grill to medium-high, about 375°F to 400°F (a quick hand test: hold your hand 5 inches above the grill for 5 seconds max).
- Grill chicken for 6-7 minutes per side, or until internal temp hits 165°F (no guesswork here, use a meat thermometer).
- Let chicken rest for 5 minutes before slicing (this keeps all those juicy flavors locked in).
Look at that perfectly charred, herb-infused chicken. Serve it over a crisp salad or alongside grilled veggies for a meal that’s as vibrant as it is delicious.
Creamy Garlic Parmesan Pasta

Bold flavors meet creamy comfort in this dish that’s ready in under 30 minutes. Garlic and Parmesan cheese transform simple pasta into a decadent meal.
Ingredients
- 8 oz fettuccine pasta (I always go for the bronze-cut for that perfect sauce cling)
- 3 tbsp unsalted butter (because salted can throw off the dish’s balance)
- 4 garlic cloves, minced (fresh is non-negotiable here)
- 1 cup heavy cream (the richer, the better for that velvety texture)
- 1 cup freshly grated Parmesan cheese (skip the pre-shredded stuff—it’s worth the extra effort)
- 1/2 tsp salt (I like to use sea salt for its clean taste)
- 1/4 tsp black pepper (freshly ground makes all the difference)
- 2 tbsp chopped fresh parsley (for that pop of color and freshness)
Instructions
- Bring a large pot of salted water to a boil over high heat. Add the fettuccine and cook according to package instructions until al dente, about 8-10 minutes.
- While the pasta cooks, melt the butter in a large skillet over medium heat. Add the minced garlic and sauté until fragrant, about 1 minute—watch closely to avoid burning.
- Pour in the heavy cream, stirring constantly to combine with the butter and garlic. Let it simmer gently for 2 minutes to thicken slightly.
- Reduce the heat to low and gradually stir in the grated Parmesan cheese until melted and smooth. Season with salt and pepper.
- Drain the pasta, reserving 1/2 cup of pasta water. Add the pasta to the skillet with the sauce, tossing to coat. If needed, add pasta water a little at a time to loosen the sauce.
- Remove from heat and sprinkle with chopped parsley before serving.
Mouthwatering and luxuriously creamy, this pasta is a garlic lover’s dream. Serve it with a crisp white wine and a side of garlic bread for the ultimate comfort meal.
Fluffy Buttermilk Pancakes

These aren’t just pancakes; they’re your Sunday morning happiness, fluffy clouds of joy that’ll have everyone at the table begging for seconds.
Ingredients
- 1 1/2 cups all-purpose flour (I swear by King Arthur for that perfect rise)
- 3 1/2 tsp baking powder (freshness is key—check the date!)
- 1 tsp salt (just a pinch to balance the sweetness)
- 1 tbsp white sugar (because life’s too short for bland pancakes)
- 1 1/4 cups buttermilk (full-fat for maximum fluffiness)
- 1 egg (room temp blends smoother, trust me)
- 3 tbsp melted butter (salted or unsalted, your call)
- 1 tsp vanilla extract (the secret weapon for depth of flavor)
Instructions
- Whisk together flour, baking powder, salt, and sugar in a large bowl. No lumps allowed!
- In another bowl, beat the buttermilk, egg, melted butter, and vanilla until smooth. Tip: A fork works just fine here—no fancy tools needed.
- Pour the wet ingredients into the dry ingredients. Stir gently until just combined. Tip: Overmixing is the enemy of fluffy pancakes—some lumps are okay.
- Heat a non-stick skillet over medium heat (about 375°F). Test the heat with a drop of water—it should sizzle.
- Pour 1/4 cup batter for each pancake. Cook until bubbles form on top and edges look set, about 2-3 minutes.
- Flip carefully. Cook until golden brown, another 1-2 minutes. Tip: Resist the urge to press down—let them stay fluffy.
- Serve hot with your favorite toppings. Maple syrup and butter are classics, but why not try fresh berries or a dollop of whipped cream?
Here’s the deal: These pancakes are light as air with a tender crumb and just the right amount of sweetness. Stack ’em high, drizzle generously, and watch them disappear before your eyes.
Rich and Creamy Lobster Bisque

Feast your eyes on this: a velvety lobster bisque that’s all about luxury and comfort. Dive into layers of rich flavor with every spoonful.
Ingredients
- 1.5 lbs fresh lobster tails (splurge on these—they’re the star)
- 4 tbsp unsalted butter (I always go for European-style for extra richness)
- 1/4 cup all-purpose flour (sifted to avoid lumps)
- 4 cups seafood stock (homemade if you can, but store-bought works in a pinch)
- 1 cup heavy cream (the higher the fat, the silkier the bisque)
- 1/4 cup brandy (a splash adds depth, don’t skip it)
- 1 tsp paprika (smoked paprika gives a nice twist)
- Salt to taste (I like sea salt for its clean flavor)
Instructions
- Melt butter in a large pot over medium heat until foamy, about 2 minutes.
- Whisk in flour to form a roux, cooking until golden, 3-4 minutes—don’t rush this step.
- Gradually add seafood stock, whisking constantly to prevent lumps. Tip: Warm the stock slightly before adding for smoother incorporation.
- Bring to a simmer, then add lobster tails. Cook until shells turn bright red, about 8 minutes.
- Remove lobster, let cool slightly, then extract meat. Chop meat into bite-sized pieces; set aside.
- Return shells to the pot, simmering for another 20 minutes to deepen flavor. Tip: Crush shells slightly with a spoon to release more taste.
- Strain broth into a clean pot, pressing on solids to extract all liquid. Discard shells.
- Stir in heavy cream, brandy, and paprika. Simmer gently for 5 minutes—avoid boiling to prevent curdling.
- Add lobster meat back to the pot, heating through for 2 minutes. Tip: For an extra touch, reserve a few pieces of lobster for garnish.
- Season with salt, then serve hot.
Velvety smooth with a luxurious depth, this bisque is a showstopper. Serve with crusty bread or atop a small mound of cooked rice for an unexpected twist.
Healthy Quinoa Salad with Avocado
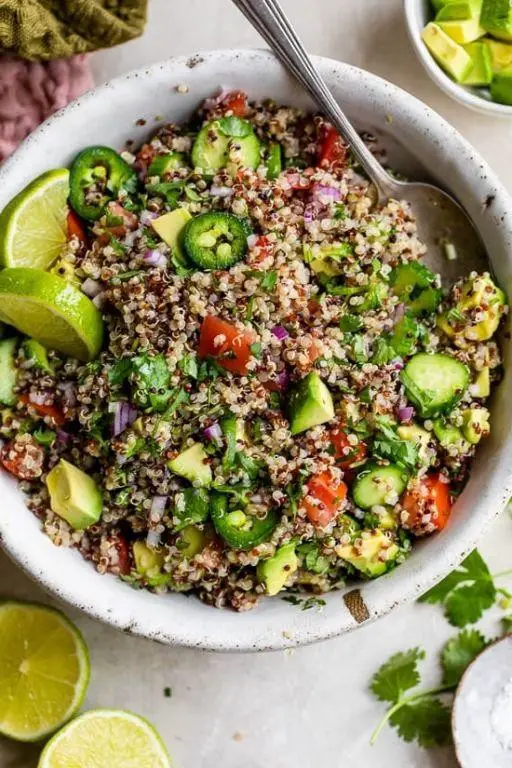
Hungry for a meal that’s both nutritious and Instagram-worthy? This quinoa salad packs a punch with creamy avocado and a rainbow of fresh veggies—perfect for your next meal prep or potluck.
Ingredients
- 1 cup quinoa (I always rinse mine for a fluffier texture)
- 2 cups water (for that perfect quinoa-to-water ratio)
- 1 ripe avocado, diced (the creamier, the better!)
- 1/2 cup cherry tomatoes, halved (I love the pop of color and sweetness)
- 1/4 cup red onion, finely chopped (for a bit of sharpness)
- 2 tbsp extra virgin olive oil (my go-to for dressings)
- 1 tbsp lemon juice (freshly squeezed, please!)
- Salt and pepper (to elevate all the flavors)
Instructions
- Rinse the quinoa under cold water in a fine-mesh strainer to remove any bitterness.
- In a medium saucepan, combine the rinsed quinoa and water. Bring to a boil over high heat.
- Once boiling, reduce the heat to low, cover, and simmer for 15 minutes—no peeking!
- After 15 minutes, remove the saucepan from the heat and let it sit, covered, for 5 minutes. This step is crucial for fluffy quinoa.
- Fluff the quinoa with a fork and transfer it to a large bowl to cool slightly.
- While the quinoa cools, dice the avocado, halve the cherry tomatoes, and finely chop the red onion.
- Add the avocado, cherry tomatoes, and red onion to the bowl with the quinoa.
- Drizzle with extra virgin olive oil and freshly squeezed lemon juice. Season with salt and pepper.
- Gently toss everything together until well combined. Tip: Use a folding motion to keep the avocado pieces intact.
Who knew healthy could taste this good? The creamy avocado pairs perfectly with the fluffy quinoa and crisp veggies, making every bite a delight. Serve it in a hollowed-out bell pepper for an edible bowl that’s sure to impress.
Sweet and Tangy BBQ Ribs
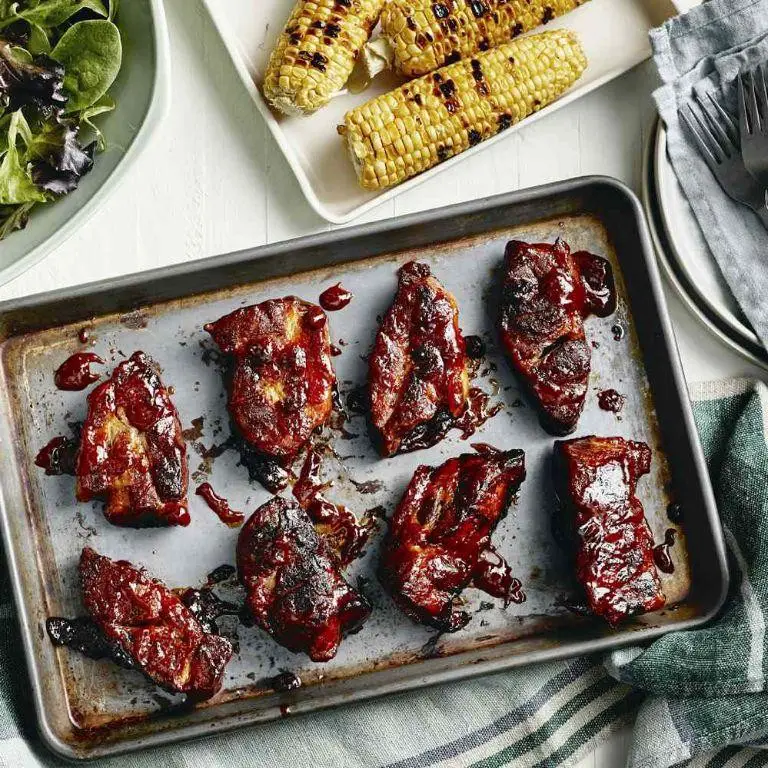
You won’t believe how these Sweet and Tangy BBQ Ribs will steal the show at your next cookout. Fire up the grill and let’s dive in.
Ingredients
- 2 racks of baby back ribs – because they’re tender and cook faster.
- 1 cup of your favorite BBQ sauce – I’m all about that smoky, spicy blend.
- 1/4 cup apple cider vinegar – for that tangy kick.
- 2 tbsp brown sugar – to sweeten the deal.
- 1 tbsp smoked paprika – trust me, it makes all the difference.
- 1 tsp garlic powder – because everything’s better with garlic.
- 1 tsp onion powder – for that extra layer of flavor.
- 1/2 tsp cayenne pepper – if you like it hot.
- Salt and pepper – to season perfectly.
Instructions
- Preheat your grill to 250°F for indirect cooking – low and slow is the way to go.
- Remove the membrane from the back of the ribs for tender bites – a pro tip that’s a game changer.
- Mix the dry ingredients (brown sugar, smoked paprika, garlic powder, onion powder, cayenne, salt, and pepper) in a bowl.
- Rub the spice mix all over the ribs – don’t be shy, coat them well.
- Place the ribs on the grill, meat side up, away from direct heat.
- Close the lid and let them smoke for 3 hours – patience pays off here.
- Whisk together BBQ sauce and apple cider vinegar in a bowl for the glaze.
- After 3 hours, brush the ribs with the glaze every 15 minutes for another hour – this builds flavor layers.
- Check for doneness – the meat should pull away from the bone easily.
- Let the ribs rest for 10 minutes before slicing – this keeps them juicy.
Bite into ribs that are fall-off-the-bone tender with a perfect balance of sweet and tangy. Serve them with a side of coleslaw and cornbread for the ultimate BBQ feast.
Refreshing Cucumber Mint Salad
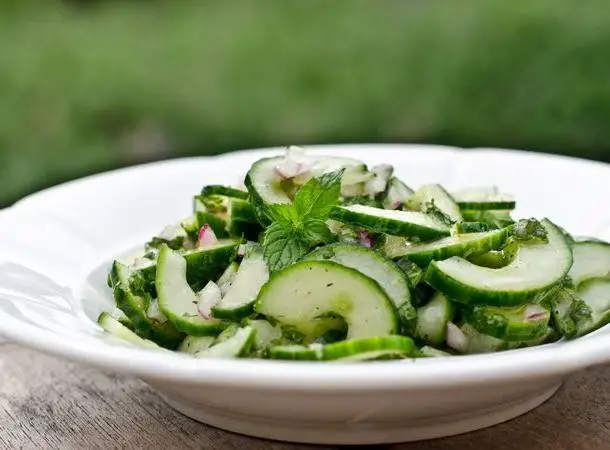
Whip up this crisp, cooling salad in minutes—perfect for those scorching summer days when you need a quick, hydrating bite.
Ingredients
- 2 large cucumbers, thinly sliced (I leave the skin on for extra crunch)
- 1/4 cup fresh mint leaves, roughly chopped (trust me, fresh makes all the difference)
- 2 tbsp extra virgin olive oil (my go-to for its fruity punch)
- 1 tbsp lemon juice (freshly squeezed, please)
- 1/2 tsp salt (I use sea salt for its subtle texture)
- 1/4 tsp black pepper (freshly ground for that aromatic kick)
Instructions
- Grab a large mixing bowl—this is where the magic happens.
- Toss in the sliced cucumbers and chopped mint. Mix gently to avoid bruising the mint.
- Drizzle the olive oil and lemon juice over the cucumber-mint mixture. Tip: The oil coats the cucumbers, helping the flavors meld beautifully.
- Sprinkle the salt and black pepper evenly. Tip: Always add seasoning in layers for even distribution.
- Give everything a good, but gentle, toss. Tip: Use your hands for the best mix without crushing the cucumbers.
- Let the salad sit for 5 minutes before serving—this brief rest allows the flavors to deepen.
Out of the bowl, this salad bursts with freshness—the cucumbers stay crisp, the mint brightens every bite, and the lemon adds just the right zing. Serve it alongside grilled chicken or scoop it onto toasted pita for a refreshing twist.
Warm Apple Cinnamon Oatmeal

Just when you thought oatmeal couldn’t get any cozier, this Warm Apple Cinnamon Oatmeal proves you wrong. **Boost** your morning with this hug-in-a-bowl that’s as easy as it is delicious.
Ingredients
- 1 cup rolled oats (the heartier, the better for that perfect chew)
- 1 1/2 cups water (filtered makes a difference, trust me)
- 1/2 cup almond milk (or whatever milk makes you happy)
- 1 medium apple, diced (I’m team Honeycrisp for sweetness and crunch)
- 1 tbsp maple syrup (the real deal, please)
- 1/2 tsp cinnamon (because more is always better)
- A pinch of salt (it’s the secret to making flavors pop)
Instructions
- **Combine** oats, water, almond milk, and salt in a medium saucepan over medium heat.
- **Stir** occasionally until the mixture begins to simmer, about 5 minutes. Tip: Keep an eye on it to prevent boiling over.
- **Add** diced apple and cinnamon, stirring to incorporate. Let it cook for another 3 minutes until the apples soften slightly.
- **Drizzle** in maple syrup, stirring well to ensure it’s evenly distributed. Cook for an additional 2 minutes. Tip: Taste and adjust sweetness if needed, but remember the apples bring their own natural sugars.
- **Remove** from heat and let it sit for 2 minutes to thicken. Tip: This resting time is crucial for achieving the perfect oatmeal texture.
Final thoughts: This oatmeal is **creamy** with just the right amount of bite from the apples. **Serve** it topped with a dollop of almond butter or a sprinkle of granola for extra crunch. **Forget** boring breakfasts—this dish is a game-changer.
Golden Crispy Fish Tacos

Viral-worthy and utterly delicious, these Golden Crispy Fish Tacos are your next kitchen conquest. Crispy, golden fish meets zesty slaw in a warm tortilla—game over.
Ingredients
- 1 lb cod fillets (fresh is best, but frozen works in a pinch)
- 1 cup all-purpose flour (I swear by King Arthur for that perfect crisp)
- 1 tsp smoked paprika (adds a smoky depth you’ll love)
- 1/2 tsp garlic powder (because everything’s better with garlic)
- 1/2 tsp salt (I use sea salt for a cleaner taste)
- 1/4 tsp black pepper (freshly ground, please)
- 1 cup beer (a lager keeps it light and bubbly)
- 1/2 head purple cabbage, shredded (for that crunch and color)
- 1/4 cup mayonnaise (Duke’s is my Southern heart’s choice)
- 1 tbsp lime juice (freshly squeezed, no bottles)
- 8 corn tortillas (warmed up, they’re the perfect vessel)
- Vegetable oil for frying (enough to cover the fish halfway)
Instructions
- Pat the cod fillets dry with paper towels—this ensures maximum crispiness.
- In a large bowl, whisk together flour, smoked paprika, garlic powder, salt, and pepper.
- Pour in the beer and stir until just combined; a few lumps are okay for texture.
- Heat oil in a deep skillet to 375°F—use a thermometer for accuracy.
- Dip each fillet into the batter, letting excess drip off, then fry for 3-4 minutes per side until golden brown.
- Transfer to a wire rack over a baking sheet; this keeps them crispy.
- While the fish rests, toss shredded cabbage with mayonnaise and lime juice for a quick slaw.
- Warm tortillas in a dry skillet for about 30 seconds per side—just until pliable.
- Flake the fish into chunks and pile onto tortillas, topping with slaw.
Light, crunchy, and bursting with flavor, these tacos are a textural dream. Serve them with extra lime wedges and a cold beer for the ultimate taco night.
Velvety Pumpkin Soup

Craving something cozy yet chic? This velvety pumpkin soup is your fall fantasy in a bowl—smooth, rich, and ridiculously easy to whip up.
Ingredients
- 2 tbsp extra virgin olive oil (my go-to for that fruity depth)
- 1 medium onion, diced (yellow for sweetness)
- 2 garlic cloves, minced (fresh only, please)
- 1 can (15 oz) pure pumpkin puree (not pie filling)
- 3 cups vegetable broth (homemade if you’ve got it)
- 1 cup heavy cream (for that luxurious texture)
- 1/2 tsp ground cinnamon (a must for warmth)
- 1/4 tsp ground nutmeg (just a whisper)
- Salt to taste (I start with 1/2 tsp)
Instructions
- Heat olive oil in a large pot over medium heat until shimmering.
- Add diced onion and sauté until translucent, about 5 minutes—stir occasionally.
- Toss in minced garlic and cook for 30 seconds until fragrant (don’t let it burn!).
- Stir in pumpkin puree, vegetable broth, heavy cream, cinnamon, and nutmeg.
- Bring to a gentle boil, then reduce heat to low and simmer for 15 minutes—stirring occasionally.
- Use an immersion blender to puree the soup until perfectly smooth (or blend in batches in a regular blender).
- Season with salt, starting with 1/2 tsp and adjusting as needed.
Get ready to dive into a bowl of pure comfort. The soup’s velvety texture and warm spices make it a fall favorite—try topping with toasted pumpkin seeds for crunch or a drizzle of cream for drama.
Bold Espresso Chocolate Chip Cookies

Let’s bake cookies that pack a caffeinated punch! These Bold Espresso Chocolate Chip Cookies are your new go-to for a sweet, energizing treat.
Ingredients
- 1 cup unsalted butter, softened (I swear by Kerrygold for that rich flavor)
- 1 cup granulated sugar (because life’s too short for less sugar)
- 1 cup packed brown sugar (dark brown for that deep molasses kick)
- 2 large eggs, room temp (they blend smoother, trust me)
- 1 tsp vanilla extract (the real deal, no imitations)
- 3 cups all-purpose flour (scoop and level for accuracy)
- 1 tsp baking soda (freshness is key—check the date)
- 1/2 tsp baking powder (just a lil’ lift)
- 1 tsp salt (flaky sea salt if you’re feeling fancy)
- 2 tbsp finely ground espresso (I use Stumptown for that bold flavor)
- 2 cups semi-sweet chocolate chips (Guittard’s my ride or die)
Instructions
- Preheat your oven to 375°F (190°C)—no guessing, use an oven thermometer.
- Cream butter and both sugars in a stand mixer on medium for 3 mins until fluffy. Scrape the bowl—this ensures even mixing.
- Beat in eggs one at a time, then vanilla. Mix just until combined to avoid overworking.
- Whisk flour, baking soda, baking powder, salt, and espresso in a separate bowl. Tip: Sifting avoids lumps.
- Gradually add dry to wet ingredients on low speed. Stop when just combined—overmixing = tough cookies.
- Fold in chocolate chips with a spatula. Tip: Reserve some chips to press on top before baking for that bakery look.
- Scoop 2-tbsp balls onto parchment-lined baking sheets, 2 inches apart. They spread!
- Bake for 10-12 mins until edges are golden but centers are soft. They’ll firm up as they cool.
- Let cool on sheets for 5 mins, then transfer to a wire rack. Tip: Sprinkle with flaky salt right out of the oven for a salty-sweet contrast.
Perfectly crisp edges give way to a chewy center, with espresso and chocolate in every bite. Serve warm with a cold glass of milk or crumble over vanilla ice cream for next-level indulgence.
Conclusion
Gourmet delights await in our roundup of 18 Epicurious recipes, each promising to elevate your home cooking to restaurant-quality heights. Whether you’re craving comfort food or something exquisitely refined, there’s a dish here to inspire your next meal. We’d love to hear which recipes stole your heart—drop us a comment below! And don’t forget to share the love by pinning your favorites on Pinterest. Happy cooking!

Michael Johnson is the founder of Pan Mastery, Inspired by his blacksmith grandfather’s legacy has a deep appreciation for hand-crafted pots and pans, he provides invaluable guides, reviews, and recipes to enhance your culinary journey.