Ready to transform your meals into a healing feast for your gut? Dive into our collection of 18 Delicious Gut Protocol Recipes, where flavor meets wellness in every bite. Perfect for home cooks across North America, these dishes are not just nourishing but also a joy to prepare. Let’s embark on a culinary journey that promises to delight your taste buds while soothing your digestive system. Keep reading to discover your next favorite recipe!
Fermented Carrot Sticks with Ginger

Zesty and vibrant, these Fermented Carrot Sticks with Ginger are my go-to for a crunchy, probiotic-rich snack that’s bursting with flavor. I stumbled upon this recipe during a summer cleanse, and it’s been a staple in my fridge ever since, offering a tangy bite that’s both refreshing and satisfying.
Ingredients
- 1 lb fresh, crisp carrots, cut into uniform sticks
- 1 tbsp freshly grated, aromatic ginger
- 2 cups filtered water, at room temperature
- 1 tbsp high-quality sea salt
- 1 tsp whole peppercorns, for a subtle spice
- 2 cloves garlic, smashed, for depth
Instructions
- In a clean bowl, combine the filtered water and sea salt, stirring until the salt is completely dissolved to create a brine.
- Place the carrot sticks, grated ginger, peppercorns, and smashed garlic cloves into a sterilized quart-sized mason jar, packing them tightly but leaving about an inch of headspace at the top.
- Pour the brine over the carrots until they are fully submerged, ensuring no carrot sticks are exposed to air to prevent mold. Tip: Use a fermentation weight or a small, clean glass jar to keep the carrots under the brine.
- Seal the jar with a lid and let it sit at room temperature, away from direct sunlight, for 3 to 5 days. Tip: Check daily to release any built-up gases by briefly opening the lid, a process known as burping the jar.
- After 3 days, taste a carrot stick. If it’s tangy and slightly fizzy to your liking, transfer the jar to the refrigerator to slow fermentation. Tip: The longer it ferments, the tangier it becomes, so adjust according to your preference.
How delightful these fermented carrot sticks turn out, with a perfect crunch and a lively, tangy flavor that’s accentuated by the warmth of ginger. Serve them alongside a cheese board for a probiotic punch or chop them into salads for an extra zing.
Bone Broth with Turmeric and Black Pepper
How many times have I turned to a warm, comforting bowl of bone broth when I needed a little pick-me-up? Too many to count, but each time, it feels like a hug from the inside. Today, I’m sharing my go-to recipe for Bone Broth with Turmeric and Black Pepper, a golden elixir that’s as nourishing as it is delicious.
Ingredients
- 2 lbs of organic, grass-fed beef bones
- 1 tbsp of vibrant, golden turmeric powder
- 1 tsp of freshly ground, aromatic black pepper
- 1 tbsp of rich, extra virgin olive oil
- 1 large, crisp carrot, roughly chopped
- 1 stalk of fresh celery, roughly chopped
- 1 medium, sweet onion, quartered
- 2 cloves of fragrant garlic, smashed
- 8 cups of filtered, cold water
- 1 tsp of fine sea salt
Instructions
- Preheat your oven to 400°F. Place the beef bones on a baking sheet and roast for 30 minutes until deeply browned, which enhances the broth’s flavor.
- In a large pot, heat the olive oil over medium heat. Add the carrot, celery, onion, and garlic, sautéing until softened, about 5 minutes.
- Transfer the roasted bones to the pot. Pour in the cold water, ensuring the bones are fully submerged. Bring to a gentle boil, then reduce to a simmer.
- Skim off any foam that rises to the surface with a spoon for a clearer broth. Tip: This step is crucial for a clean-tasting broth.
- Stir in the turmeric, black pepper, and sea salt. Partially cover and simmer on low for 12-24 hours. Tip: The longer it simmers, the more nutrient-dense and flavorful it becomes.
- Strain the broth through a fine-mesh sieve into a large bowl, discarding the solids. Tip: For an ultra-smooth broth, strain it a second time through cheesecloth.
- Let the broth cool slightly before serving, or store it in airtight containers in the fridge for up to a week.
What you’ll love about this broth is its deep, umami richness, with the turmeric and black pepper adding a subtle warmth and complexity. Serve it steaming hot with a sprinkle of fresh herbs, or use it as a base for soups and stews to elevate your dishes with its golden goodness.
Kefir Smoothie with Blueberries and Banana

Breakfast just got a whole lot better with this creamy, dreamy kefir smoothie that’s become my go-to morning ritual. There’s something about blending tangy kefir with sweet blueberries and banana that feels like a hug in a glass, especially on those rushed mornings when I need a quick yet nutritious start.
Ingredients
- 1 cup of creamy, probiotic-rich plain kefir
- 1/2 cup of plump, juicy blueberries
- 1 ripe banana, peeled and sliced
- 1 tablespoon of golden, raw honey
- 1/2 cup of crushed ice
Instructions
- In a high-powered blender, combine the creamy kefir, plump blueberries, sliced banana, and golden honey.
- Blend on high speed for 30 seconds, or until the mixture is smooth and the blueberries are fully incorporated.
- Add the crushed ice to the blender and pulse for an additional 15 seconds, or until the smoothie reaches your desired thickness. Tip: For a thicker smoothie, add more ice; for a thinner consistency, add a splash of water.
- Pour the smoothie into a tall glass and serve immediately. Tip: Garnish with a few extra blueberries on top for a beautiful presentation.
- Enjoy your smoothie right away to experience the full range of flavors and textures. Tip: For an extra nutritional boost, sprinkle a teaspoon of chia seeds or flaxseeds on top before serving.
Nothing beats the velvety texture and the perfect balance of tangy and sweet in this smoothie. It’s a versatile drink that can also be poured into popsicle molds for a refreshing summer treat.
Sauerkraut with Juniper Berries
Having grown up in a family that cherished traditional fermented foods, I’ve always had a soft spot for sauerkraut. But it wasn’t until I stumbled upon a jar of juniper berries at a local farmers’ market that I decided to give my classic sauerkraut recipe a twist. The result? A tangy, aromatic dish that’s become a staple in my kitchen.
Ingredients
- 1 medium head of cabbage, finely shredded (about 5 cups)
- 1 tbsp juniper berries, lightly crushed to release their piney aroma
- 1.5 tbsp kosher salt, for that perfect crunch
- 1 cup filtered water, to ensure a clean fermentation
Instructions
- In a large mixing bowl, combine the shredded cabbage and kosher salt. Massage the cabbage with your hands for about 10 minutes, until it starts to release its liquid and becomes limp. Tip: Wear gloves if you have cuts on your hands to avoid irritation.
- Add the lightly crushed juniper berries to the cabbage and mix well to distribute evenly.
- Pack the cabbage mixture tightly into a clean, large mason jar, pressing down firmly to eliminate air pockets and submerge the cabbage under its own liquid. Tip: If the cabbage hasn’t released enough liquid to cover itself, add a bit of filtered water until it’s fully submerged.
- Cover the jar with a clean cloth secured with a rubber band to keep dust and bugs out while allowing air to circulate. Place the jar in a cool, dark spot (around 65°F to 70°F) for fermentation.
- Check the sauerkraut every few days, pressing down on the cabbage to keep it submerged. After about 2 weeks, taste it. If it’s tangy and flavorful to your liking, it’s ready. If not, let it ferment for a few more days. Tip: The colder the temperature, the slower the fermentation process, so adjust your timeline accordingly.
Zesty and vibrant, this sauerkraut with juniper berries is a revelation. The berries add a subtle, woodsy depth that elevates the humble cabbage to something truly special. Try it piled high on a grilled sausage sandwich for a burst of flavor that cuts through the richness.
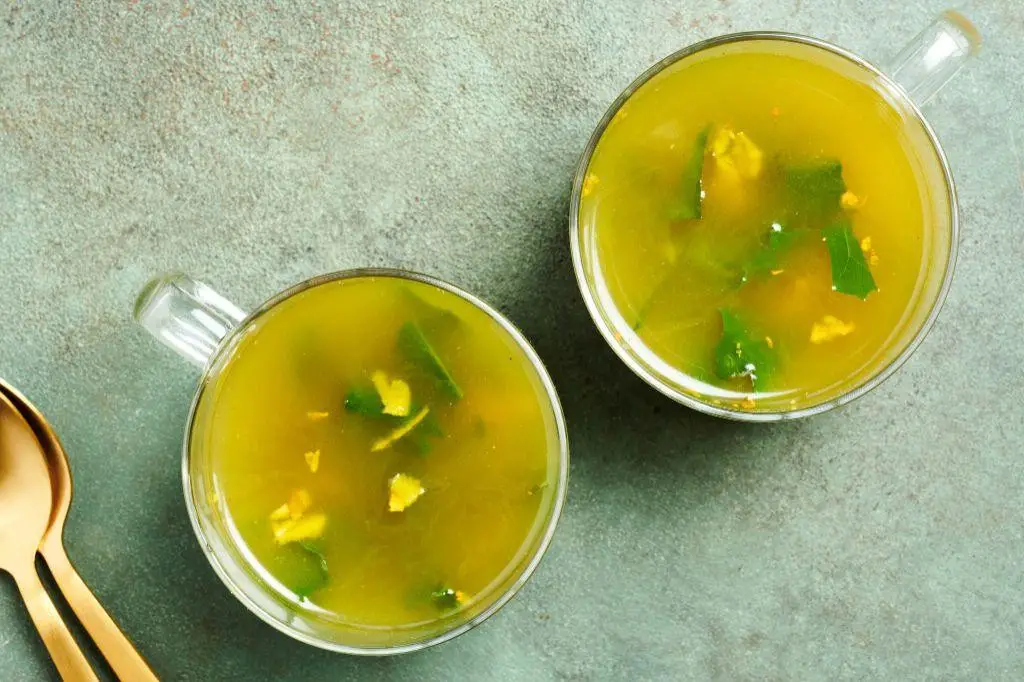
Gut-Healing Chicken Soup
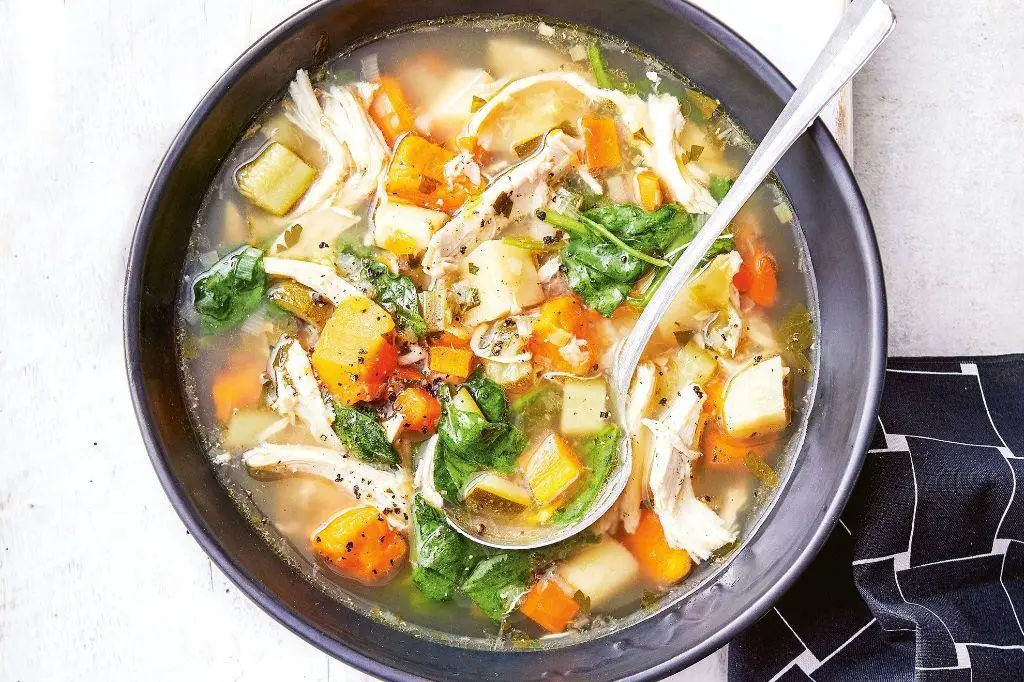
Many of us have those days when all we crave is something comforting yet nourishing, and that’s exactly what this Gut-Healing Chicken Soup is all about. I remember whipping up this recipe on a chilly evening when my stomach was feeling a bit off, and the warmth and spices worked like magic.
Ingredients
- 1 whole organic chicken, about 3-4 lbs
- 2 quarts homemade chicken broth, rich and golden
- 3 large carrots, peeled and sliced into hearty coins
- 2 stalks celery, diced finely for a subtle crunch
- 1 large onion, chopped to release its sweet aroma
- 3 cloves garlic, minced for a pungent kick
- 1 inch fresh ginger, grated to soothe the gut
- 1 tbsp apple cider vinegar, with the mother for extra probiotics
- 1 tsp turmeric powder, vibrant and earthy
- 1/2 tsp sea salt, finely ground to enhance flavors
- 1/4 tsp black pepper, freshly cracked for a bit of heat
- 2 tbsp fresh parsley, chopped for a bright finish
Instructions
- In a large pot, combine the whole chicken and chicken broth. Bring to a boil over high heat, then reduce to a simmer for 90 minutes, skimming off any foam that rises to the top.
- Remove the chicken from the pot and let it cool slightly. Shred the meat, discarding the bones and skin, and return the meat to the broth.
- Add the carrots, celery, onion, garlic, ginger, apple cider vinegar, turmeric, salt, and pepper to the pot. Simmer for another 20 minutes, or until the vegetables are tender.
- Stir in the fresh parsley just before serving to preserve its color and flavor.
As you ladle this soup into bowls, notice how the broth glistens with golden hues, promising a depth of flavor that’s both comforting and invigorating. The tender chicken and vegetables offer a satisfying texture, making each spoonful a delight. For an extra touch, serve with a slice of crusty bread to soak up every last drop.
Lacto-Fermented Pickles
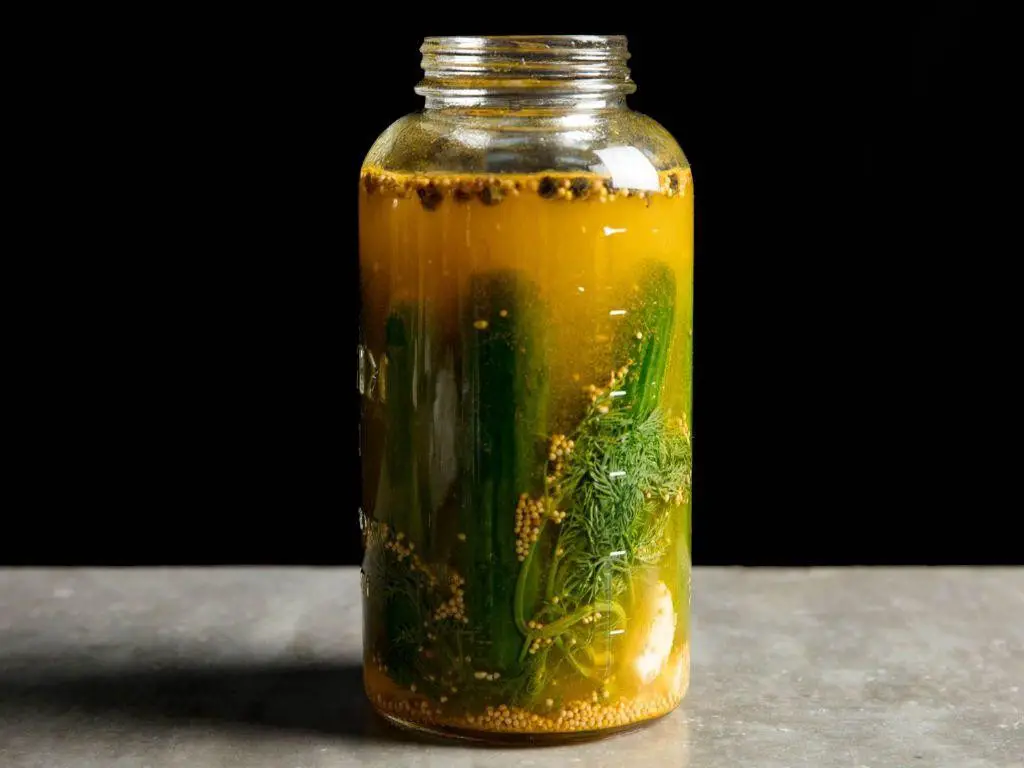
Believe it or not, the secret to the crunchiest, tangiest pickles you’ve ever tasted lies in the ancient art of lacto-fermentation. I stumbled upon this method during a summer glut of cucumbers from my garden, and now, I’ll never go back to store-bought. There’s something magical about transforming simple ingredients into something bursting with flavor and probiotics.
Ingredients
- 5 lbs of fresh, firm cucumbers (look for unwaxed, pickle varieties for best results)
- 6 cups of filtered water (chlorine-free to protect the fermentation process)
- 3 tbsp of coarse sea salt (for that perfect brine)
- 8 cloves of garlic, smashed (for a pungent kick)
- 2 tbsp of whole black peppercorns (for a subtle heat)
- 1 bunch of fresh dill, stems and all (for that classic pickle aroma)
Instructions
- Wash the cucumbers thoroughly under cold water, scrubbing gently to remove any dirt. Trim off the blossom ends to prevent softening.
- In a large bowl, dissolve the sea salt in filtered water to create your brine, stirring until completely clear.
- Place the garlic, peppercorns, and dill at the bottom of a clean, large jar. Pack the cucumbers tightly on top.
- Pour the brine over the cucumbers, ensuring they’re fully submerged. Use a fermentation weight or a small, clean jar filled with water to keep them under the brine.
- Cover the jar with a clean cloth or a fermentation lid to allow gases to escape. Store at room temperature, away from direct sunlight, for 3-7 days. Tip: Check daily for bubbles, a sign fermentation is happening!
- After 3 days, start tasting your pickles. Once they reach your desired level of tanginess, move them to the fridge to slow fermentation.
You’ll know these pickles are ready when they’re fizzy, tangy, and irresistibly crunchy. I love serving them straight from the jar as a snack, or chopping them into a creamy potato salad for an extra zing. Yum, the wait is always worth it!
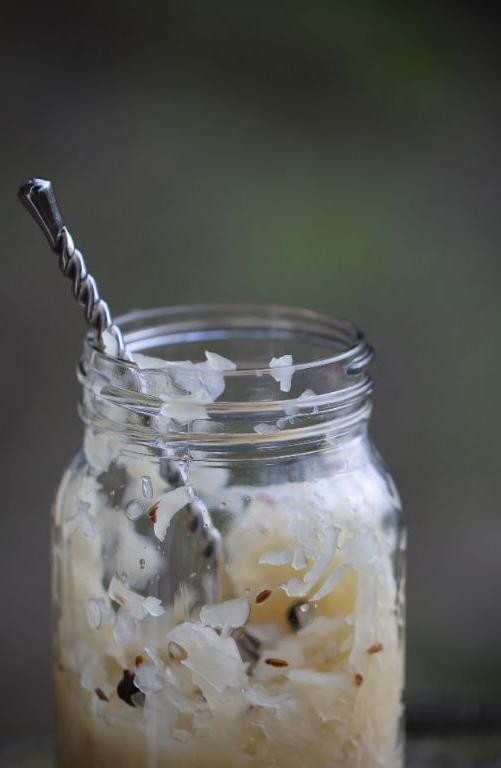
Probiotic Coconut Yogurt
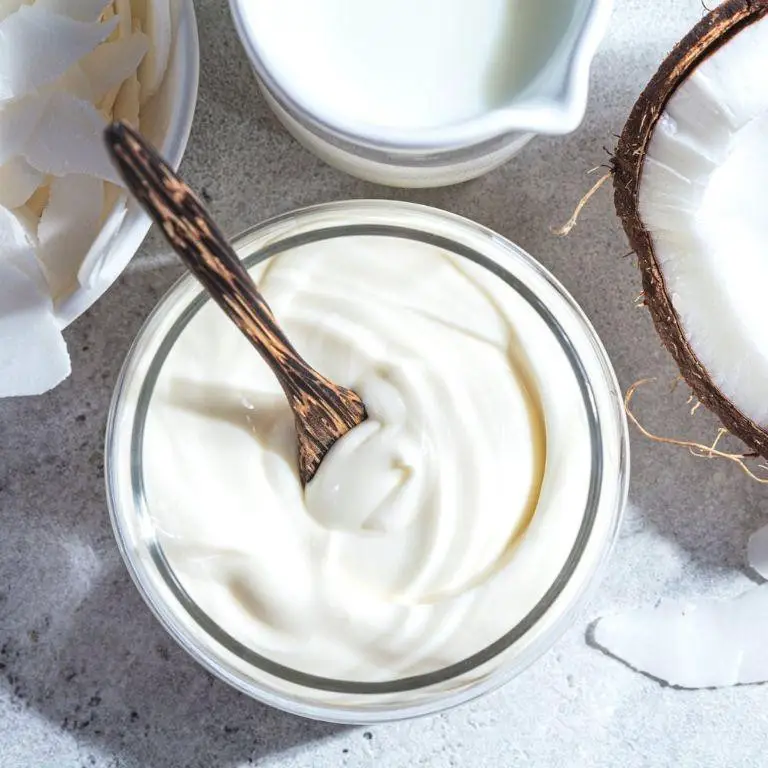
Whisking up a batch of homemade probiotic coconut yogurt has become my Sunday ritual, a creamy, tangy delight that’s as good for my gut as it is for my taste buds. There’s something incredibly satisfying about fermenting your own yogurt, and this coconut version is a game-changer for anyone dairy-free or just looking to mix things up.
Ingredients
- 2 cans (13.5 oz each) of full-fat coconut milk, creamy and lush
- 2 probiotic capsules, packed with live cultures
- 1 tablespoon of pure maple syrup, for a hint of sweetness
- 1 teaspoon of vanilla extract, aromatic and warm
Instructions
- Pour the creamy full-fat coconut milk into a clean, medium-sized saucepan over low heat. Warm it gently until it reaches 110°F, stirring occasionally to ensure it doesn’t scorch.
- Remove the saucepan from the heat. Stir in the pure maple syrup and aromatic vanilla extract until fully incorporated.
- Open the probiotic capsules and sprinkle the powder into the warm coconut milk mixture, whisking gently to distribute the cultures evenly.
- Transfer the mixture to a clean glass jar, cover it with a breathable cloth, and secure it with a rubber band to keep out dust while allowing air flow.
- Place the jar in a warm, draft-free spot (like an oven with the light on) for 24-36 hours. The longer it ferments, the tangier it becomes.
- After fermentation, replace the cloth with a tight lid and refrigerate the yogurt for at least 4 hours to thicken and develop flavor.
Zesty and velvety, this probiotic coconut yogurt is a dream topped with fresh berries or a drizzle of honey. Its creamy texture and subtle tang make it a versatile base for both sweet and savory dishes, proving that good things really do come to those who wait.
Beet Kvass

Remember the first time I tried Beet Kvass? It was at a friend’s farm-to-table dinner, and its deep, earthy flavor paired with a tangy kick left me utterly fascinated. Since then, I’ve been experimenting with my own versions, and today, I’m sharing the one that’s become a staple in my kitchen.
Ingredients
- 2 large, organic beets, peeled and roughly chopped
- 1 tablespoon of coarse sea salt
- 4 cups of filtered water, at room temperature
- 1/4 cup of whey (from straining yogurt) or additional tablespoon of salt for a non-dairy version
Instructions
- In a clean, 1-quart mason jar, combine the roughly chopped beets and coarse sea salt.
- Pour the filtered water over the beets, leaving about 1 inch of space at the top of the jar.
- Add the whey (or additional salt) to the jar, ensuring it’s fully submerged in the liquid.
- Seal the jar tightly with a lid and shake it gently to dissolve the salt.
- Store the jar at room temperature, away from direct sunlight, for 2-3 days. Tip: Check daily to release any built-up pressure by slightly opening the lid.
- After 2-3 days, strain the liquid into a clean bottle, discarding the beets or saving them for another use. Tip: Taste the kvass; if you prefer a stronger flavor, let it ferment for an additional day.
- Refrigerate the Beet Kvass for up to 2 weeks. Tip: Serve chilled for the best flavor and effervescence.
Perfect for sipping straight or adding a probiotic punch to your morning routine, this Beet Kvass boasts a vibrant hue and a flavor that’s both refreshing and complex. Try it over ice with a squeeze of lemon for an extra zing.
Kimchi with Napa Cabbage
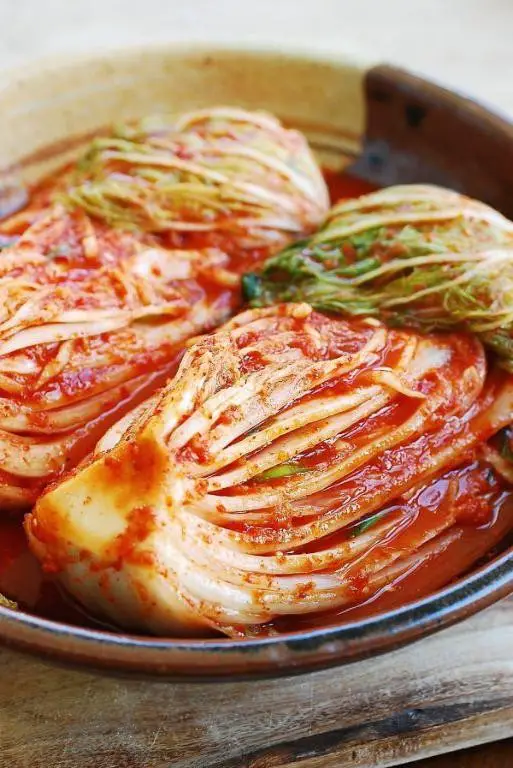
Venturing into the world of homemade kimchi has been a game-changer for my kitchen adventures. There’s something incredibly rewarding about transforming a humble Napa cabbage into a jar of spicy, tangy goodness that gets better with time. I remember my first batch was a bit timid on the spice, but now, I’ve got the balance just right—trust me, your taste buds will thank you.
Ingredients
- 1 large head of Napa cabbage, crisp and fresh
- 1/4 cup coarse sea salt, for drawing out moisture
- 1 tbsp grated garlic, aromatic and pungent
- 1 tsp grated ginger, with a warm, spicy kick
- 1 tbsp sugar, to balance the flavors
- 2 tbsp fish sauce, for that umami depth
- 3 tbsp gochugaru (Korean chili flakes), vibrant and fiery
- 4 green onions, thinly sliced for a sharp, fresh contrast
- 1 medium daikon radish, julienned for crunch
Instructions
- Cut the Napa cabbage into quarters lengthwise, then chop into 2-inch pieces. Rinse under cold water and drain.
- In a large bowl, toss the cabbage with the coarse sea salt. Let it sit for 2 hours, turning every 30 minutes to ensure even salting.
- Rinse the cabbage thoroughly under cold water 3 times to remove excess salt. Squeeze out as much water as possible and set aside.
- In a separate bowl, mix together the grated garlic, ginger, sugar, fish sauce, and gochugaru until a paste forms. Tip: Wear gloves to avoid chili burns.
- Add the green onions and daikon radish to the paste, mixing well to coat evenly.
- Gently fold the cabbage into the spice mixture, ensuring each piece is well coated. Tip: Use a folding motion to keep the cabbage pieces intact.
- Pack the kimchi tightly into a clean, large jar, pressing down to remove air pockets. Leave about 1 inch of space at the top.
- Seal the jar and let it ferment at room temperature for 1-2 days, then refrigerate. Tip: Place the jar on a plate to catch any overflow during fermentation.
Bursting with flavors, this kimchi is a perfect balance of spicy, sweet, and tangy, with a satisfying crunch from the daikon. Try it atop a steaming bowl of rice or as a bold addition to your next taco night for an unexpected twist.
Golden Milk with Coconut Oil

After a long day of chasing deadlines and dodging raindrops, there’s nothing like wrapping my hands around a warm mug of something soothing. That’s how I stumbled upon this golden milk recipe, a creamy, spiced elixir that’s become my go-to for unwinding. It’s not just a drink; it’s a hug in a mug, especially when infused with the subtle richness of coconut oil.
Ingredients
- 1 cup unsweetened almond milk, creamy and cold
- 1 tablespoon coconut oil, unrefined and fragrant
- 1 teaspoon ground turmeric, vibrant and earthy
- 1/2 teaspoon ground cinnamon, sweet and warming
- 1 pinch ground black pepper, freshly cracked for potency
- 1 teaspoon honey, raw and golden for natural sweetness
Instructions
- In a small saucepan, gently heat the almond milk over medium-low heat until it’s warm but not boiling, about 3 minutes. This preserves its nutrients and prevents a skin from forming.
- Whisk in the coconut oil until it’s fully melted and the mixture looks slightly glossy, about 1 minute. The oil adds a luxurious mouthfeel.
- Add the turmeric, cinnamon, and black pepper, whisking vigorously to avoid any lumps and to evenly distribute the spices, about 2 minutes. The black pepper enhances turmeric’s benefits.
- Remove the saucepan from the heat and stir in the honey until it’s completely dissolved, about 30 seconds. Adjust the sweetness to your liking, but remember, the spices are the stars here.
By now, your kitchen should smell like a spice market at sunrise. The golden milk is velvety with a warmth that builds with each sip, thanks to the cinnamon and pepper. I love serving it in my favorite ceramic mug, the one with the tiny chip on the handle, because perfection is overrated.
Grass-Fed Beef Bone Broth
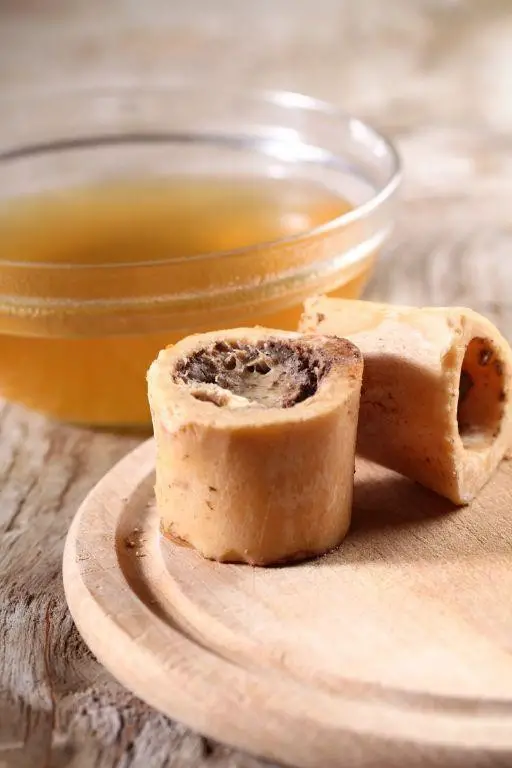
First off, let me tell you, there’s nothing quite like the comfort of a warm, homemade bone broth. Especially when it’s made from grass-fed beef bones, the kind that promises a depth of flavor you just can’t buy off the shelf. I remember the first time I tried making it; the aroma filled my kitchen for hours, teasing me with the promise of the rich, nourishing broth to come.
Ingredients
- 2 lbs grass-fed beef bones, preferably a mix of marrow and knuckle for the best flavor
- 1 large yellow onion, roughly chopped to unlock its sweet, caramelized potential
- 2 carrots, scrubbed and chopped into large chunks for a hint of natural sweetness
- 3 celery stalks, including the leafy tops, chopped for their fresh, herbal notes
- 2 tbsp apple cider vinegar, to help extract all the goodness from the bones
- 1 tsp sea salt, to enhance the broth’s natural flavors
- 8 cups cold, filtered water, to cover the bones and vegetables completely
Instructions
- Preheat your oven to 400°F. Arrange the beef bones on a baking sheet in a single layer. Roast for 30 minutes until they’re deeply browned, which will add a rich flavor to your broth.
- Transfer the roasted bones to a large stockpot. Add the chopped onion, carrots, celery, apple cider vinegar, and sea salt.
- Pour in the cold, filtered water, ensuring all ingredients are submerged. Bring to a boil over high heat, then reduce to a low simmer.
- Simmer gently, uncovered, for 12-24 hours. The longer it simmers, the more flavorful and nutrient-rich your broth will be. Skim off any foam that rises to the top with a spoon.
- Strain the broth through a fine-mesh sieve into a large bowl, discarding the solids. Let it cool slightly before transferring to jars or containers.
Let me just say, the result is a silky, golden broth with layers of flavor that dance on your palate. It’s perfect as a base for soups, or simply enjoyed on its own with a sprinkle of fresh herbs. Trust me, once you’ve tasted homemade, there’s no going back.
Fermented Garlic Honey
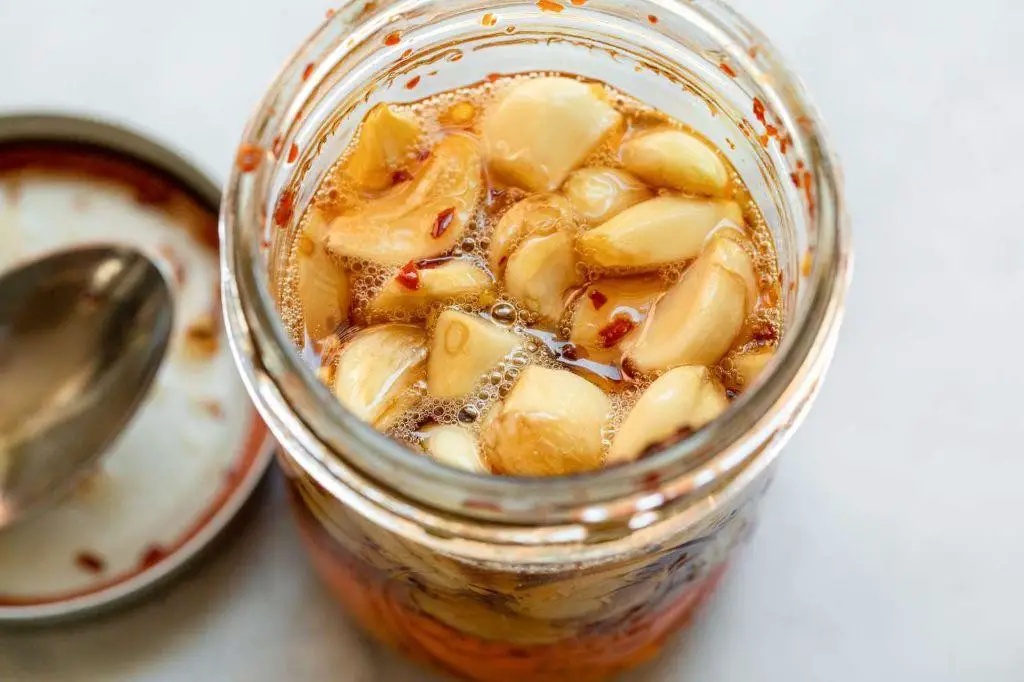
Never did I think that combining garlic and honey would lead to such a magical concoction until I stumbled upon Fermented Garlic Honey. It’s a game-changer in my kitchen, adding a punch of flavor to everything from marinades to dressings. Here’s how I make it, with a few personal tweaks along the way.
Ingredients
- 1 cup raw, unfiltered honey (thick and golden)
- 1/2 cup fresh garlic cloves (plump and aromatic)
- 1 clean, sterilized 16-ounce glass jar with lid
Instructions
- Peel the garlic cloves carefully, ensuring they’re free of blemishes and the papery skin is completely removed.
- Place the peeled garlic cloves into the sterilized glass jar, arranging them so they’re not too tightly packed.
- Pour the raw honey over the garlic cloves, making sure they’re fully submerged. This is crucial for proper fermentation.
- Seal the jar with the lid, but not too tightly, as gases will need to escape during fermentation.
- Store the jar in a cool, dark place for at least 3 days, opening the lid once a day to release any built-up gases.
- After 3 days, taste the honey. If you prefer a stronger garlic flavor, let it ferment for up to a month, continuing to burp the jar daily.
- Once fermented to your liking, store the jar in the refrigerator to slow down the fermentation process.
Just like that, you’ve got yourself a jar of Fermented Garlic Honey that’s bursting with complex flavors. The honey takes on a subtle garlicky sweetness, while the cloves mellow out and become almost candy-like. Try drizzling it over a charcuterie board or mixing it into a vinaigrette for an unexpected twist.
Pumpkin Seed Pesto with Fermented Garlic
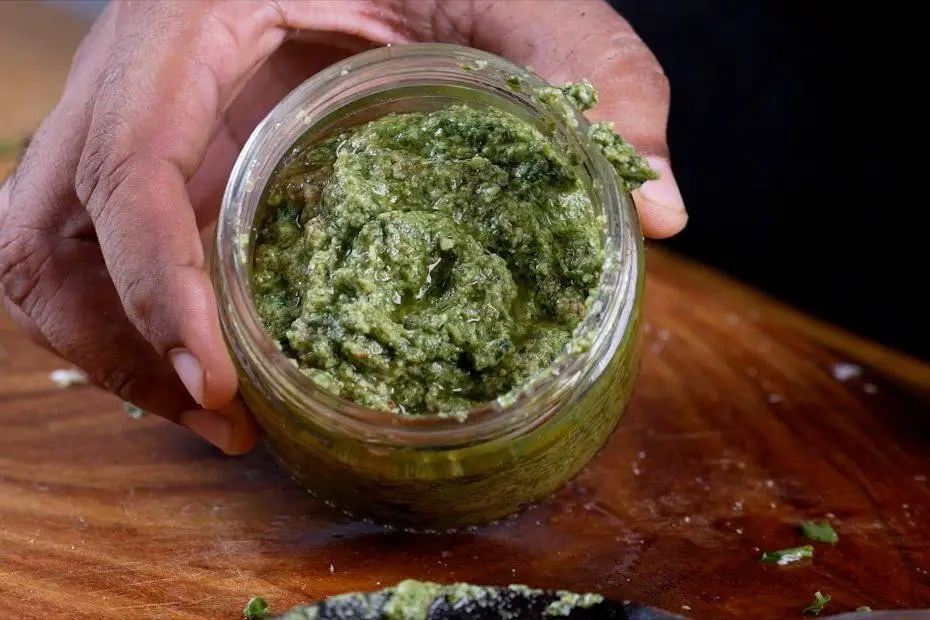
Zesty and vibrant, this Pumpkin Seed Pesto with Fermented Garlic is a twist on the classic that’ll have your taste buds dancing. I stumbled upon this combination during a late-summer farmers’ market haul, and it’s been a staple in my kitchen ever since. Perfect for those who love a nutty, garlicky kick in their dishes.
Ingredients
- 1 cup raw pumpkin seeds, toasted to golden perfection
- 1/2 cup rich extra virgin olive oil
- 3 cloves fermented garlic, finely minced
- 1/2 cup freshly grated Parmesan cheese, sharp and nutty
- 1/4 cup fresh basil leaves, packed and vibrant green
- 1 tbsp fresh lemon juice, bright and tangy
- 1/2 tsp sea salt, finely ground
- 1/4 tsp freshly ground black pepper, aromatic and bold
Instructions
- Preheat your oven to 350°F. Spread the pumpkin seeds in a single layer on a baking sheet and toast for 8-10 minutes, until golden and fragrant. Let them cool slightly.
- In a food processor, combine the toasted pumpkin seeds, fermented garlic, Parmesan cheese, and basil leaves. Pulse until the mixture is coarsely ground.
- With the processor running, slowly drizzle in the olive oil until the pesto is smooth and well combined. Tip: Scrape down the sides of the bowl as needed to ensure everything is evenly incorporated.
- Add the lemon juice, sea salt, and black pepper. Process for another 30 seconds to blend all the flavors together. Tip: Taste and adjust the seasoning if necessary, but remember the fermented garlic adds a unique depth.
- Transfer the pesto to a jar or bowl. Tip: For the best flavor, let it sit for at least 30 minutes before serving to allow the flavors to meld.
Creamy with a crunchy texture from the pumpkin seeds, this pesto packs a punch of umami from the fermented garlic. Try it tossed with warm pasta, spread on crusty bread, or as a bold dressing for a summer salad.
Gut-Friendly Green Smoothie
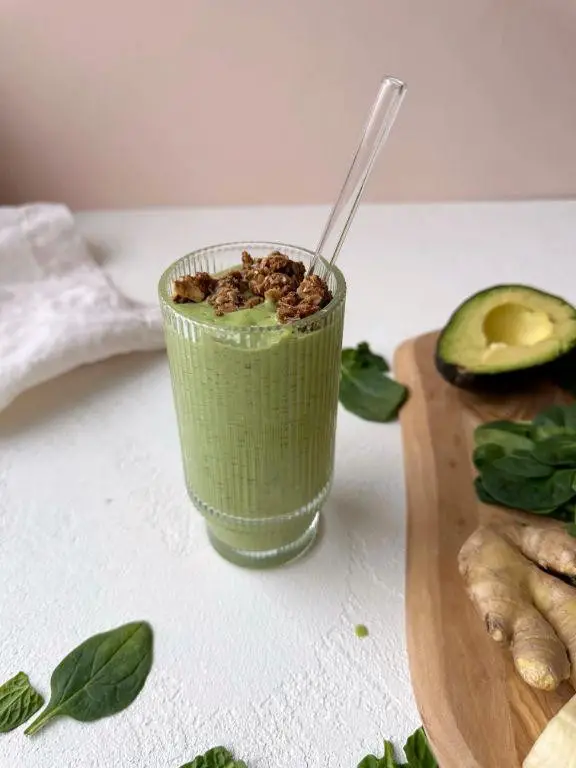
Remember those mornings when you feel like your stomach is staging a protest? That’s exactly when I reach for my Gut-Friendly Green Smoothie. It’s not just a drink; it’s a morning ritual that sets the tone for a happy digestive system and a vibrant day ahead.
Ingredients
- 1 cup of fresh, crisp spinach leaves
- 1/2 ripe avocado, creamy and smooth
- 1 cup of unsweetened almond milk, chilled
- 1 tablespoon of raw honey, golden and fragrant
- 1/2 inch piece of fresh ginger, zesty and pungent
- 1/2 cup of frozen pineapple chunks, sweet and tangy
- 1 tablespoon of chia seeds, tiny but mighty
Instructions
- Wash the spinach leaves thoroughly under cold running water to ensure they’re clean and ready to blend.
- Peel the avocado and remove the pit. Scoop out the flesh directly into the blender for that creamy texture.
- Pour the chilled almond milk into the blender first to create a smooth blending base.
- Add the raw honey, fresh ginger, and frozen pineapple chunks to the blender. The pineapple not only adds sweetness but also helps in breaking down the greens.
- Sprinkle the chia seeds into the mix. They’ll thicken the smoothie slightly and add a nutritional boost.
- Blend on high for 45 seconds or until the mixture is completely smooth and no chunks remain. If the smoothie is too thick, add a splash more almond milk and blend again.
- Pour into a tall glass and enjoy immediately for the best texture and flavor.
My favorite thing about this smoothie is its velvety texture, thanks to the avocado, and the perfect balance of sweetness from the pineapple and honey. Sometimes, I like to top it with a sprinkle of granola for an extra crunch.
Homemade Kombucha
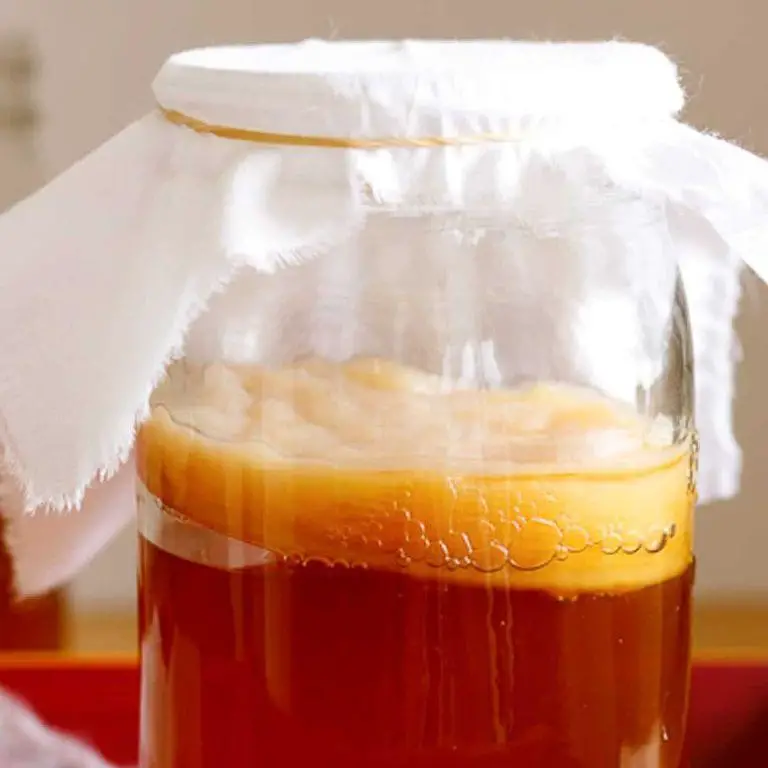
Zesty and refreshing, homemade kombucha has become my go-to drink for those sweltering summer afternoons. I remember the first time I tried brewing it at home; the process seemed daunting, but the result was so rewarding that I’ve been hooked ever since.
Ingredients
- 1 cup of organic white sugar, for a clean, sweet base
- 8 bags of high-quality black tea, robust and full-bodied
- 1 SCOBY (Symbiotic Culture Of Bacteria and Yeast), the heart of kombucha brewing
- 1 gallon of filtered water, to ensure purity
- 1 cup of raw, unflavored kombucha from a previous batch, to kickstart fermentation
Instructions
- Boil 4 cups of filtered water in a large pot until it reaches a rolling boil, about 212°F.
- Remove the pot from heat and steep the 8 black tea bags for 15 minutes, ensuring a deep, rich flavor.
- Stir in the 1 cup of organic white sugar until fully dissolved, creating a sweet tea base.
- Pour the sweet tea into a 1-gallon glass jar and top it off with the remaining filtered water, leaving room at the top.
- Once the tea has cooled to room temperature (around 75°F), gently add the SCOBY and 1 cup of raw kombucha.
- Cover the jar with a breathable cloth secured with a rubber band, to keep out contaminants while allowing airflow.
- Place the jar in a warm, dark place (ideally between 75-85°F) for 7 to 14 days, tasting periodically until it reaches your preferred balance of sweetness and tartness.
- Once fermented, remove the SCOBY and reserve 1 cup of the kombucha for your next batch.
- Transfer the remaining kombucha to bottles, leaving about an inch of headspace, and seal tightly.
- For a fizzy finish, let the bottles sit at room temperature for 1-3 days before refrigerating to halt fermentation.
After the final fermentation, your kombucha will boast a delightful effervescence and a perfect tangy-sweet balance. I love serving it over ice with a splash of fresh fruit juice for an extra layer of flavor.
Fermented Salsa Verde
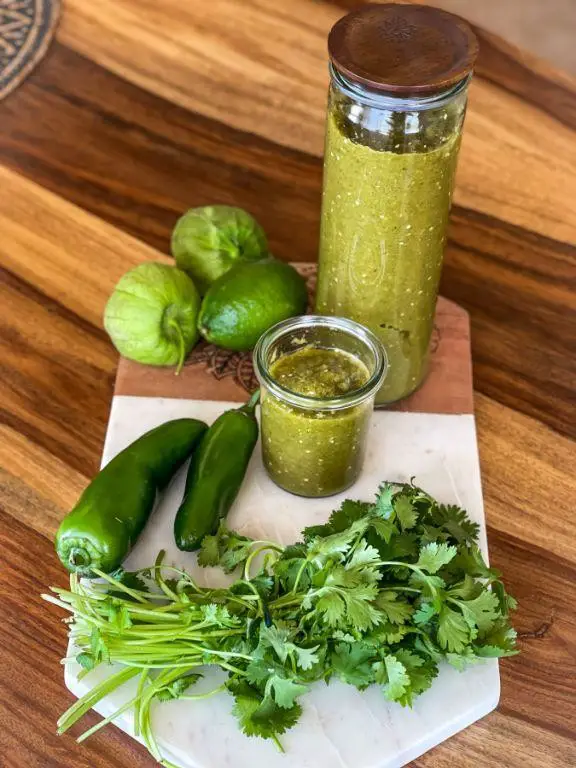
Last summer, I stumbled upon the magic of fermented salsa verde during a backyard potluck, and let me tell you, it was a game-changer. The tangy, slightly effervescent kick it added to my tacos had me hooked, and I’ve been perfecting my recipe ever since.
Ingredients
- 1 pound fresh tomatillos, husked and rinsed
- 2 large, vibrant green jalapeños, stems removed
- 1/2 cup packed, fragrant cilantro leaves
- 3 cloves garlic, peeled and smashed
- 1/4 cup freshly squeezed lime juice
- 1 teaspoon coarse sea salt
- 1/2 teaspoon cumin seeds, toasted
- 1/4 cup filtered water
Instructions
- In a blender, combine the tomatillos, jalapeños, cilantro, garlic, lime juice, salt, and cumin seeds. Pulse until the mixture is finely chopped but not pureed.
- Transfer the mixture to a clean, quart-sized mason jar, leaving about 1 inch of headspace at the top.
- Pour the filtered water over the mixture until the ingredients are just submerged. Tip: Use a fermentation weight to keep the ingredients below the water level to prevent mold.
- Seal the jar with a fermentation lid or a regular lid loosely covered to allow gases to escape. Place the jar in a cool, dark spot for 3 days. Tip: Check daily to ensure the ingredients remain submerged and to release any built-up gases.
- After 3 days, taste the salsa. If you prefer a tangier flavor, let it ferment for up to 2 more days.
- Once fermented to your liking, refrigerate the salsa to halt the fermentation process. It will keep for up to 2 weeks.
My fermented salsa verde boasts a lively, tangy flavor with a subtle crunch from the tomatillos. Try it spooned over grilled fish or stirred into a creamy avocado dip for an extra zing.
Liver Cleansing Pate
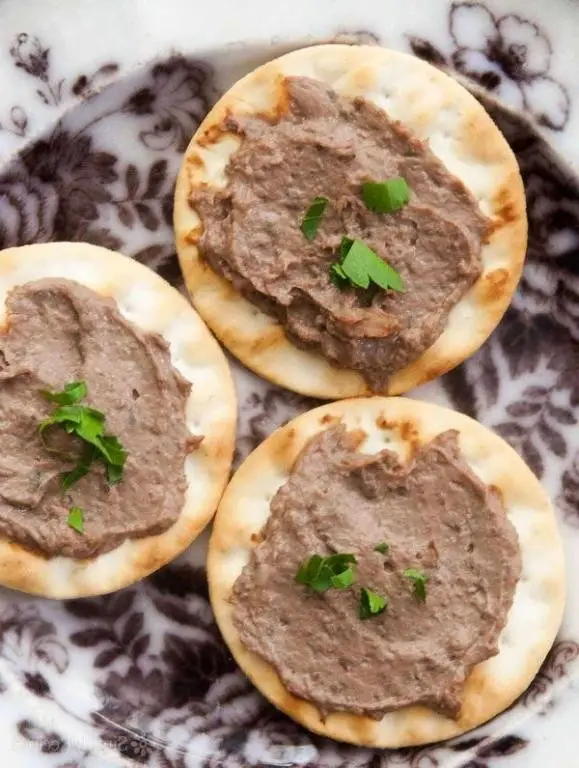
Recently, I stumbled upon the most delightful way to incorporate liver into my diet without feeling like I’m forcing down something just for the health benefits. This Liver Cleansing Pate is not only nutritious but also surprisingly delicious, with a rich, creamy texture that pairs perfectly with crisp, toasted bread.
Ingredients
- 1 lb fresh, organic chicken livers, cleaned and trimmed
- 1/2 cup rich, unsalted butter, softened
- 1/4 cup finely chopped shallots
- 2 cloves garlic, minced
- 1/4 cup high-quality brandy
- 1 tsp finely ground sea salt
- 1/2 tsp freshly ground black pepper
- 1/4 tsp ground allspice
- 2 tbsp heavy cream
Instructions
- In a large skillet over medium heat, melt 2 tablespoons of the butter until it’s frothy but not browned.
- Add the shallots and garlic, sautéing until they’re soft and translucent, about 3 minutes.
- Increase the heat to medium-high and add the chicken livers, cooking until they’re browned on the outside but still pink inside, about 5 minutes.
- Pour in the brandy carefully, standing back as it may flame up. Let the alcohol cook off for about 2 minutes.
- Reduce the heat to low and add the remaining butter, salt, pepper, and allspice, stirring until the butter is melted and everything is well combined.
- Transfer the mixture to a food processor, add the heavy cream, and blend until smooth and creamy, about 2 minutes.
- Pass the pate through a fine-mesh sieve for an extra smooth texture, pressing down with a spatula.
- Pack the pate into a serving dish or ramekins, smoothing the top with a spatula.
- Cover with plastic wrap, pressing it directly onto the surface of the pate to prevent a skin from forming, and refrigerate for at least 4 hours, or overnight, to let the flavors meld.
Velvety smooth with a deep, complex flavor, this pate is a testament to how luxurious liver can be. Serve it with a side of pickled vegetables or a dollop of fruit compote for a contrast in flavors that will elevate your appetizer game.
Fermented Hot Sauce
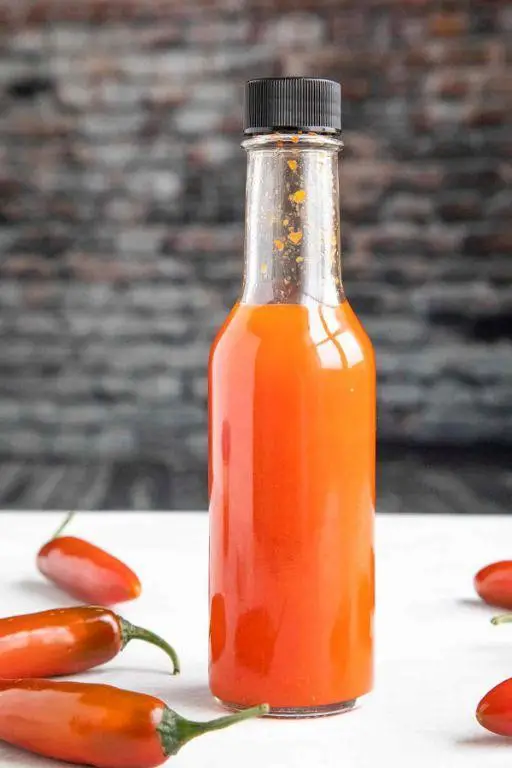
Believe it or not, my journey into making fermented hot sauce started with a serendipitous find at the farmers’ market—a basket of vibrant, fiery red chili peppers that I just couldn’t resist. Now, it’s become my go-to method for adding a punch of flavor to just about anything.
Ingredients
- 1 pound of fresh, brightly colored red chili peppers, stems removed
- 4 cloves of garlic, peeled and slightly crushed
- 2 tablespoons of coarse sea salt
- 1 tablespoon of raw, unfiltered honey
- 1 cup of distilled water
- 1/2 cup of crisp, white vinegar
Instructions
- Wash the chili peppers thoroughly under cold running water to remove any dirt or debris.
- Slice the peppers into thin rings, keeping the seeds for extra heat, and place them in a clean, large glass jar.
- Add the crushed garlic cloves to the jar with the peppers.
- In a small bowl, dissolve the coarse sea salt and raw honey in the distilled water to create a brine.
- Pour the brine over the peppers and garlic in the jar, ensuring they are completely submerged. If necessary, place a small weight on top to keep them under the liquid.
- Cover the jar with a clean cloth secured with a rubber band to allow air circulation while keeping out contaminants.
- Let the jar sit at room temperature, away from direct sunlight, for 7 days. Check daily to ensure the peppers remain submerged and to release any built-up gases.
- After fermentation, strain the mixture, reserving the liquid. Blend the peppers and garlic until smooth, then mix in the vinegar and reserved brine to achieve your desired consistency.
- Transfer the sauce to a clean bottle and refrigerate. The flavor will continue to develop over time.
Now, this fermented hot sauce boasts a complex, tangy heat that’s perfect for drizzling over tacos or mixing into mayo for a spicy sandwich spread. The fermentation process not only deepens the flavor but also adds a probiotic boost, making it as good for your gut as it is for your taste buds.
Conclusion
Valuable for anyone looking to nourish their gut health, this roundup of 18 delicious recipes offers a tasty path to healing. We invite you to try these dishes, share your favorites in the comments, and spread the love by pinning this article on Pinterest. Happy cooking and healing!

Michael Johnson is the founder of Pan Mastery, Inspired by his blacksmith grandfather’s legacy has a deep appreciation for hand-crafted pots and pans, he provides invaluable guides, reviews, and recipes to enhance your culinary journey.