Let’s talk about hazelnut flour, the secret ingredient that’s about to revolutionize your kitchen! Whether you’re whipping up quick weeknight dinners, indulging in seasonal favorites, or craving some comfort food, these 18 delicious recipes have got you covered. From sweet to savory, there’s something for every occasion. So, grab your apron, and let’s dive into the nutty goodness that awaits!
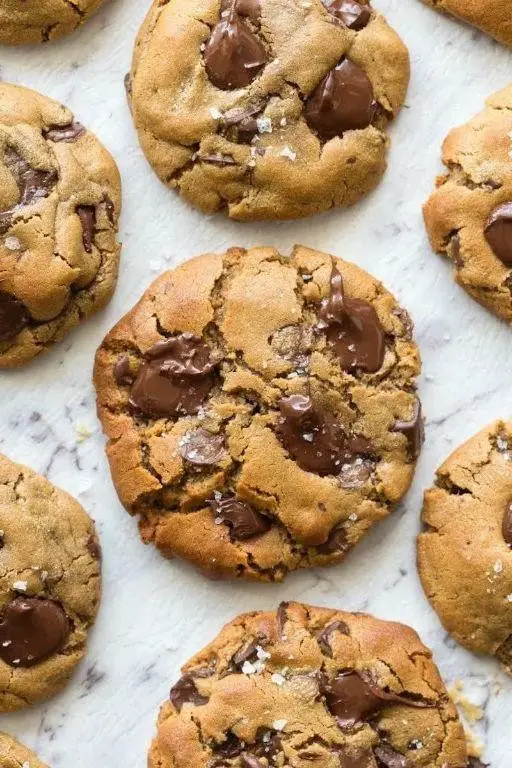
Hazelnut Flour Chocolate Chip Cookies
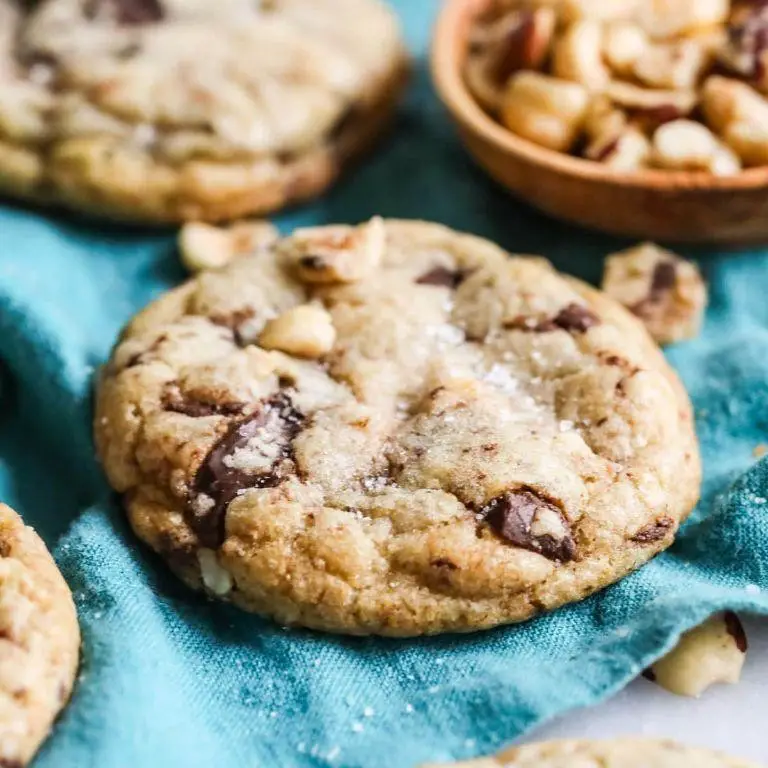
Every now and then, a cookie comes along that shakes up your snack game—this is that cookie. Hazelnut flour chocolate chip cookies are here to make your taste buds do a happy dance, combining nutty richness with the classic comfort of chocolate chips.
Ingredients
- 1 cup hazelnut flour (because almond flour who? This is the nutty star we deserve)
- 1/2 cup unsalted butter, softened (room temp is key—don’t rush it with the microwave)
- 1/2 cup brown sugar (for that deep, caramel-like sweetness)
- 1/4 cup granulated sugar (because balance is everything)
- 1 large egg (room temp, please—it’s all about the mix)
- 1 tsp vanilla extract (the good stuff, none of that imitation business)
- 1/2 tsp baking soda (the lift maestro)
- 1/4 tsp salt (to make the flavors pop)
- 1/2 cup chocolate chips (more is always an option)
Instructions
- Preheat your oven to 350°F (177°C)—no guessing, this cookie demands precision.
- In a large bowl, cream together the softened butter, brown sugar, and granulated sugar until light and fluffy. Tip: This is where your arm gets a workout, but it’s worth it.
- Beat in the egg and vanilla extract until just combined. Overmixing is the enemy of tender cookies.
- Gently fold in the hazelnut flour, baking soda, and salt. The dough will be thick—this is normal, soldier on.
- Stir in the chocolate chips. Tip: Reserve a few to press on top of the cookies before baking for that Instagram-worthy look.
- Scoop tablespoon-sized balls of dough onto a parchment-lined baking sheet, spacing them about 2 inches apart. They’ll spread, so give them room to breathe.
- Bake for 10-12 minutes, or until the edges are golden but the centers are still soft. Tip: They’ll firm up as they cool, so resist the urge to overbake.
- Let the cookies cool on the baking sheet for 5 minutes before transferring to a wire rack to cool completely.
Kind of magical how these cookies strike the perfect balance between chewy and crisp, with the hazelnut flour adding a depth of flavor that’s downright addictive. Serve them warm with a glass of cold milk, or crumble them over ice cream for a next-level dessert.
Gluten-Free Hazelnut Flour Pancakes
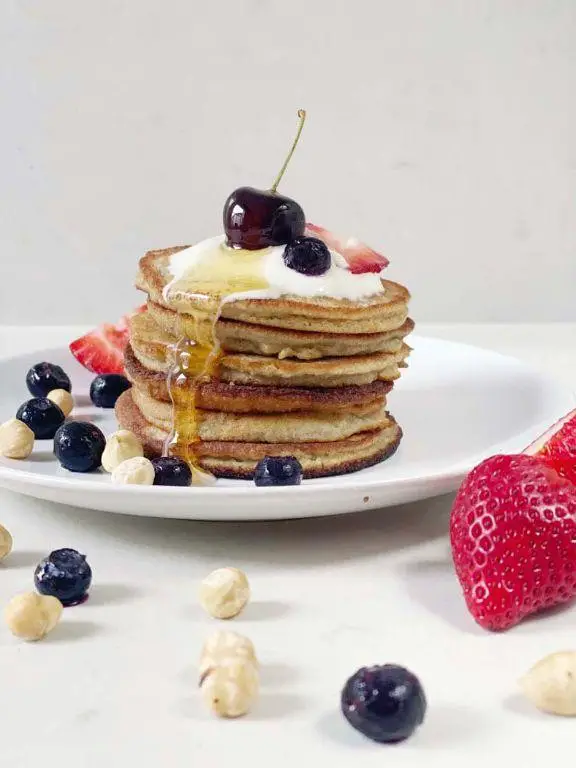
Venture into the world of gluten-free breakfast bliss with these hazelnut flour pancakes that promise to turn your morning routine from mundane to magnificent. Light, fluffy, and packed with nutty goodness, they’re the perfect excuse to hit the snooze button one more time—because who can resist pancakes that taste like dessert but are totally breakfast-appropriate?
Ingredients
- 1 cup hazelnut flour (because who knew nuts could be so versatile?)
- 2 eggs, room temp (they mix better, trust me)
- 1/4 cup almond milk (or any milk that floats your boat)
- 1 tbsp maple syrup (the real deal, none of that imposter stuff)
- 1/2 tsp baking powder (the unsung hero of fluffiness)
- 1 tbsp coconut oil, melted (for that subtle tropical vibe)
- A pinch of salt (to make all the flavors pop)
Instructions
- In a large bowl, whisk together the hazelnut flour, baking powder, and salt. This is where the magic starts.
- In another bowl, beat the eggs, then add the almond milk and maple syrup. Mix until it’s as smooth as your morning playlist.
- Pour the wet ingredients into the dry ingredients and stir gently. Overmixing is the enemy of fluffy pancakes—think of it as folding in clouds.
- Heat a non-stick pan over medium heat (about 350°F) and brush with melted coconut oil. This is your pancake’s first-class ticket to golden perfection.
- Pour 1/4 cup of batter for each pancake. Watch for bubbles to form on the surface, about 2-3 minutes, then flip. The second side cooks faster, about 1-2 minutes, so don’t wander off.
- Repeat with the remaining batter, adding more coconut oil as needed. Stack them high and serve with your favorite toppings.
Mmm, these pancakes are a textural dream—crispy edges with a center so tender it practically melts in your mouth. Drizzle with extra maple syrup, a dollop of almond butter, or fresh berries for a breakfast that feels like a hug in plate form.
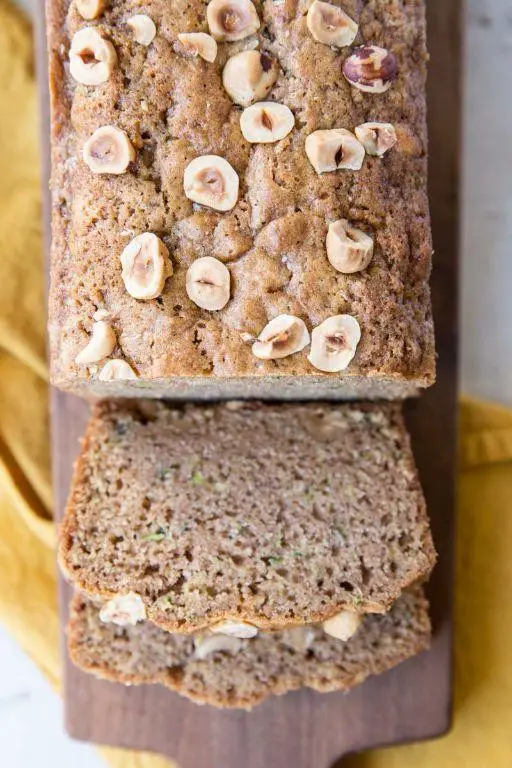
Hazelnut Flour Banana Bread
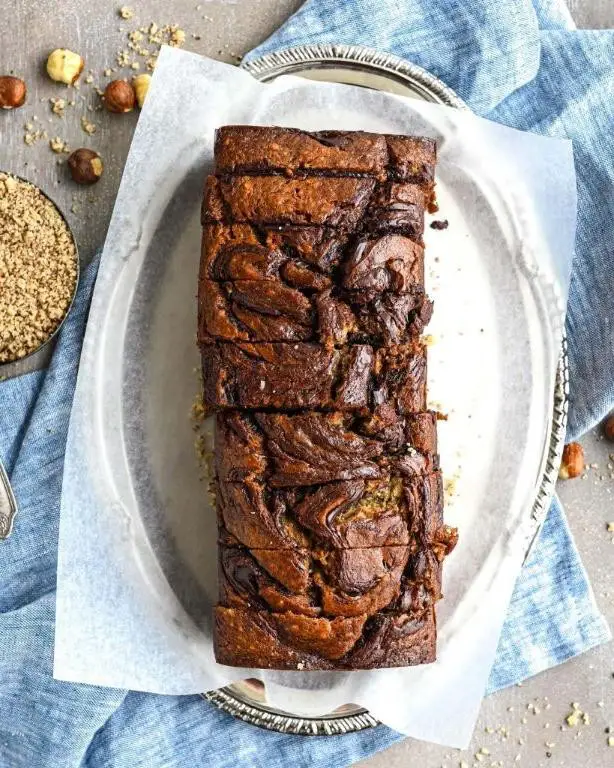
Every now and then, a recipe comes along that shakes up your baking routine in the best way possible—like this hazelnut flour banana bread that’s about to become your new obsession. It’s moist, nutty, and just sweet enough to justify eating it for breakfast (or, let’s be real, any time of day).
Ingredients
- 3 ripe bananas (the spottier, the better—trust me)
- 3 large eggs (I prefer room temp eggs here for a smoother batter)
- 1/2 cup maple syrup (the real deal, none of that pancake syrup nonsense)
- 1/4 cup extra virgin olive oil (my go-to for a fruity depth)
- 1 tsp vanilla extract (because vanilla makes everything better)
- 2 cups hazelnut flour (hello, nutty goodness)
- 1 tsp baking soda (the magic rise-maker)
- 1/2 tsp salt (to balance the sweetness)
- 1/2 cup dark chocolate chips (optional, but highly recommended for a melty surprise)
Instructions
- Preheat your oven to 350°F and grease a 9×5 inch loaf pan. No one likes a sticky situation.
- In a large bowl, mash the bananas until smooth. A few lumps are okay—it’s homemade, not a science project.
- Whisk in the eggs, maple syrup, olive oil, and vanilla extract until well combined. Tip: A fork works great for this—no fancy tools needed.
- Gently fold in the hazelnut flour, baking soda, and salt. Mix just until combined to keep the bread light and fluffy.
- If using, stir in the chocolate chips. Because chocolate makes everything better, obviously.
- Pour the batter into the prepared loaf pan and smooth the top. Tip: A spatula lightly coated with oil prevents sticking.
- Bake for 50-60 minutes, or until a toothpick inserted into the center comes out clean. Tip: Ovens vary, so start checking at 50 minutes to avoid overbaking.
- Let the bread cool in the pan for 10 minutes, then transfer to a wire rack to cool completely. Patience is key here—it’s worth the wait.
What you’ll end up with is a loaf that’s irresistibly moist with a tender crumb and a rich, nutty flavor that pairs perfectly with the occasional chocolatey bite. Serve it toasted with a smear of almond butter for a next-level breakfast or enjoy as is with your afternoon coffee. Either way, it’s a win.
Keto Hazelnut Flour Waffles
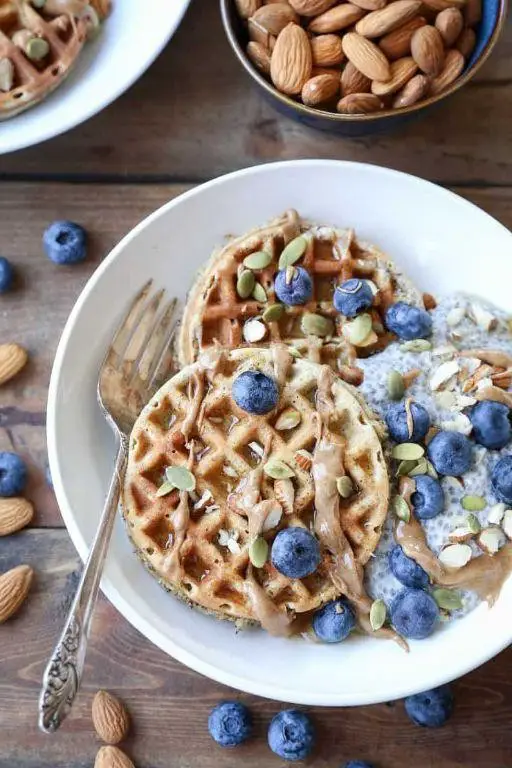
Unbelievably, these Keto Hazelnut Flour Waffles are so good, you’ll forget they’re low-carb. Perfect for those mornings when you’re craving something indulgent but still want to keep it keto-friendly. Let’s dive into making these crispy-on-the-outside, fluffy-on-the-inside wonders.
Ingredients
- 1 cup hazelnut flour – because almond flour is so last season, and hazelnut adds a richer flavor.
- 2 large eggs – room temperature, please, unless you enjoy the thrill of uneven mixing.
- 1/4 cup melted butter – unsalted, because we’re not savages who can’t control their salt intake.
- 1 tsp vanilla extract – the good stuff, none of that imitation nonsense.
- 1/2 tsp baking powder – the unsung hero that gives these waffles their lift.
- Pinch of salt – to make all the flavors pop, like a tiny flavor firework.
Instructions
- Preheat your waffle iron to 375°F – no guessing games here, precision is key.
- In a large bowl, whisk together the hazelnut flour, baking powder, and salt. This is where the magic starts.
- Add the eggs, melted butter, and vanilla extract to the dry ingredients. Mix until just combined – overmixing is the enemy of fluffy waffles.
- Let the batter sit for 2 minutes. This gives the hazelnut flour a chance to absorb the liquids, making for a better texture.
- Pour 1/4 cup of batter onto the center of the waffle iron. Close the lid and cook for 3-4 minutes, or until golden brown and crispy.
- Repeat with the remaining batter, because one waffle is never enough.
Marvel at your creation! These waffles have a nutty depth that’s perfectly balanced by the sweetness of the vanilla. Serve them with a dollop of whipped cream and a sprinkle of crushed hazelnuts for an extra decadent touch.
Hazelnut Flour Lemon Cake
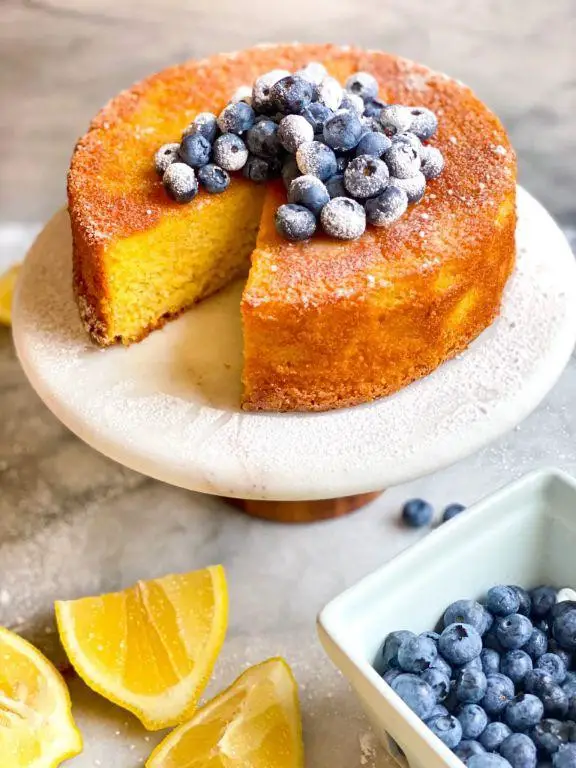
Ready to dazzle your taste buds with a cake that’s as bright and cheerful as a summer day? This Hazelnut Flour Lemon Cake is a zesty, nutty delight that’ll have you coming back for seconds—no shame, we’ve all been there.
Ingredients
- 1 1/2 cups hazelnut flour (because who doesn’t love a nutty twist?)
- 1/2 cup granulated sugar (for that sweet, sweet life)
- 3 large eggs, room temp (they mix better when they’re not chilly)
- 1/4 cup extra virgin olive oil (my go-to for a fruity depth)
- Zest and juice of 2 lemons (for that punchy, wake-me-up flavor)
- 1 tsp baking powder (the unsung hero of fluffiness)
- A pinch of salt (to balance the sweetness, because life’s all about balance)
Instructions
- Preheat your oven to 350°F (175°C)—no guessing, just precision.
- In a large bowl, whisk together hazelnut flour, sugar, baking powder, and salt. Tip: Sift the hazelnut flour if it’s clumpy for a smoother batter.
- Add the eggs one at a time, mixing well after each addition. Room temp eggs blend more smoothly, avoiding a lumpy situation.
- Stir in the olive oil, lemon zest, and lemon juice until the batter is homogenous. Tip: Fresh lemon juice is key—bottled just won’t give you that vibrant kick.
- Pour the batter into a greased 8-inch round cake pan. Tip: Line the bottom with parchment paper for an easy exit post-baking.
- Bake for 25-30 minutes, or until a toothpick comes out clean. Visual cue: The edges should be golden and pulling away from the pan.
- Let the cake cool in the pan for 10 minutes, then transfer to a wire rack to cool completely. Patience is a virtue, especially with cake.
Unbelievably moist with a tender crumb, this cake is a citrusy, nutty dream. Serve it with a dollop of whipped cream or fresh berries for an extra pop of color and flavor. Trust me, it’s a game-changer.
Paleo Hazelnut Flour Muffins
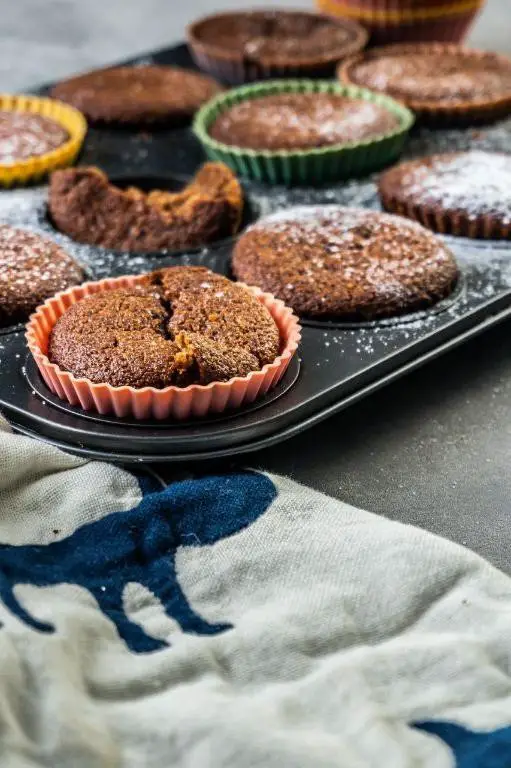
Oh, the joys of baking without the guilt! These Paleo Hazelnut Flour Muffins are here to prove that healthy can be deliciously decadent. Packed with nutty goodness and a texture that’ll make you forget they’re grain-free, these muffins are your new best friend for breakfast or that 3 PM slump.
Ingredients
- 2 cups hazelnut flour – because almond flour is so last season.
- 1/2 cup coconut sugar – for that subtle sweetness that doesn’t scream ‘sugar rush’.
- 3 large eggs – I swear by room temp eggs for that perfect rise.
- 1/4 cup coconut oil, melted – extra virgin is my hero, but any will do in a pinch.
- 1 tsp vanilla extract – the real deal, please, none of that imitation stuff.
- 1/2 tsp baking soda – the unsung hero of fluffiness.
- A pinch of salt – because even muffins need a little seasoning.
Instructions
- Preheat your oven to 350°F (175°C) and line a muffin tin with parchment liners. No sticking allowed!
- In a large bowl, whisk together the hazelnut flour, coconut sugar, baking soda, and salt. No lumps, please!
- In another bowl, beat the eggs, then mix in the melted coconut oil and vanilla extract. Think of it as a mini arm workout.
- Pour the wet ingredients into the dry and stir until just combined. Overmixing is the enemy of fluffy muffins!
- Divide the batter evenly among the muffin cups, filling each about 3/4 full. They need room to grow!
- Bake for 18-20 minutes, or until a toothpick comes out clean. Watch them like a hawk after 15 minutes!
- Let them cool in the pan for 5 minutes, then transfer to a wire rack. Patience is key, unless you like muffin crumbs everywhere.
Light, fluffy, and with a nutty flavor that’s downright addictive, these muffins are perfect on their own or slathered with almond butter for an extra protein kick. Serve them warm with a dollop of coconut yogurt, and watch them disappear before your eyes!
Hazelnut Flour Brownies
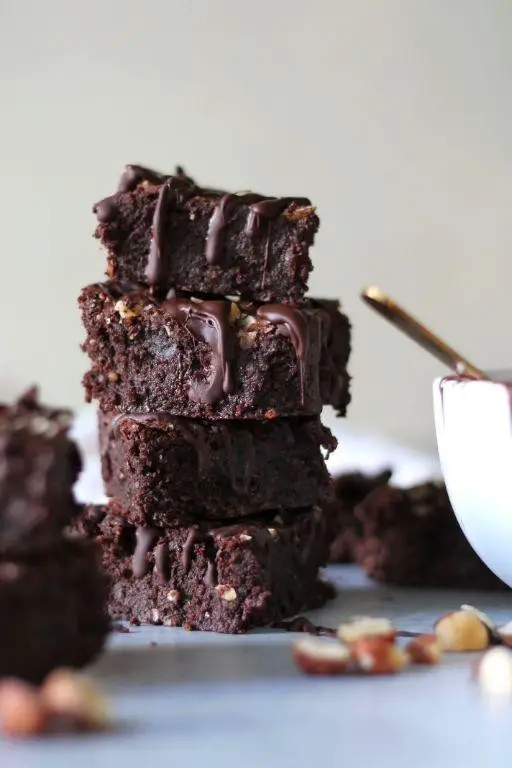
Just when you thought brownies couldn’t get any better, along comes this game-changer: hazelnut flour brownies. They’re the love child of your favorite chocolatey treat and that jar of hazelnut flour you’ve been side-eyeing in your pantry. Perfect for when you want to indulge without the guilt (or at least with less guilt).
Ingredients
- 1 cup hazelnut flour – because all-purpose flour is so last season.
- 1/2 cup unsweetened cocoa powder – the darker, the better, like my sense of humor.
- 1/2 cup melted coconut oil – extra virgin olive oil who?
- 2 large eggs – room temp, unless you enjoy the thrill of uneven mixing.
- 3/4 cup maple syrup – for that ‘I’m healthy’ illusion.
- 1 tsp vanilla extract – the secret handshake of baking.
- 1/2 tsp salt – to balance out the sweetness, like a good friendship.
- 1/2 cup dark chocolate chips – because more chocolate is always the answer.
Instructions
- Preheat your oven to 350°F – no guessing games here, unless you’re into that.
- Line an 8×8 baking pan with parchment paper – because nobody likes a sticky situation.
- In a large bowl, whisk together the hazelnut flour, cocoa powder, and salt – think of it as a dry ingredients party.
- In another bowl, mix the melted coconut oil, maple syrup, eggs, and vanilla extract until it’s smoother than your pickup lines.
- Combine the wet and dry ingredients, stirring until just mixed – overmixing is the enemy of fluffy brownies.
- Fold in the chocolate chips – because surprises are fun, especially when they’re chocolate.
- Pour the batter into the prepared pan and spread it evenly – symmetry is key, unless you’re going for abstract art.
- Bake for 20-25 minutes, or until a toothpick comes out mostly clean – a few crumbs are fine, we’re not perfectionists here.
- Let them cool in the pan for 10 minutes, then transfer to a wire rack – patience is a virtue, but we won’t judge if you sneak a bite.
Kick back and marvel at your creation: these brownies are fudgy, nutty, and just the right amount of sweet. Serve them warm with a scoop of vanilla ice cream for that ‘I meant to do that’ gourmet touch.
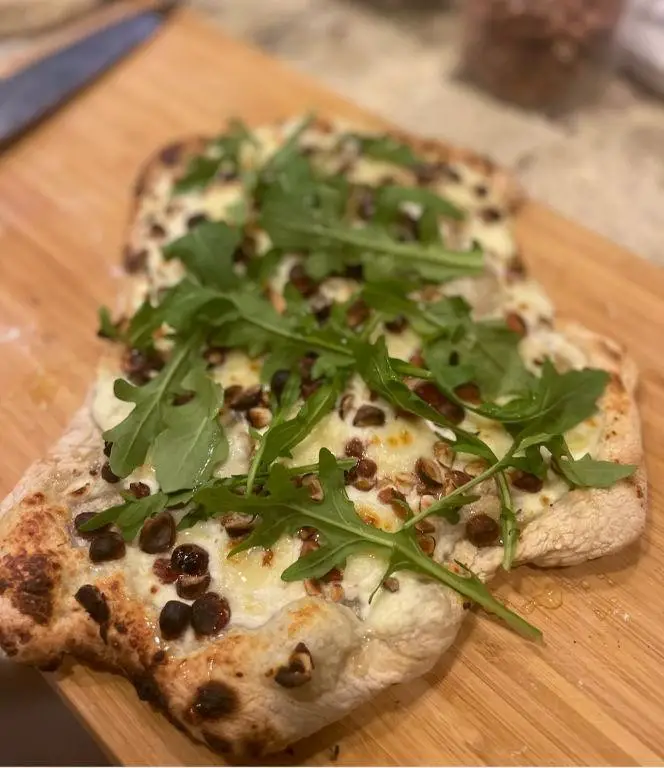
Hazelnut Flour Pizza Crust
Today is ‘2025-06-15 01:29:30.306071’, You’re a professional food blogger writing a relatable US-based roundup-style recipe article. Introduce the dish: ‘Hazelnut Flour Pizza Crust’ using the structure below.
Tone: Use a playful, witty voice. Add light humor, bold phrasing, and fun energy throughout.
Write a short 2-3 sentence intro, The first word of your introduction must begin with the letter ‘T’. Do not display the title. Start directly with the introduction.
Ingredients
- 1 1/2 cups hazelnut flour – because who doesn’t love a nutty twist?
- 1/4 cup tapioca flour – for that stretchy, chewy goodness we all crave.
- 1 tsp baking powder – the unsung hero of lift and fluff.
- 1/2 tsp salt – because flavor is everything.
- 2 eggs – I swear by room temp eggs for better mixing.
- 2 tbsp extra virgin olive oil – my go-to for richness and depth.
- 1 tbsp honey – a sweet whisper to balance the nuttiness.
Instructions
- Preheat your oven to 375°F – no guessing, just perfect pizza every time.
- In a large bowl, whisk together hazelnut flour, tapioca flour, baking powder, and salt. This is where the magic starts.
- Make a well in the center of your dry ingredients and add the eggs, olive oil, and honey. Mix until a dough forms. Tip: If it’s too sticky, a little more hazelnut flour will save the day.
- Place the dough between two sheets of parchment paper and roll out to your desired thickness. Tip: Thinner means crispier, so choose your adventure.
- Remove the top parchment and transfer the bottom sheet with the dough onto a baking sheet. Bake for 12-15 minutes until the edges are golden. Tip: Keep an eye on it – nut flours can go from golden to gone in a flash.
- Let it cool slightly before adding your toppings and baking again if desired.
Absolutely divine, this crust is a game-changer with its rich, nutty flavor and satisfying crunch. Serve it up with bold toppings to match its personality, or keep it simple and let the crust shine.
Hazelnut Flour Chocolate Cake
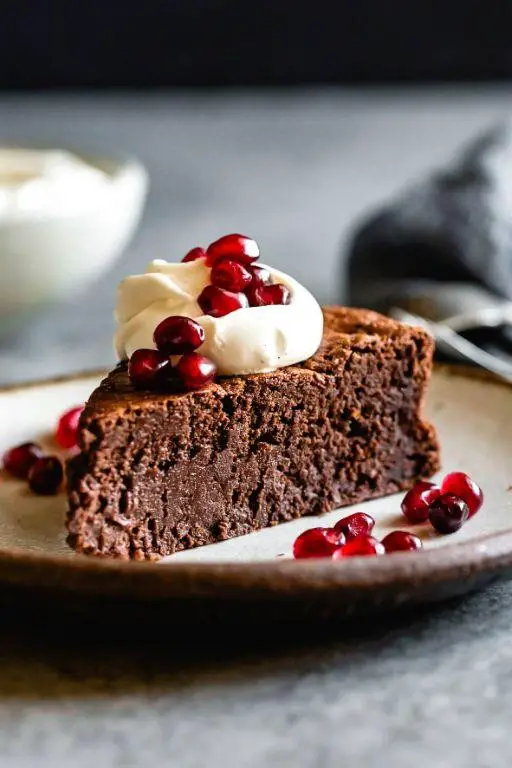
So, you’ve decided to dive into the world of gluten-free baking, and let me tell you, this Hazelnut Flour Chocolate Cake is the perfect place to start. It’s rich, decadent, and has a nutty twist that’ll make you forget all about traditional flour.
Ingredients
- 1 1/2 cups hazelnut flour – because who needs regular flour when you can have this nutty goodness?
- 3/4 cup cocoa powder – the darker, the better for that intense chocolate flavor.
- 1 cup granulated sugar – sweetens the deal just right.
- 1/2 teaspoon salt – a pinch to balance the sweetness.
- 1 teaspoon baking soda – gives our cake the lift it deserves.
- 3 large eggs – I prefer room temp eggs here; they mix better.
- 1/2 cup extra virgin olive oil – my go-to for a moist crumb.
- 1 teaspoon vanilla extract – because vanilla makes everything better.
- 1/2 cup hot water – to bring all the flavors together.
Instructions
- Preheat your oven to 350°F (175°C) and grease a 9-inch round cake pan. Trust me, nobody likes a cake that sticks.
- In a large bowl, whisk together the hazelnut flour, cocoa powder, sugar, salt, and baking soda. No lumps allowed!
- Add the eggs, olive oil, and vanilla extract to the dry ingredients. Mix until just combined. Overmixing is the enemy of fluffy cakes.
- Gradually add the hot water to the batter, stirring until smooth. The batter will be thin, but that’s perfectly okay.
- Pour the batter into the prepared pan and bake for 30-35 minutes, or until a toothpick inserted into the center comes out clean.
- Let the cake cool in the pan for 10 minutes, then transfer to a wire rack to cool completely. Patience is key here.
Rich in flavor with a moist, tender crumb, this cake is a chocolate lover’s dream. Serve it with a dollop of whipped cream or a scoop of vanilla ice cream for an extra indulgent treat.
Hazelnut Flour Blueberry Scones
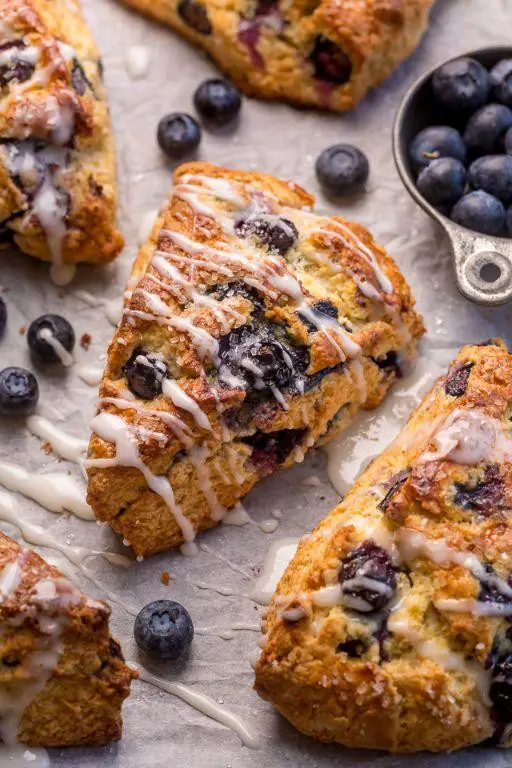
Yum, have we got a treat for you today! These Hazelnut Flour Blueberry Scones are the perfect blend of nutty, fruity, and downright delicious. Perfect for those mornings when you want to feel fancy without putting in too much effort.
Ingredients
- 1 1/2 cups hazelnut flour – because regular flour is so last season.
- 1/4 cup coconut sugar – for that subtle sweetness that won’t send you into a sugar coma.
- 1 tsp baking powder – the little lift that could.
- 1/4 tsp salt – just a pinch to make everything pop.
- 1/3 cup cold butter, cubed – cold is key here, folks.
- 1/2 cup fresh blueberries – the star of the show, bursting with joy.
- 1 large egg – I like mine room temp, but you do you.
- 1 tsp vanilla extract – because vanilla makes everything better.
- 2 tbsp heavy cream – for that rich, tender crumb we’re all after.
Instructions
- Preheat your oven to 375°F – no guessing, just set it and forget it.
- In a large bowl, whisk together hazelnut flour, coconut sugar, baking powder, and salt. This is where the magic starts.
- Add the cold, cubed butter to the dry ingredients. Use your fingers to work the butter into the flour until it resembles coarse crumbs. Tip: Keep it cold for flaky scones!
- Gently fold in the blueberries – we want them whole and happy, not smashed and sad.
- In a separate bowl, whisk together the egg, vanilla extract, and heavy cream. Pour this into the dry ingredients and stir until just combined. Tip: Overmixing is the enemy of tender scones.
- Turn the dough out onto a lightly floured surface and shape into a 6-inch circle. Cut into 8 wedges – like a pizza, but way better.
- Transfer the wedges to a baking sheet lined with parchment paper, spacing them about 2 inches apart. Bake for 18-20 minutes, or until golden brown. Tip: Watch them like a hawk in the last few minutes to avoid overbaking.
Oh, the joy of biting into one of these scones! The hazelnut flour gives them a wonderfully nutty flavor, while the blueberries add a burst of sweetness. Serve them warm with a dollop of clotted cream or your favorite jam for an extra special treat.
Hazelnut Flour Apple Crisp
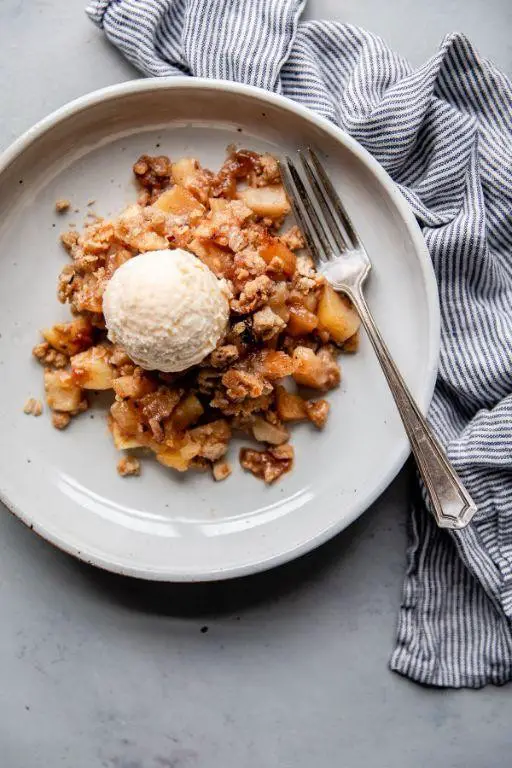
Just when you thought apple crisp couldn’t get any better, we went and tossed hazelnut flour into the mix. This Hazelnut Flour Apple Crisp is like the cozy sweater of desserts—warm, comforting, and surprisingly stylish.
Ingredients
- 4 cups thinly sliced apples (I’m a Honeycrisp fan, but use your fave!)
- 1/2 cup hazelnut flour (because regular flour is so last season)
- 1/2 cup rolled oats (the heartier, the better)
- 1/4 cup brown sugar (for that deep, caramel-y goodness)
- 1/4 cup melted butter (salted, because life’s too short for unsalted)
- 1 tsp cinnamon (the spice of life, literally)
- 1/2 tsp vanilla extract (the good stuff, please)
Instructions
- Preheat your oven to 350°F—no rushing this preheat, it’s the foundation of greatness.
- Toss the apple slices with cinnamon and vanilla extract in a large bowl. Think of it as giving the apples a cozy spice blanket.
- In a separate bowl, mix hazelnut flour, oats, and brown sugar. This is where the magic starts.
- Pour the melted butter over the dry ingredients and stir until crumbly. Pro tip: Use your hands for this—it’s therapeutic.
- Spread the apple mixture evenly in a baking dish, then sprinkle the crumbly topping over it. No apple left behind!
- Bake for 35-40 minutes, or until the topping is golden and the apples are bubbling. Your kitchen should smell like heaven.
Ready to dive in? This crisp is a textural dream—crunchy topping, soft apples, and a nutty depth from the hazelnut flour. Serve it warm with a scoop of vanilla ice cream for the ultimate ‘I made this’ moment.
Hazelnut Flour Crepes
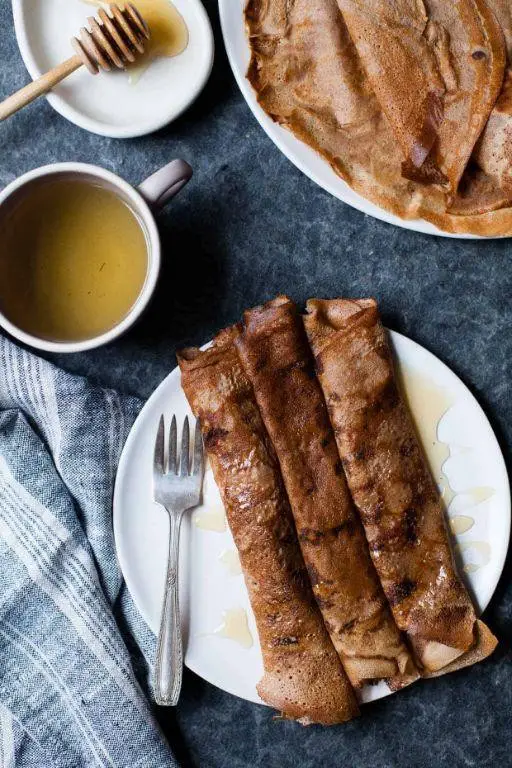
Picture this: a lazy Sunday morning where the only thing rising faster than the sun is your craving for something gloriously gluten-free yet sinfully delicious. Enter hazelnut flour crepes, the nutty, tender answer to your breakfast prayers that’ll have you flipping out—literally and figuratively.
Ingredients
- 1 cup hazelnut flour (because almond flour is so last season)
- 2 large eggs (room temp, unless you enjoy the thrill of lumpy batter)
- 1 cup whole milk (or any milk that moo’s your boat)
- 2 tbsp melted butter (unsalted, unless you’re living on the edge)
- 1 tbsp sugar (for that hint of sweetness that says ‘good morning’)
- A pinch of salt (to balance out your life, just like it does the batter)
Instructions
- In a large bowl, whisk together the hazelnut flour, sugar, and salt like you’re mixing the secrets to happiness.
- Add the eggs and milk to the dry ingredients, whisking until the batter is as smooth as your morning playlist. Tip: Let the batter rest for 10 minutes; it’s like a mini meditation session for your crepes.
- Heat a non-stick skillet over medium heat (about 350°F) and brush it with a bit of the melted butter. This is where the magic—and the butter—happens.
- Pour 1/4 cup of batter into the skillet, swirling it around like you’re painting the next Mona Lisa. Tip: The first crepe is always the test crepe; don’t sweat it if it’s not perfect.
- Cook for about 2 minutes until the edges start to lift like they’re trying to escape, then flip with the confidence of a pancake-flipping champion. Tip: Use a thin spatula for the flip; it’s the crepe’s best friend.
- Cook for another minute on the other side, then slide it onto a plate. Repeat until you’ve got a stack that’ll make your Instagram followers jealous.
Ready to dive in? These crepes are delightfully nutty with a texture that’s somehow both delicate and satisfying. Serve them rolled up with a smear of chocolate hazelnut spread and a sprinkle of crushed hazelnuts for a breakfast that’s basically dessert in disguise.
Hazelnut Flour Pumpkin Bread
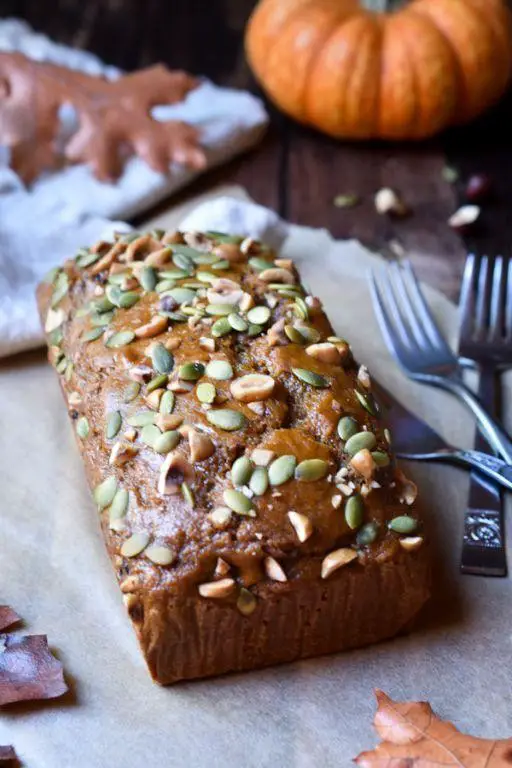
Delightfully moist and packed with flavor, this hazelnut flour pumpkin bread is your ticket to autumn bliss, no matter the season. It’s like a hug from your grandma, if your grandma was a pumpkin-spiced wizard.
Ingredients
- 1 1/2 cups hazelnut flour – because almond flour is so last season.
- 1 cup pumpkin puree – homemade or canned, no judgment here.
- 3 large eggs – room temperature, unless you enjoy the thrill of cold eggs in your batter.
- 1/2 cup maple syrup – the real deal, none of that pancake syrup nonsense.
- 1/4 cup extra virgin olive oil – my go-to for that rich, fruity undertone.
- 1 tsp vanilla extract – because vanilla is the secret handshake of baking.
- 1 tsp baking soda – the unsung hero of lift and fluff.
- 1 tbsp pumpkin pie spice – or mix your own if you’re feeling fancy.
- A pinch of salt – to make all the flavors pop like a New Year’s Eve party.
Instructions
- Preheat your oven to 350°F (175°C) and grease a loaf pan like you’re preparing it for a slip ‘n slide.
- In a large bowl, whisk together the hazelnut flour, baking soda, pumpkin pie spice, and salt. This is where the magic starts.
- In another bowl, beat the eggs, then add the pumpkin puree, maple syrup, olive oil, and vanilla extract. Mix until it’s smoother than a jazz playlist.
- Combine the wet and dry ingredients, stirring just until they’re friends. Overmixing is the enemy of fluffy bread.
- Pour the batter into the prepared loaf pan, smoothing the top with a spatula as if you’re tucking it into bed.
- Bake for 50-60 minutes, or until a toothpick comes out cleaner than your conscience after a spa day.
- Let the bread cool in the pan for 10 minutes, then transfer to a wire rack. Patience is a virtue, especially when it comes to pumpkin bread.
Rich in flavor with a tender crumb, this hazelnut flour pumpkin bread is a masterpiece of moistness. Serve it toasted with a smear of butter, or go wild and top it with whipped cream for a dessert that’ll have everyone asking for seconds.
Hazelnut Flour Almond Butter Cookies
Just when you thought cookies couldn’t get any nuttier, here comes a duo that’s here to prove you wrong. These Hazelnut Flour Almond Butter Cookies are the cheeky, crunchy answer to your snack-time prayers, blending the best of both nut worlds into one irresistible treat.
Ingredients
- 1 cup hazelnut flour – because all-purpose flour is so last season.
- 1/2 cup almond butter – smooth or crunchy, your call, but I’m team crunchy for that extra oomph.
- 1/2 cup coconut sugar – for that subtly sweet, caramel-like vibe.
- 1 large egg – room temp, please, unless you enjoy playing the waiting game.
- 1 tsp vanilla extract – the good stuff, none of that imitation nonsense.
- 1/2 tsp baking soda – the unsung hero of lift and lightness.
- A pinch of sea salt – to make all those flavors pop like confetti.
Instructions
- Preheat your oven to 350°F (175°C) – no guessing games here, precision is key.
- In a large bowl, whisk together the hazelnut flour, coconut sugar, baking soda, and sea salt. Think of it as a dry ingredient party.
- Add the almond butter, egg, and vanilla extract to the bowl. Mix until you’ve got a dough that’s smoother than your last pickup line.
- Roll the dough into 1-inch balls and place them on a parchment-lined baking sheet. Pro tip: a cookie scoop is your best friend here for uniform cookies.
- Flatten each ball slightly with the back of a fork, creating a crisscross pattern. This isn’t just for looks; it helps the cookies bake evenly.
- Bake for 10-12 minutes, or until the edges are golden but the centers are still soft. They’ll firm up as they cool, so resist the urge to overbake.
- Let the cookies cool on the baking sheet for 5 minutes before transferring them to a wire rack. Patience is a virtue, especially when cookies are involved.
Kick back and marvel at your creation: these cookies are the perfect blend of chewy and crisp, with a nutty depth that’s downright addictive. Serve them with a dollop of almond butter on top for a next-level experience, or just enjoy them straight up – no judgment here.
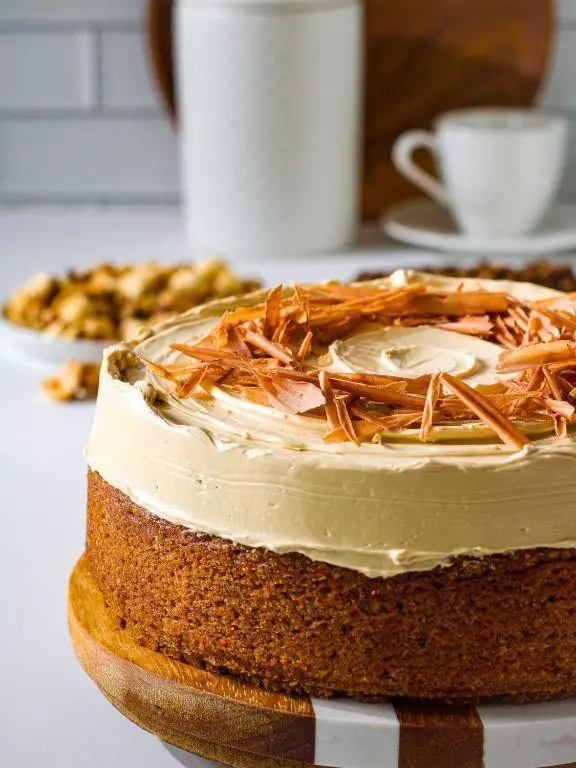
Hazelnut Flour Carrot Cake
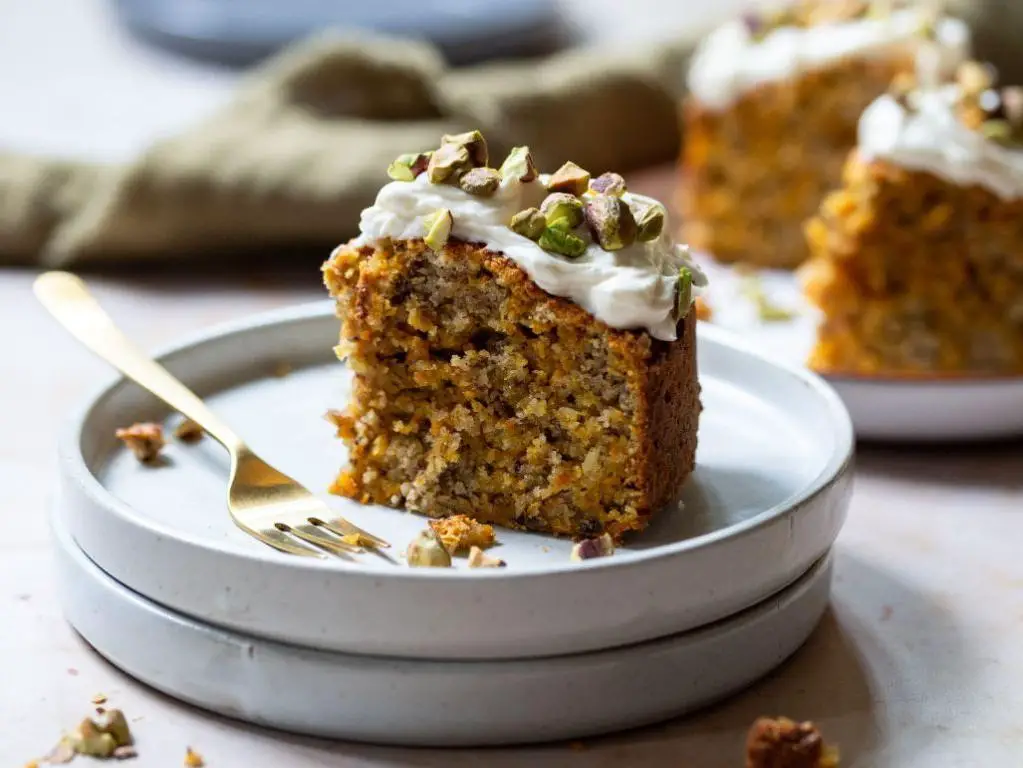
Mmm, buckle up, buttercups, because we’re about to dive into a cake that’s so good, it’ll make your taste buds do a happy dance. This hazelnut flour carrot cake is the perfect blend of nutty, sweet, and downright delicious, with a twist that’ll have you coming back for seconds (and maybe thirds).
Ingredients
- 2 cups hazelnut flour – because all-purpose flour is so last year.
- 3 large eggs – room temp, please, unless you enjoy the thrill of lumpy batter.
- 1 cup grated carrots – the more, the merrier, and yes, you can grate them yourself for that ‘I’m a kitchen warrior’ feeling.
- 1/2 cup maple syrup – for that sweet, sweet hug in every bite.
- 1/4 cup melted coconut oil – extra virgin olive oil’s cool cousin.
- 1 tsp vanilla extract – the secret handshake of baking.
- 1 tsp baking soda – because we need some lift in our lives.
- 1/2 tsp cinnamon – a sprinkle of magic.
- Pinch of salt – to make all the flavors pop like a surprise party.
Instructions
- Preheat your oven to 350°F – no guessing, just set it and forget it.
- In a large bowl, whisk together the hazelnut flour, baking soda, cinnamon, and salt. This is where the party starts.
- In another bowl, beat the eggs, then add the maple syrup, melted coconut oil, and vanilla extract. Mix until it’s as smooth as your best pickup line.
- Fold the wet ingredients into the dry ingredients. Gentle does it – we’re making cake, not mud pies.
- Stir in the grated carrots until they’re evenly distributed. Think of it as hiding little nuggets of joy throughout.
- Pour the batter into a greased 9-inch cake pan. Smooth the top like you’re putting the final touches on a masterpiece.
- Bake for 25-30 minutes, or until a toothpick comes out clean. No peeking too early, or you’ll let the heat out!
- Let the cake cool in the pan for 10 minutes, then transfer to a wire rack. Patience is a virtue, especially when cake is involved.
Get ready to fall in love with a cake that’s moist, flavorful, and packed with texture. Serve it with a dollop of whipped cream or a scoop of vanilla ice cream for an extra indulgent treat. Either way, it’s a win.
Hazelnut Flour Peach Cobbler
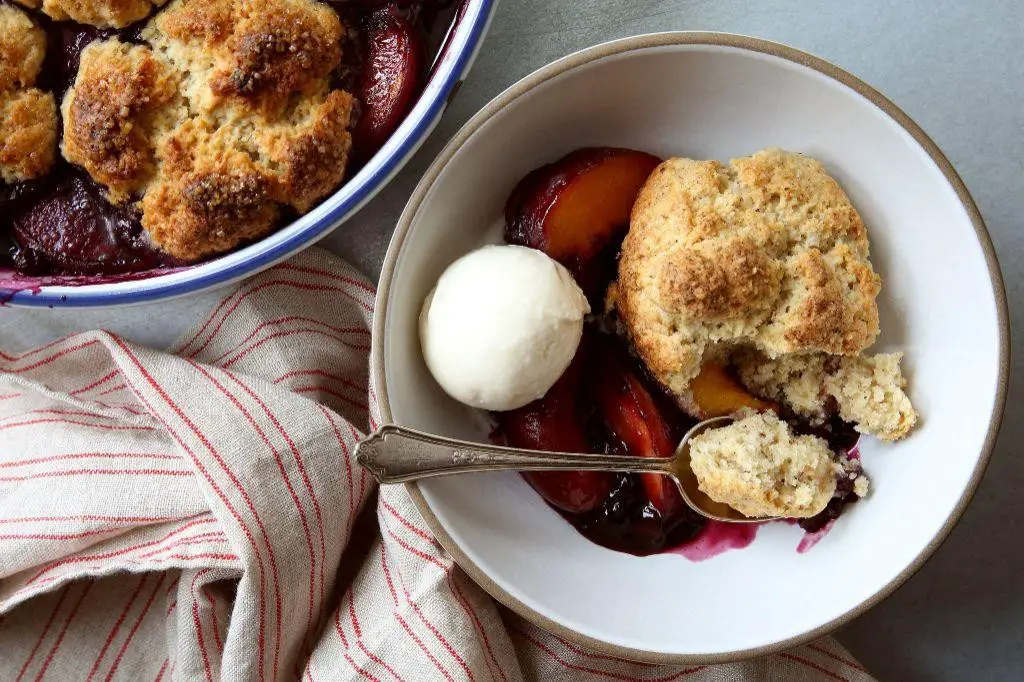
Forget everything you thought you knew about cobbler, because this hazelnut flour peach cobbler is about to rock your world. It’s like summer decided to throw a party in your mouth, and everyone’s invited—especially your sweet tooth.
Ingredients
- 2 cups of fresh peaches, sliced (because canned just doesn’t bring the same vibe)
- 1 cup hazelnut flour (for that nutty, gluten-free goodness)
- 1/2 cup maple syrup (the real deal, none of that pancake syrup nonsense)
- 1/4 cup coconut oil, melted (extra virgin, because we’re fancy like that)
- 1 tsp vanilla extract (the secret weapon)
- 1/2 tsp cinnamon (for a little spice in your life)
- Pinch of salt (to make all the flavors pop)
Instructions
- Preheat your oven to 350°F (175°C), because we’re not baking in the dark ages.
- Toss the sliced peaches with half of the maple syrup and the cinnamon in a bowl. Let them sit and get to know each other for about 10 minutes.
- In another bowl, mix the hazelnut flour, remaining maple syrup, melted coconut oil, vanilla extract, and salt until it looks like the world’s most delicious sand.
- Spread the peach mixture evenly in a baking dish, then sprinkle the hazelnut mixture on top like you’re decorating a cake.
- Bake for 25-30 minutes, or until the top is golden and the peaches are bubbling like a hot spring.
- Let it cool for a bit unless you’re into burning your tongue (no judgment here).
Bursting with juicy peaches and a crumbly, nutty topping, this cobbler is a textural dream. Serve it warm with a scoop of vanilla ice cream, and watch as it disappears faster than your last diet resolution.
Hazelnut Flour Zucchini Bread
Let’s face it, zucchini bread is the undercover hero of the baking world, and when you throw hazelnut flour into the mix, it’s like giving that hero a superhero cape. This version is nutty, moist, and just begging to be devoured with a cup of coffee or tea.
Ingredients
- 1 1/2 cups grated zucchini (squeeze out the water like you’re wringing out a tiny towel)
- 1/2 cup hazelnut flour (because almond flour had its moment)
- 1 cup all-purpose flour (the trusty sidekick)
- 1/2 cup sugar (or a smidge more if you’ve got a sweet tooth)
- 1/4 cup extra virgin olive oil (my liquid gold for baking)
- 2 eggs, room temp (they mix better when they’re not chilly)
- 1 tsp vanilla extract (the secret whisper of flavor)
- 1/2 tsp baking soda (the lift in your loaf)
- 1/2 tsp salt (because even sweets need balance)
Instructions
- Preheat your oven to 350°F and grease a loaf pan like you’re buttering up your favorite relative.
- In a large bowl, whisk together the hazelnut flour, all-purpose flour, sugar, baking soda, and salt.
- In another bowl, beat the eggs, then mix in the olive oil and vanilla extract until it’s as smooth as your favorite jazz playlist.
- Fold in the grated zucchini into the wet ingredients, mixing until it’s evenly distributed—no zucchini left behind!
- Combine the wet and dry ingredients, stirring just until they’re friends. Overmixing is the enemy of fluffy bread.
- Pour the batter into the prepared loaf pan and smooth the top like you’re tucking it into bed.
- Bake for 50-60 minutes, or until a toothpick comes out clean—no gooey batter, just pure perfection.
- Let it cool in the pan for 10 minutes, then transfer to a wire rack. Patience is key here; rushing this step is like skipping the best part of a movie.
Velvety with a nutty crunch, this bread is a texture dream. Serve it warm with a smear of butter or go wild with a dollop of hazelnut spread for that extra oomph.
Hazelnut Flour Coffee Cake
Every morning deserves a little sparkle, and what better way to jazz up your coffee break than with a slice of Hazelnut Flour Coffee Cake? This nutty, tender delight is like a hug in cake form, perfect for those who believe breakfast should be both delicious and slightly indulgent.
Ingredients
- 1 1/2 cups hazelnut flour – because almond flour is so last season.
- 1/2 cup coconut sugar – for a subtly sweet touch that won’t send you into a sugar coma.
- 1/4 cup melted coconut oil – extra virgin, because we’re fancy like that.
- 3 large eggs – room temp, unless you enjoy the thrill of uneven mixing.
- 1 tsp vanilla extract – the good stuff, none of that imitation nonsense.
- 1/2 tsp baking soda – the unsung hero of fluffiness.
- 1/4 tsp sea salt – to balance the sweetness and keep things interesting.
Instructions
- Preheat your oven to 350°F (177°C) and grease an 8-inch round cake pan. Tip: A little coconut oil goes a long way here.
- In a large bowl, whisk together the hazelnut flour, coconut sugar, baking soda, and sea salt. No lumps allowed!
- Add the melted coconut oil, eggs, and vanilla extract to the dry ingredients. Mix until just combined. Tip: Overmixing is the enemy of tenderness.
- Pour the batter into the prepared pan and smooth the top with a spatula. Tip: A little jiggle helps settle the batter evenly.
- Bake for 25-30 minutes, or until a toothpick inserted into the center comes out clean. Visual cue: The edges should be golden and pulling away from the pan.
- Let the cake cool in the pan for 10 minutes, then transfer to a wire rack to cool completely. Patience is key here, unless you’re into crumbly disasters.
This cake is a masterpiece of moist, nutty flavors with a texture that’s somehow both dense and airy. Serve it with a dollop of whipped coconut cream and a sprinkle of crushed hazelnuts for that extra ‘wow’ factor. Or, you know, eat it straight from the pan—we won’t judge.
Conclusion
Kickstart your culinary adventures with these 18 scrumptious hazelnut flour recipes, perfect for any occasion! Whether you’re baking for a special event or whipping up a weekday treat, there’s something here for everyone. We’d love to hear which recipes stole your heart—drop us a comment below. And if you enjoyed this roundup, don’t forget to share the love on Pinterest. Happy baking!

Michael Johnson is the founder of Pan Mastery, Inspired by his blacksmith grandfather’s legacy has a deep appreciation for hand-crafted pots and pans, he provides invaluable guides, reviews, and recipes to enhance your culinary journey.