Unleash the fiery flavors of hibachi right in your kitchen with our sizzling roundup of 18 spicy hibachi recipes that promise to turn any meal into a celebration of taste! Whether you’re craving a quick weeknight dinner or planning a special weekend feast, these dishes are sure to impress. Get ready to spice up your cooking routine—your taste buds will thank you!
Hibachi Chicken with Vegetables

Understanding the art of Hibachi cooking at home can be a delightful experience, especially when you master the classic Hibachi Chicken with Vegetables. This dish combines tender chicken, crisp vegetables, and a savory sauce, all cooked to perfection on a hot griddle or skillet.
Ingredients
- 1 lb boneless, skinless chicken thighs, cut into bite-sized pieces
- 2 cups mixed vegetables (zucchini, onions, carrots), sliced
- 2 tbsp soy sauce (low sodium preferred)
- 1 tbsp sesame oil (or any neutral oil)
- 1 tbsp butter
- 1 tsp garlic, minced
- 1 tsp ginger, minced
- Salt and pepper, adjust to taste
Instructions
- Heat a large skillet or griddle over medium-high heat until hot, about 2 minutes.
- Add sesame oil to the skillet, then immediately add the chicken pieces. Cook for 5-6 minutes, stirring occasionally, until the chicken is golden brown and cooked through.
- Push the chicken to one side of the skillet. Add the butter, garlic, and ginger to the other side, sautéing for 30 seconds until fragrant.
- Add the mixed vegetables to the skillet, stirring to combine with the garlic and ginger. Cook for 4-5 minutes, until the vegetables are tender but still crisp.
- Drizzle soy sauce over the chicken and vegetables, tossing everything together to coat evenly. Cook for an additional 1-2 minutes to allow the flavors to meld.
- Season with salt and pepper to taste, then remove from heat.
Ready to serve, this Hibachi Chicken with Vegetables boasts a perfect balance of savory and slightly sweet flavors, with a satisfying contrast between the tender chicken and crisp vegetables. For an authentic touch, serve it over a bed of steamed rice or alongside a side of fried rice and a drizzle of yum yum sauce.
Hibachi Steak with Garlic Butter
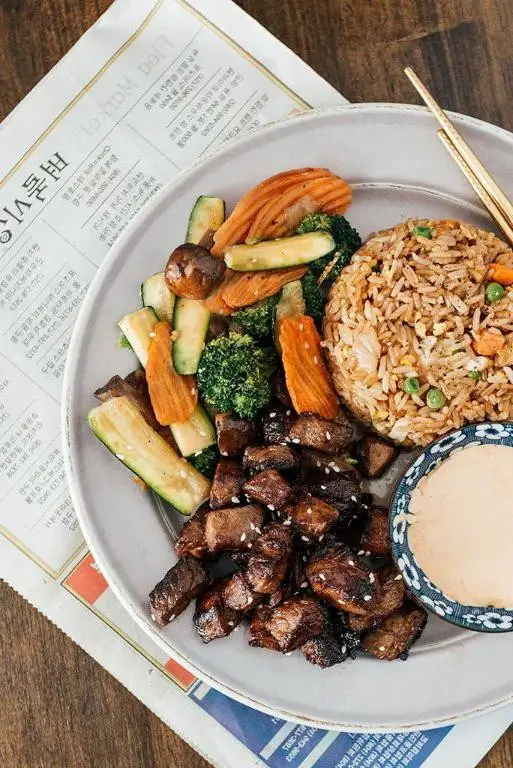
Gather around your kitchen as we embark on a flavorful journey to create a mouthwatering Hibachi Steak with Garlic Butter. This dish combines the rich, savory flavors of perfectly cooked steak with the aromatic allure of garlic butter, making it a surefire hit for any meal.
Ingredients
- 1 lb ribeye steak, thinly sliced (for quick cooking)
- 2 tbsp unsalted butter (or substitute with margarine for a lighter version)
- 3 cloves garlic, minced (fresh is best for vibrant flavor)
- 1 tbsp vegetable oil (or any neutral oil with a high smoke point)
- 1 tsp salt (adjust to taste)
- 1/2 tsp black pepper (freshly ground preferred)
- 1 tbsp soy sauce (low sodium if preferred)
- 1 tsp sesame oil (for a nutty aroma)
Instructions
- Heat a large skillet or hibachi grill over medium-high heat until it’s very hot, about 2 minutes.
- Add vegetable oil to the skillet, swirling to coat the surface evenly.
- Place the thinly sliced ribeye steak in the skillet, spreading the pieces out to ensure even cooking. Cook for 1 minute without stirring.
- Flip the steak pieces and cook for another minute. Tip: Avoid overcrowding the skillet to ensure each piece gets a nice sear.
- Add minced garlic to the skillet, stirring quickly to prevent burning. Cook for 30 seconds until fragrant.
- Pour in soy sauce and sesame oil, tossing the steak to coat evenly. Cook for an additional 30 seconds.
- Remove the skillet from heat and add unsalted butter, stirring until melted and the steak is glossy. Tip: The residual heat will melt the butter perfectly without overcooking the garlic.
- Season with salt and black pepper, tossing once more to combine. Tip: Taste and adjust seasoning before serving.
Just as the steak is tender and juicy, the garlic butter adds a luxurious depth that elevates the dish. Serve it over a bed of steamed rice or with a side of grilled vegetables for a complete meal that’s bursting with flavor.
Hibachi Shrimp with Yum Yum Sauce
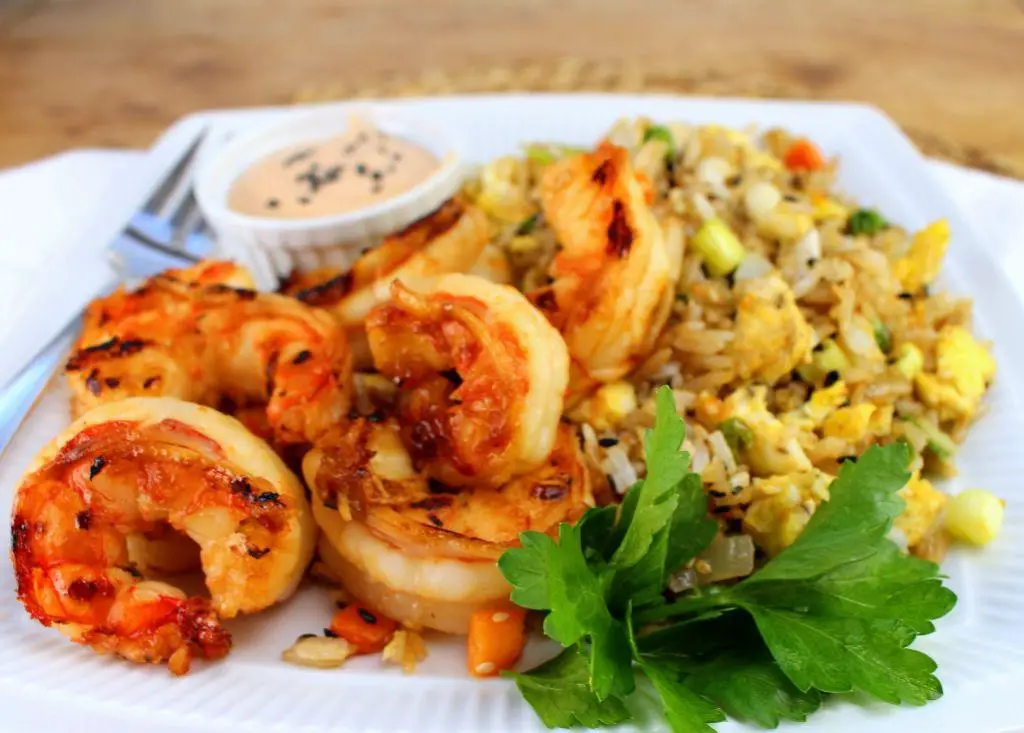
Delight your taste buds with this easy-to-follow Hibachi Shrimp with Yum Yum Sauce recipe, perfect for a quick weeknight dinner or a special weekend treat. Designed for beginners, this guide will walk you through each step to achieve restaurant-quality results at home.
Ingredients
- 1 lb large shrimp, peeled and deveined (thaw if frozen)
- 2 tbsp vegetable oil (or any neutral oil)
- 1 tbsp soy sauce (low sodium recommended)
- 1 tsp garlic powder
- 1/2 tsp paprika
- 1/2 cup mayonnaise
- 1 tbsp ketchup
- 1 tsp rice vinegar
- 1/2 tsp garlic powder
- 1/2 tsp paprika
- 1/4 tsp cayenne pepper (adjust to taste)
Instructions
- In a medium bowl, combine the shrimp with soy sauce, 1 tsp garlic powder, and 1/2 tsp paprika. Let marinate for 10 minutes at room temperature.
- While the shrimp marinates, prepare the Yum Yum Sauce by whisking together mayonnaise, ketchup, rice vinegar, 1/2 tsp garlic powder, 1/2 tsp paprika, and cayenne pepper in a small bowl. Set aside.
- Heat vegetable oil in a large skillet over medium-high heat until shimmering, about 2 minutes.
- Add the marinated shrimp to the skillet in a single layer. Cook for 2 minutes per side, or until the shrimp are pink and opaque.
- Remove the shrimp from the skillet and serve immediately with the Yum Yum Sauce on the side.
Light and succulent, the shrimp pairs beautifully with the creamy, slightly spicy Yum Yum Sauce. For an extra touch, serve over a bed of steamed rice or alongside grilled vegetables for a complete meal.
Hibachi Fried Rice
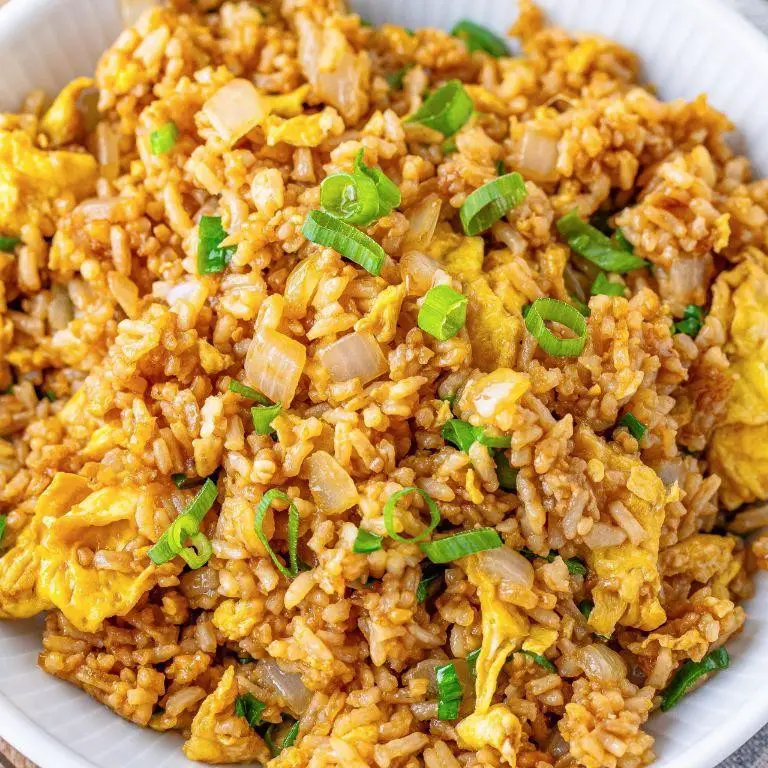
Discover the art of making Hibachi Fried Rice, a beloved dish that brings the excitement of Japanese teppanyaki right into your kitchen. This guide will walk you through each step, ensuring you achieve that perfect blend of flavors and textures.
Ingredients
- 2 cups cooked white rice (day-old rice works best for texture)
- 2 tbsp vegetable oil (or any neutral oil)
- 1/2 cup diced onion (yellow or white for sweetness)
- 1/2 cup diced carrots (for a slight crunch)
- 2 eggs (beaten, for richness)
- 2 tbsp soy sauce (adjust to taste)
- 1 tbsp butter (for a rich finish)
- 1/2 cup frozen peas (thawed, for color and sweetness)
- Salt (to taste, but soy sauce adds saltiness)
Instructions
- Heat a large skillet or wok over medium-high heat (about 375°F) and add 1 tbsp of vegetable oil.
- Add the diced onions and carrots to the skillet, stirring frequently for 3-4 minutes until slightly softened.
- Push the vegetables to one side of the skillet and pour the beaten eggs into the other side. Scramble the eggs until fully cooked, about 2 minutes.
- Mix the scrambled eggs with the vegetables, then add the remaining 1 tbsp of oil and the day-old rice. Break up any clumps for even cooking.
- Stir in the soy sauce, ensuring the rice is evenly coated. Cook for another 3-4 minutes, stirring occasionally.
- Add the thawed peas and butter, stirring until the butter is melted and everything is well combined. Cook for an additional 2 minutes.
- Season with salt if needed, but remember the soy sauce is already salty.
Kick your Hibachi Fried Rice up a notch by serving it with a side of yum yum sauce or topping it with grilled shrimp for a protein-packed meal. The result is a dish with a delightful mix of textures—fluffy rice, crisp vegetables, and tender eggs—all brought together with a savory, buttery finish.
Hibachi Noodles with Soy Sauce
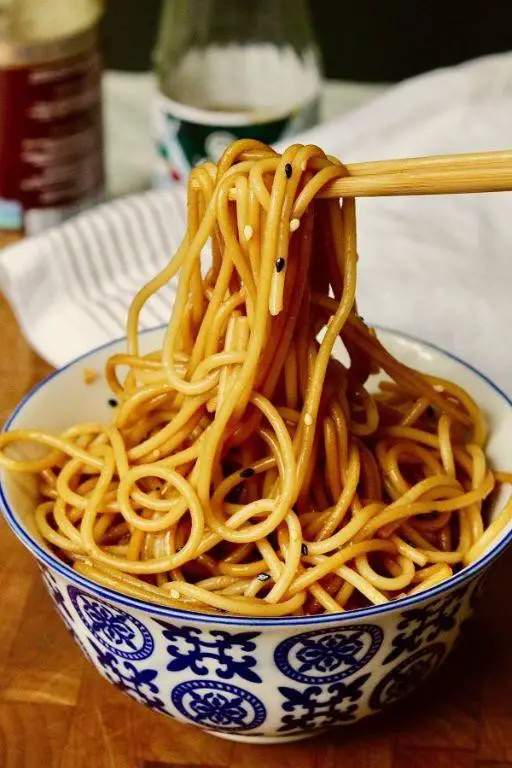
Today, we’re diving into the art of making Hibachi Noodles with Soy Sauce, a dish that’s as fun to prepare as it is to eat. This recipe is perfect for beginners looking to bring the hibachi experience home.
Ingredients
- 8 oz spaghetti noodles (or any long pasta you prefer)
- 2 tbsp vegetable oil (or any neutral oil)
- 1 cup sliced onions (thin slices for quicker cooking)
- 1 cup sliced carrots (julienne for even cooking)
- 1 cup sliced zucchini (optional, adds a nice crunch)
- 2 tbsp soy sauce (adjust to taste)
- 1 tbsp butter (for richness, optional)
- 2 cloves garlic, minced (fresh is best for flavor)
Instructions
- Bring a large pot of salted water to a boil over high heat. Add the spaghetti noodles and cook according to package instructions until al dente, about 8-10 minutes. Drain and set aside.
- Heat the vegetable oil in a large skillet or wok over medium-high heat. Add the onions and carrots, stirring frequently, until they begin to soften, about 3-4 minutes.
- Add the zucchini (if using) and minced garlic to the skillet. Continue to stir-fry for another 2 minutes until the vegetables are tender but still crisp.
- Push the vegetables to one side of the skillet. Add the cooked noodles to the other side. Pour the soy sauce over the noodles and toss everything together until well combined.
- Add the butter to the skillet, stirring until it melts and coats the noodles and vegetables, about 1 minute. Remove from heat.
Vibrant and flavorful, these Hibachi Noodles with Soy Sauce offer a delightful mix of textures, from the tender noodles to the crisp vegetables. Serve them straight from the skillet for a dramatic presentation, or top with a fried egg for an extra layer of flavor.
Hibachi Salmon with Teriyaki Glaze
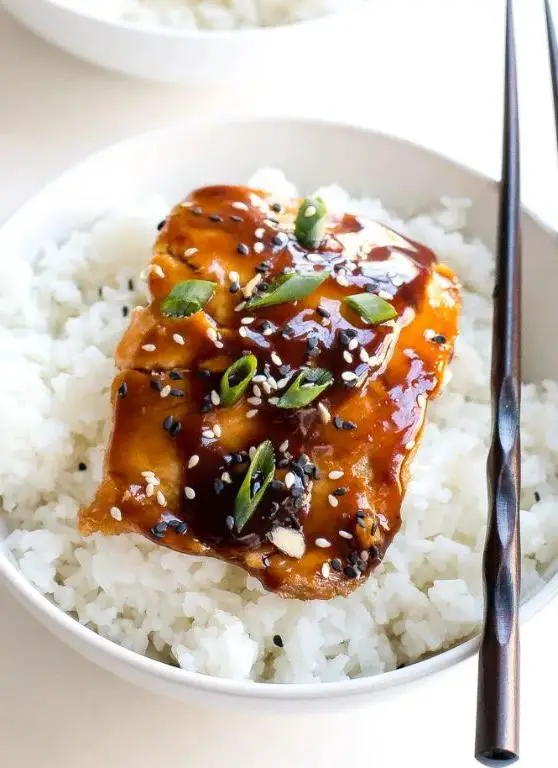
This Hibachi Salmon with Teriyaki Glaze is a delightful dish that combines the rich flavors of salmon with the sweet and savory notes of teriyaki. Perfect for a weeknight dinner or a special occasion, this recipe is straightforward and rewarding.
Ingredients
- 1 lb salmon fillet, skin-on (for extra flavor and crispiness)
- 1/4 cup soy sauce (low sodium preferred)
- 2 tbsp mirin (or substitute with a mix of 1 tbsp sugar and 1 tbsp water)
- 1 tbsp honey (adjust to sweetness preference)
- 1 tsp grated ginger (fresh for best flavor)
- 1 clove garlic, minced
- 1 tbsp vegetable oil (or any neutral oil)
- 1 tsp sesame seeds (for garnish)
- 2 green onions, thinly sliced (for garnish)
Instructions
- Preheat your skillet or hibachi grill to medium-high heat, about 375°F, to ensure a good sear on the salmon.
- While the skillet heats, mix soy sauce, mirin, honey, ginger, and garlic in a small bowl to create the teriyaki glaze.
- Pat the salmon fillet dry with paper towels to remove excess moisture, which helps in achieving a crispy skin.
- Add vegetable oil to the skillet, then place the salmon skin-side down. Cook for 4-5 minutes without moving to get a crispy skin.
- Carefully flip the salmon and cook for another 3-4 minutes, or until the salmon reaches an internal temperature of 145°F.
- Reduce the heat to low and pour the teriyaki glaze over the salmon. Let it simmer for 1-2 minutes until the glaze thickens slightly.
- Remove the salmon from the skillet and let it rest for a couple of minutes before serving to allow the juices to redistribute.
- Garnish with sesame seeds and green onions for added texture and flavor.
Delight in the perfectly cooked salmon with its crispy skin and glossy teriyaki glaze. The combination of sweet, savory, and umami flavors makes this dish a standout. Serve it over a bed of steamed rice or with a side of grilled vegetables for a complete meal.
Hibachi Scallops with Lemon Butter
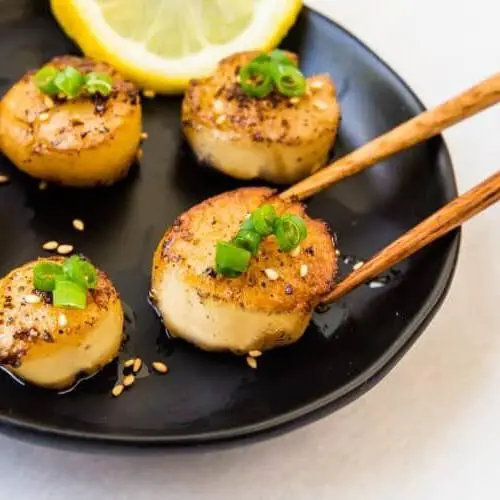
Let’s dive into creating a dish that’s as delightful to prepare as it is to eat. Hibachi Scallops with Lemon Butter combines the succulence of perfectly seared scallops with the bright, creamy notes of lemon butter, offering a restaurant-quality meal right from your kitchen.
Ingredients
- 1 lb fresh scallops (pat dry for better searing)
- 2 tbsp unsalted butter (for richness)
- 1 tbsp olive oil (or any neutral oil)
- 1 tbsp lemon juice (freshly squeezed for best flavor)
- 1 tsp garlic, minced (adjust to taste)
- Salt (to season)
- Black pepper (freshly ground, to season)
- 1 tbsp parsley, chopped (for garnish)
Instructions
- Heat a large skillet over medium-high heat until hot, about 2 minutes.
- Add olive oil to the skillet, swirling to coat the bottom evenly.
- Season scallops lightly with salt and black pepper on both sides.
- Place scallops in the skillet, ensuring they are not touching, and sear for 2 minutes without moving them for a golden crust.
- Flip scallops carefully and sear the other side for another 2 minutes until just cooked through.
- Remove scallops from the skillet and set aside on a warm plate.
- Reduce heat to low and add butter to the same skillet, letting it melt slowly.
- Stir in minced garlic and cook for 30 seconds until fragrant but not browned.
- Add lemon juice to the skillet, stirring to combine with the butter and garlic.
- Return scallops to the skillet, spooning the lemon butter sauce over them to coat evenly.
- Garnish with chopped parsley before serving.
Buttery and tender, these Hibachi Scallops with Lemon Butter boast a delicate crust with a melt-in-your-mouth interior. Serve them over a bed of steamed rice or alongside grilled vegetables for a complete meal that’s sure to impress.
Hibachi Tofu with Mushrooms
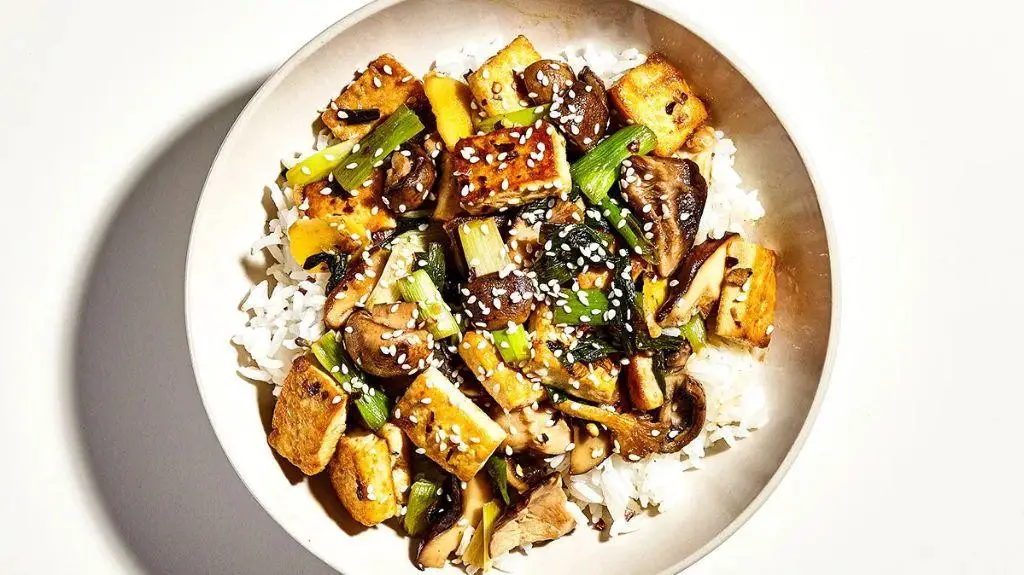
Unlock the secrets to a flavorful vegetarian delight with this Hibachi Tofu with Mushrooms recipe, perfect for those seeking a healthy yet satisfying meal. Follow these steps to create a dish that’s bursting with umami and textures that please every palate.
Ingredients
- 14 oz firm tofu, pressed and cubed (for better texture)
- 2 cups sliced mushrooms (shiitake or button for variety)
- 2 tbsp soy sauce (or tamari for gluten-free)
- 1 tbsp sesame oil (or any neutral oil)
- 1 tbsp minced garlic (adjust to taste)
- 1 tbsp grated ginger (fresh for best flavor)
- 1/2 cup sliced onions (yellow or white for sweetness)
- 1 tbsp butter (optional for richness)
- 1/2 tsp salt (adjust to taste)
- 1/4 tsp black pepper (freshly ground preferred)
Instructions
- Heat a large skillet or hibachi grill over medium-high heat (375°F) for even cooking.
- Add sesame oil to the skillet, followed by tofu cubes. Cook for 5 minutes until golden, flipping halfway. Tip: Avoid overcrowding to ensure crispiness.
- Push tofu to one side. Add mushrooms, onions, garlic, and ginger to the skillet. Sauté for 3 minutes until fragrant. Tip: High heat enhances the mushrooms’ umami.
- Combine all ingredients in the skillet. Add soy sauce, salt, and pepper. Stir-fry for 2 minutes. Tip: A splash of water can deglaze the pan for more flavor.
- Optional: Add butter in the last 30 seconds for a glossy finish and richer taste.
Crispy tofu and tender mushrooms come together in this dish, offering a contrast in textures that’s simply irresistible. Serve over steamed rice or alongside a fresh salad for a complete meal that’s as nutritious as it is delicious.
Hibachi Lobster Tail with Drawn Butter
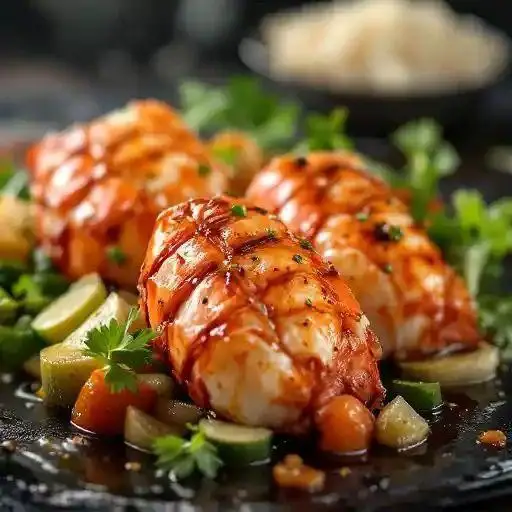
Amazingly, Hibachi Lobster Tail with Drawn Butter is a luxurious yet approachable dish that brings the excitement of Japanese steakhouse cooking right to your kitchen. Follow these steps to achieve perfectly tender lobster with rich, flavorful butter.
Ingredients
- 2 lobster tails (about 6 oz each, thawed if frozen)
- 1/2 cup unsalted butter (for a richer flavor, use European-style butter)
- 1 tbsp lemon juice (freshly squeezed for the best taste)
- 1/2 tsp salt (adjust to taste)
- 1/4 tsp black pepper (freshly ground preferred)
Instructions
- Preheat your grill or grill pan to medium-high heat (about 375°F) to ensure a good sear without burning.
- Using kitchen shears, carefully cut the top shell of each lobster tail lengthwise, stopping at the tail fin. Tip: Keep the shell intact at the bottom to hold the meat in place.
- Gently pry the meat upwards, separating it from the shell, and rest it on top of the shell. This technique, known as ‘butterflying,’ exposes more surface area for even cooking.
- Season the lobster meat evenly with salt and black pepper. Tip: Lightly oil the grill grates to prevent sticking.
- Place the lobster tails on the grill, meat side down, and cook for 2-3 minutes until lightly charred. Flip and cook for another 4-5 minutes until the meat is opaque and firm.
- While the lobster cooks, melt the butter in a small saucepan over low heat. Stir in lemon juice for a bright, acidic balance. Tip: Keep the butter warm but not boiling to prevent separation.
- Serve the lobster tails immediately with the drawn butter on the side for dipping.
Zesty and succulent, the lobster tails are a testament to the magic of simple ingredients treated with care. For an extra touch of elegance, garnish with a sprinkle of chopped parsley or serve over a bed of steamed rice to soak up every last drop of butter.
Hibachi Pork Chops with Apple Sauce
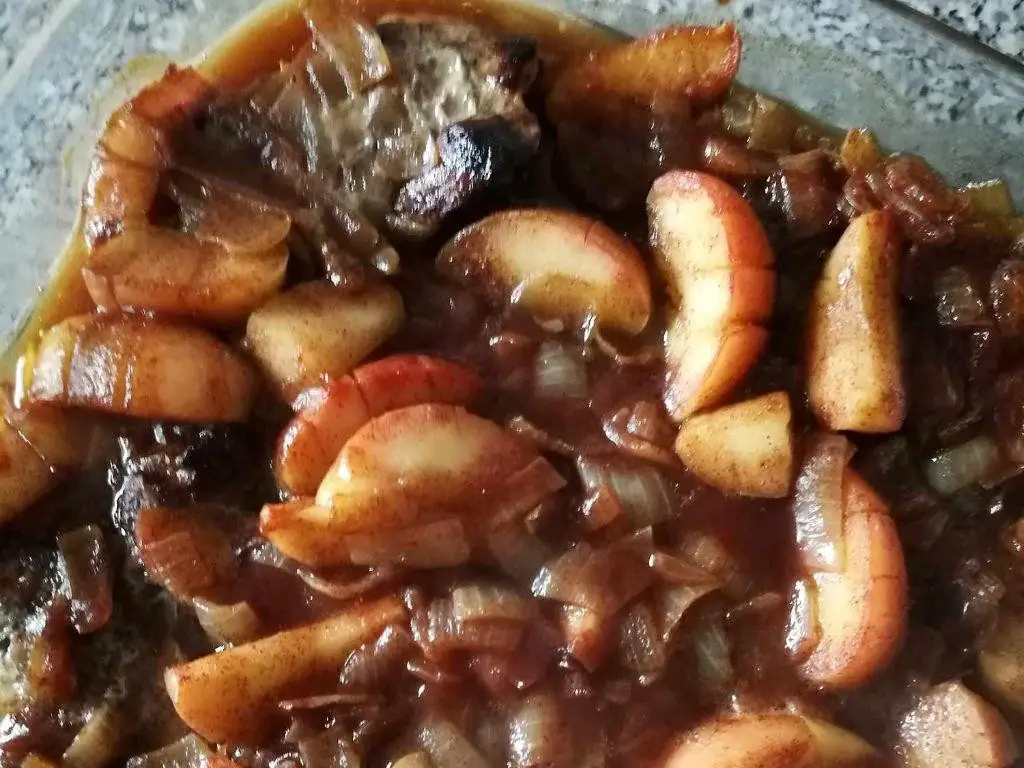
On a bustling weeknight, nothing beats the simplicity and flavor of Hibachi Pork Chops with Apple Sauce. This dish combines the savory taste of perfectly grilled pork with the sweet tang of homemade apple sauce, creating a balanced meal that’s both satisfying and easy to prepare.
Ingredients
- 4 pork chops, 1-inch thick (for even cooking)
- 1 cup apple sauce (homemade or store-bought, for convenience)
- 2 tbsp soy sauce (or tamari for gluten-free option)
- 1 tbsp vegetable oil (or any neutral oil)
- 1 tsp garlic powder (adjust to taste)
- 1 tsp ginger powder (fresh ginger can be used for more zest)
- Salt and pepper (to season the pork chops)
Instructions
- Preheat your grill or grill pan to medium-high heat (about 375°F) to ensure a good sear without burning.
- While the grill heats, season both sides of the pork chops with salt, pepper, garlic powder, and ginger powder, pressing the spices into the meat for better adhesion.
- Lightly brush the grill with vegetable oil to prevent sticking, then place the pork chops on the grill. Cook for 5-6 minutes on each side, or until the internal temperature reaches 145°F for perfect doneness.
- In the last 2 minutes of cooking, brush the pork chops with soy sauce for a glossy, flavorful finish.
- Remove the pork chops from the grill and let them rest for 3 minutes to allow the juices to redistribute.
- Serve the pork chops warm with a generous dollop of apple sauce on the side or drizzled on top.
Zesty and juicy, these Hibachi Pork Chops with Apple Sauce offer a delightful contrast of flavors and textures. For an extra touch, serve alongside a crisp green salad or roasted vegetables to round out the meal.
Hibachi Vegetable Medley
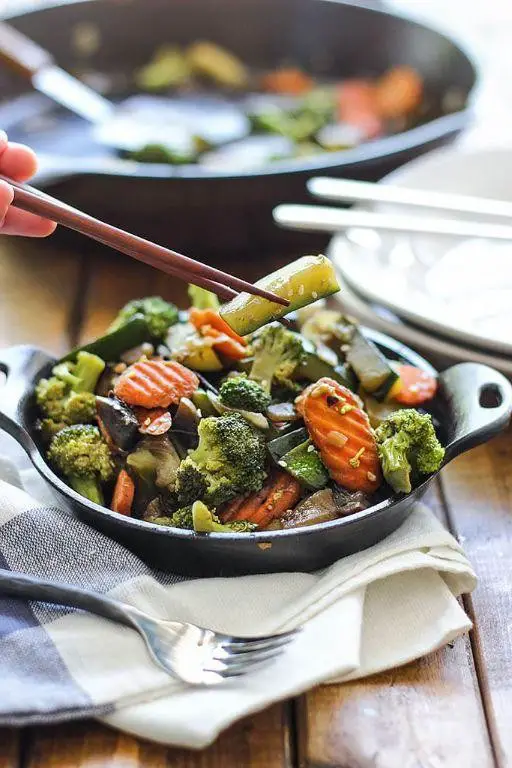
Today, we’re diving into the vibrant world of hibachi cooking with a dish that’s as colorful as it is flavorful. This Hibachi Vegetable Medley is a perfect way to bring the excitement of Japanese teppanyaki right into your kitchen.
Ingredients
- 2 cups zucchini, sliced into 1/2-inch rounds (or any summer squash)
- 1 cup onions, sliced into 1/2-inch wedges (yellow or white for sweetness)
- 1 cup mushrooms, sliced (button or cremini for earthiness)
- 1 cup carrots, julienned (for a crisp texture)
- 2 tbsp soy sauce (low sodium preferred)
- 1 tbsp sesame oil (or any neutral oil)
- 1 tbsp butter (for richness)
- 1 tsp garlic, minced (adjust to taste)
- 1/2 tsp salt (adjust to taste)
- 1/4 tsp black pepper (freshly ground for best flavor)
Instructions
- Heat a large skillet or hibachi grill over medium-high heat until a drop of water sizzles upon contact.
- Add sesame oil and butter to the skillet, swirling to coat the surface evenly.
- Add minced garlic, sautéing for 30 seconds until fragrant but not browned.
- Introduce onions and carrots to the skillet, stirring occasionally for 3 minutes until slightly softened.
- Add zucchini and mushrooms, continuing to stir-fry for another 4 minutes until vegetables are tender-crisp.
- Season with soy sauce, salt, and black pepper, tossing the vegetables to ensure even coating.
- Cook for an additional 2 minutes, allowing the flavors to meld together.
Unbelievably simple yet bursting with umami, this Hibachi Vegetable Medley offers a delightful crunch and a symphony of flavors. Serve it over steamed rice or alongside your favorite protein for a complete meal that’s sure to impress.
Hibachi Beef and Broccoli

Discover the art of creating a mouthwatering Hibachi Beef and Broccoli right in your own kitchen with this easy-to-follow guide. Perfect for beginners, this recipe breaks down each step to ensure a delicious outcome every time.
Ingredients
- 1 lb beef sirloin, thinly sliced (freeze for 30 minutes for easier slicing)
- 2 cups broccoli florets (fresh or frozen, thawed)
- 2 tbsp soy sauce (low sodium preferred)
- 1 tbsp sesame oil (or any neutral oil)
- 1 tbsp garlic, minced (adjust to taste)
- 1 tbsp ginger, grated
- 1 tbsp butter (unsalted)
- 1/2 cup onion, sliced
- 1/4 cup water
- 1 tsp sugar (adjust to taste)
Instructions
- Heat a large skillet or wok over medium-high heat and add sesame oil.
- Add the beef slices to the skillet, spreading them out in a single layer. Cook for 2 minutes without stirring to allow a sear, then flip and cook for another 2 minutes. Tip: Avoid overcrowding the pan to ensure even cooking.
- Remove the beef from the skillet and set aside on a plate.
- In the same skillet, add butter, garlic, and ginger. Sauté for 30 seconds until fragrant.
- Add the onion slices and broccoli florets to the skillet. Stir-fry for 3 minutes until the vegetables start to soften.
- Pour in water and cover the skillet with a lid. Steam the vegetables for 2 minutes. Tip: This method helps retain the vibrant color and nutrients of the broccoli.
- Return the beef to the skillet. Add soy sauce and sugar, stirring to combine all ingredients evenly.
- Cook for an additional 2 minutes, stirring occasionally, until everything is heated through and the sauce has thickened slightly. Tip: For a thicker sauce, mix 1 tsp cornstarch with 1 tbsp water and add it to the skillet.
Combining tender beef with crisp broccoli in a savory sauce, this dish offers a delightful contrast in textures. Serve it over a bed of steamed rice or alongside fried rice for a complete Hibachi experience at home.
Hibachi Duck with Hoisin Sauce

Let’s dive into creating a mouthwatering Hibachi Duck with Hoisin Sauce, a dish that combines the rich flavors of duck with the sweet and tangy notes of hoisin sauce, perfect for a special dinner.
Ingredients
- 1 lb duck breast, skin on (score the skin to help render fat)
- 1/4 cup hoisin sauce (for a thicker sauce, reduce it slightly)
- 2 tbsp soy sauce (low sodium preferred to control saltiness)
- 1 tbsp honey (adjust to taste for sweetness)
- 1 tbsp rice vinegar (or apple cider vinegar as an alternative)
- 1 tsp garlic, minced (fresh is best for flavor)
- 1 tsp ginger, minced (peel first to avoid bitterness)
- 1 tbsp vegetable oil (or any neutral oil with high smoke point)
- Green onions, sliced (for garnish, optional)
Instructions
- Preheat your skillet over medium heat for 2 minutes to ensure even cooking.
- Add vegetable oil to the skillet, swirling to coat the bottom evenly.
- Place the duck breast skin-side down in the skillet. Cook for 6-8 minutes until the skin is crispy and golden brown. Tip: Resist the urge to move the duck; letting it sear undisturbed ensures a perfect crust.
- Flip the duck breast and cook for another 4-5 minutes for medium-rare, or until desired doneness. Tip: Use a meat thermometer; 135°F is ideal for medium-rare.
- Remove the duck from the skillet and let it rest on a cutting board for 5 minutes. This allows the juices to redistribute.
- In a small bowl, whisk together hoisin sauce, soy sauce, honey, rice vinegar, garlic, and ginger to make the sauce.
- Slice the duck breast thinly against the grain. Tip: Cutting against the grain ensures each piece is tender.
- Drizzle the hoisin sauce over the sliced duck or serve on the side for dipping. Garnish with green onions if desired.
Here’s how the dish turns out: the duck is succulent with a crispy skin, perfectly complemented by the velvety hoisin sauce. For a creative twist, serve it over a bed of steamed jasmine rice or alongside stir-fried vegetables to soak up the delicious sauce.
Hibachi Lamb Chops with Mint Jelly
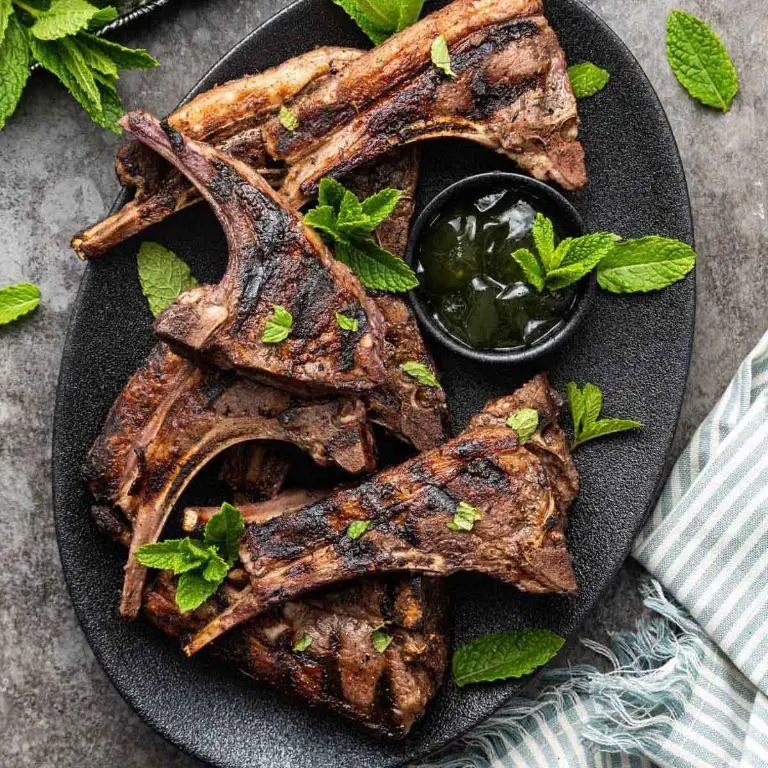
Start by preheating your grill or hibachi to medium-high heat, ensuring it’s hot enough to sear the lamb chops beautifully while locking in those juicy flavors.
Ingredients
- 4 lamb chops (about 1 inch thick for even cooking)
- 2 tbsp olive oil (or any neutral oil for brushing)
- 1 tsp salt (adjust to taste)
- 1/2 tsp black pepper (freshly ground preferred)
- 1/2 cup mint jelly (for glazing and serving)
Instructions
- Brush both sides of the lamb chops lightly with olive oil to prevent sticking and help the seasoning adhere.
- Season the lamb chops evenly with salt and black pepper, pressing the seasoning gently into the meat.
- Place the lamb chops on the preheated grill or hibachi. Cook for 3-4 minutes on the first side without moving to achieve a good sear.
- Flip the lamb chops and brush the cooked side with a thin layer of mint jelly. Cook for another 3-4 minutes.
- Flip once more, brush the other side with mint jelly, and cook for an additional 1-2 minutes to caramelize the jelly slightly.
- Remove the lamb chops from the heat and let them rest for 5 minutes before serving to allow the juices to redistribute.
Best enjoyed when the lamb chops are served slightly pink in the center, offering a perfect balance of tenderness and flavor. The mint jelly adds a sweet and refreshing contrast, making each bite a delightful experience. Consider serving alongside a crisp salad or grilled vegetables for a complete meal.
Hibachi Calamari with Spicy Mayo
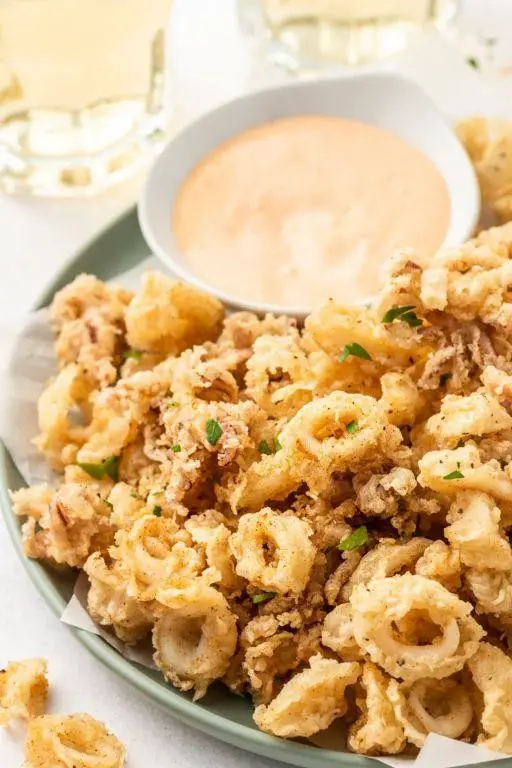
Welcome to a delightful culinary journey where we’ll master the art of making Hibachi Calamari with Spicy Mayo, a dish that’s as fun to prepare as it is to eat. Let’s dive into the flavors and techniques that make this recipe a standout.
Ingredients
- 1 lb calamari, cleaned and sliced into rings (thaw if frozen)
- 1 cup all-purpose flour (for a lighter coating, substitute with rice flour)
- 1 tsp salt (adjust to taste)
- 1/2 tsp black pepper (freshly ground preferred)
- 1 cup vegetable oil (or any neutral oil for frying)
- 1/2 cup mayonnaise
- 1 tbsp sriracha sauce (adjust for desired heat level)
- 1 tsp lemon juice (freshly squeezed for best flavor)
Instructions
- In a medium bowl, mix the flour, salt, and black pepper until well combined. This will be your dredging mixture for the calamari.
- Heat the vegetable oil in a deep skillet over medium-high heat until it reaches 375°F. Use a cooking thermometer for accuracy.
- Dredge the calamari rings in the flour mixture, shaking off any excess. This ensures a light, crispy coating.
- Carefully add the calamari to the hot oil in batches, avoiding overcrowding. Fry for 2-3 minutes or until golden brown and crispy.
- Remove the calamari with a slotted spoon and drain on paper towels to remove excess oil.
- In a small bowl, whisk together the mayonnaise, sriracha, and lemon juice to create the spicy mayo. Adjust the sriracha to suit your heat preference.
- Serve the crispy calamari hot with the spicy mayo on the side for dipping.
Marvel at the contrast between the crispy, tender calamari and the creamy, spicy mayo. For an extra touch, garnish with thinly sliced green onions or serve over a bed of mixed greens for a light meal.
Hibachi Eggplant with Miso Glaze

Eggplant transforms into a silky, savory delight when prepared with care and the right ingredients. This Hibachi Eggplant with Miso Glaze recipe is a perfect example, combining simple techniques with bold flavors for a dish that’s sure to impress.
Ingredients
- 1 large eggplant, sliced into 1/2-inch rounds (choose firm, glossy skin for best results)
- 2 tbsp vegetable oil (or any neutral oil)
- 2 tbsp white miso paste (look for it in the international aisle)
- 1 tbsp honey (adjust to taste)
- 1 tbsp soy sauce (low sodium preferred)
- 1 tsp grated ginger (fresh is best)
- 1 garlic clove, minced
- 1 tbsp water (to thin the glaze if needed)
- Sesame seeds and sliced green onions for garnish
Instructions
- Preheat your grill or grill pan to medium-high heat (about 375°F).
- Brush both sides of the eggplant slices with vegetable oil to prevent sticking.
- Grill the eggplant for 3-4 minutes per side, until you see grill marks and the flesh softens.
- While the eggplant grills, whisk together miso paste, honey, soy sauce, ginger, and garlic in a small bowl. Add water if the mixture is too thick.
- Once the eggplant is grilled, brush the miso glaze generously over each slice.
- Return the glazed eggplant to the grill for 1-2 minutes, just to caramelize the glaze slightly.
- Remove from heat and garnish with sesame seeds and green onions before serving.
Unbelievably tender with a rich, umami-packed glaze, this Hibachi Eggplant is a standout side or main. Try serving it over steamed rice with a sprinkle of extra green onions for a complete meal.
Hibachi Sweet Potatoes with Honey
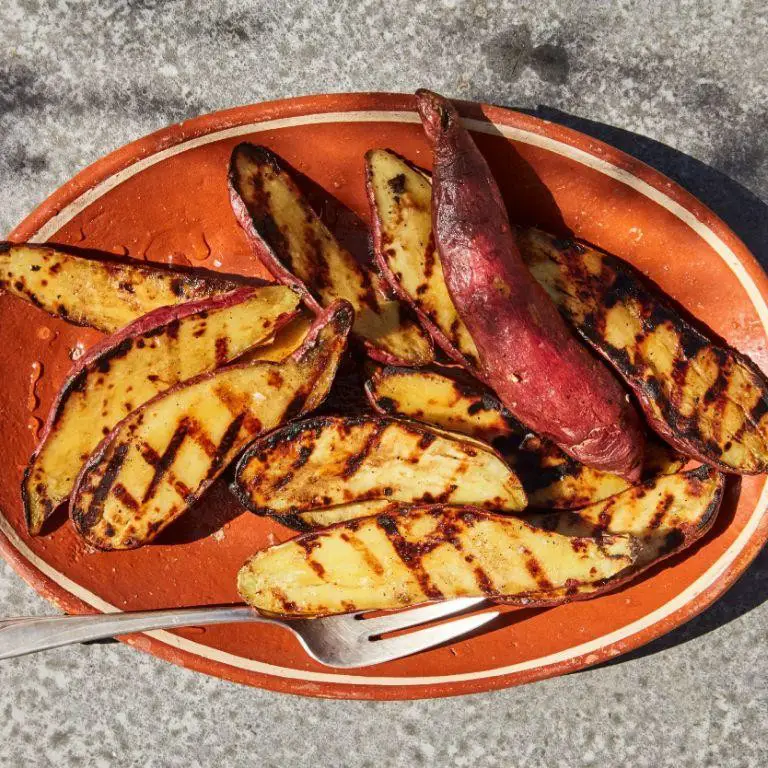
Cooking at home doesn’t have to be complicated, especially when you’re making something as straightforward and delicious as Hibachi Sweet Potatoes with Honey. This dish combines the natural sweetness of potatoes with a glossy honey glaze, perfect for a side or a main.
Ingredients
- 2 large sweet potatoes, peeled and cubed (about 4 cups)
- 2 tbsp olive oil (or any neutral oil)
- 2 tbsp honey (adjust to taste)
- 1/2 tsp salt
- 1/4 tsp black pepper
- 1 tbsp unsalted butter
Instructions
- Preheat your hibachi grill or a large skillet over medium-high heat (375°F).
- Toss the sweet potato cubes with olive oil, salt, and pepper in a large bowl until evenly coated.
- Place the sweet potatoes on the grill or skillet in a single layer. Cook for 5 minutes without stirring to allow them to caramelize.
- Flip the sweet potatoes and cook for another 5 minutes, or until they are tender and have grill marks.
- Reduce the heat to low. Drizzle honey over the sweet potatoes and add the butter. Stir gently to coat the potatoes evenly.
- Cook for an additional 2 minutes, stirring constantly, until the honey and butter form a glossy glaze.
These Hibachi Sweet Potatoes with Honey come out perfectly caramelized on the outside and tender on the inside. The honey glaze adds a sweet and rich flavor that pairs wonderfully with the smoky notes from the grill. Try serving them alongside grilled chicken or fish for a complete meal.
Hibachi Zucchini with Sesame Seeds
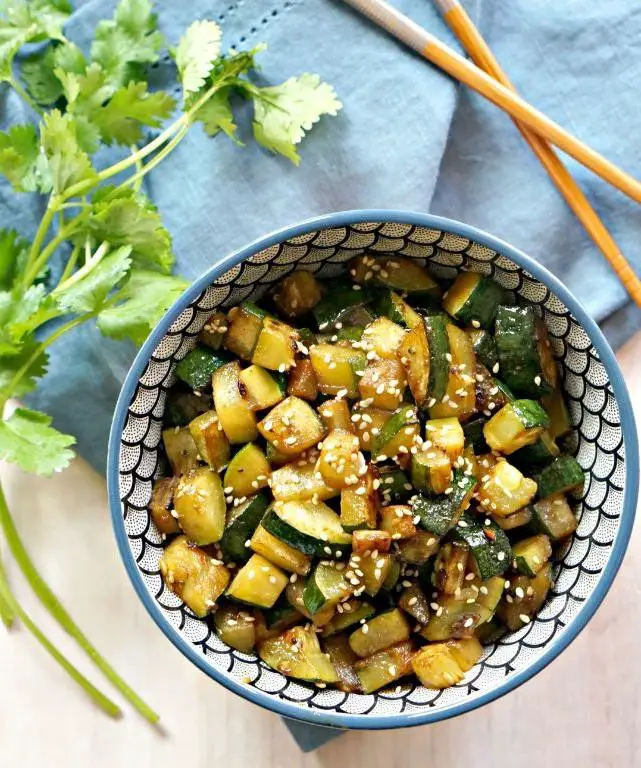
Discover the simplicity and flavor of preparing Hibachi Zucchini with Sesame Seeds, a dish that brings the excitement of Japanese teppanyaki right to your kitchen. Perfect for beginners, this recipe focuses on easy-to-follow steps and common ingredients to create a side dish that’s both nutritious and delicious.
Ingredients
- 2 medium zucchinis, sliced into 1/4-inch rounds (uniform slices ensure even cooking)
- 1 tbsp sesame oil (or any neutral oil for a different flavor profile)
- 1 tbsp soy sauce (low sodium recommended for a healthier option)
- 1 tsp garlic, minced (fresh garlic preferred for the best taste)
- 1 tbsp sesame seeds (toasted for extra crunch and aroma)
- 1/2 tsp salt (adjust to taste)
- 1/4 tsp black pepper (freshly ground for enhanced flavor)
Instructions
- Heat a large skillet or hibachi grill over medium-high heat until hot, about 2 minutes. A properly heated pan ensures a good sear on the zucchini.
- Add sesame oil to the pan, swirling to coat evenly. The oil should shimmer but not smoke, indicating it’s ready.
- Place zucchini slices in a single layer in the pan. Avoid overcrowding to allow each piece to brown properly.
- Cook zucchini for 2-3 minutes on one side until golden brown. Flip each slice carefully to cook the other side for an additional 2-3 minutes.
- Add minced garlic, soy sauce, salt, and black pepper to the pan. Stir gently to coat the zucchini evenly without breaking the slices.
- Sprinkle toasted sesame seeds over the zucchini, tossing lightly to distribute. Remove from heat immediately to prevent burning the seeds.
Just out of the pan, the zucchini boasts a tender-crisp texture with a savory, slightly sweet glaze from the soy sauce and a nutty crunch from the sesame seeds. Serve it alongside grilled meats or over a bed of steamed rice for a complete meal that’s sure to impress.
Conclusion
Vibrant and full of flavor, these 18 Spicy Hibachi Recipes are a must-try for anyone looking to spice up their meal routine. From sizzling skewers to fiery fried rice, there’s something for every palate. We’d love to hear which dish becomes your favorite—drop us a comment below! And if you enjoyed this roundup, don’t forget to share the love on Pinterest. Happy cooking!

Michael Johnson is the founder of Pan Mastery, Inspired by his blacksmith grandfather’s legacy has a deep appreciation for hand-crafted pots and pans, he provides invaluable guides, reviews, and recipes to enhance your culinary journey.