Get ready to beat the summer heat with a scoop (or two) of happiness! Our roundup of 18 Delicious Ice Cream Cake Recipes is your ticket to cool, creamy bliss. Whether you’re hosting a backyard bash or just treating yourself, these no-bake wonders and frozen delights are sure to impress. Dive in and discover your next favorite summer dessert!
Classic Vanilla Ice Cream Cake
Under the soft glow of the kitchen light, there’s something profoundly comforting about the process of creating a Classic Vanilla Ice Cream Cake. It’s a journey back to simpler times, where the sweetness of vanilla and the creaminess of ice cream come together in a symphony of flavors.
Ingredients
- 2 cups heavy cream, chilled
- 1 cup whole milk
- 3/4 cup granulated sugar
- 1 tbsp pure vanilla extract
- 1/4 tsp fine sea salt
- 1 package (14.4 oz) vanilla wafer cookies
- 1/2 cup unsalted butter, melted
Instructions
- In a large mixing bowl, combine the heavy cream, whole milk, granulated sugar, pure vanilla extract, and fine sea salt. Whisk until the sugar is completely dissolved, about 2 minutes.
- Pour the mixture into an ice cream maker and churn according to the manufacturer’s instructions, typically about 25 minutes, until it reaches a soft-serve consistency.
- While the ice cream churns, crush the vanilla wafer cookies into fine crumbs using a food processor or a rolling pin. Mix the crumbs with the melted unsalted butter until well combined.
- Press the cookie crumb mixture into the bottom of a 9-inch springform pan, creating an even layer. Freeze for 10 minutes to set.
- Once the ice cream is ready, spread it evenly over the chilled cookie crust. Cover with plastic wrap and freeze for at least 4 hours, or until firm.
- Before serving, let the cake sit at room temperature for 5 minutes to slightly soften for easier slicing.
Zesty yet soothing, the Classic Vanilla Ice Cream Cake offers a velvety texture that melts delicately on the tongue, with the crisp contrast of the buttery cookie crust. For an elegant twist, drizzle with a warm caramel sauce or garnish with fresh berries to elevate its simplicity.
Chocolate Fudge Ice Cream Cake
Gently, as the summer heat embraces us, there’s a dessert that whispers comfort and indulgence in every bite—a layered marvel that combines the richness of chocolate fudge with the coolness of ice cream, all nestled within a tender cake base.
Ingredients
- 1 1/2 cups all-purpose flour, sifted
- 3/4 cup granulated sugar
- 1/2 cup unsweetened cocoa powder, Dutch-processed
- 1 tsp baking soda
- 1/2 tsp fine sea salt
- 1/2 cup clarified butter, melted
- 2 pasture-raised eggs, lightly beaten
- 1 tsp pure vanilla extract
- 1 cup buttermilk, room temperature
- 1 pint premium chocolate ice cream, slightly softened
- 1 cup heavy cream, chilled
- 2 tbsp confectioners’ sugar
- 1/2 cup dark chocolate fudge sauce, warmed
Instructions
- Preheat the oven to 350°F (175°C). Grease a 9-inch springform pan and line the bottom with parchment paper.
- In a large mixing bowl, whisk together the sifted flour, granulated sugar, Dutch-processed cocoa powder, baking soda, and fine sea salt until well combined.
- Add the melted clarified butter, lightly beaten pasture-raised eggs, pure vanilla extract, and room temperature buttermilk to the dry ingredients. Mix until just combined, being careful not to overmix.
- Pour the batter into the prepared springform pan, smoothing the top with a spatula. Bake for 25-30 minutes, or until a toothpick inserted into the center comes out clean.
- Allow the cake to cool completely in the pan on a wire rack. Once cooled, spread the slightly softened premium chocolate ice cream evenly over the top. Freeze for at least 4 hours, or until the ice cream is firm.
- In a chilled bowl, whip the heavy cream and confectioners’ sugar until stiff peaks form. Spread over the frozen ice cream layer.
- Drizzle the warmed dark chocolate fudge sauce over the whipped cream. Freeze for an additional 30 minutes before serving.
Overtly, this chocolate fudge ice cream cake is a textural dream—each layer offering a distinct contrast, from the moist cake base to the creamy ice cream and the airy whipped topping. The deep chocolate flavors meld beautifully, making it a showstopper when sliced to reveal its layers or served with a sprinkle of sea salt for a sophisticated twist.
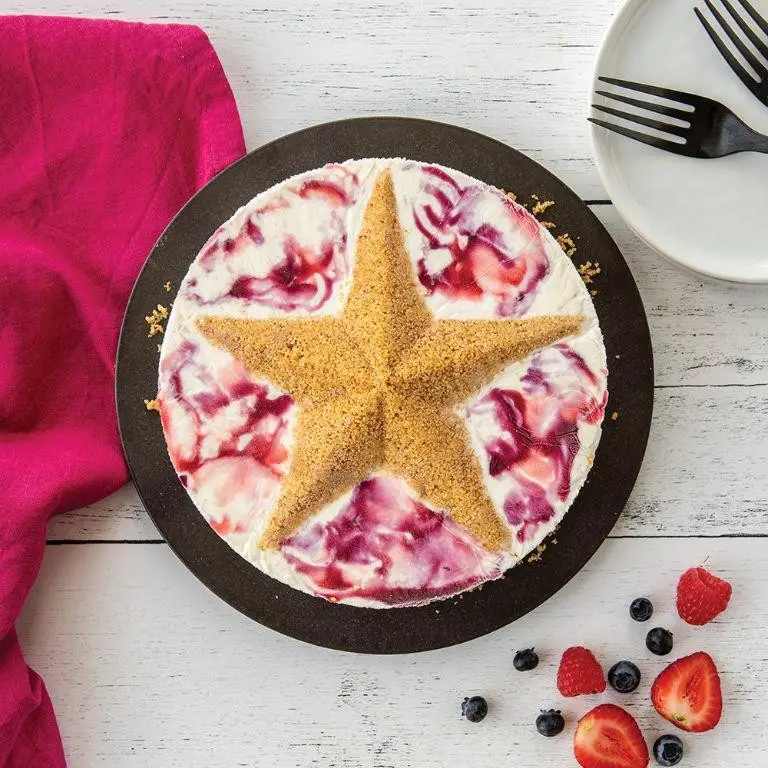
Strawberry Swirl Ice Cream Cake
Dreaming of summer days and the sweet, creamy indulgence of homemade desserts, this Strawberry Swirl Ice Cream Cake combines the freshness of ripe strawberries with the rich, velvety texture of ice cream, all nestled on a crisp cookie crust. It’s a celebration of flavors and textures that feels like a hug on a warm day.
Ingredients
- 1 1/2 cups finely ground graham cracker crumbs
- 1/3 cup clarified butter, melted
- 1/4 cup granulated sugar
- 1 quart premium vanilla bean ice cream, slightly softened
- 1 cup fresh strawberry puree, strained
- 1/2 cup heavy cream, whipped to stiff peaks
- 1 tsp pure vanilla extract
Instructions
- Preheat your oven to 350°F. In a medium bowl, combine the graham cracker crumbs, clarified butter, and granulated sugar until the mixture resembles wet sand.
- Press the crumb mixture firmly into the bottom of a 9-inch springform pan, using the back of a spoon to create an even layer. Bake for 10 minutes, then cool completely on a wire rack.
- Once the crust is cool, spread the slightly softened vanilla bean ice cream over the crust in an even layer. Freeze for 1 hour, or until the ice cream is firm.
- Drizzle the strained strawberry puree over the ice cream layer, then use a knife to swirl the puree into the ice cream for a marbled effect.
- Gently fold the whipped cream and vanilla extract together, then spread this mixture over the strawberry-swirled ice cream layer. Freeze for at least 4 hours, or until the cake is completely set.
- Before serving, let the cake sit at room temperature for 5-10 minutes to soften slightly for easier slicing.
Unveiling this cake reveals layers of contrasting textures—the crunch of the graham cracker crust, the smooth ice cream, and the bright bursts of strawberry. Serve it with a drizzle of reduced balsamic vinegar for an unexpected twist that elevates the strawberries’ natural sweetness.
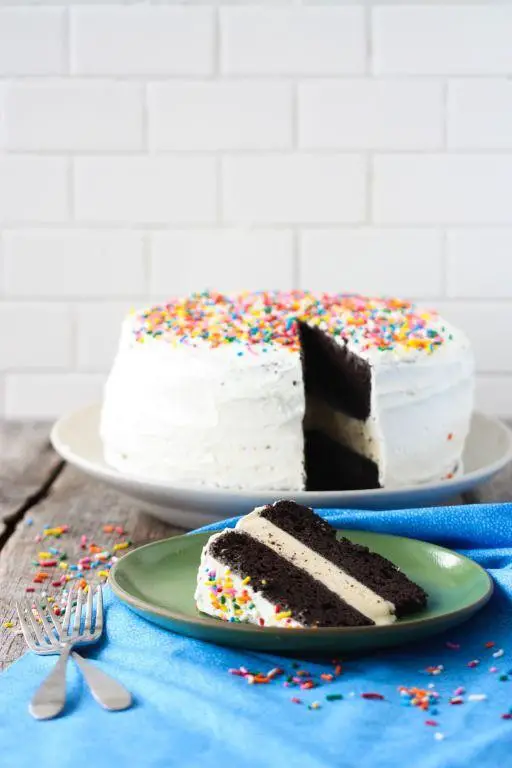
Cookies and Cream Ice Cream Cake
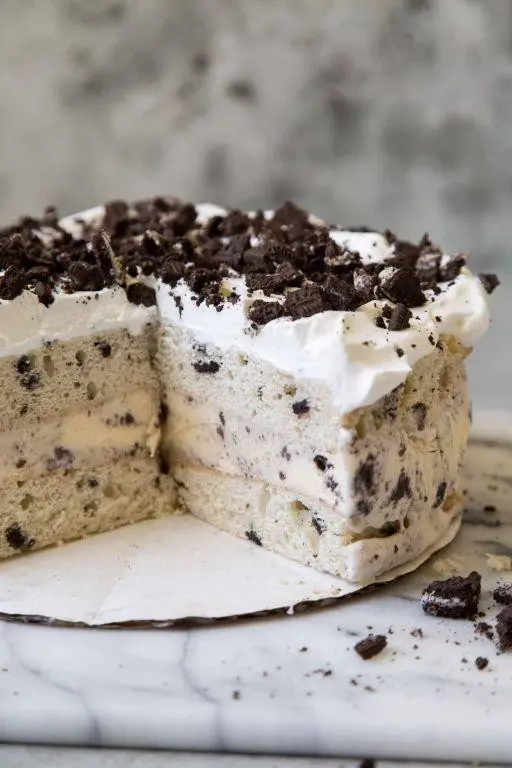
Lingering in the quiet of the kitchen, the thought of combining two beloved desserts into one brings a comforting warmth. This cookies and cream ice cream cake is a celebration of textures and flavors, a perfect project for a reflective afternoon.
Ingredients
- 1.5 cups heavy cream, chilled
- 1 cup whole milk
- 3/4 cup granulated sugar
- 1 tsp pure vanilla extract
- 1/8 tsp fine sea salt
- 15 chocolate sandwich cookies, coarsely crushed
- 5 chocolate sandwich cookies, finely crushed
- 1 tbsp unsalted butter, melted
Instructions
- In a medium bowl, combine the finely crushed chocolate sandwich cookies with melted butter, pressing the mixture firmly into the bottom of a 9-inch springform pan to form the base. Chill for 15 minutes to set.
- In a large bowl, whisk together the heavy cream, whole milk, granulated sugar, vanilla extract, and fine sea salt until the sugar is completely dissolved.
- Pour the cream mixture into an ice cream maker and churn according to the manufacturer’s instructions, about 20-25 minutes, until it reaches a soft-serve consistency.
- Gently fold the coarsely crushed chocolate sandwich cookies into the churned ice cream, then spread the mixture over the prepared cookie base in the springform pan.
- Cover the pan with plastic wrap, ensuring it touches the surface of the ice cream to prevent ice crystals, and freeze for at least 6 hours, or until firm.
- Before serving, let the cake sit at room temperature for 5 minutes to slightly soften for easier slicing.
Best enjoyed when the creamy ice cream contrasts with the crunchy cookie base, this cake is a delightful play of textures. Serve with a drizzle of chocolate sauce or a sprinkle of extra cookie crumbs for an added touch of indulgence.
Mint Chocolate Chip Ice Cream Cake
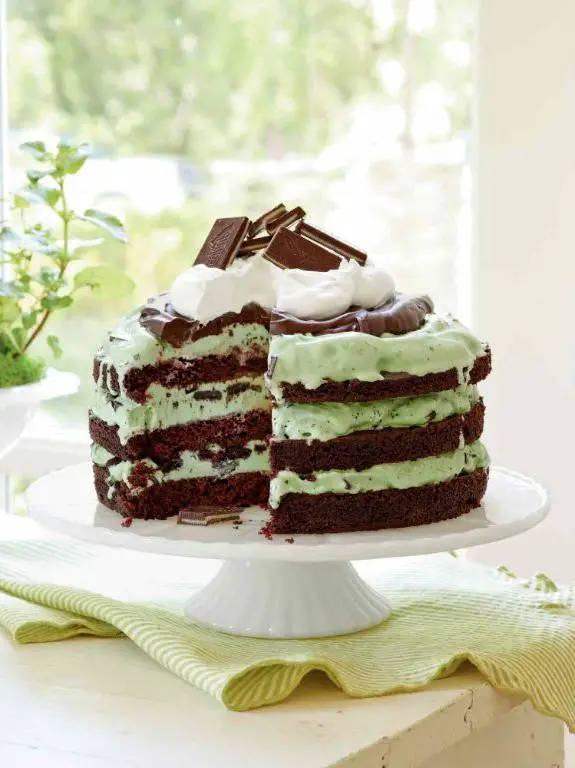
Cool evenings call for desserts that blend the freshness of mint with the rich depth of chocolate, a combination that feels both indulgent and refreshing. This Mint Chocolate Chip Ice Cream Cake is a layered delight, perfect for those moments when you crave something sweet yet sophisticated.
Ingredients
- 2 cups heavy cream, chilled
- 1 cup whole milk
- 3/4 cup granulated sugar
- 1 tsp pure peppermint extract
- 1/2 tsp vanilla extract
- 1/4 tsp fine sea salt
- 1 cup mini chocolate chips, divided
- 1 1/2 cups chocolate cookie crumbs
- 6 tbsp unsalted butter, melted
Instructions
- In a medium bowl, combine chocolate cookie crumbs and melted butter until the mixture resembles wet sand. Press firmly into the bottom of a 9-inch springform pan to form the base. Chill in the freezer for 15 minutes to set.
- In a large mixing bowl, whisk together heavy cream, whole milk, granulated sugar, peppermint extract, vanilla extract, and fine sea salt until the sugar is completely dissolved. Tip: Ensure all ingredients are cold to help the mixture whip faster.
- Pour the mixture into an ice cream maker and churn according to the manufacturer’s instructions, about 20-25 minutes, until it reaches a soft-serve consistency. Tip: Avoid over-churning to prevent the ice cream from becoming too hard.
- Gently fold in 3/4 cup of mini chocolate chips into the churned ice cream, reserving the remainder for garnish.
- Spread the ice cream evenly over the prepared crust in the springform pan. Sprinkle the remaining chocolate chips on top. Cover with plastic wrap, ensuring it touches the surface to prevent ice crystals. Freeze for at least 6 hours, or until firm.
- Before serving, let the cake sit at room temperature for 5-10 minutes to soften slightly for easier slicing. Tip: Use a hot knife to cleanly slice through the cake.
Minty and cool with bursts of chocolate, this cake offers a creamy texture that contrasts beautifully with the crunchy cookie base. Serve it with a drizzle of chocolate sauce or a sprinkle of crushed peppermint candies for an extra festive touch.
Peanut Butter Cup Ice Cream Cake
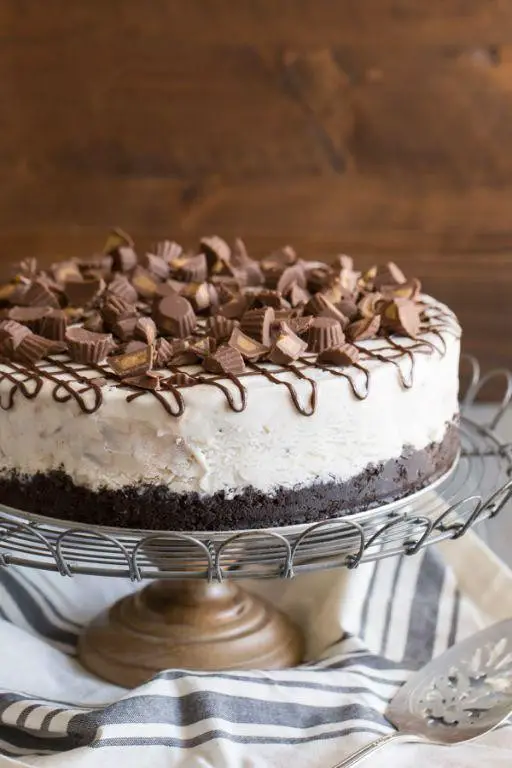
Yearning for a dessert that combines the creamy richness of ice cream with the nostalgic crunch of peanut butter cups? This Peanut Butter Cup Ice Cream Cake is a dreamy concoction that marries the two in a frozen symphony of textures and flavors, perfect for those warm evenings when only something decadent will do.
Ingredients
- 1 1/2 cups heavy cream, chilled
- 1/2 cup whole milk
- 3/4 cup granulated sugar
- 1 teaspoon pure vanilla extract
- 1/4 teaspoon fine sea salt
- 1 cup creamy peanut butter, room temperature
- 1 1/2 cups mini peanut butter cups, roughly chopped
- 1 pre-made chocolate cookie crust
Instructions
- In a large mixing bowl, combine the heavy cream, whole milk, granulated sugar, vanilla extract, and fine sea salt. Whisk until the sugar is completely dissolved, about 2 minutes.
- Add the room temperature creamy peanut butter to the mixture. Use an electric mixer on medium speed to blend until smooth and fully incorporated, about 1 minute.
- Pour the mixture into the pre-made chocolate cookie crust, spreading evenly with a spatula.
- Sprinkle the roughly chopped mini peanut butter cups evenly over the top, gently pressing them into the mixture.
- Cover the cake with plastic wrap, ensuring it touches the surface to prevent ice crystals. Freeze for at least 6 hours, or until firm.
- Before serving, let the cake sit at room temperature for 5 minutes to slightly soften for easier slicing.
Decadently rich with a velvety texture, this ice cream cake offers a delightful contrast between the smooth peanut butter base and the crunchy peanut butter cups. Serve it with a drizzle of chocolate sauce or a sprinkle of sea salt to elevate the flavors even further.
Rocky Road Ice Cream Cake
On a quiet evening, when the air hums with the promise of summer, there’s something deeply comforting about the idea of a Rocky Road Ice Cream Cake. It’s a dessert that marries the nostalgic crunch of almonds and the gooey sweetness of marshmallows with the rich, velvety embrace of chocolate ice cream, all resting on a foundation of buttery cookie crumbs.
Ingredients
- 1 1/2 cups finely crushed chocolate wafer cookies
- 1/4 cup unsalted butter, melted
- 1 quart premium chocolate ice cream, slightly softened
- 1/2 cup mini marshmallows
- 1/3 cup roasted almonds, coarsely chopped
- 1/4 cup hot fudge sauce, warmed
Instructions
- In a medium bowl, combine the crushed chocolate wafer cookies and melted unsalted butter until the mixture resembles wet sand.
- Press the cookie mixture firmly into the bottom of a 9-inch springform pan, using the back of a spoon to create an even layer. Chill in the freezer for 15 minutes to set.
- Spread the slightly softened premium chocolate ice cream over the chilled crust, smoothing the top with an offset spatula.
- Sprinkle the mini marshmallows and coarsely chopped roasted almonds evenly over the ice cream layer.
- Drizzle the warmed hot fudge sauce over the top, allowing it to slightly sink into the ice cream for a marbled effect.
- Cover the pan with plastic wrap and freeze for at least 4 hours, or until the cake is firm to the touch.
Kindly savor the contrast between the crunchy base and the creamy ice cream, punctuated by the soft marshmallows and the bold almonds. For an extra touch of elegance, serve each slice with a drizzle of additional hot fudge sauce and a sprinkle of sea salt.
Caramel Pecan Ice Cream Cake

Just imagine the quiet joy of slicing into a dessert that marries the rich, buttery crunch of pecans with the smooth, velvety sweetness of caramel, all nestled within layers of creamy ice cream. This creation is not just a treat; it’s a moment of indulgence, a pause in the hustle of life to savor something truly special.
Ingredients
- 1 1/2 cups heavy cream, chilled
- 1/2 cup whole milk
- 3/4 cup granulated sugar
- 1/4 cup light corn syrup
- 1/4 teaspoon fine sea salt
- 2 teaspoons pure vanilla extract
- 1 cup caramel sauce, divided
- 1 1/2 cups toasted pecans, roughly chopped
- 1 pre-made pound cake, sliced into 1/2-inch layers
Instructions
- In a large bowl, whisk together the heavy cream, whole milk, granulated sugar, light corn syrup, and fine sea salt until the sugar is completely dissolved.
- Stir in the pure vanilla extract and 1/2 cup of the caramel sauce until well combined.
- Pour the mixture into an ice cream maker and churn according to the manufacturer’s instructions, about 25 minutes, until it reaches a soft-serve consistency.
- Line a 9-inch springform pan with plastic wrap, leaving an overhang on all sides. Arrange a layer of pound cake slices on the bottom of the pan.
- Spread half of the churned ice cream over the pound cake layer, then drizzle with 1/4 cup of the remaining caramel sauce and sprinkle with 3/4 cup of the toasted pecans.
- Add another layer of pound cake slices, then top with the remaining ice cream, caramel sauce, and pecans.
- Fold the overhanging plastic wrap over the top of the cake and freeze for at least 6 hours, or until firm.
- Before serving, let the cake sit at room temperature for 5 minutes to slightly soften for easier slicing.
Offering a symphony of textures from the creamy ice cream to the crunchy pecans and soft cake, this dessert is a masterpiece of contrasts. Serve it with a drizzle of warm caramel sauce for an extra touch of decadence, or alongside a cup of strong coffee to balance its sweetness.
Lemon Blueberry Ice Cream Cake
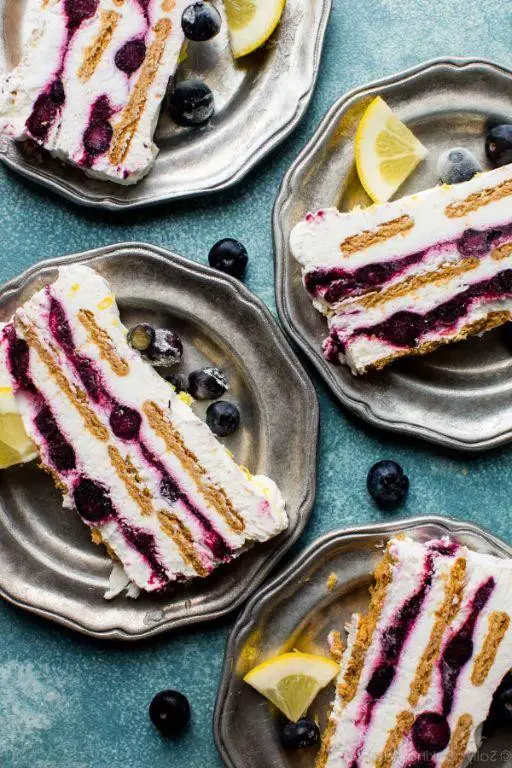
Yesterday, as the golden light of early summer streamed through my kitchen window, I found myself lost in the simple joy of creating something sweet and refreshing. The idea of combining the tartness of lemons with the sweetness of blueberries in an ice cream cake seemed like the perfect way to celebrate the season.
Ingredients
- 1 1/2 cups heavy cream, chilled
- 1/2 cup granulated sugar
- 1 tbsp lemon zest, finely grated
- 1/4 cup fresh lemon juice
- 1 cup fresh blueberries, washed and dried
- 1 1/2 cups vanilla ice cream, softened
- 1 cup graham cracker crumbs
- 1/4 cup unsalted butter, melted
Instructions
- In a large mixing bowl, whip the chilled heavy cream and granulated sugar together until stiff peaks form, about 3 minutes.
- Gently fold in the lemon zest, lemon juice, and fresh blueberries into the whipped cream mixture until just combined.
- In a separate bowl, mix the graham cracker crumbs and melted unsalted butter until the crumbs are evenly coated.
- Press the graham cracker mixture into the bottom of a 9-inch springform pan to form an even crust. Freeze for 10 minutes to set.
- Spread the softened vanilla ice cream over the chilled graham cracker crust, smoothing the top with a spatula. Freeze for 30 minutes.
- Carefully spoon the lemon blueberry whipped cream mixture over the ice cream layer, spreading it evenly. Freeze for at least 4 hours, or until firm.
- Before serving, let the cake sit at room temperature for 5 minutes to slightly soften for easier slicing.
Momentarily, the first bite reveals a delightful contrast between the creamy ice cream and the crisp graham cracker crust, with bursts of juicy blueberries and a bright lemon finish. Serve slices with a drizzle of blueberry compote or a sprinkle of additional lemon zest for an extra touch of elegance.
Raspberry White Chocolate Ice Cream Cake
Evenings like these call for something sweet, something that marries the tartness of summer berries with the creamy decadence of white chocolate, all nestled within the cool embrace of ice cream. It’s a dessert that feels like a celebration, yet simple enough to whisper of quiet moments savored alone.
Ingredients
- 1 1/2 cups heavy cream, chilled
- 1/2 cup whole milk
- 3/4 cup granulated sugar
- 1 tsp pure vanilla extract
- 1/4 tsp fine sea salt
- 4 oz high-quality white chocolate, finely chopped
- 1 1/2 cups fresh raspberries
- 1 tbsp fresh lemon juice
- 1 pre-made chocolate cookie crust, 9-inch
Instructions
- In a medium saucepan over low heat, combine the heavy cream, whole milk, granulated sugar, vanilla extract, and fine sea salt. Stir gently until the sugar is completely dissolved, about 5 minutes.
- Remove the saucepan from heat and add the finely chopped white chocolate. Let it sit for 2 minutes to melt, then whisk until smooth.
- Transfer the mixture to a large bowl and refrigerate until completely chilled, at least 4 hours or overnight for best results.
- While the mixture chills, puree the fresh raspberries with the lemon juice in a blender until smooth. Strain through a fine-mesh sieve to remove seeds, pressing with a spatula to extract as much liquid as possible.
- Once the cream mixture is chilled, pour it into an ice cream maker and churn according to the manufacturer’s instructions, about 20-25 minutes, until it reaches a soft-serve consistency.
- Gently fold the raspberry puree into the churned ice cream to create a swirl effect, being careful not to overmix.
- Spread the ice cream evenly into the pre-made chocolate cookie crust. Cover with plastic wrap, pressing directly onto the surface, and freeze until firm, at least 6 hours or overnight.
Firm yet yielding, the cake slices beautifully, revealing layers of vibrant raspberry swirls against the snowy white chocolate base. Serve it on a chilled plate with a few fresh raspberries on top for a touch of elegance, or drizzle with a little extra raspberry puree for those who crave a bit more tartness.
Tiramisu Ice Cream Cake

Just imagine the perfect blend of creamy tiramisu and the cool, refreshing texture of ice cream, all layered into a cake that promises to be the star of any summer gathering. This Tiramisu Ice Cream Cake is a dreamy concoction that marries the rich flavors of coffee and mascarpone with the lightness of ice cream, creating a dessert that’s both indulgent and refreshing.
Ingredients
- 1 1/2 cups heavy cream, chilled
- 1 cup granulated sugar
- 8 oz mascarpone cheese, room temperature
- 1/2 cup strong brewed coffee, cooled to room temperature
- 24 ladyfingers
- 2 tbsp cocoa powder, for dusting
- 1 tsp pure vanilla extract
Instructions
- In a large mixing bowl, whip the chilled heavy cream and granulated sugar together until stiff peaks form, about 3 minutes on high speed.
- Gently fold in the mascarpone cheese and vanilla extract into the whipped cream until fully incorporated, being careful not to deflate the mixture.
- Quickly dip each ladyfinger into the cooled coffee, ensuring they are moist but not soggy, and layer them at the bottom of a 9-inch springform pan.
- Spread half of the mascarpone mixture over the ladyfingers, smoothing the top with a spatula.
- Repeat the layers with the remaining ladyfingers and mascarpone mixture, ending with a final layer of the cream.
- Cover the pan with plastic wrap and freeze for at least 6 hours, or until firm.
- Before serving, dust the top with cocoa powder using a fine mesh sieve for an even, professional finish.
Now, this Tiramisu Ice Cream Cake offers a delightful contrast between the creamy layers and the slight crunch of coffee-infused ladyfingers. The dusting of cocoa powder not only adds a touch of elegance but also a hint of bitterness that balances the sweetness perfectly. Serve it sliced, with a drizzle of espresso or a sprinkle of chocolate shavings for an extra decadent touch.
Pistachio Almond Ice Cream Cake
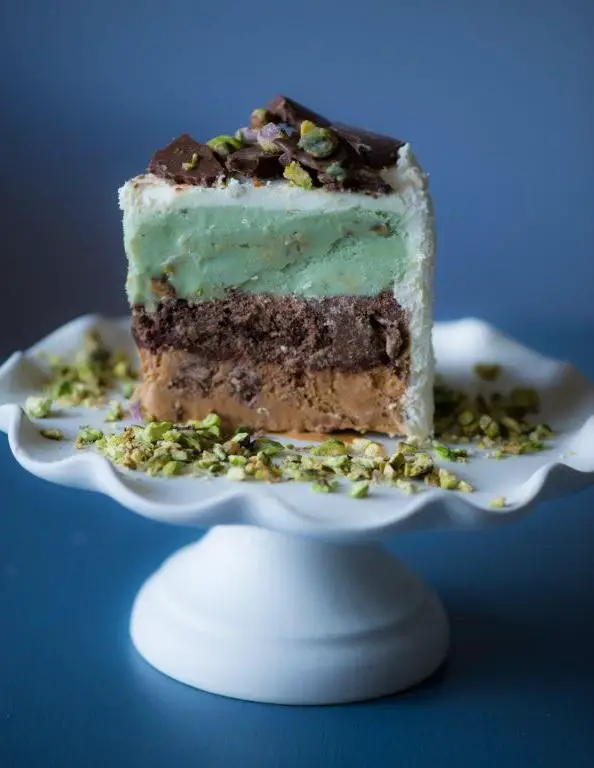
Under the soft glow of the kitchen light, the process of creating something sweet and textured feels like a quiet celebration of summer. This pistachio almond ice cream cake, with its layers of nutty richness and creamy coolness, is a testament to the joy of slow, intentional baking.
Ingredients
- 1 1/2 cups finely ground pistachios
- 1 cup almond flour
- 1/2 cup granulated sugar
- 1/4 cup unsalted butter, melted
- 1 pint vanilla bean ice cream, slightly softened
- 1 pint pistachio ice cream, slightly softened
- 1/2 cup heavy cream, whipped to stiff peaks
- 1/4 cup chopped roasted almonds
- 1 tsp pure vanilla extract
Instructions
- Preheat the oven to 350°F. Line a 9-inch springform pan with parchment paper, ensuring the sides are covered for easy removal.
- In a medium bowl, combine the ground pistachios, almond flour, and granulated sugar. Stir in the melted butter until the mixture resembles wet sand.
- Press the nut mixture firmly into the bottom of the prepared pan, creating an even layer. Bake for 10-12 minutes, or until the edges are lightly golden. Cool completely.
- Spread the slightly softened vanilla bean ice cream over the cooled crust, smoothing the top with a spatula. Freeze for 1 hour, or until firm.
- Layer the pistachio ice cream over the vanilla layer, smoothing again. Freeze for another hour.
- Gently fold the vanilla extract into the whipped cream. Spread over the top of the cake, creating decorative peaks with the back of a spoon.
- Sprinkle the chopped roasted almonds over the whipped cream. Freeze for at least 4 hours, or overnight, before serving.
Notably, the cake presents a delightful contrast between the crunchy nut base and the smooth, creamy layers. The pistachio and almond flavors meld beautifully, offering a sophisticated twist on classic ice cream cake. Serve slices with a drizzle of warm honey or a sprinkle of sea salt for an extra layer of flavor.
Coconut Mango Ice Cream Cake
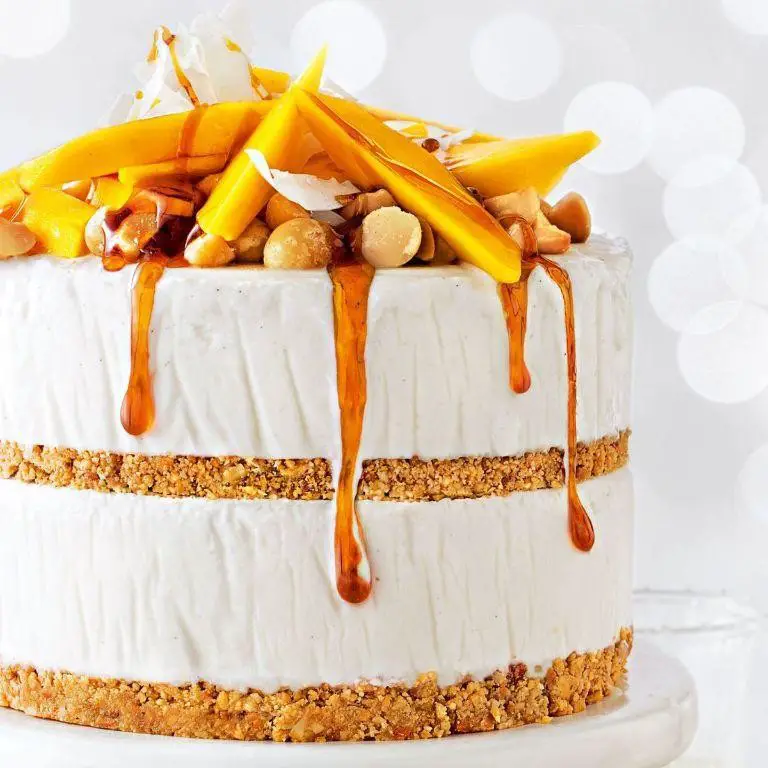
Lately, I’ve found myself longing for the kind of dessert that marries the exotic sweetness of mango with the creamy, comforting embrace of coconut, a treat that feels both indulgent and refreshingly light.
Ingredients
- 2 cups heavy cream, chilled
- 1 cup full-fat coconut milk
- 3/4 cup granulated sugar
- 1 teaspoon pure vanilla extract
- 1/4 teaspoon fine sea salt
- 2 ripe mangoes, peeled and pureed
- 1/2 cup sweetened shredded coconut, toasted
- 1 9-inch springform pan, lined with parchment paper
Instructions
- In a large mixing bowl, combine the chilled heavy cream, coconut milk, granulated sugar, vanilla extract, and fine sea salt. Whisk until the sugar is completely dissolved and the mixture is smooth.
- Gently fold in the mango puree until fully incorporated, being careful not to overmix to maintain a light, airy texture.
- Pour the mixture into the prepared springform pan, smoothing the top with a spatula for an even layer.
- Sprinkle the toasted shredded coconut evenly over the top, pressing lightly to adhere.
- Cover the pan with plastic wrap, ensuring it touches the surface of the mixture to prevent ice crystals from forming. Freeze for at least 6 hours, or until firm.
- Tip: For easier slicing, dip a sharp knife in hot water before cutting each piece.
- Tip: To enhance the mango flavor, consider adding a tablespoon of mango liqueur to the mixture before freezing.
- Tip: For a decorative touch, garnish each slice with fresh mango slices and a sprinkle of toasted coconut before serving.
The resulting ice cream cake is a symphony of textures, from the creamy base to the crunchy coconut topping, with the mango lending a vibrant, tropical sweetness. Try serving it with a drizzle of caramel sauce for an extra layer of decadence.
Black Forest Ice Cream Cake
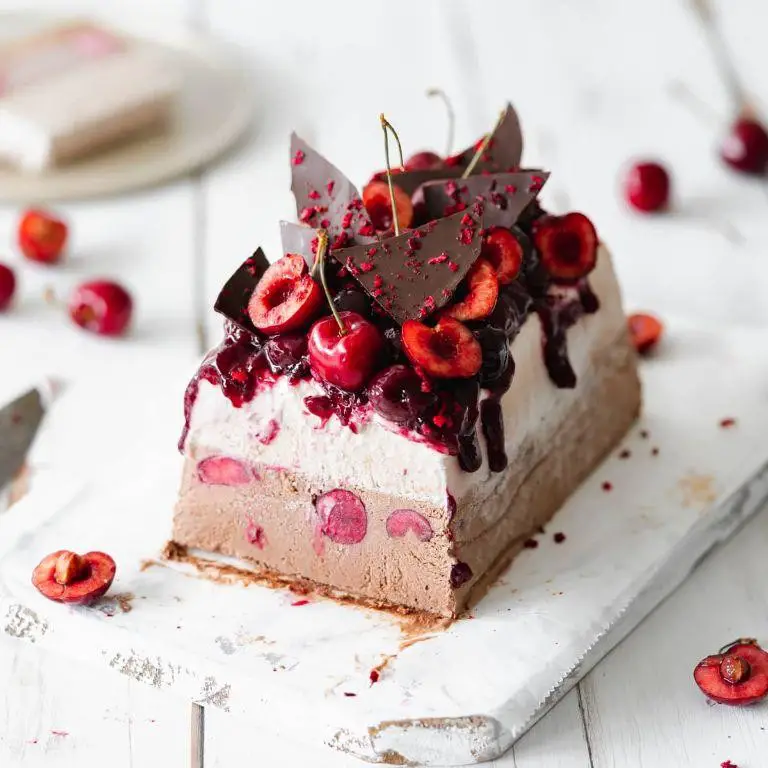
Now, as the summer sun casts long shadows, there’s a dessert that captures the essence of indulgence and nostalgia—a creation that marries the rich, dark whispers of chocolate with the bright, tart notes of cherries, all cradled in the cool embrace of cream.
Ingredients
- 1 1/2 cups heavy cream, chilled
- 1/2 cup granulated sugar
- 1/4 cup Dutch-process cocoa powder, sifted
- 1 tsp pure vanilla extract
- 1/2 cup sour cherries, pitted and halved
- 1/4 cup Kirsch (cherry brandy)
- 1 1/2 cups chocolate cookie crumbs
- 1/4 cup unsalted butter, melted
- 1/2 cup dark chocolate shavings
Instructions
- In a medium bowl, combine chocolate cookie crumbs and melted butter until the mixture resembles wet sand. Press firmly into the bottom of a 9-inch springform pan to form the base. Chill for 30 minutes to set.
- Meanwhile, macerate sour cherries in Kirsch for 20 minutes, stirring occasionally to ensure even flavor distribution.
- In a large bowl, whip chilled heavy cream, granulated sugar, sifted cocoa powder, and vanilla extract to stiff peaks, about 3-4 minutes on high speed. Tip: Ensure the bowl and beaters are chilled for optimal volume.
- Gently fold in the macerated cherries and their liquid into the whipped cream mixture, reserving a few cherries for garnish.
- Pour the mixture over the chilled cookie base, smoothing the top with a spatula. Freeze for at least 6 hours, or until firm. Tip: Cover the pan with plastic wrap to prevent freezer burn.
- Before serving, sprinkle dark chocolate shavings over the top and garnish with reserved cherries. Tip: Let the cake sit at room temperature for 5 minutes for easier slicing.
Finally, the Black Forest Ice Cream Cake presents a symphony of textures—from the crisp cookie base to the velvety cream, each bite is a contrast of temperatures and tastes. Serve it on a chilled plate to accentuate its frosty elegance, or pair with a drizzle of warm chocolate sauce for an extra layer of decadence.
Banana Split Ice Cream Cake
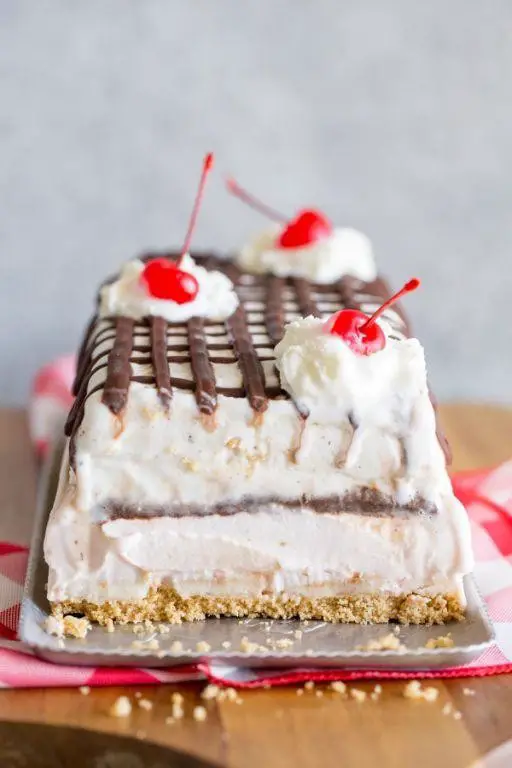
Musing over the simplicity of summer desserts brings to mind the classic banana split, reimagined here as a decadent ice cream cake. This version layers the nostalgic flavors of ripe bananas, rich chocolate, and sweet strawberries into a frozen treat that’s both effortless and elegant.
Ingredients
- 1 1/2 cups heavy cream, chilled
- 1/4 cup granulated sugar
- 1 tsp pure vanilla extract
- 3 ripe bananas, sliced
- 1 cup strawberry ice cream, softened
- 1 cup chocolate ice cream, softened
- 1/2 cup hot fudge sauce, warmed
- 1/4 cup roasted peanuts, chopped
- Maraschino cherries, for garnish
Instructions
- In a large mixing bowl, whip the heavy cream, sugar, and vanilla extract to stiff peaks, about 3 minutes on high speed.
- Layer half of the whipped cream in the bottom of a 9-inch springform pan, spreading evenly with a spatula.
- Arrange a single layer of banana slices over the whipped cream, covering the surface completely.
- Spread the softened strawberry ice cream over the bananas, smoothing the top with a spatula.
- Repeat the layers with the remaining whipped cream, bananas, and chocolate ice cream, ensuring each layer is even.
- Drizzle the warmed hot fudge sauce over the top, allowing it to slightly sink into the chocolate ice cream.
- Sprinkle the chopped peanuts over the fudge and place the cake in the freezer for at least 6 hours, or until firm.
- Before serving, garnish with maraschino cherries for a classic banana split finish.
Rich in texture and flavor, this banana split ice cream cake offers a creamy contrast between the layers of ice cream and the crunch of peanuts. Serve it on a warm evening, letting each slice melt slightly to mimic the gooey delight of its namesake dessert.
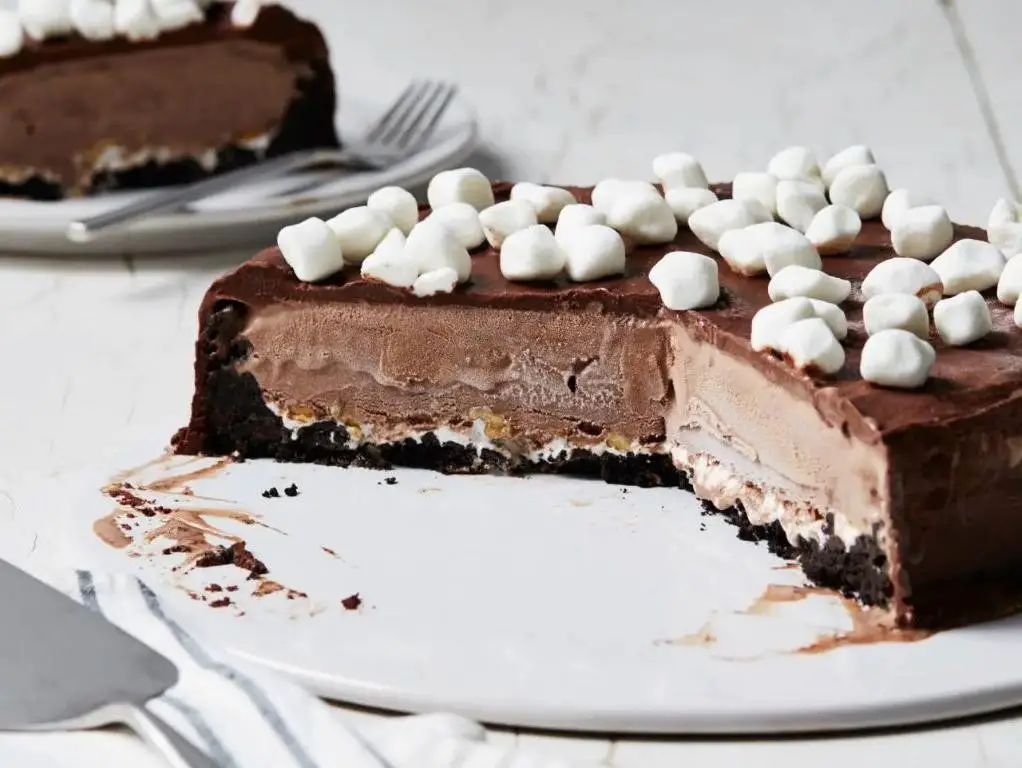
S’mores Ice Cream Cake
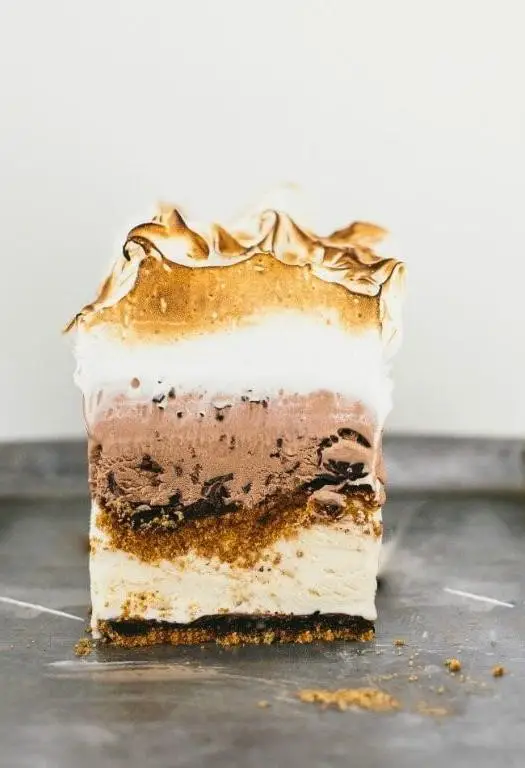
Flickering candlelight and the quiet hum of the refrigerator set the scene for tonight’s culinary adventure, a dessert that marries the nostalgic charm of campfire s’mores with the creamy indulgence of ice cream cake.
Ingredients
- 1 1/2 cups graham cracker crumbs, finely ground
- 1/4 cup unsalted butter, melted and slightly cooled
- 1/4 cup granulated sugar
- 1 pint vanilla bean ice cream, softened
- 1 pint chocolate ice cream, softened
- 1 cup mini marshmallows
- 1/2 cup dark chocolate chips
- 1 tbsp clarified butter
Instructions
- Preheat your oven to 350°F (175°C) to toast the graham cracker crust for enhanced flavor.
- In a medium bowl, combine graham cracker crumbs, melted unsalted butter, and granulated sugar until the mixture resembles wet sand.
- Press the mixture firmly into the bottom of a 9-inch springform pan, using the back of a spoon to create an even layer. Bake for 10 minutes, then cool completely on a wire rack.
- Spread the softened vanilla bean ice cream over the cooled crust, smoothing the top with a spatula. Freeze for 1 hour, or until firm.
- Repeat the process with the chocolate ice cream, freezing for another hour. Tip: For easier spreading, let the ice cream sit at room temperature for 5-10 minutes before using.
- In a small saucepan over low heat, melt dark chocolate chips with clarified butter, stirring until smooth. Drizzle over the frozen cake.
- Arrange mini marshmallows on top. Using a kitchen torch, lightly toast the marshmallows until golden brown. Tip: For a smokier flavor, hold the torch slightly farther away to slow the toasting process.
- Freeze the cake for at least 4 hours, or overnight, to set completely. Tip: Cover the cake with plastic wrap to prevent freezer burn.
Gently slice the cake to reveal layers of creamy ice cream and crunchy graham cracker, each bite a harmonious blend of textures and temperatures. Serve on a chilled plate to keep the layers distinct, or alongside a glass of cold milk for a classic pairing.
Red Velvet Ice Cream Cake
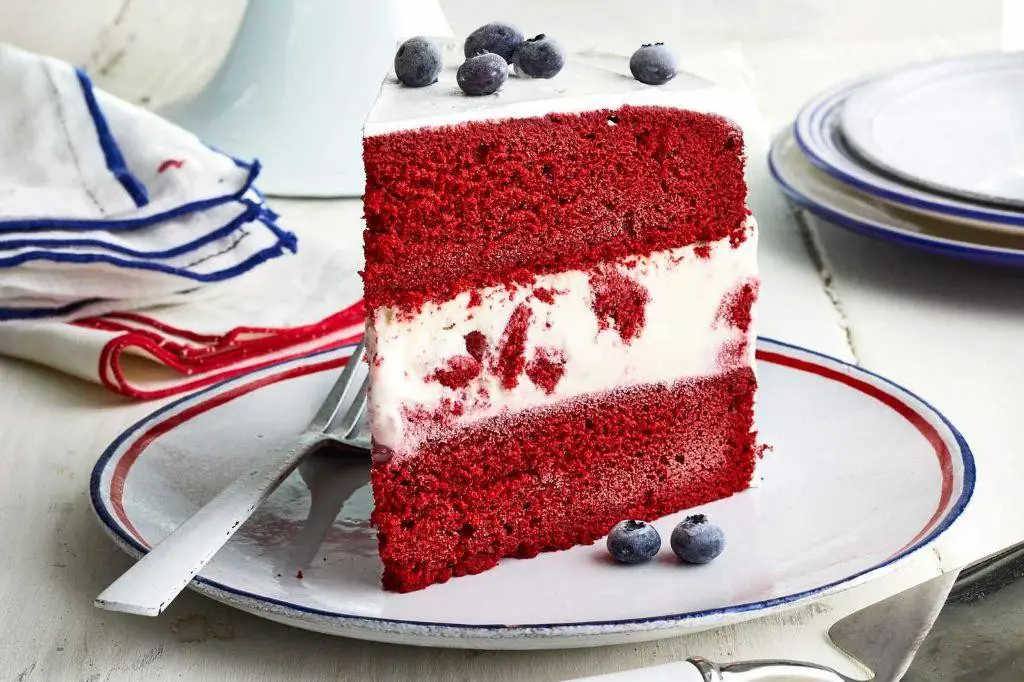
Under the soft glow of the kitchen light, the Red Velvet Ice Cream Cake emerges as a symphony of textures and flavors, a dessert that whispers of summer nights and cherished gatherings. Its layers tell a story of contrast—velvety cake meeting creamy ice cream, each bite a delicate balance of sweet and tang.
Ingredients
- 1 1/2 cups all-purpose flour, sifted
- 1/4 cup Dutch-processed cocoa powder
- 1 tsp baking soda
- 1/2 tsp fine sea salt
- 1 cup granulated sugar
- 1 cup buttermilk, room temperature
- 2 pasture-raised eggs, lightly beaten
- 1 tbsp distilled white vinegar
- 1 tsp pure vanilla extract
- 1 oz red food coloring
- 1/2 cup unsalted butter, clarified and cooled
- 1 quart vanilla bean ice cream, slightly softened
Instructions
- Preheat the oven to 350°F. Grease and line a 9-inch round cake pan with parchment paper.
- In a medium bowl, whisk together the sifted flour, cocoa powder, baking soda, and sea salt until fully combined.
- In a separate large bowl, beat the granulated sugar, buttermilk, eggs, vinegar, vanilla extract, and red food coloring on medium speed until smooth, about 2 minutes.
- Gradually add the dry ingredients to the wet mixture, folding gently with a spatula to avoid overmixing.
- Drizzle in the clarified butter, stirring just until the batter is homogenous and glossy.
- Pour the batter into the prepared pan, smoothing the top with an offset spatula. Bake for 25-30 minutes, or until a toothpick inserted into the center comes out clean.
- Allow the cake to cool in the pan for 10 minutes, then transfer to a wire rack to cool completely.
- Once cooled, slice the cake horizontally into two even layers. Spread the slightly softened vanilla bean ice cream over the bottom layer, then top with the second cake layer.
- Wrap the assembled cake tightly in plastic wrap and freeze for at least 4 hours, or until the ice cream is firm.
Cool and creamy, the Red Velvet Ice Cream Cake offers a playful twist on the classic, its rich cocoa notes mingling with the vanilla’s sweetness. Serve it on a chilled plate, garnished with fresh raspberries or a drizzle of white chocolate for an extra touch of elegance.
Matcha Green Tea Ice Cream Cake
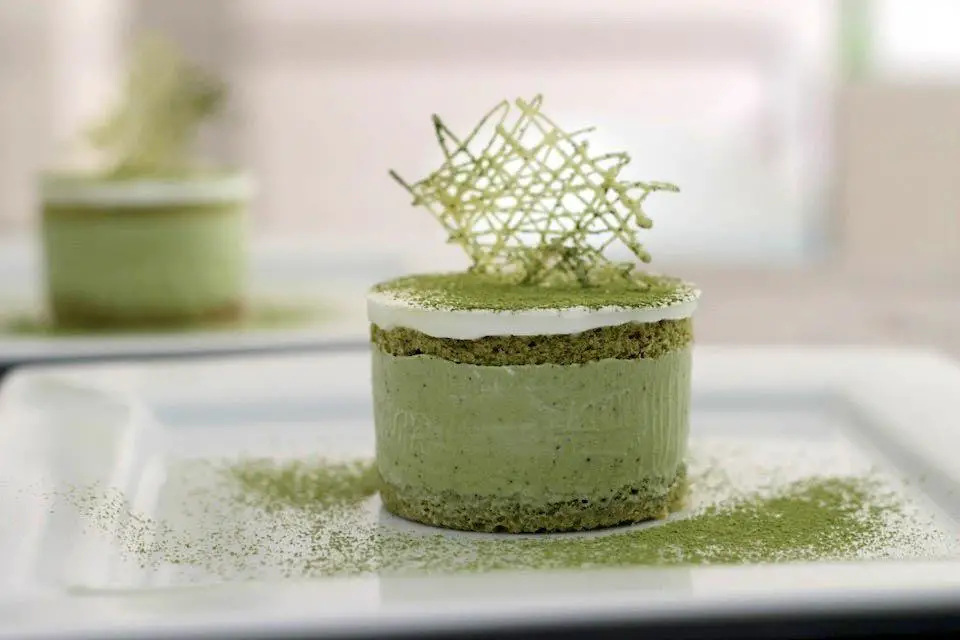
Zenfully, the art of crafting a Matcha Green Tea Ice Cream Cake begins with the quiet whisking of vibrant green tea powder into creamy folds, a meditation in motion that promises a dessert both refreshing and rich.
Ingredients
- 1 1/2 cups heavy cream, chilled to 40°F
- 3/4 cup whole milk
- 3/4 cup granulated sugar
- 2 tbsp culinary-grade matcha green tea powder
- 1 tsp pure vanilla extract
- 1/4 tsp fine sea salt
- 6 large pasture-raised egg yolks, lightly beaten
- 1 pre-made sponge cake layer, 9-inch diameter
Instructions
- In a medium saucepan over low heat, combine heavy cream, whole milk, and granulated sugar, stirring until sugar dissolves completely, about 5 minutes.
- Whisk in matcha green tea powder until no lumps remain, then stir in vanilla extract and fine sea salt.
- Gradually temper the egg yolks by slowly adding half of the warm cream mixture to the yolks, whisking constantly to prevent curdling.
- Return the tempered yolk mixture to the saucepan, cooking over low heat while stirring continuously until the custard thickens enough to coat the back of a spoon, about 7-10 minutes.
- Strain the custard through a fine-mesh sieve into a clean bowl to ensure a silky texture, then cool to room temperature before covering and refrigerating for at least 4 hours, or until thoroughly chilled.
- Pour the chilled custard into an ice cream maker and churn according to manufacturer’s instructions until it reaches a soft-serve consistency, about 20-25 minutes.
- Place the pre-made sponge cake layer at the bottom of a 9-inch springform pan, then spread the churned matcha ice cream evenly over the cake.
- Freeze the assembled cake for at least 6 hours, or until firm, before unmolding and slicing to serve.
Lusciously creamy with a delicate crumb beneath, this cake marries the earthy depth of matcha with the sweet simplicity of vanilla. Serve adorned with a dusting of matcha powder or alongside a dollop of whipped cream for an extra touch of indulgence.
Conclusion
Brimming with creativity and flavor, our roundup of 18 Delicious Ice Cream Cake Recipes is your ticket to summer bliss. Whether you’re a novice or a seasoned baker, there’s a recipe here to cool and delight. We’d love to hear which one becomes your favorite—drop us a comment below! Don’t forget to share the sweet inspiration on Pinterest for others to enjoy. Happy baking!

Michael Johnson is the founder of Pan Mastery, Inspired by his blacksmith grandfather’s legacy has a deep appreciation for hand-crafted pots and pans, he provides invaluable guides, reviews, and recipes to enhance your culinary journey.