Zesty mornings call for something special, and what better way to start your day than with a taste of Korea? Our roundup of 18 Delicious Korean Breakfast Recipes Healthy is packed with flavors that will wake up your senses and nourish your body. From savory pancakes to comforting porridges, these dishes are perfect for home cooks looking to add a little international flair to their morning routine. Dive in and discover your new breakfast favorite!
Kimchi Fried Rice
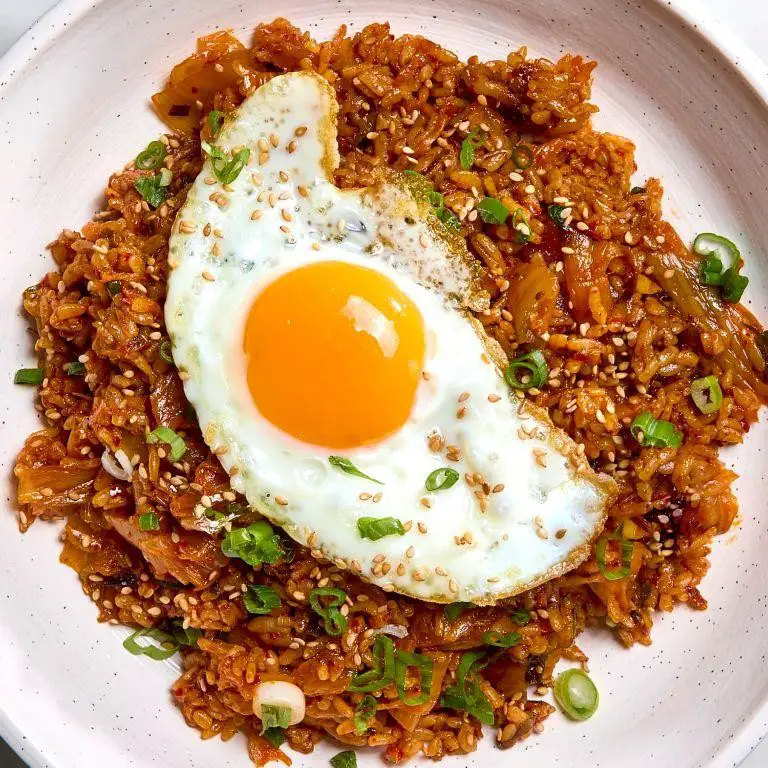
Believe it or not, my first encounter with Kimchi Fried Rice was during a late-night fridge raid. I had some leftover rice and a jar of kimchi staring back at me, and the rest was history. Now, it’s my go-to comfort dish that’s as forgiving as it is flavorful.
Ingredients
- 2 cups of day-old jasmine rice (trust me, fresh rice just doesn’t fry the same)
- 1 cup of kimchi, chopped (I like mine extra spicy, so I go for the reddest jar I can find)
- 2 tbsp of kimchi juice (this is the secret flavor bomb)
- 2 tbsp of sesame oil (the aroma is everything)
- 1 tbsp of soy sauce (I use low-sodium to control the saltiness)
- 2 eggs (room temp eggs blend better, in my experience)
- 1 green onion, thinly sliced (for that fresh crunch)
- 1 tbsp of vegetable oil (just enough to coat the pan)
Instructions
- Heat a large non-stick pan over medium-high heat and add the vegetable oil. Swirl to coat the pan evenly.
- Add the chopped kimchi and stir-fry for about 2 minutes until it starts to soften and smell amazing.
- Push the kimchi to one side of the pan and crack the eggs into the other side. Scramble them lightly until just set, about 1 minute.
- Add the day-old rice to the pan, breaking up any clumps with the back of your spoon. This is where the magic starts.
- Drizzle the sesame oil and soy sauce over the rice, then pour in the kimchi juice. Stir everything together until well combined and heated through, about 3 minutes.
- Garnish with sliced green onions right before serving for a pop of color and freshness.
Every bite of this Kimchi Fried Rice is a perfect balance of spicy, tangy, and umami flavors, with just the right amount of chew from the rice. I love topping mine with a fried egg for extra richness, or serving it alongside a crisp, cold beer to cut through the heat.
Scallion Pancakes

Many of my fondest memories involve the crispy, flaky layers of scallion pancakes, a staple in my kitchen that never fails to bring comfort. Whether it’s a lazy Sunday morning or a quick weeknight snack, these pancakes are my go-to for a deliciously savory treat.
Ingredients
- 2 cups all-purpose flour (I swear by King Arthur for consistent results)
- 3/4 cup warm water (just hot enough to touch without burning)
- 1/2 tsp salt (I like using sea salt for its subtle crunch)
- 1/4 cup scallions, finely chopped (the more, the merrier in my book)
- 2 tbsp sesame oil (this is my secret for that irresistible aroma)
- 1/4 cup vegetable oil (for that perfect golden fry)
Instructions
- In a large bowl, mix the flour and salt, then gradually add warm water, stirring until a dough forms. Tip: If the dough feels too sticky, a sprinkle of flour will save the day.
- Knead the dough on a floured surface for about 5 minutes until smooth, then cover with a damp cloth and let it rest for 30 minutes. This rest period is crucial for elasticity.
- Divide the dough into 4 equal parts. Roll each into a thin circle, brush with sesame oil, and sprinkle generously with scallions.
- Roll each circle into a tight log, then coil it into a spiral. Flatten gently with your palm, then roll out again into a pancake about 1/4 inch thick.
- Heat vegetable oil in a pan over medium heat (350°F is ideal). Cook each pancake for 2-3 minutes per side until golden and crispy. Tip: Don’t overcrowd the pan to ensure even cooking.
- Transfer to a paper towel-lined plate to drain any excess oil. Tip: For extra crispiness, press down lightly with a spatula while cooking.
Layers upon layers of flaky goodness await with every bite of these scallion pancakes. Serve them hot with a side of soy sauce or get creative by pairing with a spicy chili dip for an extra kick.
Soft Tofu Stew

Every time I crave something comforting yet light, my mind wanders to this Soft Tofu Stew. It’s a dish that reminds me of rainy evenings spent in my tiny apartment, where the aroma of simmering tofu and vegetables would fill the air, making everything feel right in the world.
Ingredients
- 1 tbsp extra virgin olive oil (my go-to for its fruity notes)
- 2 cloves garlic, minced (because fresh is always better)
- 1 small onion, diced (I like the sweetness it adds)
- 1 cup sliced mushrooms (cremini are my favorite for their earthy flavor)
- 4 cups vegetable broth (homemade if you have it)
- 1 block soft tofu, cubed (room temp blends better)
- 2 tbsp soy sauce (for that umami kick)
- 1 tsp sesame oil (a little goes a long way)
- 1 cup spinach leaves (added last for a pop of color)
Instructions
- Heat the olive oil in a large pot over medium heat until shimmering.
- Add the minced garlic and diced onion, sautéing until translucent, about 3 minutes.
- Throw in the sliced mushrooms, cooking until they release their moisture and brown slightly, around 5 minutes.
- Pour in the vegetable broth, bringing the mixture to a gentle boil.
- Gently add the cubed soft tofu, reducing the heat to a simmer to avoid breaking the tofu.
- Stir in the soy sauce and sesame oil, letting the stew simmer for 10 minutes to meld the flavors.
- Finally, add the spinach leaves, stirring just until wilted, about 1 minute.
Zesty and soothing, this stew is a harmony of textures, from the silky tofu to the tender vegetables. Serve it with a side of steamed rice or enjoy it as is for a low-carb option that doesn’t skimp on flavor.
Korean Egg Roll

Just the other day, I found myself craving something both comforting and a bit adventurous, leading me to whip up these delightful Korean Egg Rolls. They’re a perfect blend of fluffy eggs and savory fillings, wrapped up in a golden, slightly crispy exterior. I love how versatile they are, making them a hit for breakfast, lunch, or even a snack.
Ingredients
- 4 large eggs (I prefer room temp eggs here for a fluffier texture)
- 1/4 cup milk (whole milk gives the richest flavor)
- 1 tbsp soy sauce (for that umami kick)
- 1 tbsp sugar (to balance the saltiness)
- 1/2 cup chopped ham (or any protein you have on hand)
- 1/4 cup shredded cheese (I’m partial to mozzarella for its meltiness)
- 1 tbsp vegetable oil (extra virgin olive oil is my go-to, but any neutral oil works)
- 2 green onions, finely chopped (for a fresh crunch)
Instructions
- In a bowl, whisk together the eggs, milk, soy sauce, and sugar until well combined. Tip: Whisking vigorously introduces air, making the rolls fluffier.
- Heat the oil in a non-stick skillet over medium heat (about 350°F). Pour a thin layer of the egg mixture into the skillet, tilting to spread evenly.
- Sprinkle half of the ham, cheese, and green onions over the egg. Tip: Distribute the fillings evenly for every bite to be perfect.
- Once the edges start to set, gently roll the egg from one side to the other, forming a log. Push the roll to one side of the skillet.
- Pour another thin layer of egg mixture into the empty space, lifting the first roll slightly to let the new layer flow underneath. Sprinkle with the remaining fillings.
- When the new layer sets, roll the omelet back over the new layer, enclosing it. Repeat until all the mixture is used, usually 2-3 times.
- Transfer the roll to a cutting board and let it rest for a minute before slicing. Tip: Letting it rest ensures cleaner cuts.
Serve these Korean Egg Rolls warm, and watch how the cheese pulls apart with each bite. The contrast between the soft interior and the slightly crispy exterior is simply irresistible. For an extra kick, dip them in a bit of spicy mayo or sweet chili sauce.
Seaweed Soup

First off, let me tell you, there’s something incredibly soothing about a bowl of seaweed soup. It’s like a warm hug from the ocean, especially on those days when you’re craving something light yet nourishing. I stumbled upon this recipe during a chilly evening when all I wanted was something simple yet packed with flavor.
Ingredients
- 4 cups of water (I always use filtered for the cleanest taste)
- 1 ounce dried seaweed (wakame is my favorite for its tender texture)
- 2 cloves garlic, minced (because garlic makes everything better)
- 1 tablespoon sesame oil (toasted, for that nutty depth)
- 1 teaspoon soy sauce (I opt for low-sodium to control the saltiness)
- 1/2 teaspoon salt (adjust based on your preference)
- 1 green onion, thinly sliced (for a fresh, crisp finish)
Instructions
- Soak the dried seaweed in a bowl of cold water for 10 minutes until it expands and softens. Tip: Don’t skip this step; it’s crucial for achieving the right texture.
- In a medium pot, heat the sesame oil over medium heat. Add the minced garlic and sauté for about 1 minute until fragrant. Tip: Keep the heat medium to avoid burning the garlic.
- Drain the seaweed and add it to the pot along with the 4 cups of water. Bring to a boil.
- Once boiling, reduce the heat to low and simmer for 15 minutes. Tip: Simmering slowly extracts the seaweed’s flavor without making it tough.
- Stir in the soy sauce and salt. Taste and adjust seasoning if necessary.
- Garnish with sliced green onions before serving.
Delightfully light with a deep umami flavor, this seaweed soup is perfect as is or with a side of steamed rice for a more filling meal. The seaweed offers a slight chewiness, while the broth is clear and comforting, making it an ideal dish for any season.
Bean Sprout Rice
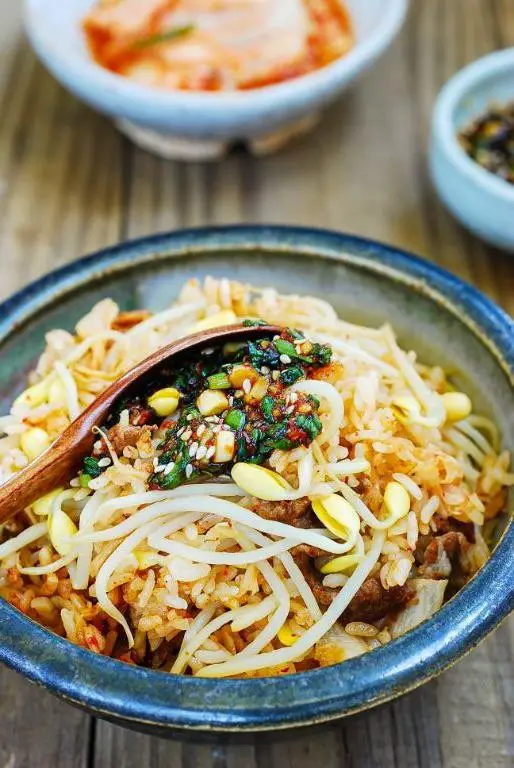
Never underestimate the power of a simple dish to bring comfort to your table. Today, I’m sharing my go-to Bean Sprout Rice recipe, a dish that’s as nourishing as it is easy to whip up, especially on those busy weeknights when time is of the essence.
Ingredients
- 1 cup jasmine rice (I swear by the fragrant, fluffy texture it brings)
- 2 cups water (filtered makes a difference in taste, in my opinion)
- 1 cup fresh bean sprouts (the crunchier, the better)
- 2 tbsp sesame oil (extra virgin is my go-to for that rich, nutty flavor)
- 1 tbsp soy sauce (I opt for low-sodium to control the saltiness)
- 1 clove garlic, minced (freshly minced releases the best aroma)
- 1/2 tsp salt (just enough to enhance all the flavors)
Instructions
- Rinse the jasmine rice under cold water until the water runs clear, to remove excess starch.
- In a medium pot, combine the rinsed rice and 2 cups of water. Bring to a boil over high heat.
- Once boiling, reduce the heat to low, cover the pot, and let it simmer for 15 minutes. Tip: Resist the urge to peek; keeping the lid on ensures even cooking.
- After 15 minutes, turn off the heat and let the rice sit, covered, for another 5 minutes to steam. This step is crucial for that perfect fluffy texture.
- While the rice is resting, heat the sesame oil in a pan over medium heat. Add the minced garlic and sauté until fragrant, about 30 seconds.
- Add the bean sprouts to the pan, along with the soy sauce and salt. Stir-fry for 2 minutes, just until the sprouts are slightly softened but still crisp. Tip: Overcooking the sprouts will make them lose their delightful crunch.
- Fluff the rested rice with a fork and gently fold in the sautéed bean sprouts mixture until well combined. Tip: Folding instead of stirring keeps the rice grains intact.
Kick back and enjoy the harmonious blend of textures and flavors in this Bean Sprout Rice. The fluffy rice paired with the crisp, savory sprouts makes for a comforting meal that’s perfect on its own or alongside a simple protein. For a creative twist, try topping it with a fried egg for added richness.
Sweet Potato Noodles

First off, let me tell you, sweet potato noodles have been a game-changer in my kitchen. They’re not just a healthier alternative to regular pasta, but their vibrant color and sweet, earthy flavor make any dish pop. I stumbled upon this recipe during a lazy Sunday experiment, and now it’s a staple in my weeknight dinner rotation.
Ingredients
- 2 medium sweet potatoes, spiralized (trust me, a spiralizer is worth the investment)
- 2 tbsp extra virgin olive oil (my go-to for its fruity notes)
- 1 clove garlic, minced (because what’s pasta without garlic?)
- 1/4 tsp red pepper flakes (for that subtle kick)
- Salt to taste (I like to use sea salt for its texture)
- Freshly grated Parmesan cheese (the real deal, none of that pre-grated stuff)
- A handful of fresh basil leaves, torn (for a burst of freshness)
Instructions
- Heat the olive oil in a large skillet over medium heat. This is where the magic starts.
- Add the minced garlic and red pepper flakes, sautéing for about 30 seconds until fragrant. Be careful not to burn the garlic—it turns bitter.
- Toss in the spiralized sweet potatoes, stirring gently to coat them in the oil and garlic mixture. Tip: Don’t overcrowd the pan to ensure even cooking.
- Cook for about 5-7 minutes, stirring occasionally, until the noodles are just tender but still have a bit of crunch. Tip: Taste as you go to avoid mushy noodles.
- Season with salt to taste, then remove from heat. Tip: Letting it sit for a minute off the heat allows the flavors to meld beautifully.
- Serve topped with freshly grated Parmesan and torn basil leaves.
Out of the pan, these sweet potato noodles are a delightful mix of sweet and savory, with a texture that’s perfectly al dente. Try serving them with a poached egg on top for a hearty breakfast twist, or alongside grilled chicken for a protein-packed dinner.
Korean Pancake with Seafood

Over the years, I’ve fallen in love with the crispy edges and savory depth of Korean pancakes, especially when they’re packed with seafood. It’s my go-to dish when I crave something comforting yet adventurous, and today, I’m sharing my foolproof recipe that never fails to impress.
Ingredients
- 1 cup all-purpose flour (I swear by King Arthur for consistent results)
- 1 cup ice-cold water (the colder, the crispier the pancake)
- 1 large egg, lightly beaten (room temp blends better)
- 1/2 tsp salt (I like to use sea salt for a cleaner taste)
- 1/2 lb mixed seafood (shrimp and squid are my favorites, but feel free to experiment)
- 2 green onions, chopped (the greener, the better for color and flavor)
- 1 tbsp vegetable oil (extra virgin olive oil is my go-to, but any neutral oil works)
Instructions
- In a large bowl, whisk together the flour, water, egg, and salt until smooth. Let the batter rest for 10 minutes to ensure a light texture.
- While the batter rests, chop the seafood into bite-sized pieces. Tip: Pat the seafood dry to prevent the pancake from getting soggy.
- Heat the oil in a non-stick skillet over medium-high heat until shimmering. Tip: A well-heated pan is key to that perfect golden crust.
- Pour the batter into the skillet, then quickly scatter the seafood and green onions on top. Cook for 4-5 minutes until the edges start to crisp.
- Carefully flip the pancake and cook for another 4-5 minutes until both sides are golden and crispy. Tip: Use a plate to help flip the pancake if you’re nervous about it falling apart.
- Transfer to a cutting board, slice into wedges, and serve immediately with a side of soy dipping sauce.
This pancake is all about the contrast between the crispy exterior and the tender, flavorful seafood inside. Try serving it with a sprinkle of sesame seeds and a drizzle of chili oil for an extra kick.
Braised Black Beans

Growing up in a household where beans were a staple, I’ve always had a soft spot for dishes that bring out their rich, earthy flavors. Braised black beans, with their deep, savory notes, have become a comforting favorite in my kitchen, especially on lazy weekends when I crave something hearty yet simple to whip up.
Ingredients
- 1 cup dried black beans (soaked overnight, because trust me, it makes all the difference)
- 2 tbsp extra virgin olive oil (my go-to for its fruity depth)
- 1 medium onion, diced (I like mine finely chopped for a smoother texture)
- 2 cloves garlic, minced (freshly minced garlic is a game-changer here)
- 1 tsp ground cumin (for that warm, earthy kick)
- 4 cups vegetable broth (homemade if you have it, but store-bought works in a pinch)
- Salt to taste (I start with 1/2 tsp and adjust from there)
Instructions
- Heat the olive oil in a large pot over medium heat until shimmering, about 2 minutes.
- Add the diced onion and cook, stirring occasionally, until translucent, about 5 minutes.
- Stir in the minced garlic and ground cumin, cooking for another minute until fragrant. Tip: Don’t let the garlic brown, or it’ll turn bitter.
- Drain the soaked black beans and add them to the pot, stirring to coat with the onion and garlic mixture.
- Pour in the vegetable broth, ensuring the beans are fully submerged. Bring to a boil, then reduce the heat to low, covering the pot with a lid.
- Simmer gently for about 1.5 to 2 hours, or until the beans are tender. Tip: Check occasionally and add more broth if needed to keep the beans covered.
- Once the beans are tender, season with salt to taste. Tip: Adding salt too early can toughen the beans, so patience is key here.
Letting the beans cool slightly before serving allows the flavors to meld beautifully. The result is a velvety, richly flavored dish that pairs wonderfully with crusty bread or over a bed of rice for a more substantial meal.
Spicy Stir-Fried Squid
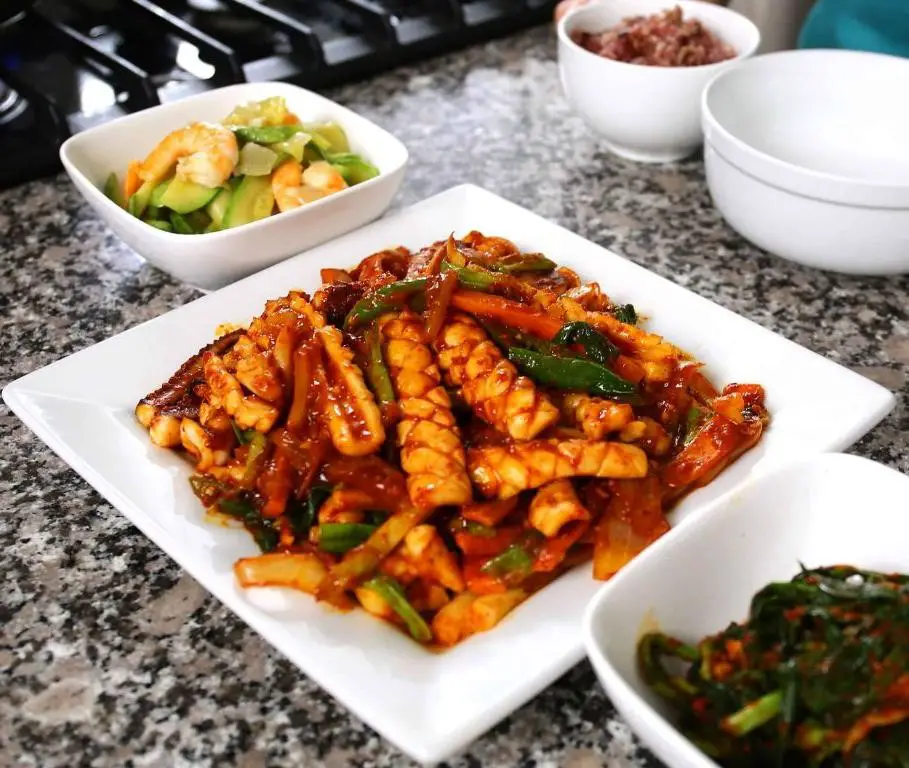
Diving into the world of seafood stir-fries, I stumbled upon this Spicy Stir-Fried Squid recipe during a summer trip to the coast. The combination of heat and the ocean’s bounty was unforgettable, and I’ve been tweaking it to perfection ever since.
Ingredients
- 1 lb squid, cleaned and sliced into rings (I find that slightly frozen squid is easier to slice)
- 2 tbsp extra virgin olive oil (my go-to for its fruity notes)
- 3 cloves garlic, minced (because more garlic is always better)
- 1 tbsp ginger, grated (fresh ginger makes all the difference)
- 1-2 red chili peppers, sliced (adjust based on your heat tolerance)
- 2 tbsp soy sauce (I opt for low-sodium to control the saltiness)
- 1 tbsp honey (for that perfect balance of sweet and spicy)
- 1/2 cup green onions, chopped (the greener, the better for color and flavor)
Instructions
- Heat the olive oil in a large wok or skillet over medium-high heat until shimmering, about 1 minute.
- Add the garlic and ginger, stirring constantly for 30 seconds until fragrant. Tip: Keep the ingredients moving to prevent burning.
- Toss in the squid rings, spreading them out in the pan. Cook for 2 minutes without stirring to get a slight sear.
- Add the chili peppers and stir-fry for another 2 minutes. The squid should be just opaque.
- Pour in the soy sauce and honey, tossing to coat the squid evenly. Cook for 1 more minute. Tip: The sauce should thicken slightly but not reduce too much.
- Remove from heat and sprinkle with green onions. Tip: Letting it sit for a minute before serving allows the flavors to meld.
Out of the pan, this dish boasts a tantalizing mix of textures—tender squid with a slight chew, all coated in a glossy, spicy-sweet sauce. Serve it over a bed of steamed rice or alongside a crisp salad for a complete meal that sings of summer.
Rice Porridge with Abalone

Delving into the comforting world of rice porridge, I stumbled upon a luxurious twist that’s become a weekend favorite in my household—Rice Porridge with Abalone. It’s a dish that marries simplicity with a touch of elegance, perfect for those mornings when you’re craving something warm and nourishing but want to feel a bit fancy.
Ingredients
- 1 cup jasmine rice (I love the floral aroma it brings to the porridge)
- 4 cups water (for a silkier texture, you can swap half with chicken broth)
- 1 can abalone, sliced (reserve the juice for an extra umami kick)
- 1 tbsp ginger, minced (it adds a nice warmth to the dish)
- 1 tbsp sesame oil (my secret for a rich, nutty flavor)
- Salt to taste (I start with 1/2 tsp and adjust from there)
Instructions
- Rinse the jasmine rice under cold water until the water runs clear, about 3 times. This removes excess starch for a cleaner taste.
- In a large pot, combine the rinsed rice and water. Bring to a boil over high heat, then reduce to a simmer. Stir occasionally to prevent sticking.
- Add the minced ginger and reserved abalone juice to the pot. Simmer for 25 minutes, or until the rice is fully broken down and the porridge is creamy.
- Gently stir in the sliced abalone and sesame oil. Cook for another 5 minutes to warm the abalone through.
- Season with salt, starting with 1/2 tsp and adjusting to your preference. Remember, the abalone adds its own saltiness, so taste as you go.
Luxuriously creamy with chunks of tender abalone, this porridge is a comforting yet sophisticated dish. Serve it with a sprinkle of green onions or a drizzle of chili oil for an extra layer of flavor. It’s the perfect bowl to start your day on a high note.
Korean Style Omelette

Every time I think about comfort food, my mind wanders to the fluffy, savory delight of a Korean Style Omelette. It’s a dish that brings back memories of lazy Sunday mornings, where the only mission was to savor each bite. Today, I’m sharing my go-to recipe that’s as fun to make as it is to eat.
Ingredients
- 4 large eggs (I swear by room temperature eggs for that perfect fluffiness)
- 1/4 cup milk (whole milk makes it richer, but any works)
- 1/2 tsp salt (I like to use sea salt for its subtle crunch)
- 1/4 tsp black pepper (freshly ground, if you have it)
- 1 tbsp unsalted butter (because butter makes everything better)
- 1/4 cup shredded cheddar cheese (or any cheese you have on hand)
- 1 green onion, finely chopped (for that fresh kick)
Instructions
- In a medium bowl, whisk together the eggs, milk, salt, and black pepper until fully combined. Tip: A fork works great here for incorporating air, making the omelette fluffier.
- Heat a non-stick skillet over medium heat (about 300°F) and melt the butter, swirling to coat the pan evenly. Tip: The butter should foam but not brown; that’s your cue it’s ready.
- Pour the egg mixture into the skillet, letting it spread out evenly. As the edges start to set, gently push them towards the center with a spatula, letting the uncooked eggs flow to the edges.
- Sprinkle the cheese and green onions over one half of the omelette once the top is still slightly runny. Tip: Adding toppings now ensures they melt perfectly into the omelette.
- Carefully fold the other half over the fillings, then cook for another minute until the cheese starts to melt.
- Slide the omelette onto a plate, and let it rest for a minute before serving. This rest period lets the residual heat finish cooking the inside without drying it out.
Buttery, cheesy, and with just the right amount of green onion bite, this Korean Style Omelette is a dream on a plate. Serve it with a side of kimchi for an extra flavor punch or enjoy it as is for a simple, satisfying meal.
Grilled Mackerel
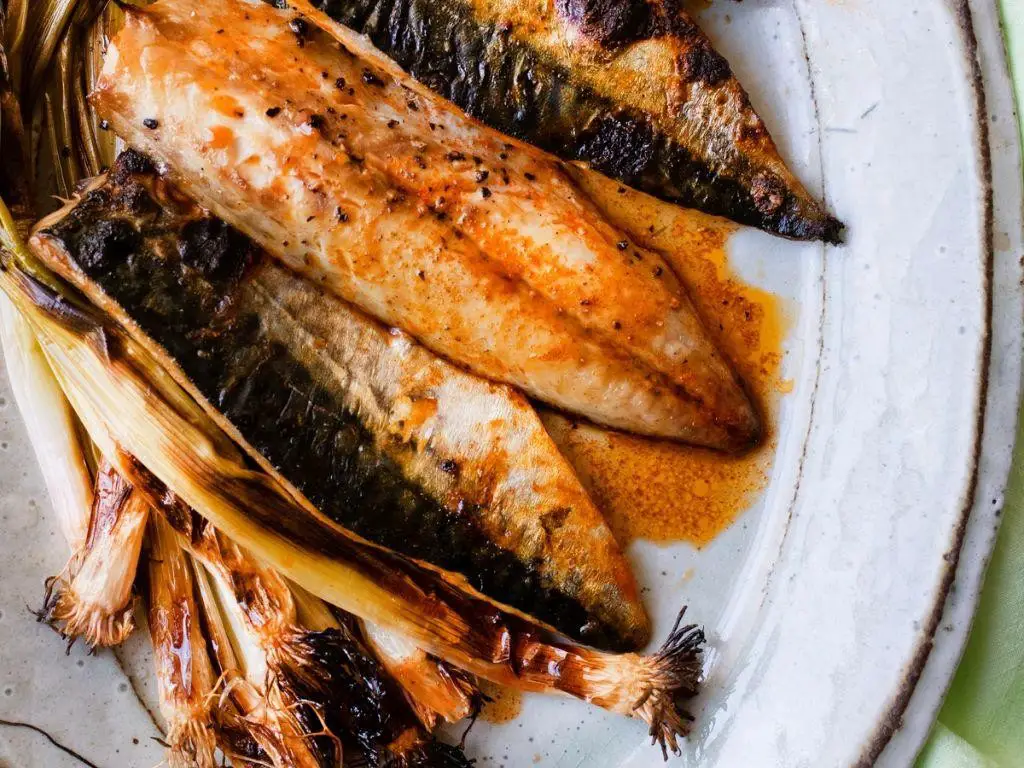
Perfectly grilled mackerel has been my go-to summer dish ever since I stumbled upon a tiny seaside grill spot during a road trip along the coast. There’s something about the smoky flavor combined with the fish’s natural richness that screams summer to me.
Ingredients
- 2 whole mackerel, cleaned and gutted (I always ask my fishmonger to do this for me—saves so much time!)
- 2 tbsp extra virgin olive oil (my go-to for its fruity notes)
- 1 tsp sea salt (I love the crunch it adds)
- 1/2 tsp black pepper, freshly ground
- 1 lemon, sliced (for that bright, citrusy kick)
- 2 sprigs of fresh rosemary (because the aroma is just unbeatable)
Instructions
- Preheat your grill to medium-high heat, about 375°F. A well-heated grill ensures those beautiful grill marks.
- While the grill heats, pat the mackerel dry with paper towels. This step is crucial for getting that crispy skin.
- Brush both sides of the mackerel with olive oil. I like to use a silicone brush for even coverage.
- Season the inside and outside of the fish with salt and pepper. Don’t be shy—the seasoning should be noticeable.
- Place a few lemon slices and a sprig of rosemary inside each fish. This infuses the mackerel with amazing flavors as it cooks.
- Grill the mackerel for about 5 minutes on each side. You’ll know it’s ready to flip when the skin releases easily from the grill.
- Remove from the grill and let it rest for 2 minutes. This allows the juices to redistribute, making every bite succulent.
Rich in flavor with a perfectly crispy skin, this grilled mackerel is a testament to simple ingredients done right. Serve it with a side of grilled vegetables or over a bed of quinoa for a complete meal that’s both nutritious and satisfying.
Steamed Eggs
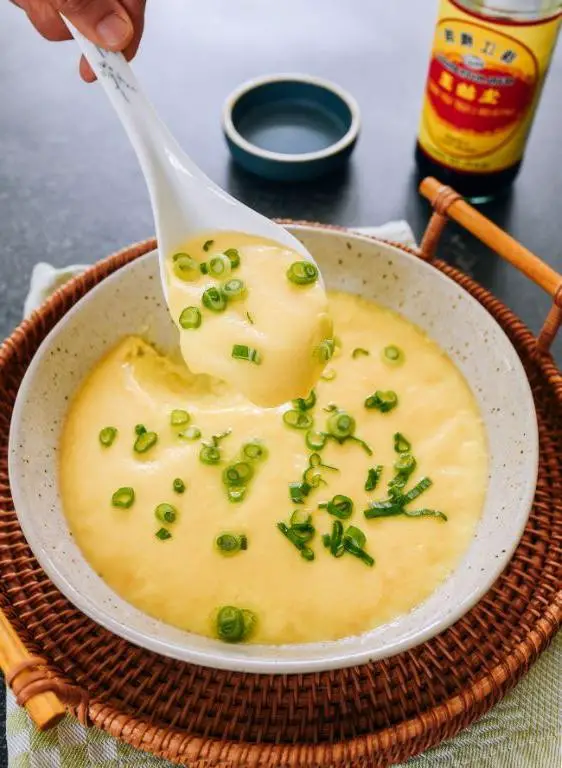
Zesty mornings call for something light yet satisfying, and that’s exactly why I turn to steamed eggs. It’s a dish that reminds me of lazy Sundays at my grandma’s, where the kitchen was always filled with the comforting aroma of simple, home-cooked meals.
Ingredients
- 4 large eggs (I prefer room temp eggs here; they blend more smoothly)
- 1 cup water (filtered is my go-to for the purest taste)
- 1/2 tsp salt (a pinch more if you’re like me and love a bit more flavor)
- 1 tbsp soy sauce (for that umami kick)
- 1 tsp sesame oil (extra virgin olive oil is my go-to, but sesame adds a unique depth)
- 2 green onions, finely chopped (for a fresh, crisp finish)
Instructions
- In a mixing bowl, gently beat the eggs until the yolks and whites are fully combined. Tip: Avoid overbeating to keep the texture silky.
- Slowly stir in the water and salt, mixing just until incorporated. Tip: Using warm water can help achieve a smoother consistency.
- Strain the egg mixture through a fine sieve into a heatproof bowl to remove any unbeaten egg whites. This step is crucial for that restaurant-quality smoothness.
- Cover the bowl with aluminum foil to prevent water droplets from falling into the eggs during steaming.
- Place a steamer rack in a pot and fill with water until it’s just below the rack. Bring the water to a boil over high heat.
- Once boiling, reduce the heat to medium and carefully place the bowl on the rack. Steam for 12 minutes. Tip: Keep the lid slightly ajar to control the steam pressure.
- After steaming, drizzle with soy sauce and sesame oil, then sprinkle with green onions.
Here you have it, a bowl of steamed eggs that’s as smooth as custard, with layers of flavor from the soy sauce and sesame oil. I love serving it with a side of steamed rice for a complete meal that’s both comforting and elegant.
Korean Beef Rice Bowl

Just last week, I found myself craving something hearty yet easy to whip up after a long day. That’s when I decided to make this Korean Beef Rice Bowl, a dish that’s become a staple in my kitchen for its perfect balance of savory, sweet, and a hint of spice.
Ingredients
- 1 lb ground beef (I like using 80/20 for that perfect fat ratio)
- 1/3 cup brown sugar (packed, because a little extra sweetness never hurt anyone)
- 1/4 cup soy sauce (I swear by Kikkoman for its depth of flavor)
- 1 tbsp sesame oil (toasted, for that nutty aroma)
- 3 cloves garlic (minced, because fresh is always better)
- 1/2 tsp ginger (grated, it adds a lovely zing)
- 1/4 tsp crushed red pepper flakes (adjust if you’re not into heat)
- 2 cups cooked rice (I prefer jasmine for its fragrance)
- 2 green onions (sliced, for a fresh finish)
- 1 tbsp sesame seeds (for that final crunchy touch)
Instructions
- In a large skillet over medium heat, cook the ground beef until no longer pink, about 5-7 minutes. Tip: Break it up as it cooks for even browning.
- While the beef cooks, whisk together the brown sugar, soy sauce, sesame oil, garlic, ginger, and red pepper flakes in a small bowl.
- Once the beef is cooked, drain any excess fat, then return the skillet to the stove.
- Pour the sauce over the beef and stir to combine. Let it simmer for 2-3 minutes until the sauce thickens slightly. Tip: Keep an eye on it to prevent burning.
- Serve the beef over cooked rice, garnished with green onions and sesame seeds. Tip: For an extra kick, add a drizzle of sriracha before serving.
Rich in flavor with a delightful contrast of textures, this Korean Beef Rice Bowl is a weeknight winner. The beef is wonderfully tender, coated in a glossy sauce that clings to every grain of rice. Try topping it with a fried egg for an extra layer of decadence.
Vegetable Bibimbap

Whenever I think about a dish that’s as vibrant and lively as a summer garden, Vegetable Bibimbap comes to mind. It’s a Korean classic that I’ve tweaked to make it a bit more accessible for my weeknight dinners, yet it never fails to bring a burst of color and flavor to the table.
Ingredients
- 2 cups cooked short-grain rice (I swear by Nishiki brand for its perfect stickiness)
- 1 tbsp sesame oil (the toasted kind adds an irreplaceable depth)
- 1 tbsp vegetable oil (for that neutral canvas to let other flavors shine)
- 1 cup spinach (fresh, because frozen just doesn’t give the same crunch)
- 1 cup shredded carrots (I like to julienne them for a bit of elegance)
- 1 cup sliced shiitake mushrooms (their earthy flavor is a must)
- 2 eggs (room temp, they fry more evenly)
- 1 tbsp gochujang (adjust according to your heat tolerance)
- 1 tsp soy sauce (I use low-sodium to control the saltiness)
- 1 tsp sugar (just a pinch to balance the flavors)
- 1 clove garlic, minced (because what’s a stir-fry without garlic?)
Instructions
- Heat the vegetable oil in a large skillet over medium-high heat until shimmering, about 2 minutes.
- Add the spinach and a pinch of salt, sautéing until just wilted, roughly 1 minute. Remove and set aside.
- In the same skillet, add a bit more oil if needed, then the carrots and mushrooms. Stir-fry until the carrots are slightly soft and the mushrooms are golden, about 3 minutes.
- Push the vegetables to one side of the skillet. Crack the eggs into the empty space and fry until the whites are set but the yolks are still runny, about 2 minutes.
- In a small bowl, mix the gochujang, soy sauce, sugar, and minced garlic to make the sauce.
- Divide the cooked rice between two bowls. Arrange the sautéed vegetables and fried egg on top of the rice.
- Drizzle with sesame oil and the prepared sauce. Tip: Mix everything together right before eating to enjoy the contrasting textures and temperatures.
After mixing, each bite is a delightful contrast of the warm, soft rice against the crisp vegetables, with the rich, runny egg yolk tying it all together. For an extra touch, serve with a side of kimchi to add a spicy, fermented kick that complements the dish beautifully.
Fish Cake Soup

Perfect for those chilly evenings when you’re craving something hearty yet light, Fish Cake Soup has been my go-to comfort food ever since I stumbled upon it during a rainy day in Seattle. The blend of tender fish cakes floating in a savory broth, with just the right amount of veggies, makes it a dish that’s both nourishing and incredibly satisfying.
Ingredients
- 1 lb white fish fillets (I love using cod for its flaky texture)
- 1/2 cup all-purpose flour (for that perfect binding)
- 1 egg (room temperature eggs mix better, in my experience)
- 2 cloves garlic, minced (because garlic makes everything better)
- 4 cups chicken broth (homemade if you have it, but store-bought works in a pinch)
- 1 cup sliced carrots (for a sweet crunch)
- 1 cup sliced zucchini (adds a lovely color and texture)
- 2 tbsp soy sauce (I opt for low-sodium to control the saltiness)
- 1 tbsp sesame oil (the secret to that deep, nutty flavor)
- 1/2 tsp black pepper (freshly ground, if possible)
Instructions
- In a large bowl, combine the fish fillets, flour, egg, and minced garlic. Mash everything together until well mixed. Tip: Using a fork helps break down the fish evenly.
- Shape the mixture into small, flat cakes, about 2 inches in diameter. Tip: Wetting your hands prevents the mixture from sticking.
- In a large pot, bring the chicken broth to a boil over medium-high heat.
- Gently add the fish cakes to the boiling broth. Reduce the heat to medium and let them cook for about 5 minutes, or until they float to the surface.
- Add the sliced carrots and zucchini to the pot. Cook for another 3 minutes, just until the vegetables are tender but still crisp. Tip: Don’t overcook the veggies to keep their vibrant color and crunch.
- Stir in the soy sauce, sesame oil, and black pepper. Let the soup simmer for another 2 minutes to blend the flavors.
Vibrant and flavorful, this Fish Cake Soup is a delightful meal that brings warmth to any table. Serve it with a side of steamed rice or enjoy it as is for a lighter option. The fish cakes are wonderfully tender, and the broth is just the right balance of savory and sweet, making every spoonful a treat.
Cold Noodles in Broth

Last summer, I stumbled upon the most refreshing dish at a tiny noodle shop in New York, and I’ve been obsessed with Cold Noodles in Broth ever since. It’s the perfect blend of cool, savory, and slightly tangy flavors that just scream summer to me.
Ingredients
- 8 oz thin wheat noodles (I love the chewy texture they bring)
- 4 cups chicken broth (homemade if you have it, but store-bought works in a pinch)
- 2 tbsp soy sauce (I always go for the low-sodium version to control the saltiness)
- 1 tbsp sesame oil (toasted, for that deep, nutty flavor)
- 1 cucumber, julienned (for a crisp, fresh crunch)
- 2 green onions, thinly sliced (they add a nice sharpness)
- 1 tsp grated ginger (fresh is best here, it really brightens the dish)
- 1/2 tsp chili flakes (adjust based on how spicy you like it)
- Ice cubes (for shocking the noodles, trust me, it makes a difference)
Instructions
- Bring a large pot of water to a rolling boil over high heat. Add the noodles and cook according to package instructions, usually about 3-4 minutes.
- While the noodles cook, prepare a large bowl of ice water. Once the noodles are done, drain them and immediately plunge into the ice water to stop the cooking process. This keeps them perfectly al dente.
- In a medium saucepan, combine the chicken broth, soy sauce, sesame oil, and grated ginger. Heat over medium heat until just simmering, then remove from heat and let cool to room temperature.
- Drain the noodles well and divide them between two bowls. Pour the cooled broth over the noodles.
- Top each bowl with julienned cucumber, sliced green onions, and a sprinkle of chili flakes.
- Serve immediately, with extra chili flakes on the side for those who like it hot.
So there you have it—a dish that’s as simple to make as it is delicious. The noodles should be slippery and cool, with the broth offering a savory depth that’s balanced by the fresh veggies. Try adding a soft-boiled egg on top for extra richness!
Conclusion
Packed with flavor and nutrition, these 18 Korean breakfast recipes offer a delightful way to start your day. Whether you’re craving something savory or sweet, there’s a dish here to satisfy every palate. We’d love to hear which recipes you try and love—drop us a comment below! Don’t forget to share your favorites on Pinterest to spread the joy of Korean breakfast delights. Happy cooking!

Michael Johnson is the founder of Pan Mastery, Inspired by his blacksmith grandfather’s legacy has a deep appreciation for hand-crafted pots and pans, he provides invaluable guides, reviews, and recipes to enhance your culinary journey.