There’s no need to sacrifice flavor for health when it comes to snacking! Whether you’re looking for a quick bite between meals or a guilt-free treat to satisfy your cravings, our roundup of 20 Delicious Low Calorie Snack Recipes is packed with tasty, nutritious options. Dive in and discover how easy it is to keep your energy up and your calorie count down with these wholesome choices.
Avocado and Egg Toast
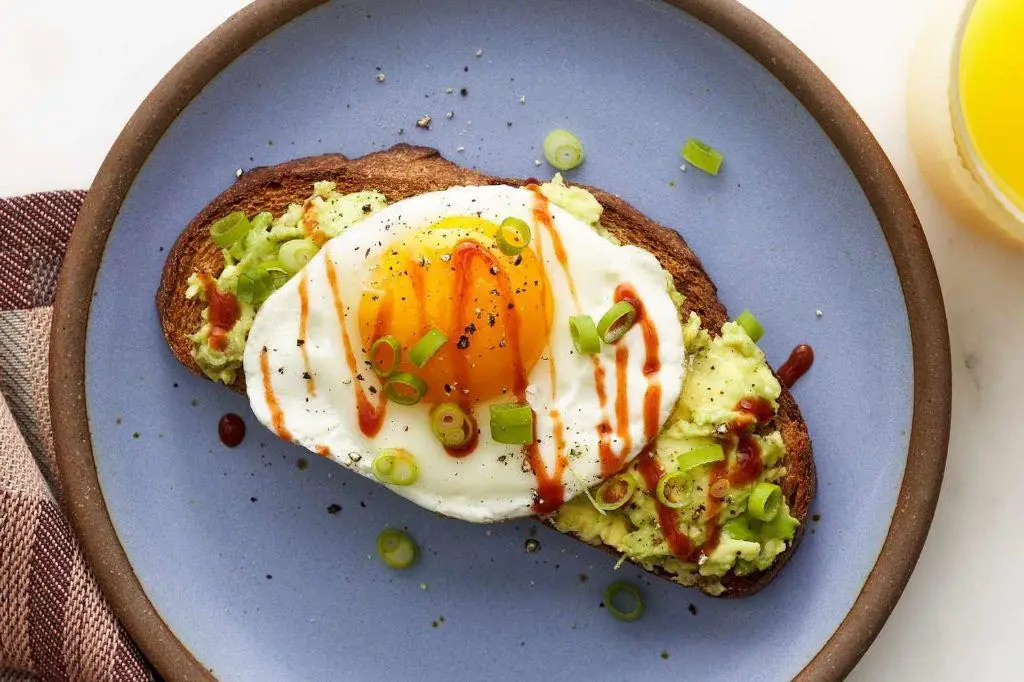
Amidst the quiet of the morning, there’s something profoundly comforting about the simplicity of avocado and egg toast. It’s a dish that speaks to the soul, offering a moment of peace before the day unfolds.
Ingredients
- Bread – 2 slices
- Avocado – 1
- Eggs – 2
- Salt – ½ tsp
- Pepper – ¼ tsp
- Olive oil – 1 tbsp
Instructions
- Heat a non-stick skillet over medium heat and add 1 tbsp of olive oil.
- Crack 2 eggs into the skillet, being careful not to break the yolks.
- Cook the eggs for 3 minutes for runny yolks, or until desired doneness, then season with salt and pepper.
- While the eggs cook, toast 2 slices of bread until golden and crisp.
- Cut 1 avocado in half, remove the pit, and scoop the flesh into a bowl.
- Mash the avocado lightly with a fork, leaving some chunks for texture.
- Spread the mashed avocado evenly on the toasted bread slices.
- Place the cooked eggs on top of the avocado toast.
- Season with additional salt and pepper if desired.
Here, the creamy avocado pairs beautifully with the rich, runny egg yolk, creating a harmony of textures and flavors. For an extra touch, sprinkle with red pepper flakes or a drizzle of hot sauce to awaken the senses.
Greek Yogurt with Honey and Almonds

Now, as the early summer light filters through the kitchen window, there’s something profoundly comforting about the simplicity of combining creamy Greek yogurt with the golden sweetness of honey and the subtle crunch of almonds. It’s a dish that feels both nourishing and indulgent, a quiet moment of self-care in a bowl.
Ingredients
- Greek yogurt – 1 cup
- Honey – 2 tbsp
- Almonds – ¼ cup
Instructions
- Measure 1 cup of Greek yogurt into a serving bowl.
- Drizzle 2 tbsp of honey over the yogurt, aiming for an even distribution.
- Toast ¼ cup of almonds in a dry skillet over medium heat for 3-5 minutes, stirring frequently, until they’re fragrant and lightly golden. Tip: Keep a close eye on them to prevent burning.
- Let the almonds cool for a minute, then roughly chop them for varied texture.
- Sprinkle the chopped almonds over the honey-drizzled yogurt. Tip: For extra flavor, consider adding a pinch of cinnamon to the almonds before toasting.
- Serve immediately, or chill in the refrigerator for up to 30 minutes to slightly thicken the yogurt. Tip: If you prefer a sweeter dish, adjust the amount of honey after tasting.
Perhaps what makes this combination so delightful is the contrast between the cool, tangy yogurt and the warm, sweet honey, punctuated by the almonds’ satisfying crunch. It’s versatile, too—serve it as a breakfast parfait layered with granola or as a light dessert garnished with fresh berries.
Cucumber and Hummus Bites

Gently, the crispness of fresh cucumbers meets the creamy embrace of hummus in these simple yet satisfying bites. Perfect for a quiet afternoon or a gathering, they whisper of summer’s ease.
Ingredients
- Cucumber – 1 large
- Hummus – 1 cup
- Olive oil – 1 tbsp
- Salt – ¼ tsp
Instructions
- Wash the cucumber under cold water and pat dry with a clean towel.
- Using a sharp knife, slice the cucumber into ¼-inch thick rounds. For even slices, a mandoline can be used carefully.
- Lay the cucumber slices on a serving plate, ensuring they are flat and not overlapping.
- Using a small spoon, dollop approximately 1 teaspoon of hummus onto the center of each cucumber slice.
- Drizzle olive oil lightly over the hummus-topped cucumbers for a glossy finish.
- Sprinkle a pinch of salt over each bite to enhance the flavors.
- Serve immediately, or chill in the refrigerator for 10 minutes to allow the flavors to meld slightly.
Offering a delightful contrast between the cool, crunchy cucumber and the smooth, rich hummus, these bites are a testament to simplicity. Try garnishing with a sprinkle of paprika or a few microgreens for an extra touch of color and flavor.
Baked Apple Chips
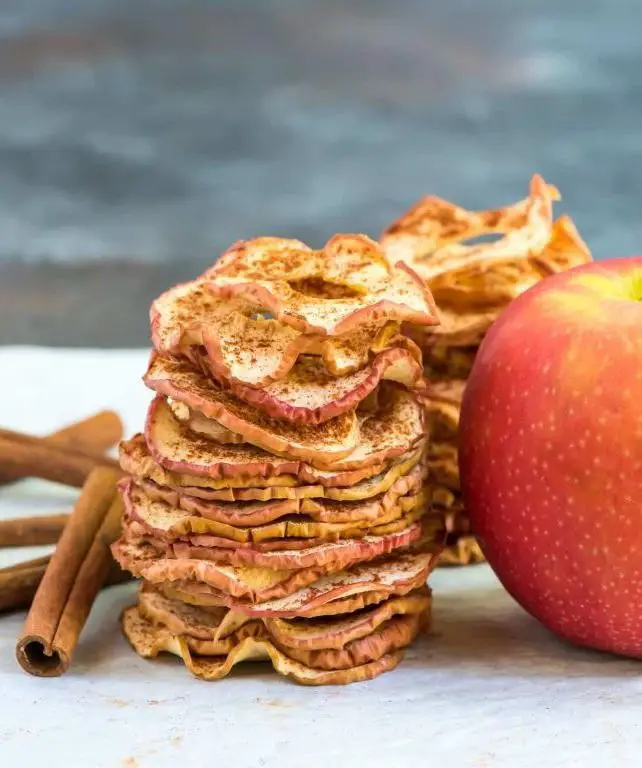
How quietly the afternoon slips away, much like these baked apple chips, thin and crisp, carrying the essence of autumn in every bite. They’re a simple pleasure, a reminder of how little we need to create something truly delightful.
Ingredients
- Apples – 2 large
- Sugar – 1 tbsp
- Cinnamon – ½ tsp
Instructions
- Preheat your oven to 200°F and line two baking sheets with parchment paper.
- Wash the apples thoroughly, then core them using an apple corer or a sharp knife.
- Slice the apples as thinly as possible, about 1/8 inch thick, for even baking. A mandoline slicer can achieve uniform slices effortlessly.
- Arrange the apple slices in a single layer on the prepared baking sheets, ensuring they don’t overlap.
- Sprinkle the apple slices lightly with sugar and cinnamon, using your fingers to distribute the spices evenly.
- Bake in the preheated oven for 1 hour, then flip each slice carefully to ensure even drying.
- Continue baking for another 1 to 1.5 hours, or until the chips are dry and crisp. They’ll crisp up further as they cool.
- Remove from the oven and let cool completely on the baking sheets before serving or storing.
For an extra touch of warmth, pair these chips with a dollop of vanilla yogurt or a drizzle of caramel. Their light crunch and sweet-spiced flavor make them a versatile snack, perfect for any time of day.
Strawberry and Banana Smoothie
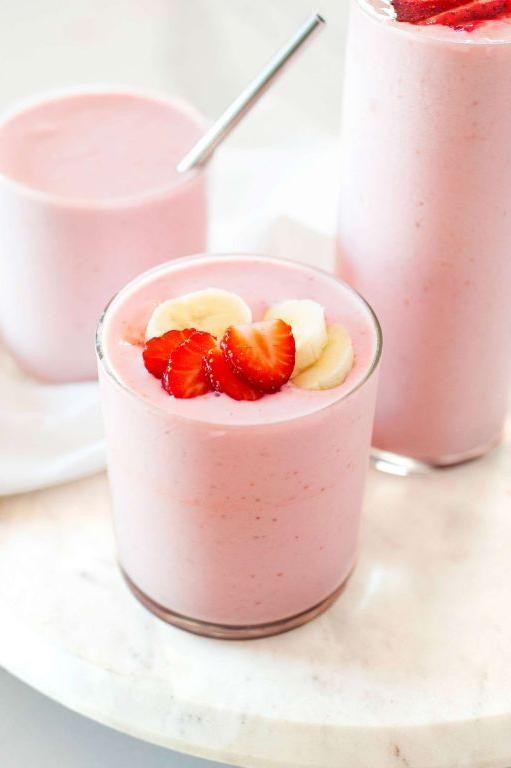
Calmly, as the morning light filters through the kitchen window, there’s something deeply comforting about blending a strawberry and banana smoothie. It’s a simple pleasure, a moment of quiet before the day unfolds, where the sweetness of fruit can almost taste like a gentle hug.
Ingredients
- Strawberries – 1 cup
- Banana – 1 medium
- Milk – 1 cup
- Honey – 1 tbsp
- Ice cubes – ½ cup
Instructions
- Wash the strawberries under cold running water for 30 seconds, then hull them.
- Peel the banana and break it into chunks.
- In a blender, combine the strawberries, banana chunks, milk, honey, and ice cubes.
- Blend on high speed for 45 seconds, or until the mixture is completely smooth. Tip: For a thicker smoothie, add more ice cubes one at a time until desired consistency is reached.
- Pour the smoothie into a tall glass. Tip: To prevent the smoothie from separating, give it a quick stir before serving.
- Serve immediately. Tip: Garnish with a thin strawberry slice on the rim of the glass for an elegant touch.
As you take the first sip, the smoothie’s velvety texture and the harmonious blend of strawberry and banana flavors are unmistakably refreshing. It’s perfect for a quick breakfast or a soothing afternoon treat, especially when enjoyed in the garden under the shade of a tree.
Zucchini Pizza Bites

Just imagine a quiet evening, the kitchen bathed in golden light, as you prepare something simple yet utterly comforting. Zucchini pizza bites offer that perfect blend of ease and indulgence, a little nod to joy in the everyday.
Ingredients
- Zucchini – 2 medium, sliced into ¼-inch rounds
- Olive oil – 1 tbsp
- Salt – ½ tsp
- Marinara sauce – ½ cup
- Shredded mozzarella cheese – 1 cup
- Pepperoni slices – ½ cup
- Dried oregano – ½ tsp
Instructions
- Preheat your oven to 400°F and line a baking sheet with parchment paper.
- Arrange the zucchini rounds on the baking sheet in a single layer, ensuring they don’t overlap.
- Brush each zucchini round lightly with olive oil and sprinkle with salt to enhance their natural flavors.
- Bake in the preheated oven for 10 minutes to soften the zucchini slightly, making them the perfect base for your toppings.
- Remove the baking sheet from the oven. Spoon a small amount of marinara sauce onto each zucchini round, spreading it evenly with the back of the spoon.
- Sprinkle shredded mozzarella cheese over the sauce, covering each round generously for that classic pizza melt.
- Top each with a pepperoni slice, pressing down gently to adhere it to the cheese.
- Sprinkle dried oregano over the tops for an aromatic touch that elevates the dish.
- Return the baking sheet to the oven and bake for another 5-7 minutes, or until the cheese is bubbly and slightly golden.
- Let the zucchini pizza bites cool for a minute or two before serving to allow the cheese to set slightly, preventing toppings from sliding off.
You’ll find these bites delightfully crisp-tender, with the zucchini offering a fresh counterpoint to the rich, savory toppings. Try serving them on a wooden board for a rustic, shareable appetizer that invites conversation.
Roasted Chickpeas
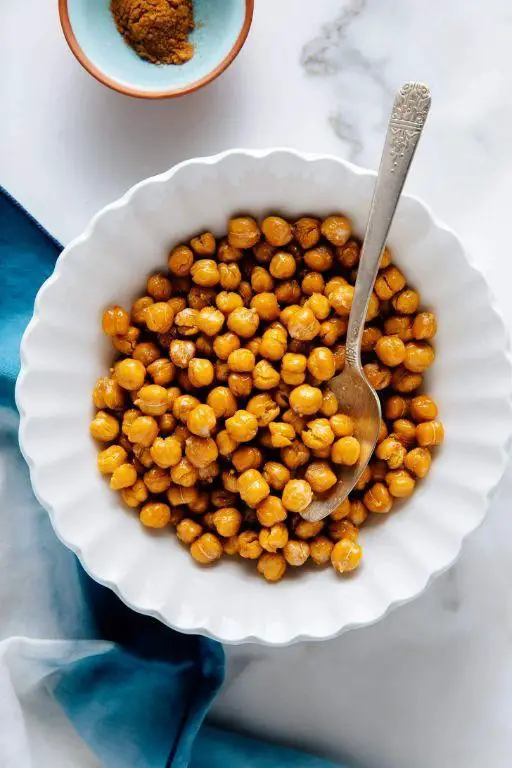
Curling up with a bowl of roasted chickpeas feels like embracing simplicity itself. Their crisp exterior and tender heart remind me of quiet afternoons and the joy of uncomplicated flavors.
Ingredients
- Chickpeas – 2 cups
- Olive oil – 2 tbsp
- Salt – ½ tsp
Instructions
- Preheat your oven to 400°F to ensure it’s ready for roasting.
- Drain and rinse the chickpeas thoroughly, then pat them dry with a clean towel to remove excess moisture for better crispiness.
- Toss the chickpeas with olive oil and salt in a bowl until evenly coated.
- Spread the chickpeas in a single layer on a baking sheet to allow even roasting.
- Roast in the preheated oven for 20 minutes, then shake the pan to turn the chickpeas for uniform browning.
- Continue roasting for another 15-20 minutes until they are golden and crispy. Keep an eye on them to prevent burning.
- Remove from the oven and let them cool slightly; they’ll crisp up more as they sit.
Enjoy these roasted chickpeas warm, their golden crunch giving way to a soft, nutty center. Sprinkle them over salads for texture or enjoy as a standalone snack with your favorite dip.
Dark Chocolate Covered Strawberries

Gently, the combination of ripe strawberries and rich dark chocolate whispers the promise of a simple yet profound pleasure. It’s a pairing that feels both indulgent and innocent, a reminder of how few ingredients are needed to create something truly special.
Ingredients
- Fresh strawberries – 1 lb
- Dark chocolate chips – 1 cup
- Vegetable oil – 1 tsp
Instructions
- Wash the strawberries under cold water and pat them dry thoroughly with a paper towel to ensure the chocolate adheres properly.
- Line a baking sheet with parchment paper to prevent the strawberries from sticking after they’re dipped.
- Place the dark chocolate chips and vegetable oil in a microwave-safe bowl. Microwave on high for 30 seconds, then stir. Repeat in 15-second intervals until the chocolate is completely melted and smooth, being careful not to overheat.
- Hold each strawberry by the stem and dip it into the melted chocolate, swirling to coat it evenly. Allow any excess chocolate to drip off back into the bowl.
- Place the dipped strawberries on the prepared baking sheet. For a decorative touch, you can drizzle any remaining chocolate over the strawberries with a spoon.
- Refrigerate the strawberries for at least 30 minutes, or until the chocolate is fully set and firm to the touch.
The strawberries emerge with a glossy chocolate shell that cracks delicately under the tooth, revealing the juicy sweetness beneath. Try serving them on a chilled plate for an elegant dessert, or as a decadent addition to a brunch spread.
Cauliflower Popcorn
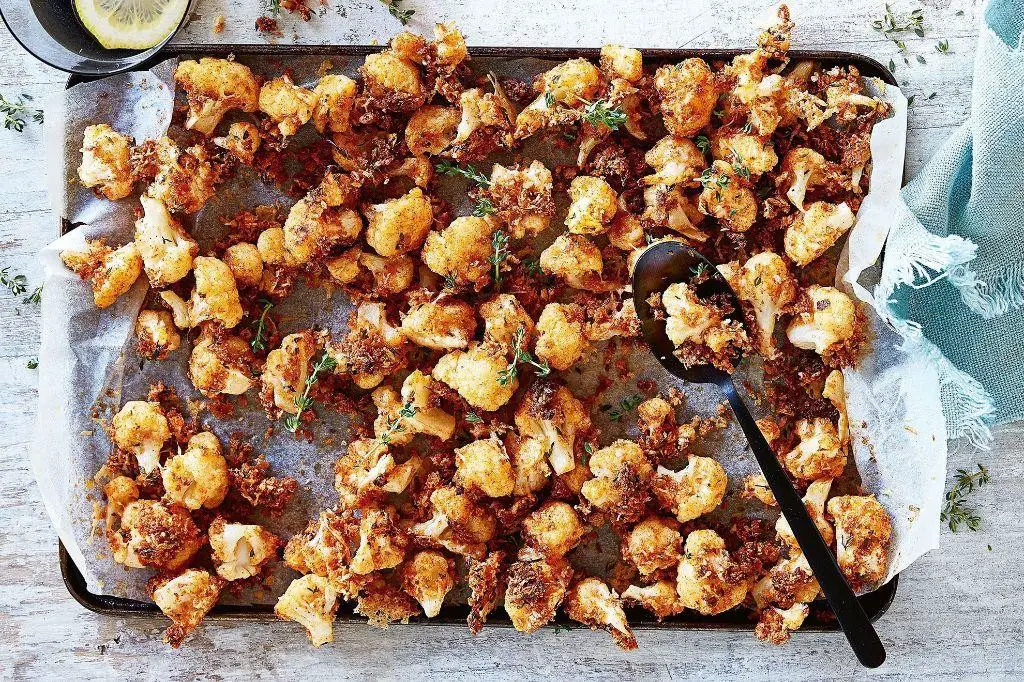
Zestfully, let’s wander into the kitchen, where simplicity meets comfort in the form of Cauliflower Popcorn. This dish, a humble yet transformative take on the vegetable, invites a moment of pause and savor in our bustling lives.
Ingredients
- Cauliflower – 1 head
- Olive oil – 2 tbsp
- Salt – ½ tsp
Instructions
- Preheat your oven to 400°F (204°C), ensuring it’s fully heated for even cooking.
- Cut the cauliflower into small, popcorn-sized florets, aiming for uniformity to promote even roasting.
- Toss the florets with olive oil and salt in a large bowl, coating each piece lightly but thoroughly.
- Spread the cauliflower in a single layer on a baking sheet, avoiding overcrowding to allow each floret to crisp up beautifully.
- Roast for 25-30 minutes, stirring halfway through, until the edges are golden and the centers are tender.
- Let the cauliflower cool for a few minutes on the baking sheet; this rest period enhances the crispiness.
Cauliflower Popcorn emerges from the oven with a delightful contrast of crispy edges and soft centers, its natural sweetness deepened by roasting. Serve it warm as a snack, or sprinkle with nutritional yeast for a cheesy twist without the dairy.
Spinach and Feta Stuffed Mushrooms
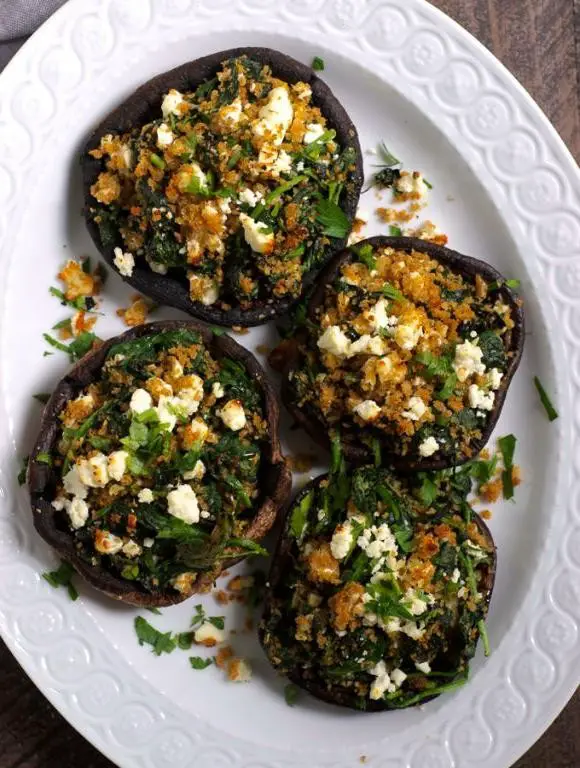
Reflecting on the simplicity of ingredients coming together to create something unexpectedly delightful, these stuffed mushrooms offer a cozy bite of earthy and tangy flavors, perfect for a quiet evening or a gathering of close friends.
Ingredients
- Mushrooms – 12 large
- Spinach – 1 cup, chopped
- Feta cheese – ½ cup, crumbled
- Olive oil – 2 tbsp
- Garlic – 2 cloves, minced
- Salt – ¼ tsp
- Black pepper – ⅛ tsp
Instructions
- Preheat your oven to 375°F (190°C) to ensure it’s ready for baking.
- Clean the mushrooms gently with a damp cloth, then remove the stems carefully to create space for the filling.
- Heat 1 tbsp of olive oil in a pan over medium heat, add the minced garlic, and sauté until fragrant, about 30 seconds.
- Add the chopped spinach to the pan, stirring until wilted, roughly 2 minutes. Tip: Squeeze out excess water from the spinach to prevent soggy mushrooms.
- Remove the pan from heat, mix in the crumbled feta, salt, and black pepper, combining well.
- Brush the mushroom caps with the remaining olive oil, then stuff each cap generously with the spinach and feta mixture.
- Arrange the stuffed mushrooms on a baking sheet and bake for 20 minutes, or until the mushrooms are tender and the tops are lightly golden. Tip: For an extra crunch, broil for the last 2 minutes.
- Let them cool for a few minutes before serving to allow the flavors to meld together beautifully.
Fresh from the oven, these mushrooms boast a juicy texture with a creamy, savory filling that contrasts wonderfully with the slight crispness of the baked tops. Serve them atop a bed of arugula for a refreshing contrast or alongside a glass of crisp white wine to elevate the experience.
Peanut Butter and Banana Roll-Ups
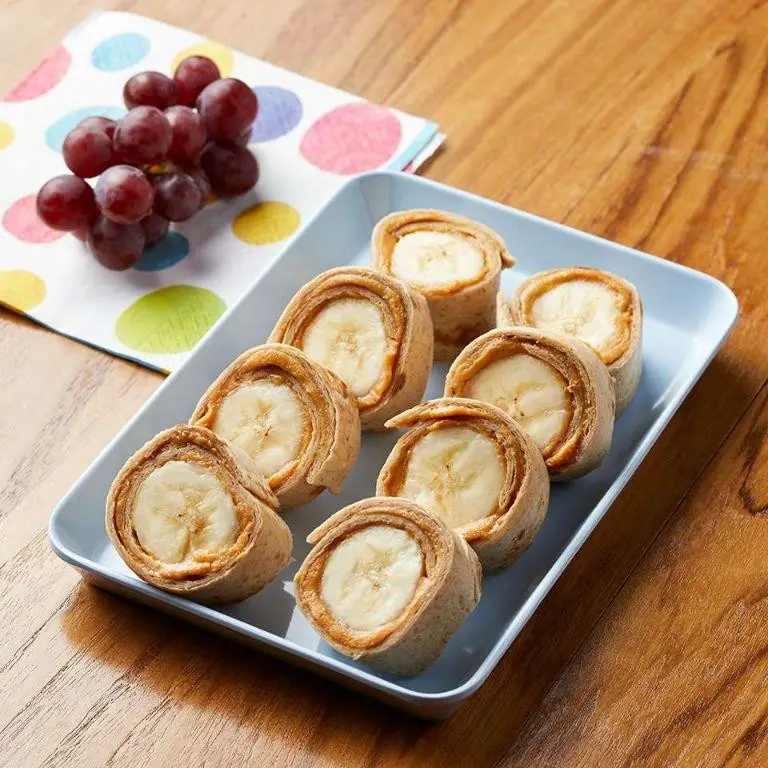
Now, as the quiet of the evening settles in, there’s something profoundly comforting about the simplicity of combining peanut butter and banana into a roll-up. It’s a humble dish that speaks to the heart, offering a sweet, creamy escape with every bite.
Ingredients
- Whole wheat tortillas – 2
- Peanut butter – ½ cup
- Bananas – 2, medium
- Honey – 2 tbsp
Instructions
- Lay the whole wheat tortillas flat on a clean surface.
- Spread ¼ cup of peanut butter evenly over each tortilla, leaving a 1-inch border around the edges.
- Peel the bananas and place one banana near the edge of each tortilla.
- Drizzle 1 tbsp of honey over each banana.
- Gently roll the tortilla around the banana, tucking in the sides as you go to secure the filling.
- Heat a non-stick skillet over medium heat (350°F) and place the roll-ups seam side down. Cook for 2-3 minutes until golden brown, then flip and cook the other side for another 2-3 minutes.
- Remove from the skillet and let cool for 1 minute before slicing into 1-inch pieces.
These roll-ups emerge with a delightful contrast of textures: the crisp exterior gives way to the soft, warm filling inside. The peanut butter and banana meld together under the heat, creating a gooey, sweet center that’s irresistible. Try serving them with a drizzle of extra honey and a sprinkle of cinnamon for an extra touch of warmth.
Tomato and Mozzarella Salad
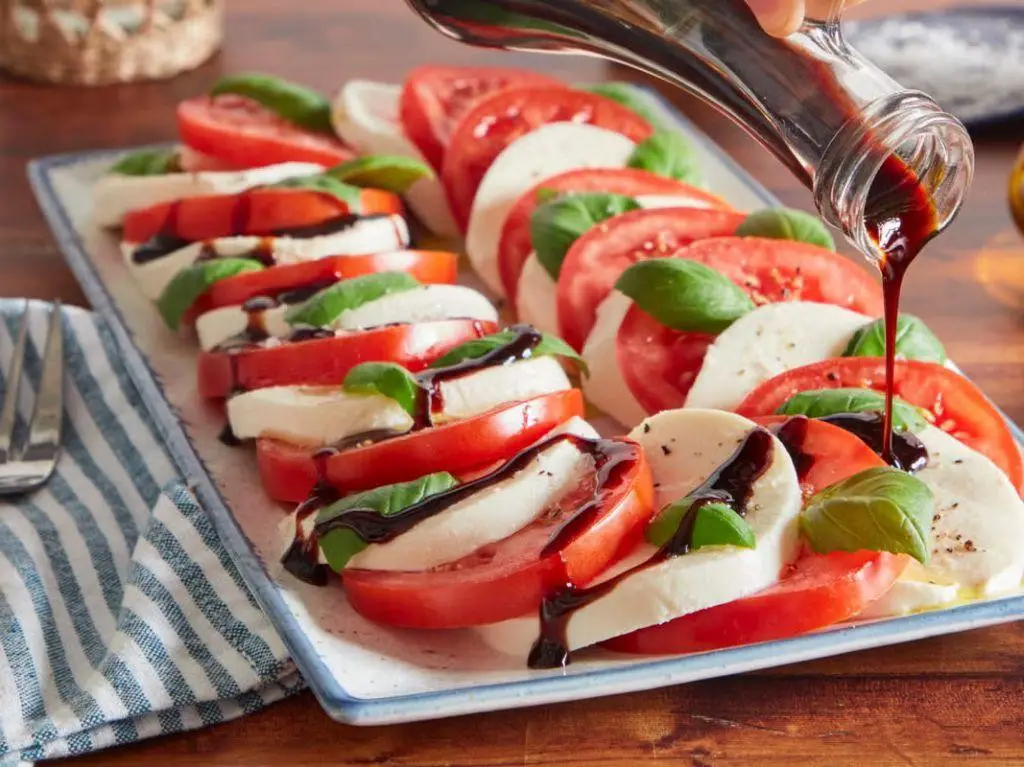
Calmly, as the summer sun begins to dip below the horizon, there’s a simplicity in combining fresh ingredients to create something truly refreshing. This Tomato and Mozzarella Salad is a testament to the beauty of minimalism in cooking, where each ingredient shines through.
Ingredients
- Tomatoes – 2 large
- Fresh mozzarella – 8 oz
- Fresh basil leaves – ¼ cup
- Extra virgin olive oil – 2 tbsp
- Balsamic vinegar – 1 tbsp
- Salt – ½ tsp
- Black pepper – ¼ tsp
Instructions
- Wash the tomatoes under cold running water and pat them dry with a clean towel.
- Slice the tomatoes into ¼-inch thick rounds, ensuring each slice is even for uniform presentation.
- Drain the fresh mozzarella and slice it into ¼-inch thick rounds, similar to the tomatoes.
- Arrange the tomato and mozzarella slices alternately on a serving plate, slightly overlapping for a visually appealing pattern.
- Tear the fresh basil leaves by hand and scatter them evenly over the arranged tomato and mozzarella slices.
- Drizzle the extra virgin olive oil and balsamic vinegar over the salad, aiming for an even distribution.
- Sprinkle the salt and black pepper over the top, adjusting the amounts to suit your preference but starting with the measurements provided.
- Let the salad sit at room temperature for 10 minutes before serving to allow the flavors to meld together beautifully.
The salad offers a delightful contrast between the juicy tomatoes and the creamy mozzarella, with the basil adding a fresh, aromatic touch. Serve it on a warm summer evening with a slice of crusty bread to soak up the flavorful oils and vinegar.
Carrot and Celery Sticks with Guacamole
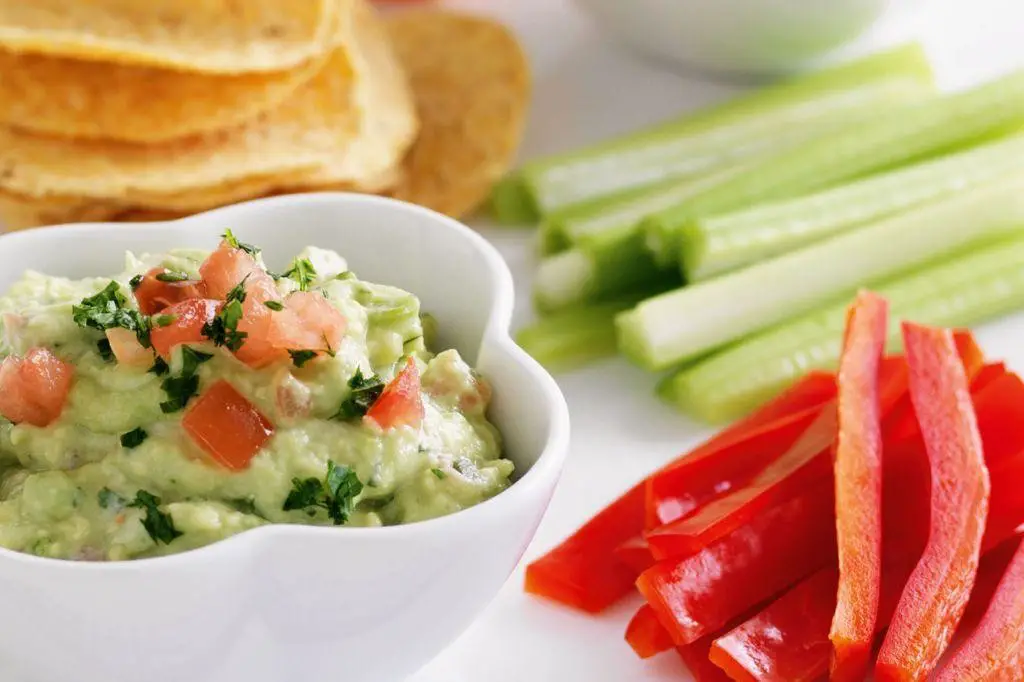
Mellow evenings call for simple, nourishing snacks that don’t demand much but give back in flavor and comfort. Carrot and celery sticks with guacamole is one such dish, a humble yet satisfying combination that brings crunch and creaminess together.
Ingredients
- Carrots – 2 large
- Celery – 4 stalks
- Avocados – 2 ripe
- Lime juice – 1 tbsp
- Salt – ½ tsp
Instructions
- Wash the carrots and celery under cold running water. Pat dry with a clean towel.
- Trim the ends off the carrots and celery. Cut them into sticks about 3 inches long and ½ inch wide.
- Cut the avocados in half, remove the pits, and scoop the flesh into a medium bowl.
- Add the lime juice and salt to the avocados. Mash with a fork until smooth but slightly chunky.
- Arrange the carrot and celery sticks on a plate with the guacamole in a small bowl in the center.
- Tip: For extra flavor, let the guacamole sit for 10 minutes before serving to allow the flavors to meld.
- Tip: Choose avocados that yield slightly to gentle pressure for the perfect ripeness.
- Tip: To prevent browning, press plastic wrap directly onto the surface of the guacamole if not serving immediately.
Every bite offers a delightful contrast between the crisp vegetables and the smooth, tangy guacamole. Serve with a sprinkle of chili flakes for a spicy kick or alongside grilled chicken for a more substantial meal.
Pineapple and Cottage Cheese
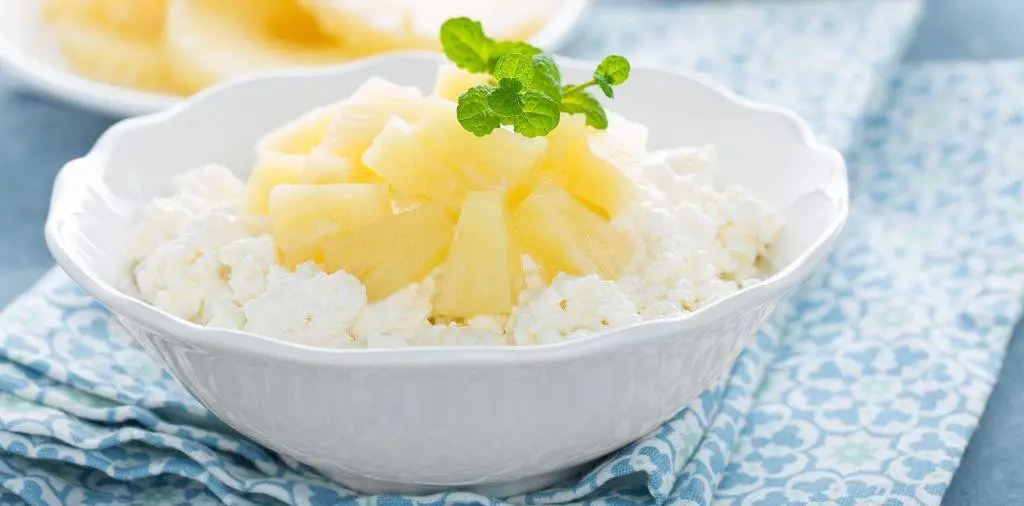
Fondly remembering the simplicity of summer snacks, this combination brings a refreshing twist to your table. It’s a humble yet satisfying pairing that whispers of lazy afternoons and the joy of uncomplicated flavors.
Ingredients
- Pineapple – 1 cup, diced
- Cottage cheese – 1 cup
- Honey – 1 tbsp
- Mint leaves – 2, for garnish
Instructions
- Dice the pineapple into small, bite-sized pieces to ensure each spoonful is balanced.
- In a mixing bowl, gently combine the diced pineapple with cottage cheese, being careful not to overmix to maintain texture.
- Drizzle honey over the mixture, adjusting the amount based on your preference for sweetness.
- Chill the mixture in the refrigerator for 30 minutes to allow the flavors to meld together beautifully.
- Garnish with fresh mint leaves before serving to add a pop of color and a hint of freshness.
Nowhere does simplicity shine brighter than in this dish, where the creamy texture of cottage cheese meets the juicy burst of pineapple. Serve it in a hollowed-out pineapple half for an eye-catching presentation that delights the senses.
Edamame with Sea Salt
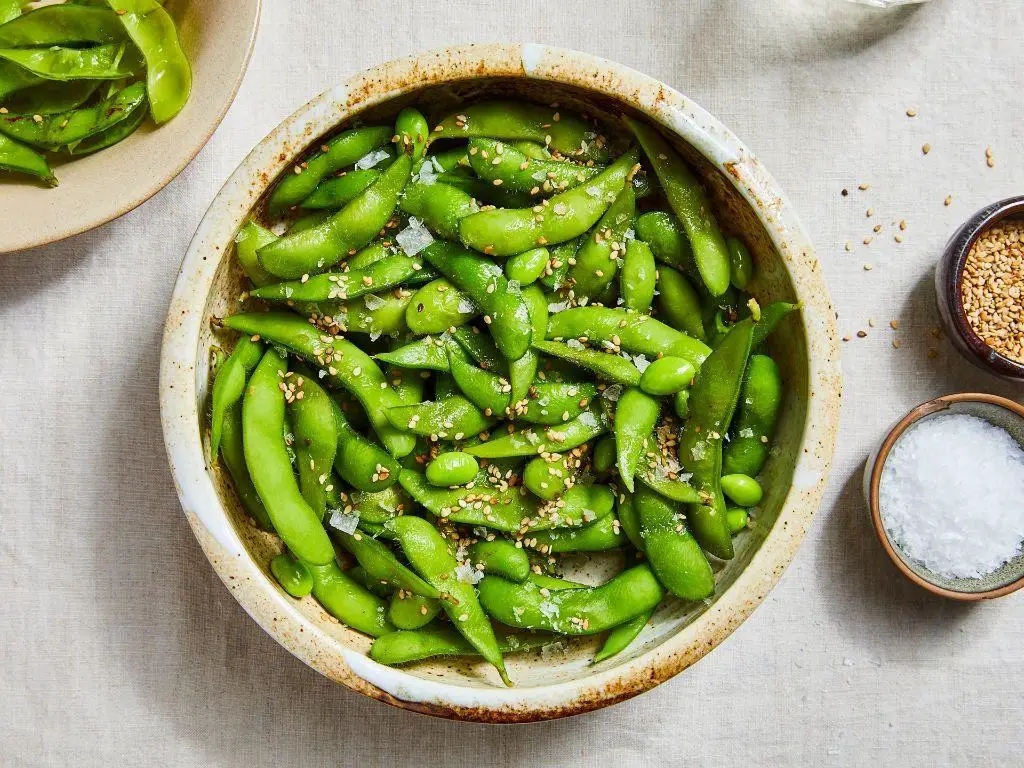
Just as the evening settles in, there’s something profoundly comforting about the simplicity of edamame with sea salt. It’s a dish that whispers of quiet moments, of hands busy with the mundane yet heart full of the present.
Ingredients
- Edamame in pods – 1 lb
- Sea salt – 1 tbsp
- Water – 4 cups
Instructions
- Fill a large pot with 4 cups of water and bring to a rolling boil over high heat.
- Add the edamame pods to the boiling water, ensuring they are fully submerged. Boil for 5 minutes exactly to retain their vibrant green color and slight crunch.
- While the edamame cooks, prepare a bowl of ice water large enough to hold the edamame. This will stop the cooking process immediately, preserving texture.
- After boiling, use a slotted spoon to transfer the edamame directly into the ice water. Let them sit for 2 minutes to cool completely.
- Drain the edamame thoroughly, shaking off excess water. Spread them out on a clean kitchen towel to dry slightly, about 1 minute.
- Sprinkle the sea salt evenly over the edamame, tossing gently to coat each pod. The warmth from the edamame will help the salt adhere.
- Serve immediately, or let them sit for a few minutes if you prefer them at room temperature. The pods should be warm, salty, and slightly moist to the touch.
Zesty and inviting, these edamame pods offer a satisfying pop with each bite, the sea salt enhancing their natural sweetness. Try serving them in a wide, shallow bowl for easy sharing, or alongside a chilled glass of sake for an evening of quiet indulgence.
Berry and Yogurt Parfait
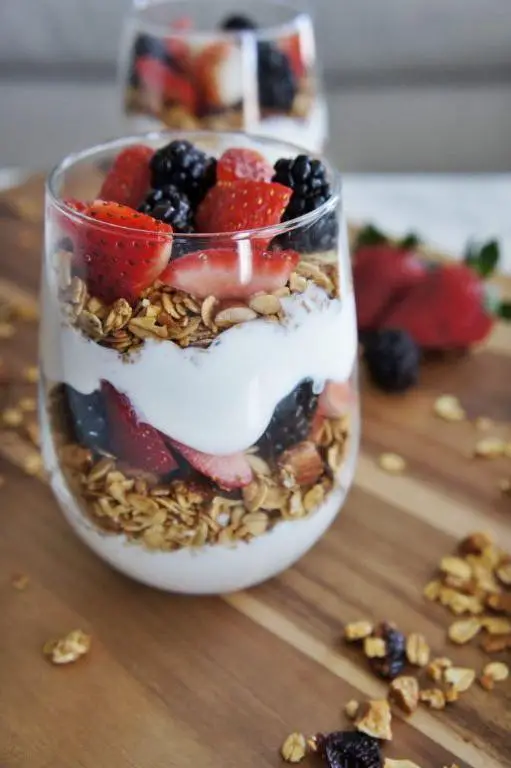
Dappled sunlight filters through the kitchen window as I layer berries and yogurt, a simple act that feels like a quiet morning ritual. This parfait, with its harmonious blend of tart and sweet, is a testament to the beauty of uncomplicated ingredients coming together.
Ingredients
- Greek yogurt – 1 cup
- Mixed berries – 1 cup
- Honey – 2 tbsp
- Granola – ½ cup
Instructions
- In a clear glass, spoon ¼ cup of Greek yogurt to create the first layer.
- Add ¼ cup of mixed berries over the yogurt, distributing them evenly.
- Drizzle ½ tbsp of honey over the berries for a touch of sweetness.
- Sprinkle 2 tbsp of granola on top to add crunch.
- Repeat the layers once more, starting with yogurt and ending with granola.
- Let the parfait sit in the refrigerator for 10 minutes to slightly soften the granola.
As you spoon through the layers, the contrast between the creamy yogurt and the crunchy granola is delightful. The berries burst with freshness, making each bite a little celebration. Try serving it in mason jars for a portable breakfast or a picnic treat.
Hard-Boiled Eggs with Everything Bagel Seasoning
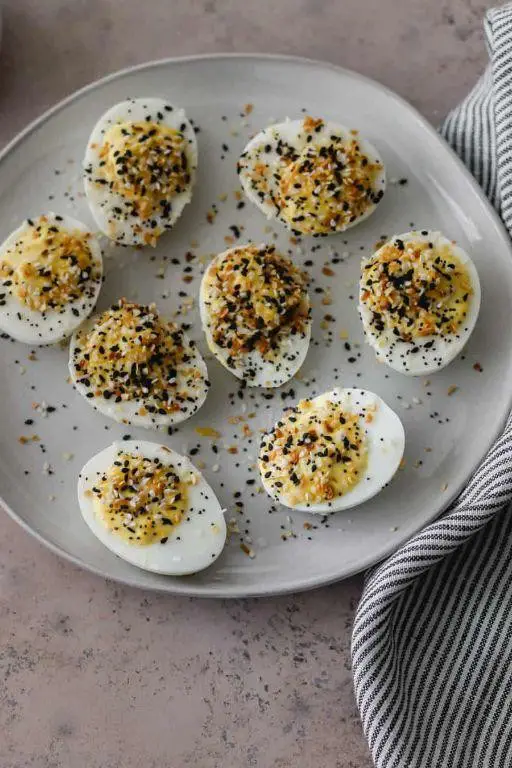
Often, the simplest dishes bring the most comfort, and today, we’re embracing the humble hard-boiled egg, elevated with a sprinkle of everything bagel seasoning. It’s a quick, satisfying treat that feels both familiar and a little special.
Ingredients
- Eggs – 4
- Everything bagel seasoning – 2 tbsp
Instructions
- Place 4 eggs in a single layer at the bottom of a saucepan. Cover with cold water until the eggs are submerged by about an inch.
- Bring the water to a rolling boil over high heat, then immediately remove the saucepan from the heat and cover with a lid.
- Let the eggs sit in the hot water for 12 minutes for perfectly firm yolks. Tip: For easier peeling, use eggs that are a week or two old.
- While the eggs are cooking, prepare an ice bath by filling a large bowl with cold water and ice cubes.
- After 12 minutes, transfer the eggs to the ice bath using a slotted spoon. Let them cool for at least 5 minutes to stop the cooking process.
- Gently tap each egg on a hard surface to crack the shell, then peel under cold running water to help remove the shell smoothly. Tip: Peeling under water can help the shell come off in larger pieces.
- Slice the peeled eggs in half lengthwise or leave them whole, depending on your preference.
- Sprinkle the eggs generously with everything bagel seasoning, ensuring each bite is flavorful. Tip: For an extra burst of flavor, lightly drizzle the eggs with olive oil before adding the seasoning.
The eggs emerge with a creamy yolk and a satisfying crunch from the seasoning, a contrast that’s endlessly enjoyable. Try serving them atop avocado toast or alongside a crisp salad for a meal that’s as nutritious as it is delicious.
Turkey and Cheese Roll-Ups

Falling into the rhythm of a quiet kitchen, there’s something deeply comforting about preparing Turkey and Cheese Roll-Ups. It’s a simple dish that carries the warmth of home, perfect for those moments when you crave something both easy and satisfying.
Ingredients
- Turkey slices – 8
- Cream cheese – 4 oz
- Flour tortillas – 4
- Spinach leaves – 1 cup
Instructions
- Lay out the flour tortillas on a clean, flat surface.
- Spread 1 oz of cream cheese evenly over each tortilla, leaving a small border around the edges.
- Place 2 turkey slices on top of the cream cheese on each tortilla.
- Distribute the spinach leaves evenly over the turkey slices.
- Roll each tortilla tightly from one end to the other, ensuring the fillings are snug inside.
- Wrap each roll-up in plastic wrap and refrigerate for 30 minutes to firm up, making them easier to slice.
- Remove from the refrigerator, unwrap, and slice each roll-up into 1-inch pieces with a sharp knife.
Nowhere does simplicity shine brighter than in these roll-ups, where the creamy texture of the cheese melds beautifully with the savory turkey and fresh spinach. Serve them chilled on a platter for a light lunch or as elegant appetizers at your next gathering.
Watermelon and Feta Salad
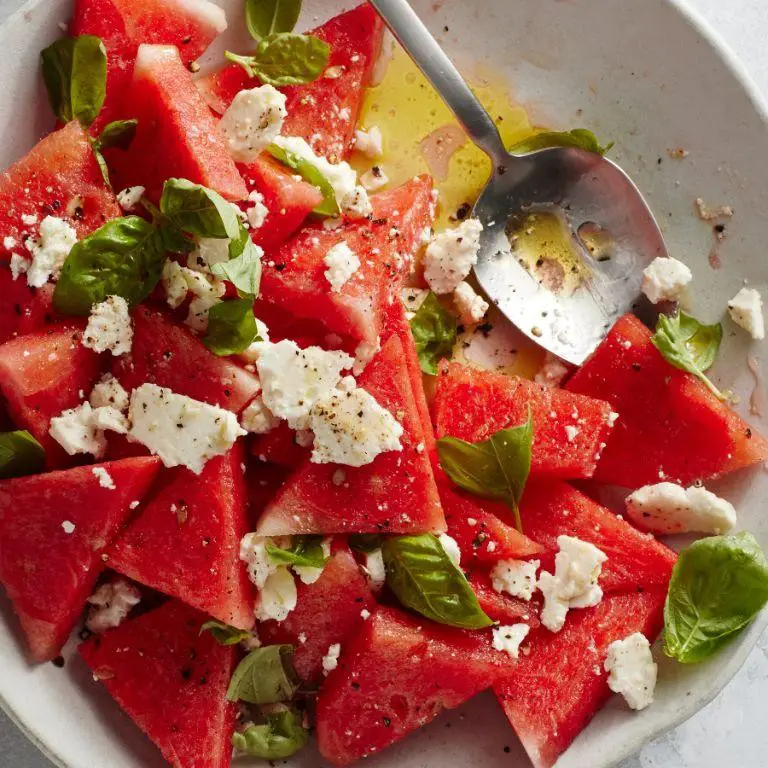
Zestful moments in the kitchen often lead to the simplest yet most refreshing dishes, like this watermelon and feta salad, a perfect blend of sweet and savory that dances on the palate under the summer sun.
Ingredients
– Watermelon – 4 cups, cubed
– Feta cheese – 1 cup, crumbled
– Fresh mint leaves – ¼ cup, chopped
– Olive oil – 2 tbsp
– Balsamic glaze – 1 tbsp
– Salt – ½ tsp
Instructions
1. In a large bowl, combine the cubed watermelon and crumbled feta cheese gently to avoid breaking the watermelon pieces.
2. Sprinkle the chopped mint leaves over the watermelon and feta mixture for a fresh aroma.
3. Drizzle olive oil evenly over the salad to add a smooth richness.
4. Add a touch of balsamic glaze for a slight tangy sweetness that complements the watermelon.
5. Season with salt to enhance all the flavors, mixing lightly to distribute evenly.
6. Chill the salad in the refrigerator for 15 minutes before serving to allow the flavors to meld together beautifully.
7. Serve the salad cold, ideally on a warm day, to contrast the temperatures for a more enjoyable eating experience.
Fragrant and vibrant, this salad offers a juicy crunch from the watermelon against the creamy saltiness of the feta, with the mint adding a refreshing finish. Try serving it on a platter lined with fresh lettuce leaves for an extra layer of texture and color.
Spicy Roasted Pumpkin Seeds

On a quiet evening like this, there’s something deeply satisfying about transforming simple pumpkin seeds into a snack that crackles with warmth and spice. It’s a humble process, yet the result feels like a small celebration of autumn’s bounty.
Ingredients
- Pumpkin seeds – 1 cup
- Olive oil – 1 tbsp
- Salt – ½ tsp
- Cayenne pepper – ¼ tsp
Instructions
- Preheat your oven to 300°F to ensure a slow, even roast that brings out the seeds’ natural flavors without burning them.
- In a bowl, toss the pumpkin seeds with olive oil, ensuring each seed is lightly coated for maximum crispiness.
- Sprinkle salt and cayenne pepper over the seeds, mixing well to distribute the spices evenly. A little tip: wearing gloves can prevent the cayenne from irritating your skin.
- Spread the seeds in a single layer on a baking sheet. This prevents them from steaming and helps achieve that perfect crunch.
- Roast for 30 minutes, stirring every 10 minutes to promote even browning and prevent any hotspots from overcooking the seeds.
- Remove from the oven and let cool on the baking sheet. They’ll crisp up even more as they cool, so resist the temptation to snack immediately.
These spicy roasted pumpkin seeds carry a delightful crunch, with a warmth that builds slowly with each bite. Try sprinkling them over a bowl of creamy butternut squash soup for a contrasting texture that elevates the entire dish.
Conclusion
Kickstart your journey to healthier snacking with these 20 delicious low-calorie recipes! Perfect for home cooks looking for tasty, guilt-free options. We’d love to hear which recipes became your favorites—drop a comment below. Don’t forget to share the love by pinning this article on Pinterest for others to discover. Happy cooking!

Michael Johnson is the founder of Pan Mastery, Inspired by his blacksmith grandfather’s legacy has a deep appreciation for hand-crafted pots and pans, he provides invaluable guides, reviews, and recipes to enhance your culinary journey.