There’s something truly special about Low Country cuisine that brings warmth to the table and joy to every bite. From the heart of the South to your kitchen, these 18 delicious recipes are packed with flavor, tradition, and a whole lot of love. Whether you’re craving comfort food or looking to spice up your meal routine, these Southern-style dishes are sure to delight. Let’s dive into the taste of the Low Country!
Shrimp and Grits

This classic Southern dish combines creamy, buttery grits with succulent shrimp for a comforting meal that’s perfect for any time of day. Today, we’ll walk through making Shrimp and Grits from scratch, ensuring even beginners can achieve delicious results.
Ingredients
- 1 cup stone-ground grits (for the creamiest texture)
- 4 cups water (or chicken stock for more flavor)
- 1 tsp salt (adjust to taste)
- 2 tbsp unsalted butter (for richness)
- 1 cup sharp cheddar cheese, shredded (or any cheese you prefer)
- 1 lb shrimp, peeled and deveined (size 31-40 for best texture)
- 2 tbsp olive oil (or any neutral oil)
- 2 cloves garlic, minced (fresh is best)
- 1/2 tsp smoked paprika (for a hint of smokiness)
- 1/4 tsp cayenne pepper (adjust to taste for heat)
- 2 green onions, sliced (for garnish)
Instructions
- In a medium saucepan, bring 4 cups of water or chicken stock to a boil over high heat.
- Slowly whisk in 1 cup of stone-ground grits and 1 tsp salt, reducing the heat to low to maintain a gentle simmer.
- Cover and cook the grits for 25-30 minutes, stirring occasionally to prevent sticking, until they’re thick and creamy.
- Stir in 2 tbsp unsalted butter and 1 cup shredded cheddar cheese until fully melted and combined. Keep warm.
- While the grits cook, heat 2 tbsp olive oil in a large skillet over medium-high heat.
- Add 1 lb shrimp in a single layer, cooking for 2 minutes per side until pink and opaque.
- Add 2 cloves minced garlic, 1/2 tsp smoked paprika, and 1/4 tsp cayenne pepper to the shrimp, stirring to coat evenly, and cook for an additional 1 minute.
- Serve the creamy grits in bowls, topped with the seasoned shrimp and garnished with sliced green onions.
Optimal texture is achieved when the grits are creamy and the shrimp are just cooked through, offering a delightful contrast. The smoky, slightly spicy shrimp pairs beautifully with the rich, cheesy grits, making this dish a hearty and satisfying meal. For a creative twist, try adding crispy bacon bits or a drizzle of hot sauce before serving.
Low Country Boil

When you’re craving a hearty, communal meal that brings everyone to the table, nothing beats the simplicity and flavor of a Low Country Boil. This one-pot wonder is a staple in Southern cuisine, combining fresh seafood, savory sausage, and sweet corn in a spicy, aromatic broth that’s as easy to make as it is delicious.
Ingredients
- 4 quarts water – enough to cover all ingredients in the pot
- 1/4 cup Old Bay seasoning – adjust for more or less spice
- 2 lbs small red potatoes – halved if larger than a golf ball
- 1 lb smoked sausage – cut into 1-inch pieces, andouille adds great flavor
- 4 ears corn – husked and broken into halves
- 2 lbs large shrimp – peeled and deveined, leave tails on for presentation
Instructions
- In a large stockpot, bring the water to a rolling boil over high heat.
- Stir in the Old Bay seasoning until fully dissolved, creating a flavorful broth.
- Add the potatoes to the pot, reduce heat to medium, and simmer for 10 minutes.
- Add the sausage pieces to the pot and continue to simmer for another 5 minutes.
- Gently place the corn halves into the pot and simmer for an additional 5 minutes.
- Finally, add the shrimp, ensuring they are fully submerged, and cook for exactly 2 minutes until pink and opaque.
- Tip: For an extra layer of flavor, add a halved lemon to the broth with the shrimp.
- Tip: Serve the boil directly on a newspaper-covered table for a traditional, hands-on dining experience.
- Tip: Reserve a cup of the broth to drizzle over the ingredients before serving for added moisture and flavor.
Expect a harmonious blend of spicy, sweet, and savory flavors with each bite, complemented by the tender texture of perfectly cooked shrimp and potatoes. For a festive twist, serve with crusty bread to soak up the flavorful broth or offer a variety of dipping sauces on the side.
She Crab Soup

Delving into the creamy depths of She Crab Soup offers a taste of coastal elegance with every spoonful. This classic dish, with its rich texture and delicate crab flavor, is surprisingly straightforward to prepare at home.
Ingredients
- 1/4 cup unsalted butter (for a richer flavor, use European-style butter)
- 1/4 cup all-purpose flour (to thicken the soup)
- 1 quart whole milk (for creaminess, half-and-half can be substituted)
- 1 cup heavy cream (adds luxurious texture)
- 1 pound fresh crabmeat (lump crabmeat preferred for texture)
- 1 tablespoon Worcestershire sauce (adjust to taste)
- 1/2 teaspoon hot sauce (like Tabasco, for a subtle kick)
- 1/2 teaspoon salt (adjust based on crabmeat saltiness)
- 1/4 teaspoon white pepper (for a mild, earthy heat)
- 2 tablespoons dry sherry (optional, for depth)
- 1 teaspoon Old Bay seasoning (or to taste, for a classic flavor)
- 2 large egg yolks (for thickening and richness)
Instructions
- Melt the butter in a large pot over medium heat until fully liquid and just starting to bubble.
- Whisk in the flour continuously for 2 minutes to create a smooth roux, ensuring no lumps form.
- Gradually add the milk, whisking constantly to incorporate fully into the roux, then bring to a gentle simmer.
- Stir in the heavy cream, crabmeat, Worcestershire sauce, hot sauce, salt, white pepper, and Old Bay seasoning, mixing well to combine.
- Reduce heat to low and simmer for 10 minutes, stirring occasionally to prevent sticking.
- In a small bowl, whisk the egg yolks with the sherry, then slowly temper by adding a ladle of the hot soup to the yolks, whisking constantly.
- Pour the tempered yolk mixture back into the pot, stirring continuously for 2 minutes to thicken the soup without curdling the eggs.
- Remove from heat and let stand for 5 minutes before serving to allow flavors to meld.
Just as the soup reaches the perfect consistency, you’ll notice its velvety texture and the harmonious blend of spices elevating the sweet crab. Serve with a sprinkle of fresh parsley or a dash of sherry on top for an extra layer of flavor.
Fried Green Tomatoes

Great choice for a summer dish, fried green tomatoes offer a crispy, tangy bite that’s perfect for any occasion. Let’s dive into making this Southern classic with ease and confidence.
Ingredients
- 4 medium green tomatoes, sliced 1/4 inch thick (firm to the touch)
- 1 cup all-purpose flour (for a lighter coating, you can substitute with cornstarch)
- 1 tbsp cornmeal (adds extra crunch)
- 1 tsp salt (adjust to taste)
- 1/2 tsp black pepper (freshly ground preferred)
- 1 cup buttermilk (or regular milk with 1 tbsp vinegar added, let sit for 5 minutes)
- 1/2 cup vegetable oil (or any neutral oil with a high smoke point)
Instructions
- In a shallow dish, mix flour, cornmeal, salt, and pepper. This blend will give your tomatoes that signature crispy coating.
- Pour buttermilk into another shallow dish. Dipping the tomatoes in buttermilk first helps the flour mixture adhere better.
- Heat oil in a large skillet over medium heat until it reaches 375°F. A candy thermometer can help monitor the temperature accurately.
- Dip each tomato slice into the buttermilk, then dredge in the flour mixture, ensuring both sides are evenly coated.
- Fry the coated tomato slices in batches, about 3-4 minutes per side, until golden brown and crispy. Avoid overcrowding the skillet to ensure even cooking.
- Transfer fried tomatoes to a paper towel-lined plate to drain excess oil. Let them sit for a minute to crisp up further.
Outstandingly crispy on the outside with a juicy, tangy interior, these fried green tomatoes are a delight. Serve them as a standalone snack with a side of remoulade sauce or layer them in a BLT for a Southern twist.
Collard Greens with Ham Hocks

Now, let’s dive into making a comforting Southern classic that’s perfect for any gathering or a cozy night in. This dish combines the hearty flavors of collard greens with the rich, smoky depth of ham hocks, creating a side that’s both nutritious and deeply satisfying.
Ingredients
- 1 lb collard greens, stems removed and leaves chopped (for quicker cooking)
- 1 smoked ham hock (about 1 lb, for that authentic smoky flavor)
- 4 cups water (or enough to cover the greens and ham hock)
- 1 tbsp apple cider vinegar (to brighten the flavors)
- 1 tsp salt (adjust to taste)
- 1/2 tsp black pepper (freshly ground preferred)
- 1 tbsp sugar (to balance the bitterness of the greens)
Instructions
- In a large pot, combine the ham hock and water. Bring to a boil over high heat, then reduce to a simmer. Cover and cook for 1 hour to tenderize the ham hock and create a flavorful broth.
- Add the chopped collard greens, apple cider vinegar, salt, black pepper, and sugar to the pot. Stir well to combine.
- Cover and simmer for 45 minutes to 1 hour, stirring occasionally, until the greens are tender and the flavors have melded. Tip: If the greens are too bitter, a pinch more sugar can help balance the flavors.
- Remove the ham hock from the pot. Let it cool slightly, then shred the meat, discarding the bone and any excess fat. Tip: The shredded meat can be stirred back into the greens for added texture and flavor.
- Return the shredded meat to the pot and stir to combine. Simmer for an additional 10 minutes to allow the flavors to come together.
- Serve hot, with a splash of vinegar on the side for those who prefer a tangier taste. Tip: Cornbread makes a perfect accompaniment to soak up the delicious broth.
Perfectly tender collard greens with a smoky, savory depth from the ham hock make this dish a standout. The slight tang from the vinegar and the hint of sweetness create a balanced flavor profile that’s hard to resist. For a creative twist, try serving it over a bowl of creamy grits or alongside a spicy sausage for an extra kick.
Cornbread

Great for beginners and seasoned cooks alike, this cornbread recipe is a staple that brings comfort to any table. Follow these steps to create a moist, golden loaf that’s perfect alongside your favorite dishes or on its own.
Ingredients
- 1 cup cornmeal (for a coarser texture, use stone-ground)
- 1 cup all-purpose flour (or gluten-free blend as a substitute)
- 1/4 cup sugar (adjust to taste)
- 1 tbsp baking powder (ensure it’s fresh for maximum rise)
- 1/2 tsp salt (fine sea salt preferred)
- 1 cup milk (whole milk for richness, or any plant-based alternative)
- 1/4 cup unsalted butter, melted (or any neutral oil)
- 1 large egg (room temperature for better incorporation)
Instructions
- Preheat your oven to 400°F (200°C) and grease an 8-inch square baking pan or a 9-inch round pan for even baking.
- In a large bowl, whisk together the cornmeal, flour, sugar, baking powder, and salt until well combined.
- In a separate bowl, mix the milk, melted butter, and egg until smooth. Tip: Ensure the butter is slightly cooled to avoid cooking the egg.
- Pour the wet ingredients into the dry ingredients and stir until just combined. Tip: Overmixing can lead to dense cornbread.
- Transfer the batter to the prepared pan and smooth the top with a spatula. Tip: For a crispy top, sprinkle a little extra cornmeal on top before baking.
- Bake for 20-25 minutes, or until the edges are golden and a toothpick inserted in the center comes out clean.
Out of the oven, this cornbread boasts a delightful contrast between its crispy crust and tender interior. Serve it warm with a drizzle of honey or a pat of butter for an extra touch of indulgence.
Red Rice

Just like any great dish, Red Rice starts with simple ingredients that come together to create something truly special. This recipe is perfect for those looking to add a vibrant and nutritious side to their meals.
Ingredients
- 1 cup long-grain white rice (for a firmer texture)
- 1 1/2 cups water (adjust if using brown rice)
- 1 tbsp olive oil (or any neutral oil)
- 1 small onion, finely chopped (about 1/2 cup)
- 2 cloves garlic, minced (adjust to taste)
- 1/2 cup tomato sauce (for a richer color and flavor)
- 1/2 tsp salt (adjust to taste)
- 1/4 tsp black pepper (freshly ground preferred)
Instructions
- Rinse the rice under cold water until the water runs clear to remove excess starch.
- In a medium saucepan, heat the olive oil over medium heat (about 30 seconds).
- Add the chopped onion and sauté until translucent, about 3 minutes, stirring occasionally.
- Stir in the minced garlic and cook for another 30 seconds, until fragrant.
- Add the rinsed rice to the saucepan and stir to coat the grains with the oil and onion mixture, about 1 minute.
- Pour in the water and tomato sauce, then add the salt and black pepper, stirring to combine.
- Bring the mixture to a boil, then reduce the heat to low, cover, and simmer for 18 minutes (do not lift the lid).
- After 18 minutes, remove the saucepan from the heat and let it sit, covered, for 5 minutes to allow the rice to steam.
- Fluff the rice with a fork before serving to separate the grains.
Serve this Red Rice as a colorful side to grilled chicken or fish. The grains should be separate and fluffy, with a slight tang from the tomato sauce. For an extra touch, garnish with fresh cilantro or a squeeze of lime juice before serving.
Okra and Tomatoes
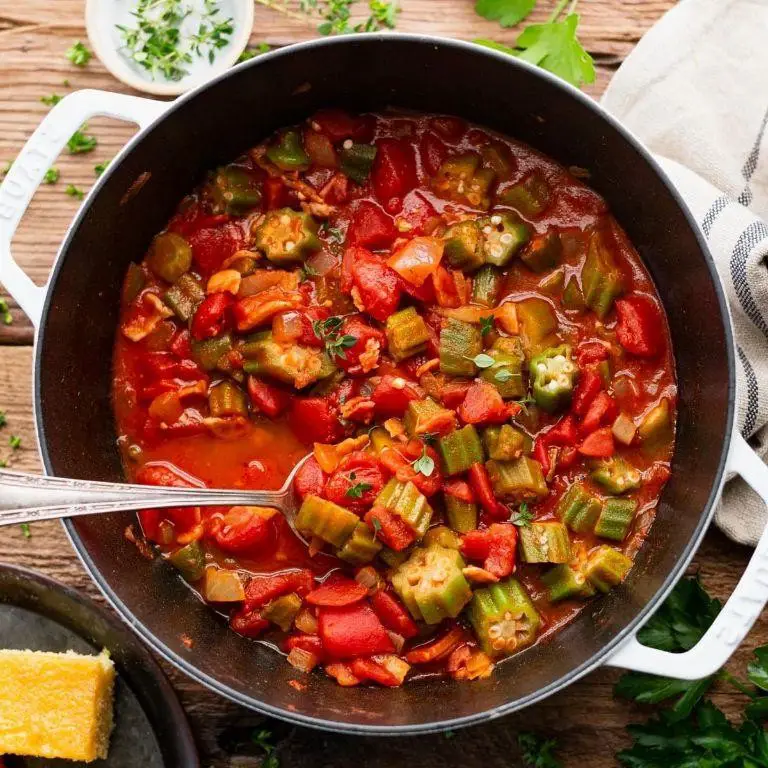
First, let’s dive into making a comforting and vibrant dish that brings together the earthy tones of okra with the sweet acidity of tomatoes. This Okra and Tomatoes recipe is a straightforward, flavorful side that pairs wonderfully with rice or bread.
Ingredients
- 1 lb fresh okra, trimmed and sliced into 1/2-inch pieces (avoid pre-cut to maintain freshness)
- 2 cups diced tomatoes (canned can be used if fresh aren’t available)
- 1 medium onion, finely chopped (yellow or white for sweetness)
- 2 cloves garlic, minced (fresh is best for vibrant flavor)
- 2 tbsp olive oil (or any neutral oil)
- 1/2 tsp salt (adjust to taste)
- 1/4 tsp black pepper (freshly ground preferred)
- 1/4 tsp red pepper flakes (optional for heat)
Instructions
- Heat olive oil in a large skillet over medium heat (about 350°F) until shimmering.
- Add chopped onions to the skillet, sautéing for 3-4 minutes until translucent (stir occasionally to prevent burning).
- Stir in minced garlic and red pepper flakes, cooking for 1 minute until fragrant (be careful not to burn the garlic).
- Add sliced okra to the skillet, stirring to coat with the onion and garlic mixture, and cook for 5 minutes (okra will start to soften).
- Mix in diced tomatoes, salt, and black pepper, reducing heat to low (about 250°F), and simmer for 15-20 minutes (stir occasionally to prevent sticking).
- Once the okra is tender and the tomatoes have broken down into a sauce, remove from heat (the mixture should be thick but not dry).
Best enjoyed when the okra is tender yet slightly crisp, offering a delightful contrast to the rich tomato sauce. Serve this dish over steamed rice or with crusty bread to soak up all the flavors.
Pimento Cheese

Every Southern kitchen has its own version of pimento cheese, but mastering the classic is a rite of passage. This creamy, tangy spread is perfect for sandwiches, crackers, or as a dip, and today, we’ll walk through making it from scratch.
Ingredients
- 2 cups sharp cheddar cheese, freshly grated (pre-grated cheese won’t melt as smoothly)
- 1/2 cup mayonnaise (for a lighter version, Greek yogurt can be substituted)
- 4 oz diced pimentos, drained (reserve a tablespoon of the liquid for adjusting consistency)
- 1/2 tsp garlic powder (for a subtle kick)
- 1/4 tsp cayenne pepper (adjust to taste for heat)
- Salt to taste (start with a pinch and adjust after mixing)
Instructions
- In a large mixing bowl, combine the freshly grated sharp cheddar cheese and mayonnaise. Stir until the cheese is evenly coated with mayonnaise.
- Add the diced pimentos, garlic powder, and cayenne pepper to the bowl. Mix well to distribute the ingredients evenly throughout the cheese mixture.
- If the mixture seems too thick, gradually add the reserved pimento liquid, one teaspoon at a time, until the desired consistency is reached.
- Taste the pimento cheese and adjust the salt and cayenne pepper as needed. Remember, the flavors will meld and intensify as it chills.
- Cover the bowl with plastic wrap and refrigerate for at least 1 hour before serving to allow the flavors to combine.
Zesty and creamy, this pimento cheese has a perfect balance of tang and spice. Serve it on toasted bread for a classic sandwich, or use it as a hearty dip for vegetables at your next gathering.
Fried Chicken

Perfecting the art of making fried chicken starts with understanding the balance between crispy skin and juicy meat. Let’s break down the process into manageable steps to ensure your fried chicken turns out golden and delicious every time.
Ingredients
- 4 cups all-purpose flour (for a crispier coating, mix with 1/4 cup cornstarch)
- 1 tbsp garlic powder (adjust to taste)
- 1 tbsp paprika (for color and mild heat)
- 2 tsp salt (adjust to taste)
- 1 tsp black pepper (freshly ground preferred)
- 2 cups buttermilk (or substitute with milk and 1 tbsp vinegar)
- 1 whole chicken, cut into pieces (or use pre-cut pieces for convenience)
- Vegetable oil for frying (or any neutral oil with a high smoke point)
Instructions
- In a large bowl, whisk together the flour, garlic powder, paprika, salt, and black pepper until well combined.
- Pour the buttermilk into a separate bowl. Dip each piece of chicken into the buttermilk, allowing excess to drip off.
- Coat the chicken pieces in the flour mixture, pressing gently to adhere. For extra crispiness, double-dip by repeating the buttermilk and flour steps.
- Heat oil in a deep fryer or large pot to 350°F. Use a thermometer to maintain the temperature.
- Carefully add the chicken pieces to the hot oil, working in batches to avoid overcrowding. Fry for about 15-18 minutes, turning occasionally, until golden brown and the internal temperature reaches 165°F.
- Remove the chicken with a slotted spoon and drain on a wire rack over a baking sheet. This keeps the chicken crispy by allowing air to circulate.
- Let the chicken rest for 5 minutes before serving to allow the juices to redistribute.
Crispy on the outside and tender on the inside, this fried chicken is a crowd-pleaser. Serve it with a side of honey or hot sauce for an extra kick, or layer it between two slices of bread for the ultimate fried chicken sandwich.
Peach Cobbler
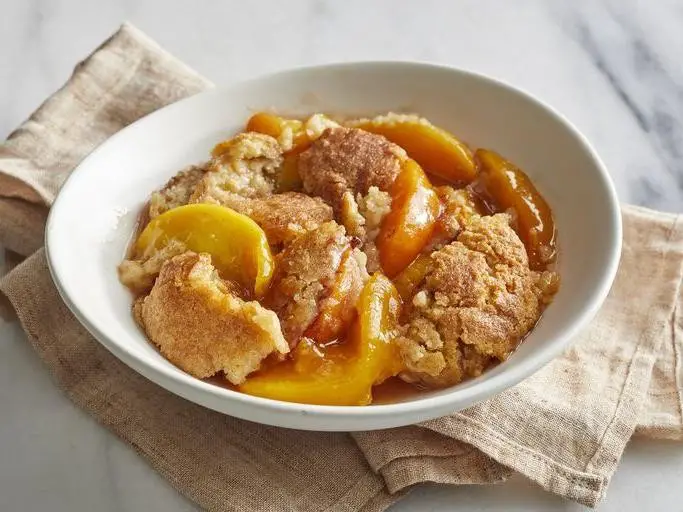
This peach cobbler is a classic dessert that combines juicy peaches with a buttery, biscuit-like topping. Perfect for beginners, this recipe walks you through each step to ensure a delicious outcome.
Ingredients
- 4 cups fresh peaches, peeled and sliced (about 6 medium peaches)
- 1 cup granulated sugar (adjust to taste)
- 1/2 cup unsalted butter, melted (or any neutral oil)
- 1 cup all-purpose flour
- 1 cup milk (whole milk recommended for richness)
- 1 tbsp baking powder
- 1/2 tsp salt
- 1 tsp vanilla extract (optional for extra flavor)
Instructions
- Preheat your oven to 375°F (190°C) to ensure it’s ready for baking.
- In a 9×13 inch baking dish, spread the melted butter evenly across the bottom.
- In a medium bowl, mix the flour, sugar, baking powder, and salt together.
- Add the milk and vanilla extract to the dry ingredients, stirring until just combined to avoid overmixing.
- Pour the batter over the melted butter in the baking dish; do not stir.
- Arrange the peach slices evenly over the batter; they will sink slightly during baking.
- Bake for 40-45 minutes, or until the top is golden brown and a toothpick inserted comes out clean.
- Let the cobbler cool for 10 minutes before serving to allow the flavors to meld.
Very tender peaches and a crispy, golden topping make this cobbler irresistible. Serve warm with a scoop of vanilla ice cream for a delightful contrast of temperatures and textures.
Brunswick Stew
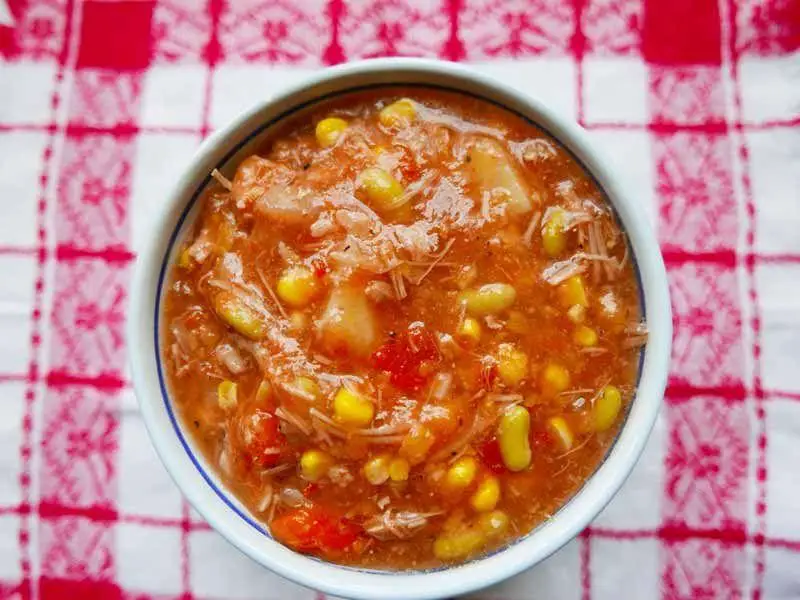
Preparing a hearty Brunswick Stew is a rewarding experience that combines simple ingredients into a rich, flavorful dish. Perfect for any season, this stew is a comforting blend of meats and vegetables, simmered to perfection.
Ingredients
- 2 cups cooked chicken, shredded (use rotisserie for convenience)
- 1 cup pulled pork (leftover barbecue works great)
- 1 cup corn kernels (fresh or frozen)
- 1 cup lima beans (frozen are fine)
- 1 can (14.5 oz) diced tomatoes (do not drain)
- 1 small onion, diced (about 1/2 cup)
- 2 cloves garlic, minced
- 4 cups chicken broth (low sodium preferred)
- 1/4 cup apple cider vinegar (adjust to taste)
- 1 tbsp Worcestershire sauce
- 1 tsp smoked paprika
- Salt and pepper to taste
Instructions
- In a large pot over medium heat, sauté the diced onion and minced garlic until translucent, about 5 minutes.
- Add the shredded chicken and pulled pork to the pot, stirring to combine with the onions and garlic.
- Pour in the chicken broth, diced tomatoes (with juice), apple cider vinegar, and Worcestershire sauce. Stir well to combine all ingredients.
- Bring the mixture to a boil, then reduce heat to low. Simmer uncovered for 20 minutes, stirring occasionally.
- Add the corn, lima beans, and smoked paprika to the pot. Continue to simmer for another 15 minutes, or until the vegetables are tender.
- Season with salt and pepper to taste. For a thicker stew, let it simmer for an additional 5-10 minutes.
Great for gatherings, this Brunswick Stew boasts a smoky, tangy flavor with a satisfyingly thick texture. Serve it with a side of cornbread for a complete meal that’s sure to impress.
Deviled Eggs

Start by gathering your ingredients and prepping your workspace for a classic dish that’s perfect for any occasion. Deviled eggs are a timeless appetizer that combines simplicity with rich flavors, making them a favorite among both novice and experienced cooks.
Ingredients
- 6 large eggs (preferably a week old for easier peeling)
- 1/4 cup mayonnaise (or Greek yogurt for a lighter version)
- 1 tsp yellow mustard (adjust to taste)
- 1/2 tsp white vinegar (adds a slight tang)
- Salt and pepper (to taste)
- Paprika (for garnish)
Instructions
- Place the eggs in a single layer at the bottom of a large pot and cover with water by 1 inch.
- Bring the water to a rolling boil over high heat, then cover the pot and remove from heat. Let stand for 12 minutes.
- Transfer the eggs to a bowl of ice water using a slotted spoon and let cool for at least 5 minutes to stop the cooking process.
- Gently tap each egg on the counter and peel under cool running water to help remove the shell smoothly.
- Slice the peeled eggs in half lengthwise and carefully remove the yolks to a small bowl.
- Mash the yolks with a fork, then mix in mayonnaise, mustard, vinegar, salt, and pepper until smooth.
- Spoon or pipe the yolk mixture back into the egg white halves.
- Sprinkle lightly with paprika for color and flavor.
Keep these deviled eggs chilled until serving to enhance their creamy texture and savory taste. For a creative twist, top with crispy bacon bits or fresh herbs before serving.
Sweet Potato Pie

Understanding the basics of Sweet Potato Pie can transform your baking from good to great. This guide will walk you through each step, ensuring a delicious outcome every time.
Ingredients
- 1 1/2 cups mashed sweet potatoes (about 2 medium potatoes, boiled and peeled)
- 1/2 cup unsalted butter, melted (cool slightly before using)
- 1 cup granulated sugar (adjust to taste)
- 1/2 cup milk (whole milk recommended for creaminess)
- 2 large eggs (room temperature blends better)
- 1 tsp vanilla extract (pure extract for best flavor)
- 1/2 tsp ground cinnamon (freshly ground adds depth)
- 1/4 tsp ground nutmeg (a little goes a long way)
- 1 unbaked 9-inch pie crust (homemade or store-bought)
Instructions
- Preheat your oven to 350°F (175°C) to ensure it’s ready for baking.
- In a large bowl, combine the mashed sweet potatoes and melted butter until smooth. Tip: A hand mixer can make this process easier and ensure a lump-free filling.
- Add the sugar, milk, eggs, vanilla extract, cinnamon, and nutmeg to the sweet potato mixture. Mix until all ingredients are fully incorporated. Tip: Scrape the sides of the bowl occasionally to ensure even mixing.
- Pour the filling into the unbaked pie crust, spreading it evenly with a spatula. Tip: Gently tap the pie dish on the counter to remove any air bubbles.
- Bake in the preheated oven for 55 to 60 minutes, or until the filling is set and a toothpick inserted into the center comes out clean.
- Allow the pie to cool on a wire rack for at least 2 hours before serving. This helps the filling set properly for slicing.
The pie boasts a velvety texture with a perfect balance of sweetness and spice. Serve it with a dollop of whipped cream or a scoop of vanilla ice cream for an extra indulgent treat.
Biscuits and Gravy

Let’s dive into making the ultimate comfort food, Biscuits and Gravy, a classic dish that’s perfect for any meal of the day. This guide will walk you through each step to ensure your dish turns out deliciously creamy and fluffy.
Ingredients
- 2 cups all-purpose flour (for fluffier biscuits, sift the flour)
- 1 tbsp baking powder (ensure it’s fresh for maximum rise)
- 1/2 tsp salt (adjust to taste)
- 1/2 cup unsalted butter, cold and cubed (keeps biscuits flaky)
- 3/4 cup whole milk (for richness, or substitute with buttermilk)
- 1 lb breakfast sausage (mild or spicy, according to preference)
- 1/4 cup all-purpose flour (for thickening the gravy)
- 2 1/2 cups whole milk (for a creamy gravy)
- 1/2 tsp black pepper (freshly ground for best flavor)
- 1/2 tsp salt (adjust to taste)
Instructions
- Preheat your oven to 450°F (232°C) to ensure it’s hot enough for the biscuits to rise properly.
- In a large bowl, whisk together 2 cups flour, baking powder, and 1/2 tsp salt until well combined.
- Add the cold, cubed butter to the flour mixture. Use your fingers or a pastry cutter to blend until the mixture resembles coarse crumbs.
- Gradually add 3/4 cup milk, stirring just until the dough comes together. Avoid overmixing to keep the biscuits tender.
- Turn the dough onto a floured surface, gently knead 2-3 times, then roll out to 1-inch thickness. Cut into rounds using a biscuit cutter.
- Place the biscuits on a baking sheet, leaving space between each. Bake for 10-12 minutes or until golden brown.
- While the biscuits bake, cook the sausage in a large skillet over medium heat until no longer pink, breaking it into small pieces as it cooks.
- Sprinkle 1/4 cup flour over the cooked sausage, stirring to coat. Cook for 1 minute to remove the raw flour taste.
- Slowly whisk in 2 1/2 cups milk, then add 1/2 tsp black pepper and 1/2 tsp salt. Bring to a simmer, stirring constantly, until the gravy thickens, about 5 minutes.
- Split the warm biscuits in half and generously spoon the sausage gravy over the top.
Mouthwatering and hearty, these Biscuits and Gravy offer a perfect balance of creamy, savory gravy and fluffy, buttery biscuits. For a twist, try adding a sprinkle of sharp cheddar cheese on top of the gravy before serving.
Pecan Pie

Just as the leaves begin to turn and the air carries a crispness, pecan pie emerges as a beloved dessert, combining the rich, buttery crust with a sweet, nutty filling. This guide will walk you through creating this classic treat with precision and ease, ensuring a perfect result every time.
Ingredients
– 1 1/2 cups pecans, halves or pieces (toasted for enhanced flavor)
– 1 cup light corn syrup (or dark for a deeper flavor)
– 1 cup granulated sugar (adjust slightly for sweetness preference)
– 3 large eggs (room temperature for better mixing)
– 2 tbsp unsalted butter, melted (cooled slightly)
– 1 tsp vanilla extract (pure for best flavor)
– 1/4 tsp salt (balances the sweetness)
– 1 unbaked 9-inch pie crust (homemade or store-bought)
Instructions
1. Preheat your oven to 350°F (175°C) to ensure it’s ready for baking.
2. In a large bowl, whisk together the corn syrup, sugar, eggs, melted butter, vanilla extract, and salt until smooth.
3. Stir in the pecans, ensuring they’re evenly coated with the mixture.
4. Pour the filling into the unbaked pie crust, spreading it evenly.
5. Bake for 60 to 70 minutes, or until the filling is set and the crust is golden brown. A toothpick inserted in the center should come out clean.
6. Allow the pie to cool completely on a wire rack before serving to let the filling firm up.
Tip: To prevent the crust edges from burning, cover them with aluminum foil halfway through baking.
Tip: For an extra flavor boost, toast the pecans before adding them to the filling.
Tip: Serve the pie at room temperature for the best texture and flavor.
Each slice of this pecan pie offers a delightful contrast between the crisp, flaky crust and the gooey, nutty filling. For a creative twist, serve with a scoop of vanilla ice cream or a drizzle of caramel sauce.
Fried Catfish

Here’s how to make perfectly crispy fried catfish, a Southern classic that’s easier to prepare than you might think. Let’s break it down into simple, foolproof steps.
Ingredients
- 4 catfish fillets (about 6 oz each, pat dry with paper towels)
- 1 cup cornmeal (for a crispier coating, or substitute with flour)
- 1/2 cup all-purpose flour
- 1 tsp paprika (adds a smoky flavor, adjust to taste)
- 1/2 tsp garlic powder
- 1/2 tsp onion powder
- 1/2 tsp salt
- 1/4 tsp black pepper
- 1 egg (beaten, for binding)
- 1/2 cup buttermilk (or regular milk with a tbsp of vinegar)
- Vegetable oil for frying (enough to fill skillet 1/2 inch, or any neutral oil)
Instructions
- In a shallow dish, mix cornmeal, flour, paprika, garlic powder, onion powder, salt, and pepper.
- In another dish, whisk together egg and buttermilk.
- Dip each catfish fillet into the egg mixture, then coat evenly with the cornmeal mixture. Tip: Let it sit for 5 minutes to help the coating adhere.
- Heat oil in a large skillet over medium-high heat to 350°F. Use a thermometer for accuracy.
- Carefully place fillets in the hot oil. Fry for 3-4 minutes per side, or until golden brown and crispy. Tip: Do not overcrowd the skillet to ensure even cooking.
- Transfer fried fillets to a paper towel-lined plate to drain excess oil. Tip: Keep them warm in a low oven if frying in batches.
Now, the catfish boasts a crunchy exterior with tender, flaky meat inside. Serve it with a side of coleslaw and hot sauce for a classic combo, or get creative by topping with a spicy remoulade for an extra kick.
Hoppin’ John
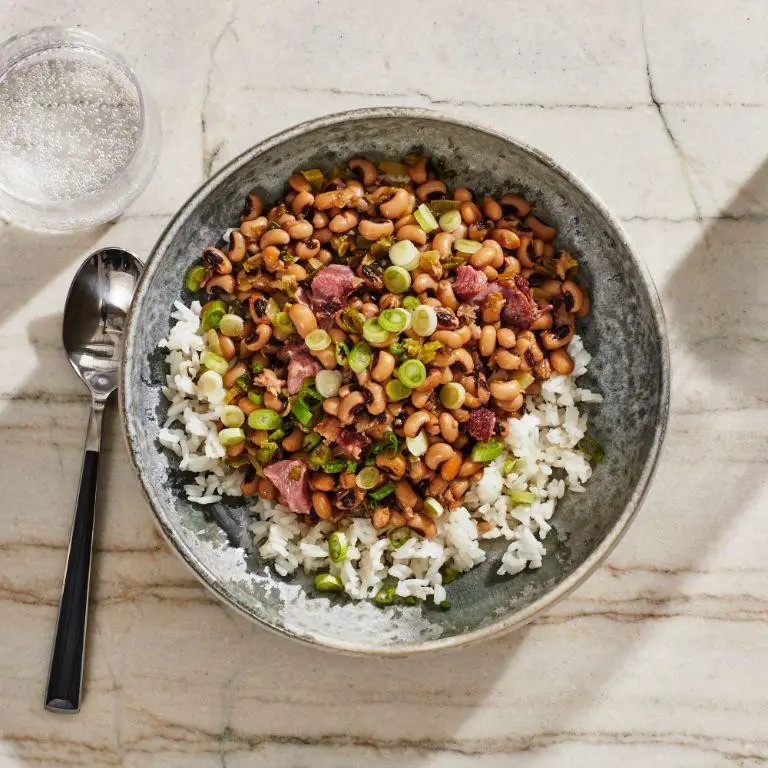
Always a staple in Southern cuisine, Hoppin’ John is a flavorful dish that combines rice, black-eyed peas, and smoked pork for a hearty meal. This step-by-step guide will walk you through creating this comforting classic with ease.
Ingredients
- 1 cup dried black-eyed peas (soaked overnight for best texture)
- 1 cup long-grain white rice (rinsed until water runs clear)
- 4 oz smoked ham hock (or substitute with smoked turkey for a lighter version)
- 1 small onion, diced (about 1/2 cup)
- 1 green bell pepper, diced (about 1/2 cup)
- 2 cloves garlic, minced (or 1/2 tsp garlic powder in a pinch)
- 2 tbsp vegetable oil (or any neutral oil)
- 4 cups water (adjust as needed for rice cooking)
- 1 tsp salt (adjust to taste)
- 1/2 tsp black pepper (freshly ground preferred)
- 1/2 tsp cayenne pepper (optional for heat)
Instructions
- In a large pot, heat 2 tbsp vegetable oil over medium heat until shimmering.
- Add diced onion and green bell pepper, sautéing until softened, about 5 minutes.
- Stir in minced garlic and cook for 30 seconds until fragrant, being careful not to burn.
- Add the soaked black-eyed peas, smoked ham hock, and 4 cups water to the pot. Bring to a boil.
- Reduce heat to low, cover, and simmer for 1 hour, or until peas are tender.
- Remove the ham hock, shred the meat, and return it to the pot. Discard the bone.
- Stir in the rinsed rice, salt, black pepper, and cayenne pepper. Bring to a simmer.
- Cover and cook on low heat for 20 minutes, or until rice is tender and liquid is absorbed. Avoid stirring to prevent mushy rice.
- Remove from heat and let stand, covered, for 5 minutes to allow flavors to meld.
This Hoppin’ John boasts a creamy texture with a smoky depth from the ham hock, balanced by the freshness of the vegetables. Try serving it with a side of collard greens for a traditional Southern meal, or top with a fried egg for a hearty breakfast twist.
Conclusion
These 18 Delicious Low Country Recipes Southern Style are a treasure trove of comfort and flavor, perfect for bringing a taste of the South to your table. We hope you’ll try these dishes, share your favorites in the comments, and spread the love by pinning this article on Pinterest. Happy cooking, y’all!

Michael Johnson is the founder of Pan Mastery, Inspired by his blacksmith grandfather’s legacy has a deep appreciation for hand-crafted pots and pans, he provides invaluable guides, reviews, and recipes to enhance your culinary journey.