Unleash your inner baker with these 18 delicious pastry flour recipes that promise to transform your kitchen into a bakery haven! Whether you’re craving flaky croissants, tender scones, or rustic pies, we’ve got a treat for every taste and occasion. Perfect for home cooks across North America, these recipes are your ticket to baking glory. Ready to roll? Let’s dive into the floury fun!
Classic Buttermilk Biscuits
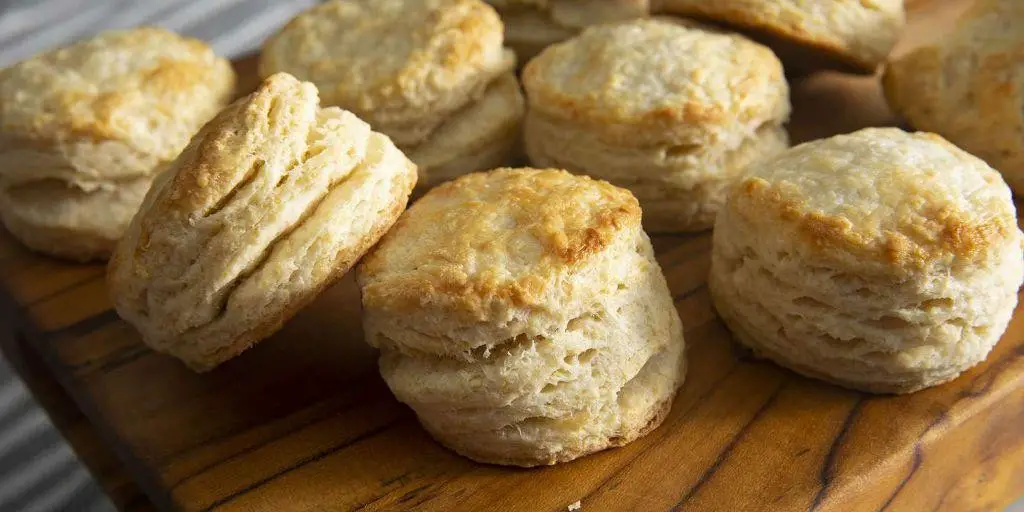
Very few things in life are as comforting as the smell of freshly baked buttermilk biscuits wafting through the kitchen. I remember my grandmother pulling a golden batch out of the oven, the steam rising as she split one open to reveal its fluffy interior. It’s a memory that inspired me to perfect my own recipe, and today, I’m sharing it with you.
Ingredients
- Flour – 2 cups
- Baking powder – 1 tbsp
- Salt – 1 tsp
- Butter – ½ cup, cold and cubed
- Buttermilk – ¾ cup
Instructions
- Preheat your oven to 450°F (232°C) and line a baking sheet with parchment paper.
- In a large bowl, whisk together the flour, baking powder, and salt.
- Add the cold, cubed butter to the dry ingredients. Using your fingers or a pastry cutter, work the butter into the flour until the mixture resembles coarse crumbs. Tip: The key to flaky biscuits is keeping the butter cold, so work quickly.
- Make a well in the center of the mixture and pour in the buttermilk. Stir just until the dough comes together. Tip: Overmixing will lead to tough biscuits, so stop as soon as the dough is cohesive.
- Turn the dough out onto a lightly floured surface and gently pat it into a 1-inch thick rectangle.
- Fold the dough over itself in thirds, like a letter, then pat it back down to 1-inch thickness. This folding technique creates layers for extra flakiness.
- Using a 2-inch round cutter, cut out biscuits and place them on the prepared baking sheet. Tip: Press straight down without twisting the cutter to ensure the biscuits rise evenly.
- Bake for 12-15 minutes, or until the biscuits are golden brown on top.
Absolutely divine when served warm, these biscuits have a tender, flaky texture with a buttery flavor that pairs perfectly with a drizzle of honey or a smear of jam. For a savory twist, try splitting them and filling with crispy bacon and a slice of sharp cheddar.
Flaky Pie Crust
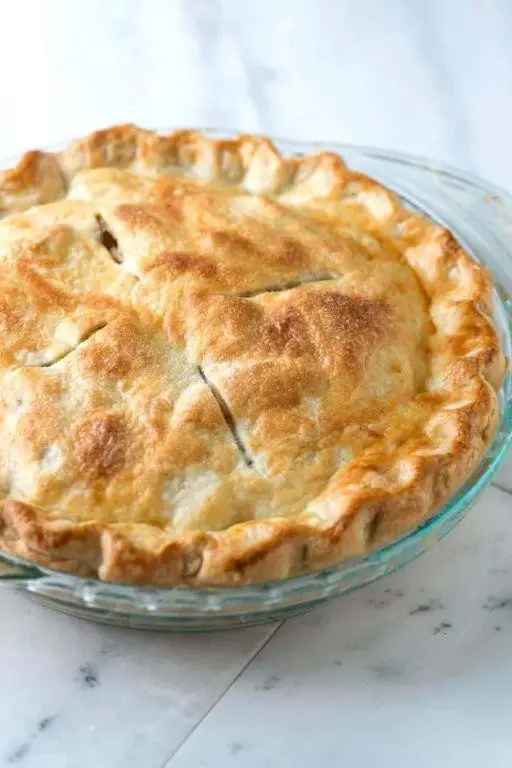
Just yesterday, I found myself staring at a pile of apples on my kitchen counter, and it hit me—it’s pie season. There’s something about the process of making a flaky pie crust from scratch that feels both meditative and a little magical. Whether you’re a seasoned baker or trying your hand at pie crust for the first time, this recipe is for you.
Ingredients
- Flour – 2 1/2 cups
- Salt – 1 tsp
- Butter – 1 cup, chilled and diced
- Ice water – 1/4 to 1/2 cup
Instructions
- In a large bowl, whisk together the flour and salt until well combined.
- Add the chilled, diced butter to the flour mixture. Using your fingers or a pastry cutter, work the butter into the flour until the mixture resembles coarse crumbs with some pea-sized pieces of butter remaining. Tip: Keeping the butter cold is key to a flaky crust.
- Gradually add ice water, 1 tablespoon at a time, mixing gently with a fork after each addition, until the dough just comes together. You may not need all the water. Tip: The dough should hold together when pinched but not be wet or sticky.
- Divide the dough in half, shape each half into a disk, and wrap tightly in plastic wrap. Chill in the refrigerator for at least 1 hour, or up to 2 days. Tip: Chilling the dough relaxes the gluten, making it easier to roll out and preventing shrinkage during baking.
- On a lightly floured surface, roll out one disk of dough to a 12-inch circle. Carefully transfer to a 9-inch pie plate, trimming and crimping the edges as desired. Repeat with the second disk if making a double-crust pie.
Out of the oven, this crust is golden, buttery, and impossibly flaky—just begging to be filled with your favorite pie filling. Try it with a classic apple pie or get creative with a savory quiche. Either way, it’s sure to impress.
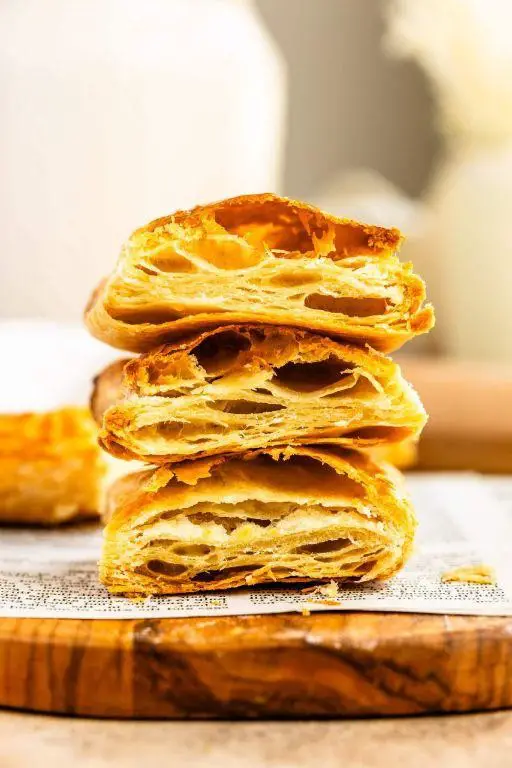
Homemade Croissants
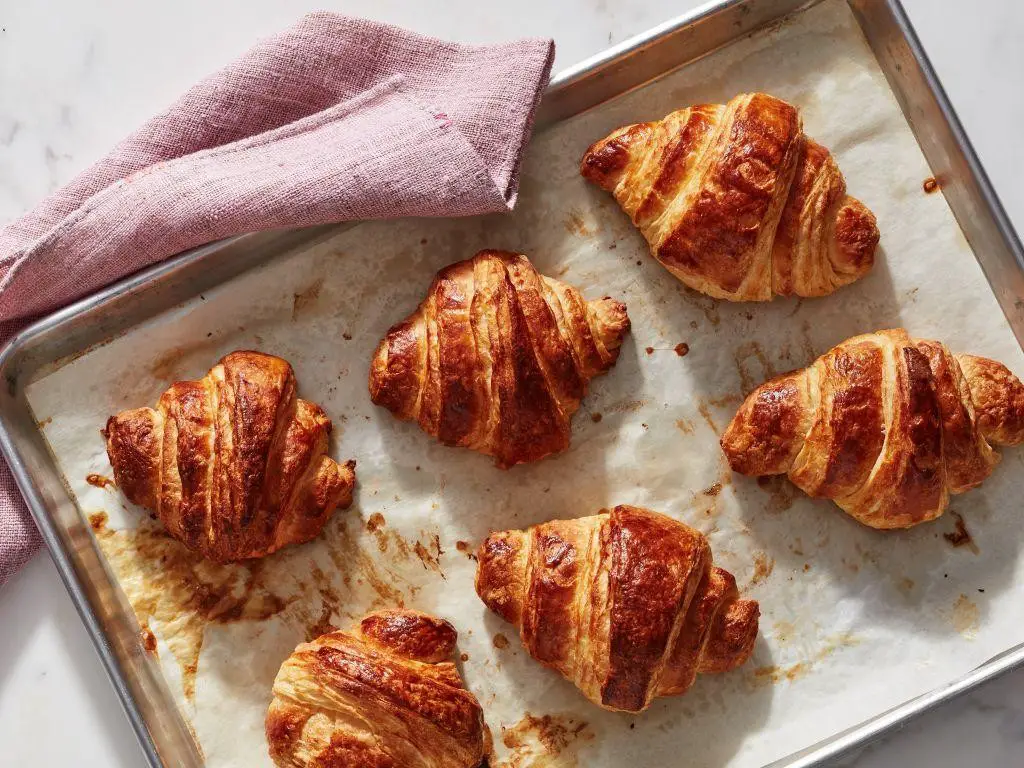
Craving something buttery, flaky, and utterly indulgent? I remember the first time I attempted homemade croissants; it was a rainy Sunday, and the aroma of butter and yeast filled my kitchen, promising a treat worth the effort. Today, I’m sharing my go-to recipe that turns any morning into a special occasion.
Ingredients
- Flour – 4 cups
- Butter – 1 1/2 cups, cold
- Water – 1 cup, warm
- Yeast – 1 tbsp
- Sugar – 1/4 cup
- Salt – 1 tsp
- Egg – 1, for egg wash
Instructions
- In a large bowl, dissolve yeast and sugar in warm water. Let sit for 5 minutes until frothy.
- Add flour and salt to the yeast mixture, stirring until a dough forms. Tip: Don’t overmix to keep the dough tender.
- Turn the dough onto a floured surface and knead for 5 minutes until smooth. Place in a greased bowl, cover, and let rise for 1 hour or until doubled in size.
- Roll the dough into a large rectangle on a floured surface. Spread cold butter over two-thirds of the dough, then fold the unbuttered third over the middle, and the remaining buttered third over that, like a letter. Tip: Keeping the butter cold is key to achieving those flaky layers.
- Roll the folded dough into a rectangle again and repeat the folding process. Chill for 30 minutes. Repeat this step twice more, chilling between folds.
- After the final fold, roll the dough into a large rectangle, about 1/4 inch thick. Cut into triangles, roll each triangle from the base to the tip to form croissants, and place on a baking sheet. Tip: For extra shine, brush with beaten egg before baking.
- Preheat oven to 400°F. Let croissants rise for 30 minutes, then bake for 15-20 minutes until golden brown.
Golden and crisp on the outside, with layers of tender, buttery goodness inside, these croissants are a labor of love. Serve them warm with a dollop of jam or alongside your morning coffee for a truly Parisian breakfast experience.
Soft Pretzels
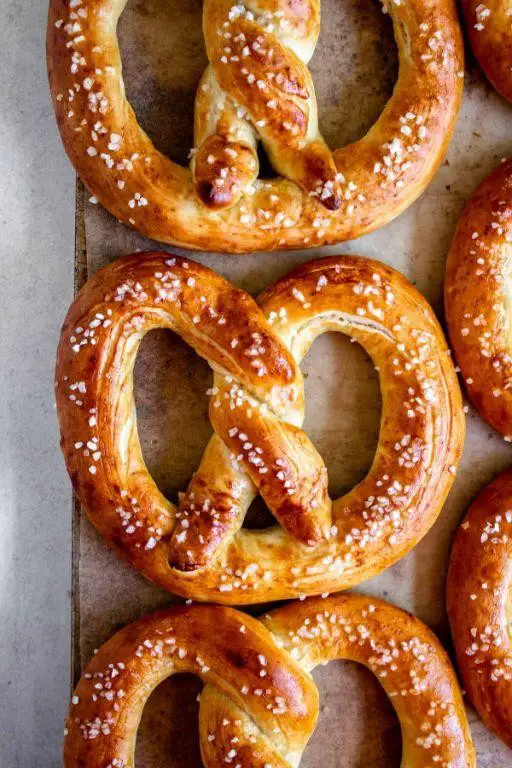
Perfectly golden and irresistibly chewy, soft pretzels have a special place in my heart. I remember the first time I tried making them at home; the kitchen was a floury mess, but the smell was absolutely worth it. Now, they’re my go-to when I need a comforting bake that feels like a hug.
Ingredients
- Flour – 4 cups
- Water – 1 ½ cups
- Yeast – 1 packet
- Sugar – 1 tbsp
- Salt – 2 tsp
- Baking soda – ½ cup
Instructions
- In a large bowl, dissolve yeast and sugar in warm water (110°F) and let sit for 5 minutes until frothy.
- Add flour and salt to the yeast mixture, stirring until a dough forms. Tip: If the dough feels too sticky, add a little more flour, but be careful not to make it too dry.
- Knead the dough on a floured surface for about 5 minutes until smooth and elastic.
- Cover the dough with a damp cloth and let it rise in a warm place for 1 hour, or until doubled in size.
- Preheat your oven to 450°F and bring a large pot of water to a boil, then add baking soda.
- Divide the dough into 8 equal pieces, rolling each into a long rope and twisting into a pretzel shape. Tip: Wetting your hands slightly can help prevent the dough from sticking.
- Boil each pretzel in the baking soda water for 30 seconds, then place on a baking sheet. Tip: This step gives pretzels their signature chewy texture and shiny crust.
- Bake for 12-15 minutes until deep golden brown.
Best enjoyed warm, these soft pretzels have a delightful chew with a slightly crisp exterior. Try serving them with a side of spicy mustard or melted cheese for an extra indulgent treat.
Blueberry Scones
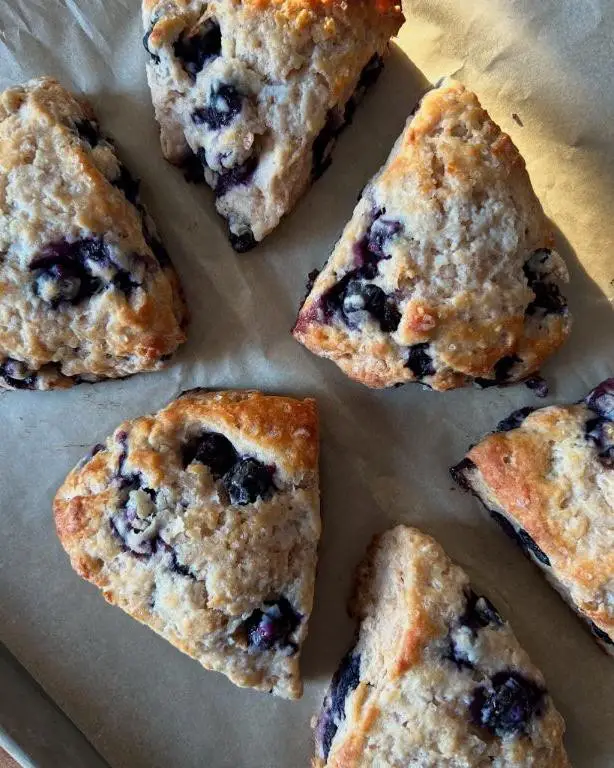
How many times have I found myself craving something sweet yet not overly indulgent for my morning coffee? Countless. That’s when I turn to these blueberry scones, a perfect blend of tender crumb and juicy bursts of fruit. They’re my go-to for a quick bake that feels both special and comforting.
Ingredients
- Flour – 2 cups
- Sugar – 1/4 cup
- Baking powder – 1 tbsp
- Salt – 1/2 tsp
- Butter – 1/2 cup, cold and cubed
- Blueberries – 1 cup
- Heavy cream – 1/2 cup
- Egg – 1
Instructions
- Preheat your oven to 400°F and line a baking sheet with parchment paper.
- In a large bowl, whisk together the flour, sugar, baking powder, and salt.
- Add the cold, cubed butter to the dry ingredients. Use your fingers to press the butter into the flour until the mixture resembles coarse crumbs. Tip: Keep the butter cold for flakier scones.
- Gently fold in the blueberries, being careful not to crush them.
- In a small bowl, whisk together the heavy cream and egg. Pour this into the flour mixture and stir until just combined. Tip: Overmixing leads to tough scones.
- Turn the dough out onto a floured surface and shape it into a 1-inch thick circle.
- Cut the dough into 8 wedges and place them on the prepared baking sheet.
- Bake for 15-20 minutes, or until the scones are golden brown. Tip: Check at 15 minutes to prevent overbaking.
Golden and slightly crisp on the outside, these scones reveal a soft, buttery interior dotted with sweet blueberries. Serve them warm with a dollop of clotted cream or a drizzle of honey for an extra touch of sweetness.
Cinnamon Rolls

How many times have I found myself craving something sweet, warm, and comforting, only to remember that cinnamon rolls are just a few ingredients away? There’s something magical about the way the cinnamon and sugar melt together, filling the kitchen with an aroma that’s impossible to resist. I’ve made these more times than I can count, and each batch feels like a little victory.
Ingredients
- Flour – 3 cups
- Sugar – 1 cup
- Butter – ½ cup
- Milk – 1 cup
- Yeast – 2 tsp
- Cinnamon – 2 tbsp
- Salt – ½ tsp
Instructions
- Warm the milk to 110°F and dissolve the yeast in it, letting it sit for 5 minutes until frothy.
- Mix the flour, sugar, and salt in a large bowl, then cut in the butter until the mixture resembles coarse crumbs.
- Pour the yeast mixture into the dry ingredients, stirring until a dough forms. Tip: If the dough feels too sticky, add a little more flour, but don’t overdo it.
- Knead the dough on a floured surface for about 5 minutes until smooth and elastic.
- Place the dough in a greased bowl, cover, and let it rise in a warm place for 1 hour or until doubled in size.
- Roll out the dough into a rectangle, sprinkle with cinnamon and sugar, then roll it up tightly from the long side.
- Cut the roll into 12 pieces and place them in a greased baking dish. Tip: For extra gooey rolls, pack them close together.
- Cover and let rise for another 30 minutes. Meanwhile, preheat your oven to 375°F.
- Bake for 20-25 minutes or until golden brown. Tip: To ensure they’re done, the rolls should sound hollow when tapped.
Devouring these cinnamon rolls straight out of the oven is a joy, with their fluffy interior and caramelized edges. For an extra indulgent twist, drizzle them with a simple glaze or serve with a scoop of vanilla ice cream.
Puff Pastry
Oh, the joy of biting into a buttery, flaky puff pastry! It’s like a little piece of heaven that melts in your mouth. I remember the first time I tried making it at home; the kitchen was a mess, but the result was absolutely worth it.
Ingredients
- Flour – 2 cups
- Butter – 1 cup, cold
- Salt – 1 tsp
- Water – ½ cup, ice cold
Instructions
- Mix flour and salt in a large bowl.
- Cut cold butter into small cubes and add to the flour mixture. Use your fingers to press the butter into the flour until the mixture resembles coarse crumbs.
- Add ice cold water, a little at a time, mixing until the dough just comes together. Tip: Don’t overwork the dough to keep it flaky.
- Shape the dough into a rectangle, wrap in plastic, and refrigerate for 1 hour. Tip: Chilling the dough makes it easier to roll out.
- On a floured surface, roll the dough into a large rectangle. Fold the dough into thirds, like a letter, then roll out again. Repeat this process 4 more times. Tip: This creates the layers that puff up in the oven.
- Preheat oven to 400°F.
- Cut the dough into desired shapes and place on a baking sheet lined with parchment paper.
- Bake for 20-25 minutes, or until golden brown and puffed up.
Just out of the oven, these pastries are irresistibly crisp and light. Serve them warm with a dollop of jam or a sprinkle of powdered sugar for a simple yet elegant treat.
Banana Bread
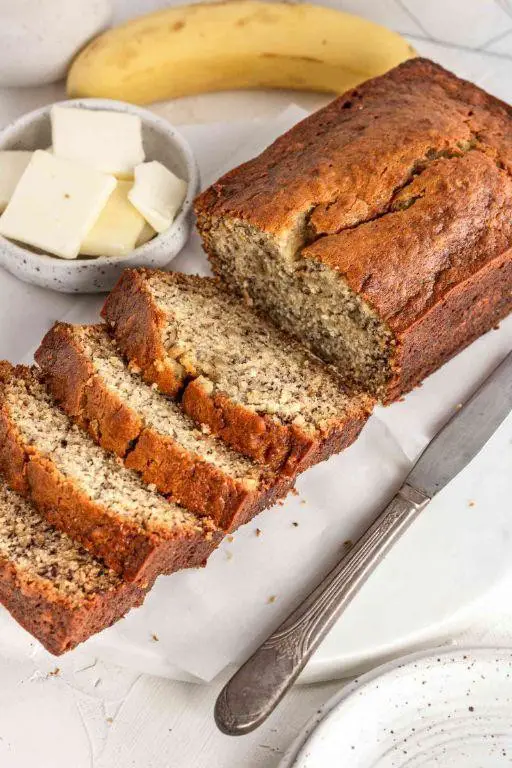
Yesterday, as I was rummaging through my kitchen, I stumbled upon some overripe bananas. You know, the ones that are too sweet for cereal but perfect for baking. That’s when I decided to whip up a loaf of banana bread, a recipe that’s become my go-to for using up those bananas.
Ingredients
- Bananas – 3 medium
- Flour – 1 ½ cups
- Sugar – ¾ cup
- Egg – 1
- Butter – ½ cup, melted
- Baking soda – 1 tsp
- Salt – ½ tsp
Instructions
- Preheat your oven to 350°F (175°C). Grease a 9×5 inch loaf pan.
- In a large bowl, mash the bananas with a fork until smooth. Tip: The riper the bananas, the sweeter your bread will be.
- Stir the melted butter into the mashed bananas.
- Mix in the sugar, egg, baking soda, and salt until well combined. Tip: Don’t overmix to keep the bread tender.
- Gently fold in the flour until just incorporated. Tip: A few lumps are okay; they’ll disappear during baking.
- Pour the batter into the prepared loaf pan.
- Bake for 60 minutes, or until a toothpick inserted into the center comes out clean.
- Let the bread cool in the pan for 10 minutes, then transfer to a wire rack to cool completely.
This banana bread comes out moist and fluffy, with a rich banana flavor that’s just sweet enough. I love serving it warm with a dollop of peanut butter on top for an extra protein kick.
Chocolate Chip Cookies
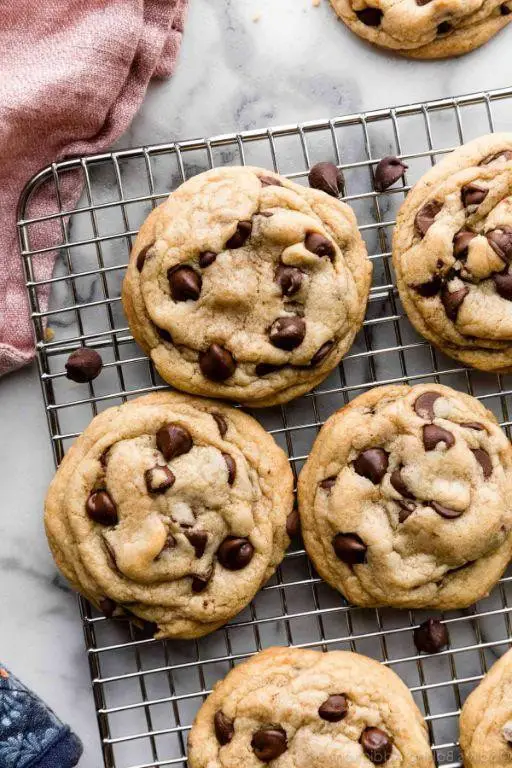
Every time I think about chocolate chip cookies, I’m transported back to my grandma’s kitchen, where the smell of butter and sugar caramelizing in the oven was the hallmark of a perfect afternoon. Today, I’m sharing my go-to recipe that’s as simple as it is delicious, perfect for those impromptu baking sessions or when you need a quick sweet fix.
Ingredients
- Flour – 2 cups
- Butter – 1 cup
- Sugar – ¾ cup
- Brown sugar – ¾ cup
- Eggs – 2
- Vanilla extract – 1 tsp
- Baking soda – 1 tsp
- Salt – ½ tsp
- Chocolate chips – 2 cups
Instructions
- Preheat your oven to 375°F (190°C) to ensure it’s ready for baking.
- Cream together the butter, sugar, and brown sugar in a large bowl until light and fluffy. Tip: Room temperature butter mixes more evenly.
- Beat in the eggs one at a time, then stir in the vanilla extract.
- In a separate bowl, whisk together the flour, baking soda, and salt.
- Gradually blend the dry ingredients into the wet mixture. Tip: Overmixing can lead to tough cookies, so mix just until combined.
- Fold in the chocolate chips evenly throughout the dough.
- Drop tablespoon-sized balls of dough onto ungreased baking sheets, leaving enough space between them for spreading.
- Bake for 9 to 11 minutes, or until the edges are golden but the centers are still soft. Tip: For chewier cookies, take them out when they’re just set.
- Let the cookies cool on the baking sheets for 2 minutes before transferring to wire racks.
You’ll love the contrast of the crispy edges against the soft, gooey centers, packed with melty chocolate chips. Try serving them warm with a scoop of vanilla ice cream for an irresistible dessert.
Apple Turnovers
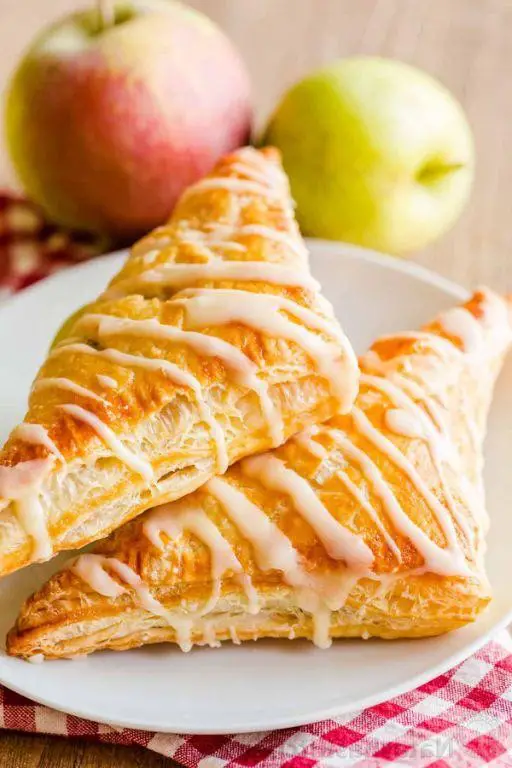
Yesterday, I found myself craving something sweet yet simple to bake, and that’s when apple turnovers came to mind. There’s something about the flaky pastry combined with the warm, spiced apple filling that feels like a hug in dessert form.
Ingredients
- Puff pastry – 1 sheet
- Apples – 2, peeled and diced
- Sugar – 1/4 cup
- Cinnamon – 1 tsp
- Egg – 1, beaten
Instructions
- Preheat your oven to 400°F (200°C) and line a baking sheet with parchment paper.
- In a bowl, mix the diced apples with sugar and cinnamon until well coated. Tip: Letting the mixture sit for 5 minutes helps the apples release their juices, enhancing the flavor.
- Roll out the puff pastry on a lightly floured surface and cut it into 4 equal squares.
- Place a spoonful of the apple mixture in the center of each square. Tip: Avoid overfilling to prevent the turnovers from bursting open during baking.
- Fold the pastry over the filling to form a triangle, pressing the edges firmly to seal. Use a fork to crimp the edges for a decorative touch.
- Brush the tops of the turnovers with the beaten egg. Tip: This gives them a beautiful golden color and a slight shine.
- Bake for 20-25 minutes, or until the turnovers are puffed and golden brown.
Delightfully crisp on the outside with a tender, juicy apple filling, these turnovers are perfect served warm with a scoop of vanilla ice cream or a dollop of whipped cream for an extra indulgent treat.
Pancakes

Pancakes have always been my go-to comfort food, especially on lazy Sunday mornings when the sun is just peeking through the kitchen window. There’s something magical about flipping that perfect golden-brown pancake that makes me feel like a breakfast champion.
Ingredients
- Flour – 1 cup
- Sugar – 2 tbsp
- Baking powder – 2 tsp
- Salt – ½ tsp
- Milk – 1 cup
- Egg – 1
- Butter – 2 tbsp, melted
Instructions
- In a large bowl, whisk together the flour, sugar, baking powder, and salt.
- In another bowl, beat the egg, then stir in the milk and melted butter. Tip: Make sure your melted butter isn’t too hot to avoid cooking the egg.
- Pour the wet ingredients into the dry ingredients and stir until just combined. Tip: A few lumps are okay; overmixing makes pancakes tough.
- Heat a non-stick skillet over medium heat and lightly grease it with butter or cooking spray.
- Pour ¼ cup of batter onto the skillet for each pancake. Cook until bubbles form on the surface and the edges look set, about 2-3 minutes.
- Flip the pancakes and cook until golden brown on the other side, about 1-2 minutes more. Tip: Adjust the heat if the pancakes are browning too quickly.
- Serve warm with your favorite toppings.
Absolutely fluffy and lightly sweet, these pancakes are a blank canvas for your creativity. Try stacking them high with fresh berries and a drizzle of maple syrup, or go savory with crispy bacon and a fried egg on top.
Waffles
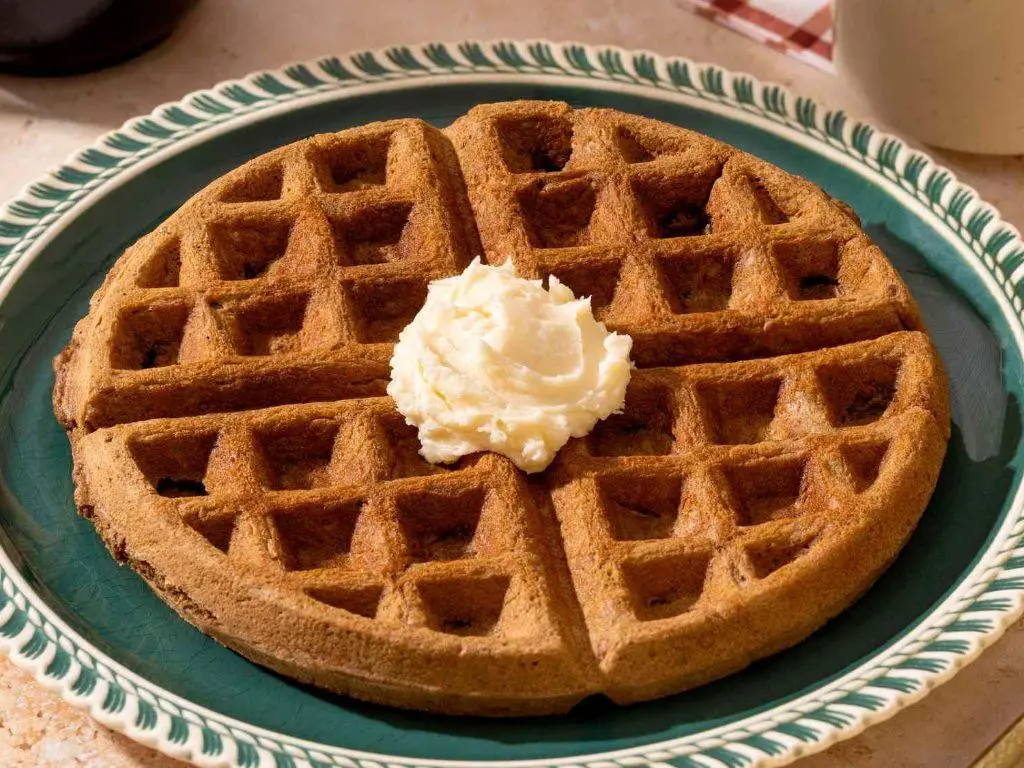
Every Sunday morning, I find myself drawn to the kitchen, whisk in hand, ready to whip up a batch of my all-time favorite breakfast—waffles. There’s something about the crisp edges and fluffy interior that makes my heart sing, and today, I’m sharing my go-to recipe with you.
Ingredients
- Flour – 1 cup
- Sugar – 2 tbsp
- Baking powder – 1 tsp
- Salt – ½ tsp
- Egg – 1
- Milk – 1 cup
- Butter – 2 tbsp, melted
Instructions
- Preheat your waffle iron to 375°F for that perfect golden crisp.
- In a large bowl, whisk together the flour, sugar, baking powder, and salt. Tip: Sifting the dry ingredients can prevent lumps for a smoother batter.
- In another bowl, beat the egg, then stir in the milk and melted butter. Tip: Ensure the butter is cooled slightly to avoid cooking the egg.
- Pour the wet ingredients into the dry ingredients and stir until just combined. Tip: Overmixing leads to tough waffles; a few lumps are okay.
- Lightly grease the waffle iron with butter or cooking spray, then pour in enough batter to cover the iron’s surface—about ½ cup for a standard waffle iron.
- Close the lid and cook until the waffle is golden brown and crisp, about 3-4 minutes. Avoid opening the iron too soon to prevent sticking.
- Carefully remove the waffle and repeat with the remaining batter.
Vibrant and inviting, these waffles boast a delightful contrast between their crispy exterior and soft, airy center. Serve them stacked high with a drizzle of maple syrup and a handful of fresh berries for a breakfast that feels like a hug.
Shortbread Cookies
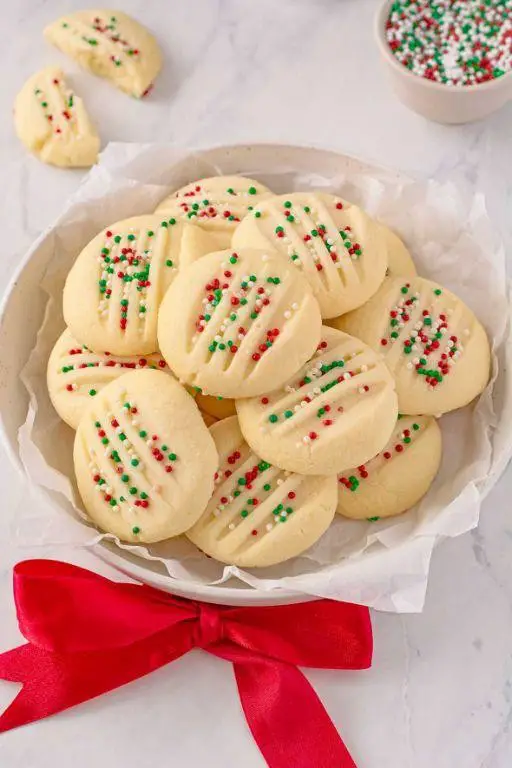
There’s something incredibly comforting about the simplicity of shortbread cookies. I remember my first attempt at making them was a bit of a disaster—too crumbly, too bland—but over the years, I’ve perfected the recipe to buttery, melt-in-your-mouth perfection.
Ingredients
- Butter – 1 cup (2 sticks), softened
- Sugar – ½ cup
- Flour – 2 cups
- Salt – ¼ tsp
Instructions
- Preheat your oven to 325°F (163°C). This lower temperature ensures the cookies bake evenly without browning too quickly.
- In a large bowl, cream together the softened butter and sugar until light and fluffy. Tip: Make sure your butter is at room temperature to avoid a gritty texture.
- Gradually mix in the flour and salt until just combined. Overmixing can lead to tough cookies, so stop as soon as the dough comes together.
- Press the dough into an ungreased 8×8 inch baking pan, smoothing the top with your hands or a flat-bottomed glass. Tip: For extra crisp edges, lightly score the dough with a knife before baking.
- Bake for 30-35 minutes, or until the edges are just starting to turn golden. The center should still be pale.
- Immediately after removing from the oven, cut into squares or rectangles while still warm. Tip: Use a sharp knife for clean cuts and let them cool completely in the pan to set.
Flaky, buttery, and just the right amount of sweet, these shortbread cookies are perfect with a cup of tea or as a base for strawberry shortcake. Try dusting them with powdered sugar or dipping one end in melted chocolate for an extra special touch.
Lemon Bars
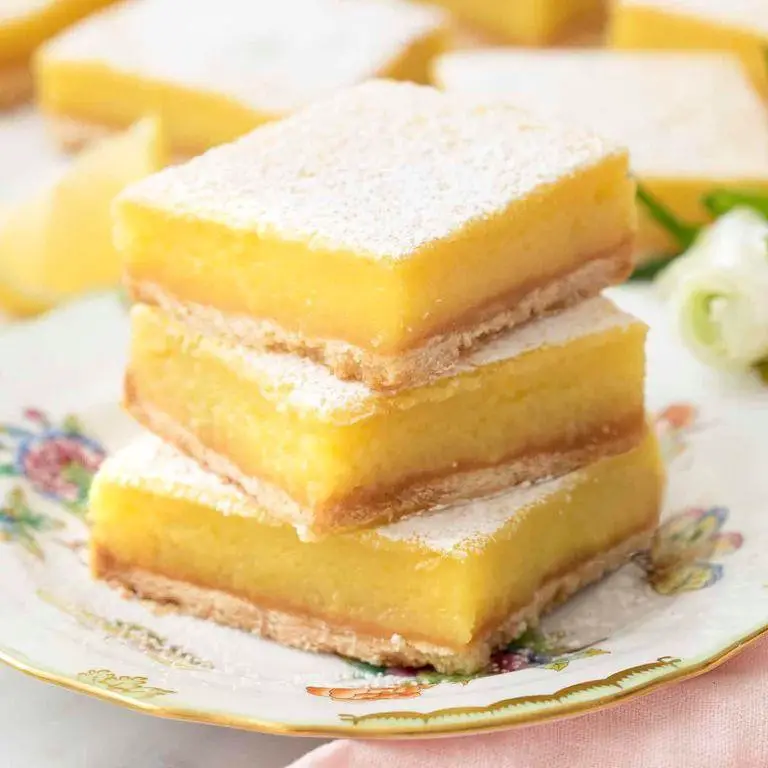
Afternoon cravings hit me hard today, and nothing satisfies my sweet tooth quite like a batch of homemade lemon bars. There’s something about the tangy lemon curd paired with a buttery shortbread crust that feels like a hug in dessert form. I remember the first time I made these; I was skeptical about the simplicity, but one bite convinced me they’re a keeper.
Ingredients
- Flour – 1 cup
- Butter – ½ cup
- Sugar – ¼ cup
- Eggs – 2
- Lemon juice – ¼ cup
- Lemon zest – 1 tbsp
Instructions
- Preheat your oven to 350°F. This ensures your lemon bars bake evenly.
- Mix 1 cup flour, ½ cup butter, and ¼ cup sugar in a bowl until crumbly. Tip: Cold butter makes the crust flakier.
- Press the mixture into an 8×8 inch baking pan. Bake for 20 minutes until lightly golden.
- While the crust bakes, whisk 2 eggs, ¼ cup lemon juice, and 1 tbsp lemon zest in a bowl. Tip: Fresh lemon juice beats bottled for flavor.
- Pour the lemon mixture over the hot crust. Bake for another 20 minutes until the filling is set. Tip: The edges should be slightly bubbly but not browned.
- Cool completely on a wire rack before cutting into squares.
When you bite into these lemon bars, the first thing you’ll notice is the perfect balance between sweet and tart. The crust is crumbly yet sturdy enough to hold the creamy lemon filling. For an extra touch, dust them with powdered sugar or serve with a dollop of whipped cream.
Cheese Danish

Ah, there’s nothing quite like the smell of a freshly baked Cheese Danish wafting through the kitchen on a lazy Sunday morning. I remember the first time I tried making it at home, thinking it would be a daunting task, but to my surprise, it turned out to be a delightful and straightforward process that’s now a staple in my baking repertoire.
Ingredients
- Puff pastry – 1 sheet
- Cream cheese – 8 oz
- Sugar – 1/4 cup
- Vanilla extract – 1 tsp
- Egg – 1, for egg wash
Instructions
- Preheat your oven to 400°F (200°C) and line a baking sheet with parchment paper.
- In a mixing bowl, combine the cream cheese, sugar, and vanilla extract until smooth. Tip: Ensure the cream cheese is at room temperature for easier mixing.
- Roll out the puff pastry sheet on a lightly floured surface to about a 10×10 inch square.
- Cut the pastry into 4 equal squares.
- Spoon 2 tablespoons of the cream cheese mixture into the center of each square.
- Fold the corners of each square over the filling, slightly overlapping in the center, and press gently to seal. Tip: Don’t overfill to prevent the filling from leaking out during baking.
- Beat the egg in a small bowl and brush it over the pastries for a golden finish.
- Bake for 15-20 minutes, or until the pastries are puffed and golden brown. Tip: Keep an eye on them after 15 minutes to avoid overbaking.
Kneading the dough might seem like a chore, but the result is absolutely worth it. The Cheese Danish comes out flaky, with a creamy center that’s just the right amount of sweet. Serve it warm with a drizzle of honey or a dusting of powdered sugar for an extra touch of indulgence.
Pumpkin Muffins
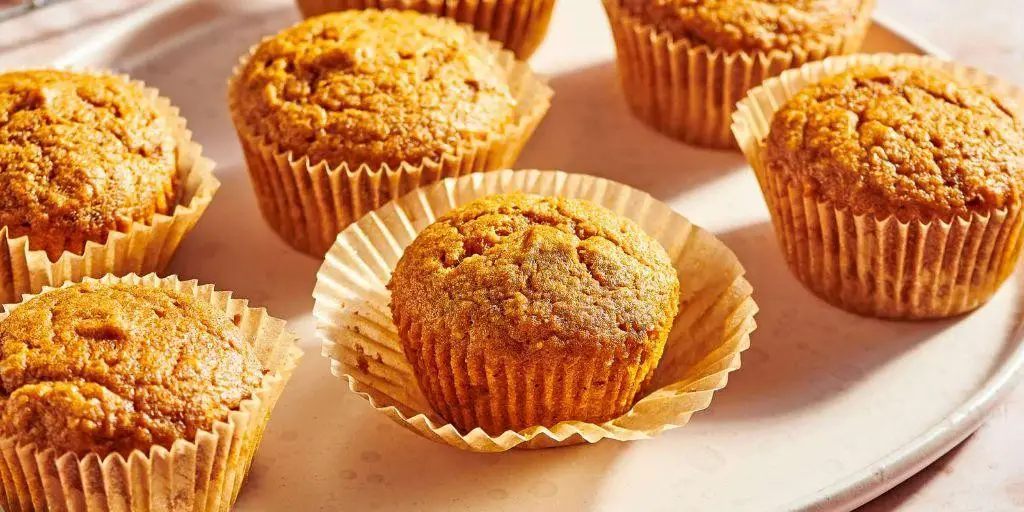
There’s something about the aroma of pumpkin muffins baking that instantly makes my kitchen feel like home. Whether it’s a lazy Sunday morning or I’m prepping for a cozy gathering, these muffins are my go-to for a comforting treat.
Ingredients
- Flour – 1 cup
- Sugar – ¾ cup
- Pumpkin puree – ½ cup
- Egg – 1
- Butter – ¼ cup, melted
- Baking powder – 1 tsp
- Salt – ½ tsp
- Cinnamon – 1 tsp
Instructions
- Preheat your oven to 375°F and line a muffin tin with paper liners.
- In a large bowl, whisk together the flour, sugar, baking powder, salt, and cinnamon.
- In another bowl, mix the pumpkin puree, egg, and melted butter until smooth.
- Tip: For extra fluffy muffins, make sure all your ingredients are at room temperature before mixing.
- Gently fold the wet ingredients into the dry ingredients until just combined. Overmixing can lead to dense muffins.
- Divide the batter evenly among the muffin cups, filling each about ⅔ full.
- Tip: Use an ice cream scoop for evenly sized muffins and easy cleanup.
- Bake for 20 minutes, or until a toothpick inserted into the center comes out clean.
- Tip: Rotate the muffin tin halfway through baking to ensure even browning.
- Let the muffins cool in the tin for 5 minutes before transferring to a wire rack.
Delightfully moist with a perfect crumb, these pumpkin muffins are a hit every time. Serve them warm with a dollop of whipped cream or a drizzle of caramel for an extra special treat.
Red Velvet Cake
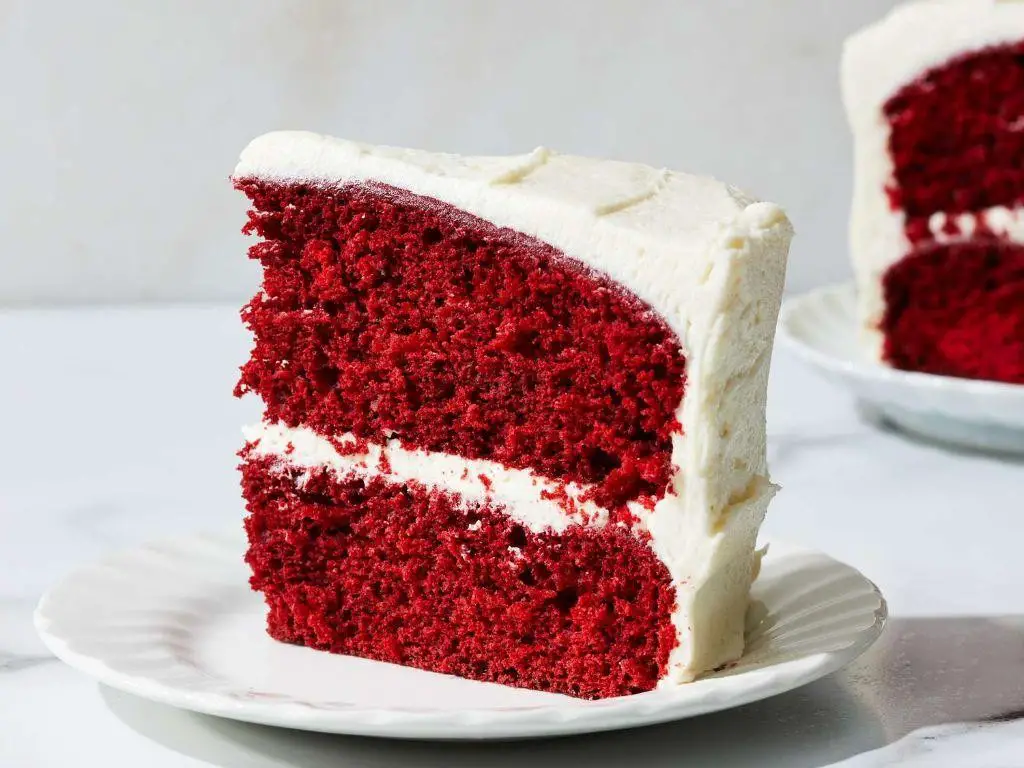
Baking a Red Velvet Cake has always been my go-to when I need to impress or simply treat myself. There’s something about its vibrant color and velvety texture that turns any ordinary day into a celebration.
Ingredients
- Flour – 2 ½ cups
- Sugar – 1 ½ cups
- Butter – 1 cup, softened
- Eggs – 2
- Cocoa powder – 2 tbsp
- Red food coloring – 2 oz
- Buttermilk – 1 cup
- Vanilla extract – 1 tsp
- Baking soda – 1 tsp
- Vinegar – 1 tsp
Instructions
- Preheat your oven to 350°F (175°C) and grease two 9-inch round cake pans. Tip: Use parchment paper at the bottom for easy removal.
- In a large bowl, cream together the butter and sugar until light and fluffy. This usually takes about 3 minutes.
- Add the eggs one at a time, beating well after each addition. Tip: Room temperature eggs blend more smoothly.
- Mix in the cocoa powder, red food coloring, and vanilla extract until the color is uniform.
- Alternately add the flour and buttermilk to the creamed mixture, starting and ending with flour. Tip: Do not overmix to keep the cake tender.
- In a small bowl, combine the baking soda and vinegar, then fold into the batter. The mixture will fizz; this is normal.
- Divide the batter evenly between the prepared pans and bake for 25-30 minutes, or until a toothpick inserted into the center comes out clean.
- Allow the cakes to cool in the pans for 10 minutes, then transfer to a wire rack to cool completely.
Rich in flavor with a moist, tender crumb, this Red Velvet Cake is a showstopper. Serve it with a dollop of cream cheese frosting or enjoy a slice with a cup of coffee for a delightful treat.
Baguettes
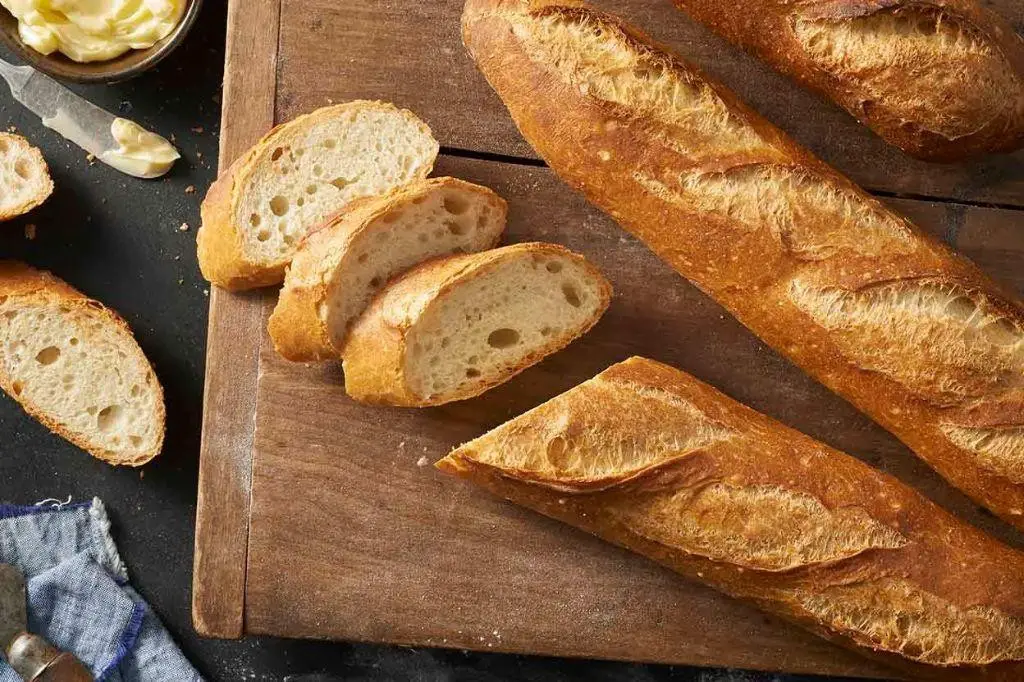
Zesty mornings call for the comforting aroma of freshly baked baguettes wafting through the kitchen. I remember the first time I attempted to make these at home, thinking it was a baker’s secret, only to discover how simple and satisfying the process can be. Here’s how I make my go-to baguettes, with a few personal twists along the way.
Ingredients
- Flour – 3 cups
- Water – 1 1/4 cups
- Salt – 1 1/2 tsp
- Yeast – 1/4 tsp
Instructions
- In a large bowl, mix flour, salt, and yeast together until well combined.
- Gradually add water to the dry ingredients, stirring until a shaggy dough forms. Tip: The dough should be sticky but manageable; adjust water or flour as needed.
- Knead the dough on a lightly floured surface for about 10 minutes until smooth and elastic.
- Place the dough in a lightly oiled bowl, cover with a damp cloth, and let it rise at room temperature (about 75°F) for 3 hours, or until doubled in size. Tip: For best results, ensure your kitchen isn’t too cold or drafty.
- Preheat your oven to 475°F and place a baking stone or inverted baking sheet inside to heat up.
- Divide the dough into two equal pieces and shape each into a long, thin baguette. Tip: Roll the dough gently to avoid deflating it too much.
- Transfer the shaped baguettes onto a piece of parchment paper, cover lightly, and let rest for 30 minutes.
- Using a sharp knife, make 3-4 diagonal slashes on each baguette.
- Bake for 20-25 minutes, or until the baguettes are golden brown and sound hollow when tapped on the bottom.
Enjoy the crisp crust and soft, airy interior of these homemade baguettes. They’re perfect sliced for sandwiches, torn apart for dipping, or simply enjoyed with a smear of butter.
Conclusion
You’ve just discovered a treasure trove of baking inspiration with our 18 Delicious Pastry Flour Recipes! Whether you’re a novice or a seasoned baker, there’s something here to spark joy in your kitchen. We’d love to hear which recipes become your favorites—drop us a comment below. And if you enjoyed this roundup, don’t forget to share the love on Pinterest for fellow baking enthusiasts to enjoy!

Michael Johnson is the founder of Pan Mastery, Inspired by his blacksmith grandfather’s legacy has a deep appreciation for hand-crafted pots and pans, he provides invaluable guides, reviews, and recipes to enhance your culinary journey.