Craving something tasty but short on time? You’re in luck! Our roundup of 18 Delicious Quick Snack Recipes is packed with easy-to-make, mouthwatering options perfect for any moment. Whether you’re looking for a quick bite between meals or something to share with friends, these recipes are sure to satisfy. Dive in and discover your next favorite snack—no fuss, just flavor!
Avocado Toast with Chili Flakes
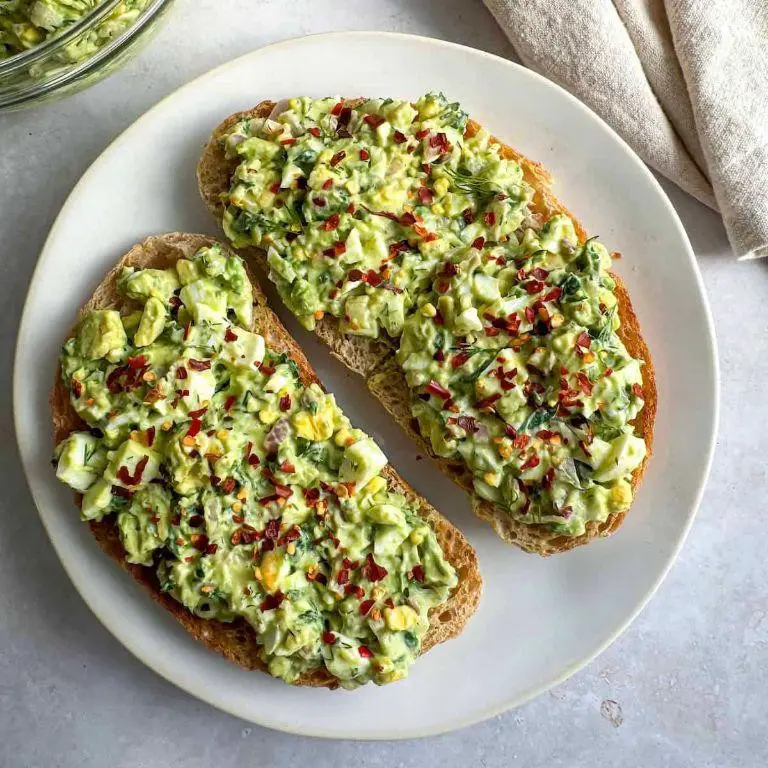
Calm mornings call for simplicity, and nothing answers that call quite like the humble yet vibrant avocado toast, lightly kissed by the warmth of chili flakes. It’s a dish that whispers of quiet beginnings and the joy of savoring each bite.
Ingredients
- 1 ripe avocado – look for one that yields slightly to gentle pressure, a sign it’s perfectly ripe.
- 2 slices of sourdough bread – my favorite for its tangy contrast to the creamy avocado.
- 1 tbsp extra virgin olive oil – the fruity notes elevate the dish.
- 1/2 tsp chili flakes – adjust to your heat preference, but a little goes a long way.
- Salt to taste – I prefer flaky sea salt for its crunch and minerality.
Instructions
- Toast the sourdough bread until golden and crisp, about 3 minutes in a toaster set to medium.
- While the bread toasts, halve the avocado and scoop the flesh into a bowl. Mash lightly with a fork, leaving some chunks for texture.
- Drizzle the toasted bread with extra virgin olive oil, ensuring each slice is lightly coated.
- Spread the mashed avocado evenly over the toast, then sprinkle with chili flakes and a pinch of salt.
- Serve immediately, perhaps with a side of cherry tomatoes or a soft-boiled egg for added richness.
Velvety avocado meets the crunch of toast, with chili flakes adding a spark that awakens the senses. This dish shines brightest when enjoyed slowly, perhaps with a cup of coffee in hand, as the morning light filters through the window.
Greek Yogurt with Honey and Almonds

How often do we find ourselves craving something sweet yet wholesome, a treat that feels indulgent without the guilt? This simple combination of Greek yogurt, honey, and almonds is my go-to for those moments, offering a perfect balance of creaminess, sweetness, and crunch.
Ingredients
- 1 cup of Greek yogurt (I love the thick, creamy texture of full-fat for this)
- 2 tablespoons of honey (local, if you can find it, for that nuanced floral note)
- 1/4 cup of sliced almonds (toasted lightly, they bring a wonderful warmth)
Instructions
- Measure out 1 cup of Greek yogurt and spoon it into your serving bowl.
- Drizzle 2 tablespoons of honey over the yogurt. Tip: Warm the honey slightly if it’s too thick to drizzle easily.
- In a small pan over medium heat, toast 1/4 cup of sliced almonds for 2-3 minutes, stirring frequently, until they’re golden and fragrant. Tip: Keep a close eye on them to prevent burning.
- Sprinkle the toasted almonds over the yogurt and honey. Tip: For an extra touch of elegance, reserve a few almonds to garnish the top.
This dish is a delightful play of textures and flavors—the yogurt’s tanginess, the honey’s sweetness, and the almonds’ nutty crunch. Try serving it in a clear glass to showcase the beautiful layers, or pair it with fresh berries for a colorful twist.
Caprese Salad Skewers
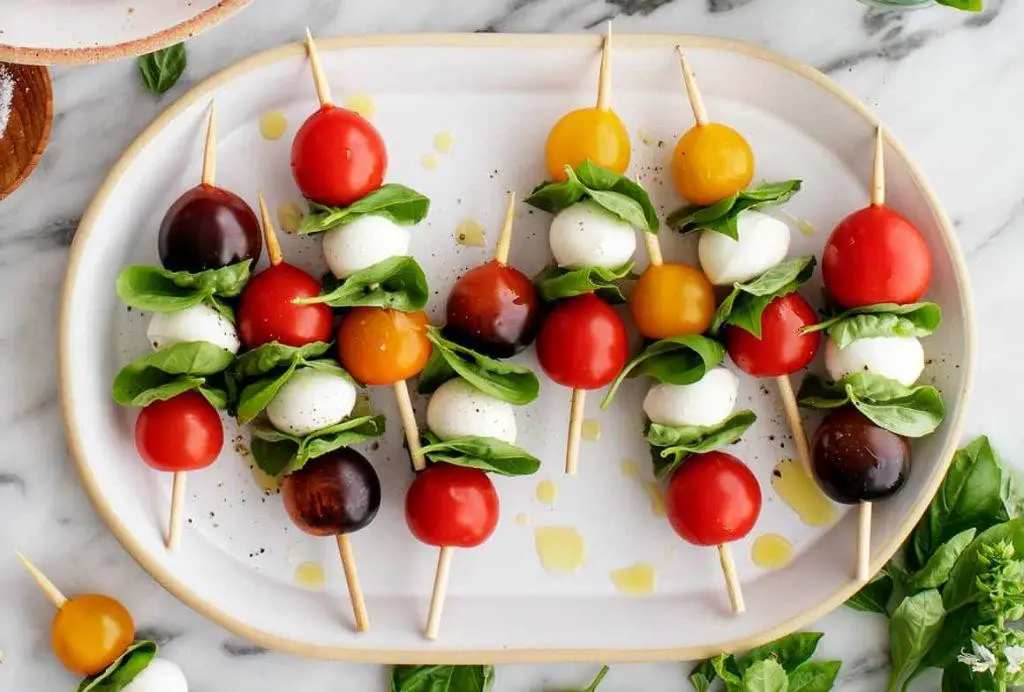
On a quiet morning like this, when the light filters through the kitchen window just so, I find myself drawn to the simplicity and elegance of Caprese Salad Skewers. They’re a reminder that the best flavors often come from the humblest ingredients, assembled with care.
Ingredients
- 1 pint cherry tomatoes (I look for the ones that are firm and shiny, like little jewels)
- 8 oz fresh mozzarella balls (the smaller, the better—they’re like creamy pearls)
- 1/4 cup extra virgin olive oil (my go-to for its fruity depth)
- 2 tbsp balsamic glaze (it adds a sweet, tangy whisper)
- 1/4 tsp sea salt (just a pinch to awaken the flavors)
- 1/4 tsp freshly ground black pepper (for a gentle kick)
- 10-12 fresh basil leaves (torn, not cut, to keep them from bruising)
Instructions
- Gently rinse the cherry tomatoes under cool water and pat them dry with a paper towel. This ensures your skewers won’t be watery.
- Drain the mozzarella balls and pat them dry as well. Moisture is the enemy of flavor here.
- Thread one cherry tomato, one mozzarella ball, and a piece of torn basil leaf onto each skewer. Repeat until all ingredients are used. The order is a dance of color and texture.
- Arrange the skewers on a serving platter. Drizzle them with extra virgin olive oil, making sure each one gets its share.
- Follow with a drizzle of balsamic glaze. A little goes a long way, so use it sparingly.
- Sprinkle the sea salt and freshly ground black pepper over the skewers. This is where they come to life.
Each bite is a burst of freshness, the mozzarella melting slightly against the crisp tomato, the basil adding a whisper of summer. Serve them on a wooden board for a rustic touch, or line them up on a sleek slate for something more modern.
Peanut Butter Banana Smoothie

Lately, I’ve found myself reaching for the same comforting blend each morning, a simple yet deeply satisfying peanut butter banana smoothie that feels like a warm hug in a glass.
Ingredients
- 1 ripe banana (the spottier, the sweeter, in my opinion)
- 2 tablespoons of creamy peanut butter (I swear by the natural, unsweetened kind for its pure flavor)
- 1 cup of almond milk (though any milk will do, almond gives it a light, nutty undertone)
- 1/2 cup of ice cubes (for that refreshing chill)
- A drizzle of honey (about 1 teaspoon, adjust based on your sweet tooth)
Instructions
- Peel the banana and break it into chunks directly into the blender.
- Add the peanut butter, almond milk, and honey to the blender with the banana.
- Blend on high for 30 seconds, or until the mixture is smooth and creamy. Tip: If the smoothie is too thick, add a splash more almond milk to reach your desired consistency.
- Add the ice cubes and blend again for another 20-30 seconds until the smoothie is frosty and well combined. Tip: For an extra cold smoothie, freeze your banana chunks overnight.
- Pour into a tall glass and serve immediately. Tip: A sprinkle of cinnamon on top adds a warm, spicy note that complements the peanut butter beautifully.
Silky and rich, this smoothie strikes the perfect balance between sweet and nutty, with a texture that’s both creamy and refreshing. Try serving it with a side of whole grain toast for a breakfast that feels indulgent yet wholesome.
Hummus and Veggie Wrap
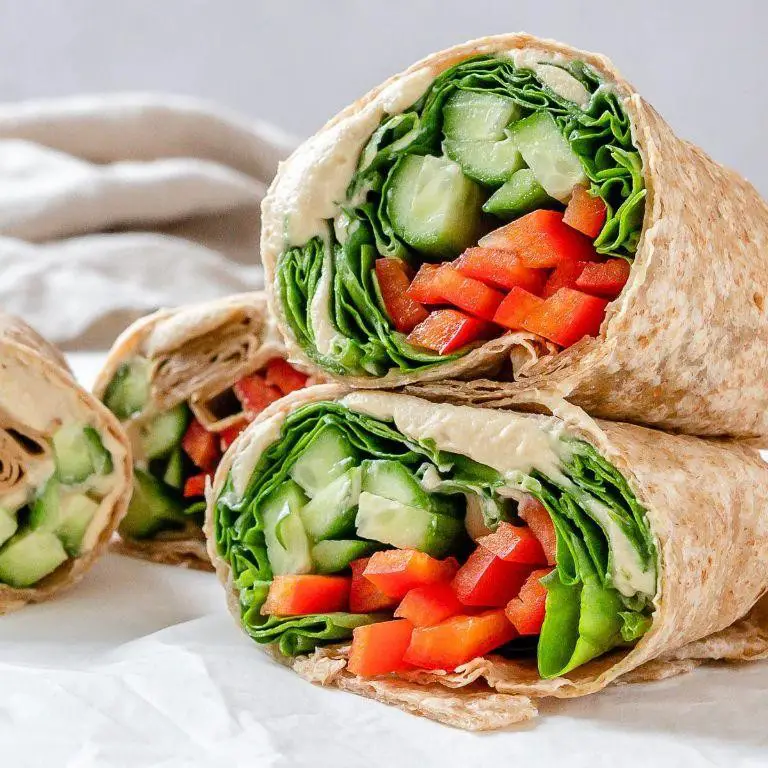
Hummus and veggie wraps have a way of bringing simplicity and nourishment to the forefront of my mind, especially on days when the world feels a bit too fast. There’s something deeply comforting about the creamy hummus paired with the crisp freshness of vegetables, all wrapped up in a soft tortilla.
Ingredients
- 1 cup of homemade hummus (I find that the garlicky kind adds a nice punch)
- 2 large whole wheat tortillas (the kind that bends without cracking is my preference)
- 1/2 cup of sliced cucumbers (I like them thin for that perfect crunch)
- 1/2 cup of shredded carrots (the pre-shredded ones save time, but fresh has more flavor)
- 1/4 cup of sliced red bell peppers (for a sweet, colorful touch)
- 2 tbsp of extra virgin olive oil (my go-to for its fruity notes)
- A handful of baby spinach leaves (they add a lovely, earthy depth)
Instructions
- Lay out the whole wheat tortillas on a clean, flat surface.
- Spread 1/2 cup of homemade hummus evenly over each tortilla, leaving a small border around the edges.
- Arrange the sliced cucumbers, shredded carrots, sliced red bell peppers, and baby spinach leaves over the hummus on each tortilla.
- Drizzle 1 tbsp of extra virgin olive oil over the veggies on each tortilla for added flavor.
- Gently roll each tortilla tightly from one end to the other, tucking in the ingredients as you go to prevent them from falling out.
- Cut each wrap in half diagonally for easier handling and a more appealing presentation.
The texture of this wrap is a delightful contrast between the creamy hummus and the crisp vegetables, while the flavors meld together beautifully. Try serving it with a side of pickled jalapeños for an extra kick, or enjoy it as is for a light, satisfying meal.
Microwave Sweet Potato Chips

Falling into the rhythm of a quiet kitchen morning, I find myself reaching for the simplicity of sweet potatoes, their earthy sweetness a comfort. Today, we’re transforming them into crispy, golden chips with nothing more than a microwave and a sprinkle of patience.
Ingredients
- 1 medium sweet potato (I like to choose one that feels firm and has a deep orange hue for the best flavor)
- 1 tablespoon extra virgin olive oil (my go-to for its fruity notes)
- 1/4 teaspoon sea salt (a fine grind ensures it sticks well)
- 1/4 teaspoon smoked paprika (for a whisper of warmth)
Instructions
- Wash the sweet potato thoroughly under cool water, scrubbing gently to remove any dirt.
- Using a sharp knife or a mandoline, slice the sweet potato into 1/8-inch thick rounds. Uniformity is key here for even cooking.
- Pat the slices dry with a clean kitchen towel to remove excess moisture—this helps them crisp up better.
- Toss the slices in a bowl with the olive oil, ensuring each piece is lightly coated.
- Arrange the slices in a single layer on a microwave-safe plate. Avoid overlapping to ensure each chip cooks evenly.
- Sprinkle the sea salt and smoked paprika evenly over the slices.
- Microwave on high for 3 minutes, then flip each slice and microwave for another 2-3 minutes, watching closely to prevent burning. Chips are done when edges curl and centers are crisp.
- Let the chips cool on the plate for 2 minutes—they’ll crisp up further as they sit.
Kaleidoscopes of golden brown and orange, these chips carry a satisfying crunch with a hint of smoky sweetness. Try serving them alongside a cool avocado dip or simply enjoy them as they are, a humble snack made with care.
Quick and Easy Guacamole
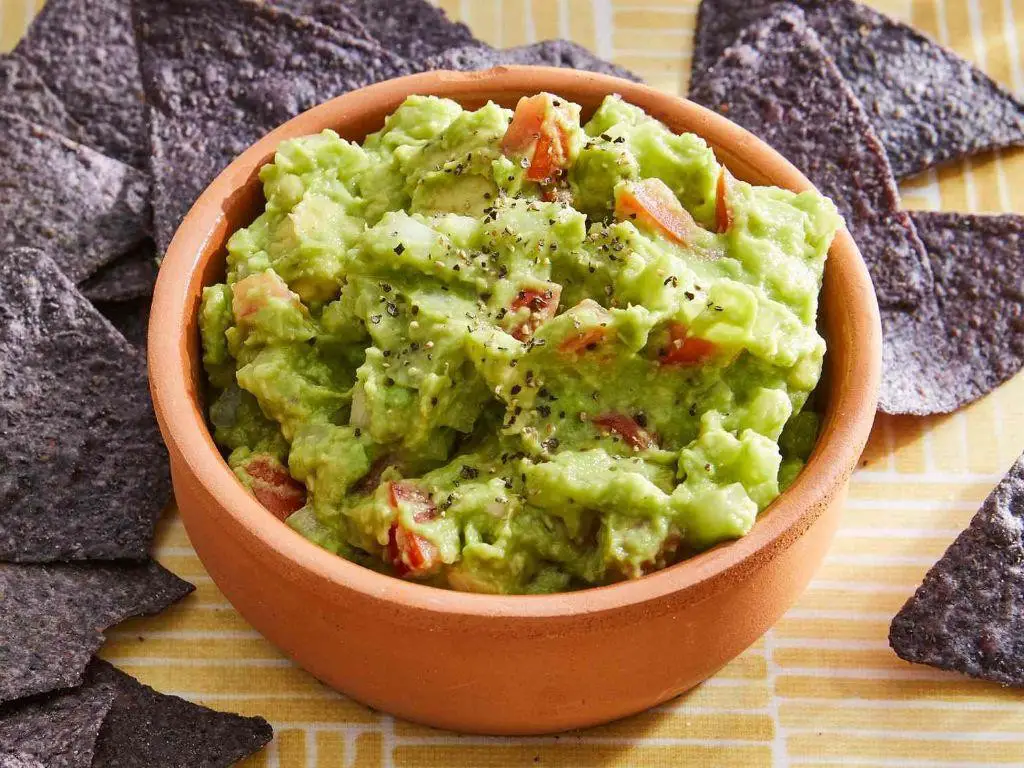
Now, as the morning light filters through the kitchen window, I find myself reaching for the ripest avocados on the counter, their skins dark and yielding slightly under my fingers. It’s moments like these, simple and unhurried, that remind me why making guacamole feels like a small act of love.
Ingredients
- 3 ripe avocados – look for ones that give a little when you press them gently.
- 1 small red onion, finely diced – about 1/4 cup for that perfect bite without overpowering.
- 2 Roma tomatoes, seeds removed and diced – I find they add just the right amount of juiciness.
- 1 jalapeño, seeds removed and minced – adjust to your heat preference, but this is my sweet spot.
- 1/4 cup fresh cilantro, chopped – it’s not guacamole without this vibrant green.
- 2 tbsp fresh lime juice – freshly squeezed, please, for that bright acidity.
- 1/2 tsp salt – I use sea salt for its clean, sharp flavor.
Instructions
- Cut the avocados in half, remove the pits, and scoop the flesh into a medium bowl.
- Using a fork, mash the avocado to your desired consistency – I like mine a bit chunky for texture.
- Add the diced red onion, tomatoes, jalapeño, and cilantro to the bowl.
- Squeeze the lime juice over the mixture and sprinkle with salt.
- Gently fold everything together until just combined – overmixing can make the guacamole mushy.
- Taste and adjust the seasoning if necessary, but remember the flavors will meld as it sits.
Zesty and creamy, this guacamole is a celebration of contrasts – the richness of avocado against the sharpness of lime and onion. Serve it with warm tortilla chips, or for a twist, spoon it over grilled chicken or fish for a burst of freshness.
Cheese and Crackers Platter

On a quiet afternoon, when the light slants just so through the kitchen window, there’s nothing quite like the simplicity and comfort of assembling a cheese and crackers platter. It’s a humble yet deeply satisfying way to pause and savor the moment, blending textures and flavors that speak to the heart of home.
Ingredients
- 1 cup sharp cheddar cheese, cubed (I love the boldness of aged cheddar for that extra kick)
- 1/2 cup creamy brie, sliced (letting it sit out for 20 minutes softens it perfectly)
- 1/4 cup goat cheese, crumbled (the tanginess adds a lovely contrast)
- 1 tbsp honey (a drizzle over the goat cheese elevates it beautifully)
- 1/4 cup mixed nuts (I prefer almonds and walnuts for their crunch and earthiness)
- 1 box assorted crackers (whole grain and sea salt varieties offer a nice balance)
- 1/2 cup grapes, washed (their sweetness complements the cheeses wonderfully)
Instructions
- Begin by arranging the assorted crackers on a large platter, spacing them out to allow room for cheeses and accompaniments.
- Place the cubed sharp cheddar and sliced brie around the crackers, ensuring each cheese is easily accessible.
- Scatter the crumbled goat cheese across the platter, focusing on areas that seem sparse for visual balance.
- Drizzle the honey lightly over the goat cheese, using a spoon to control the flow and avoid pooling.
- Add the mixed nuts in small clusters, tucking them beside cheeses and crackers for a varied texture.
- Finally, place the grapes in a few strategic spots, using them to fill any remaining gaps and add a pop of color.
You’ll find the platter comes together with a delightful mix of creamy, crunchy, and sweet elements, each bite offering a new combination of flavors. Try serving it with a light white wine or a crisp apple cider to round out the experience.
Fruit Salad with Mint
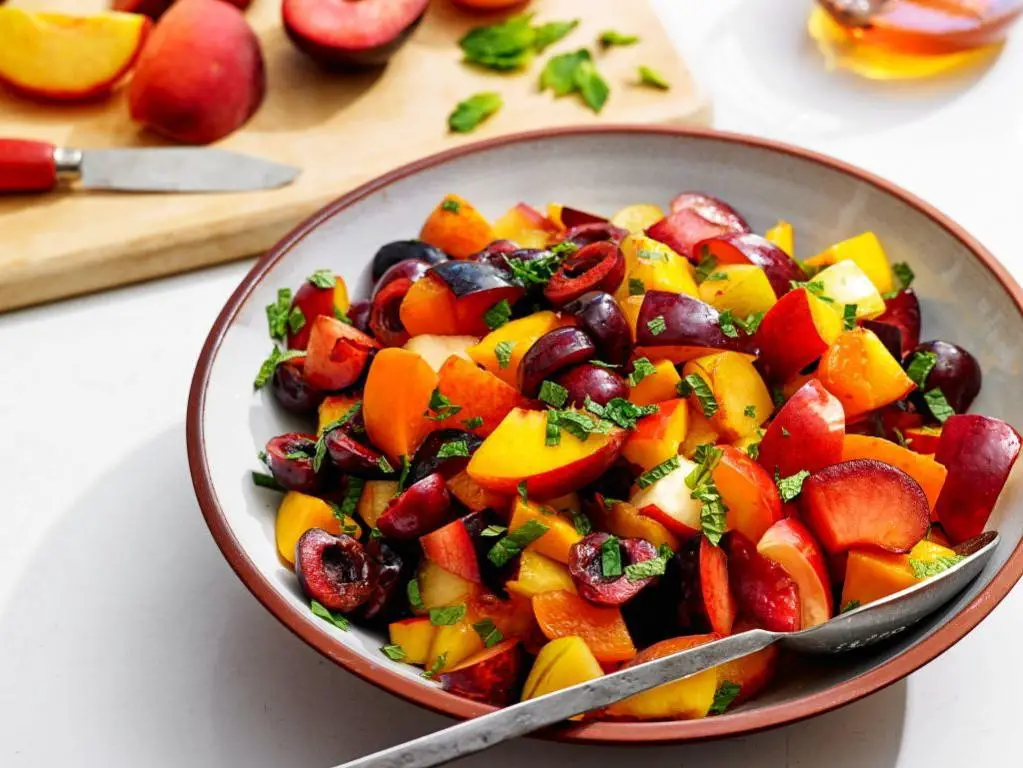
Sometimes, the simplest dishes bring the most joy, especially when they’re as fresh and vibrant as this fruit salad with mint. It’s a celebration of summer’s bounty, a dish that feels like a gentle breeze on a warm afternoon.
Ingredients
- 2 cups of mixed berries (I love the contrast of sweet strawberries and tart blueberries)
- 1 cup of watermelon, cubed (the juicier, the better)
- 1 cup of honeydew melon, cubed (for that subtle sweetness)
- 1/4 cup of fresh mint leaves, finely chopped (from my little herb garden)
- 1 tbsp of honey (local, if you can find it)
- 1 tbsp of lime juice (freshly squeezed, it makes all the difference)
Instructions
- In a large bowl, gently combine the mixed berries, watermelon, and honeydew melon.
- Add the finely chopped mint leaves to the bowl, distributing them evenly among the fruits.
- In a small bowl, whisk together the honey and lime juice until well combined. Tip: Warming the honey slightly can make it easier to mix.
- Drizzle the honey-lime mixture over the fruit and mint. Tip: Use a gentle folding motion to coat the fruit without crushing the berries.
- Let the salad sit in the refrigerator for at least 30 minutes before serving. Tip: This resting time allows the flavors to meld beautifully.
Refreshingly cool and bursting with flavors, this fruit salad is a testament to the beauty of simplicity. Serve it in a hollowed-out watermelon for a stunning presentation that’s sure to impress.
Egg Salad Sandwich
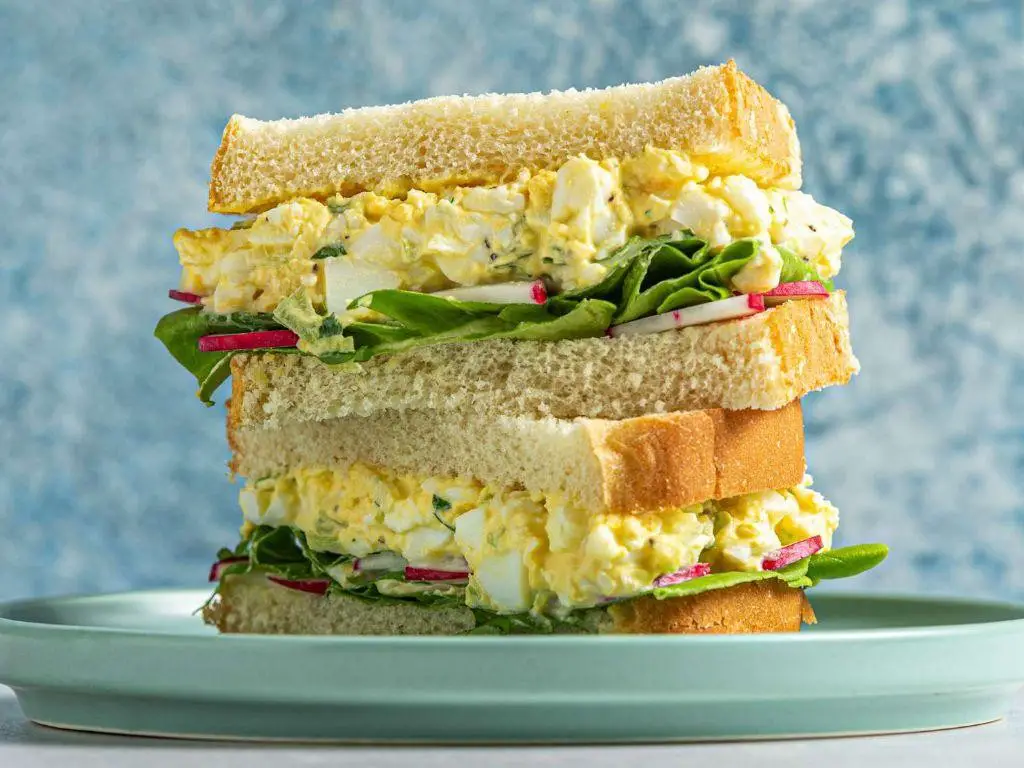
Beneath the quiet hum of the morning, there’s something profoundly comforting about crafting an egg salad sandwich, a simple pleasure that feels like a gentle embrace.
Ingredients
- 6 large eggs (I prefer room temp eggs here; they peel more easily after boiling)
- 1/4 cup mayonnaise (Duke’s is my go-to for its tangy richness)
- 1 tbsp Dijon mustard (adds a subtle depth that yellow mustard can’t match)
- 1/4 tsp salt (I like to use sea salt for its clean, crisp flavor)
- 1/8 tsp black pepper (freshly ground, for that little kick)
- 2 tbsp finely chopped celery (for a refreshing crunch)
- 1 tbsp finely chopped red onion (it’s all about that slight bite)
- 8 slices of whole wheat bread (toasted lightly, for texture)
Instructions
- Place the eggs in a single layer at the bottom of a saucepan and cover with water by 1 inch.
- Bring the water to a rolling boil over high heat, then immediately remove the pan from the heat and cover it with a lid.
- Let the eggs sit in the hot water for 12 minutes for perfectly firm yolks.
- While the eggs are sitting, prepare an ice bath by filling a large bowl with cold water and ice cubes.
- After 12 minutes, transfer the eggs to the ice bath using a slotted spoon and let them cool for at least 5 minutes.
- Once cooled, gently tap each egg on the counter and peel under cool running water to help remove the shell smoothly.
- Chop the peeled eggs into small, even pieces and place them in a mixing bowl.
- Add the mayonnaise, Dijon mustard, salt, and black pepper to the bowl with the eggs.
- Gently fold the ingredients together until well combined, being careful not to overmix and turn the salad mushy.
- Stir in the chopped celery and red onion for that extra texture and flavor.
- Divide the egg salad evenly among 4 slices of the toasted whole wheat bread, then top with the remaining slices.
- Cut the sandwiches in half diagonally for easier handling and a more appealing presentation.
Zesty and creamy with just the right amount of crunch, this egg salad sandwich is a testament to the beauty of simplicity. Serve it with a side of crisp pickles or a handful of potato chips for a lunch that feels both nostalgic and utterly satisfying.
Popcorn with Nutritional Yeast
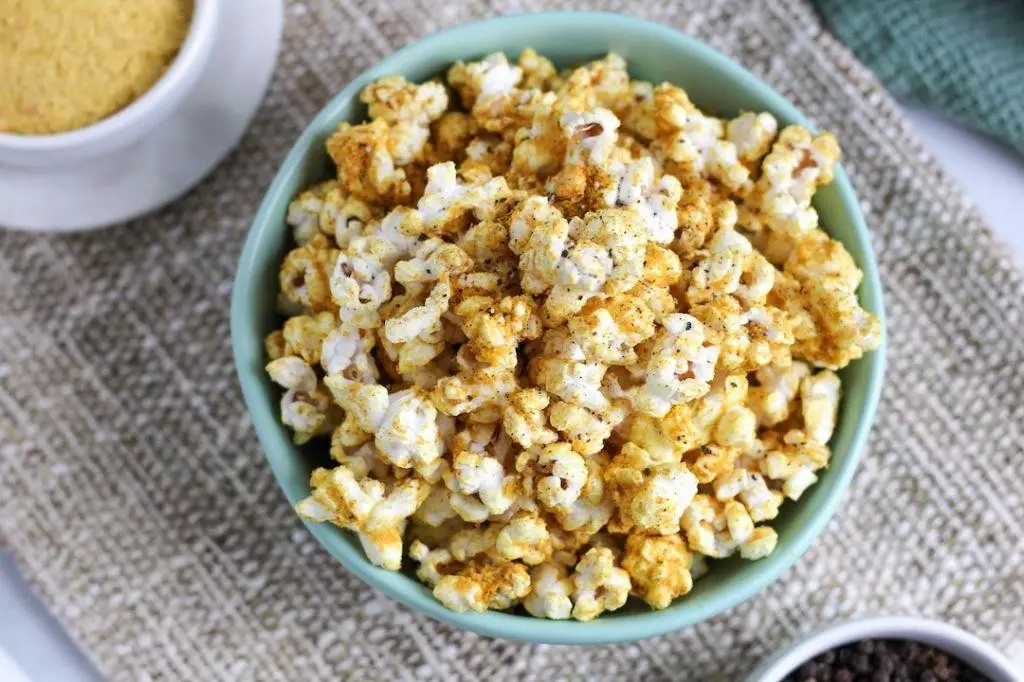
Kneading through the memories of cozy evenings, I find myself drawn to the simplicity and comfort of popcorn, a snack that feels like a warm hug. Today, I’m sharing a twist on this classic—popcorn with nutritional yeast, a combination that brings a cheesy, nutty flavor without any dairy.
Ingredients
- 1/2 cup popcorn kernels (I love the organic, non-GMO ones for their fluffy texture)
- 3 tbsp coconut oil (extra virgin olive oil works too, but coconut oil gives it a subtle sweetness)
- 1/4 cup nutritional yeast (the golden flakes add not just flavor but a boost of B vitamins)
- 1/2 tsp sea salt (fine grain melts beautifully into the warm popcorn)
Instructions
- Heat a large pot over medium heat for about 2 minutes until it’s warm to the touch.
- Add the coconut oil to the pot, letting it melt completely—this should take about 1 minute. Tip: Swirl the pot to coat the bottom evenly.
- Pour in the popcorn kernels, covering them with a lid immediately to prevent any jumps.
- Listen for the popping to begin, which usually starts around the 3-minute mark. Tip: Give the pot a gentle shake every now and then to ensure even popping and to prevent burning.
- Once the popping slows to about 2 seconds between pops, remove the pot from the heat—this should take about 5 minutes total.
- Transfer the popcorn to a large bowl, sprinkling the nutritional yeast and sea salt over the top while it’s still warm. Tip: Toss gently to distribute the flavors evenly without crushing the popcorn.
Velvety with a slight crunch, this popcorn is a delightful play of textures and flavors. Serve it in a big bowl for movie night, or pack it into small bags for a nutritious snack on the go.
Dark Chocolate and Almond Butter Rice Cakes

Darkness settles in the kitchen as I find myself reaching for the simple comforts tonight. There’s something profoundly soothing about the combination of dark chocolate and almond butter, a duo that promises both richness and a touch of nostalgia.
Ingredients
- 4 rice cakes (I love the light crunch of Lundberg’s brown rice cakes here)
- 1/2 cup dark chocolate chips (70% cacao for that perfect bittersweet balance)
- 1/4 cup almond butter (creamy and unsweetened, my pantry staple)
- 1 tbsp coconut oil (it adds a subtle sweetness and helps the chocolate melt smoothly)
- A pinch of sea salt (just a whisper to elevate all the flavors)
Instructions
- Line a baking sheet with parchment paper, ensuring it’s ready for your rice cakes to avoid any last-minute scrambling.
- In a small saucepan over low heat, combine the dark chocolate chips and coconut oil. Stir constantly for about 3 minutes, until the mixture is silky and fully melted. Tip: Keep the heat low to prevent the chocolate from seizing.
- Spread a generous layer of almond butter on each rice cake, using about 1 tbsp per cake. The almond butter acts as a delicious glue for the chocolate.
- Carefully spoon the melted chocolate over each almond butter-covered rice cake, ensuring an even coating. Tip: A small offset spatula works wonders here for a smooth finish.
- Sprinkle a tiny pinch of sea salt over each chocolate-covered rice cake. This step is quick but transformative, enhancing every bite.
- Place the baking sheet in the refrigerator for 15 minutes, allowing the chocolate to set completely. Tip: Don’t rush this step; patience ensures the perfect texture.
Silky chocolate gives way to the creamy almond butter, all atop a crisp rice cake base. Serve these chilled for a refreshing treat, or let them sit out for a few minutes if you prefer a slightly softer chocolate layer.
Tomato Basil Bruschetta

Under the soft glow of the morning light, there’s something deeply comforting about preparing Tomato Basil Bruschetta. It’s a dish that whispers of summer gardens and shared meals, simple yet profoundly satisfying.
Ingredients
- 1 French baguette, sliced into 1/2-inch pieces (I love the crispness it brings when slightly toasted)
- 4 ripe tomatoes, diced (the juicier, the better for that burst of flavor)
- 1/4 cup extra virgin olive oil (my go-to for its fruity notes)
- 1/4 cup fresh basil leaves, chopped (tearing them releases more aroma)
- 2 cloves garlic, minced (for that unmistakable warmth)
- 1 tsp balsamic vinegar (a splash adds a lovely depth)
- Salt to taste (I prefer sea salt for its mineral touch)
Instructions
- Preheat your oven to 375°F. This ensures the bread toasts evenly, getting that perfect crunch.
- Arrange the baguette slices on a baking sheet. Lightly brush each slice with olive oil. Tip: Flipping them halfway through ensures an even golden color.
- Bake for 5-7 minutes until the edges are just golden. Keep an eye on them; they can go from perfect to burnt quickly.
- In a bowl, combine the diced tomatoes, chopped basil, minced garlic, remaining olive oil, and balsamic vinegar. Gently toss to mix. Tip: Letting it sit for 10 minutes melds the flavors beautifully.
- Season the tomato mixture with salt to taste. Tip: Adding salt just before serving keeps the tomatoes from becoming too watery.
- Spoon the tomato mixture onto the toasted baguette slices. Serve immediately.
The bruschetta sings with the freshness of tomatoes and basil, the garlic adding a gentle heat, all atop the crisp, golden bread. Try serving it with a drizzle of reduced balsamic glaze for an extra touch of sweetness and elegance.
Quick Pickled Vegetables
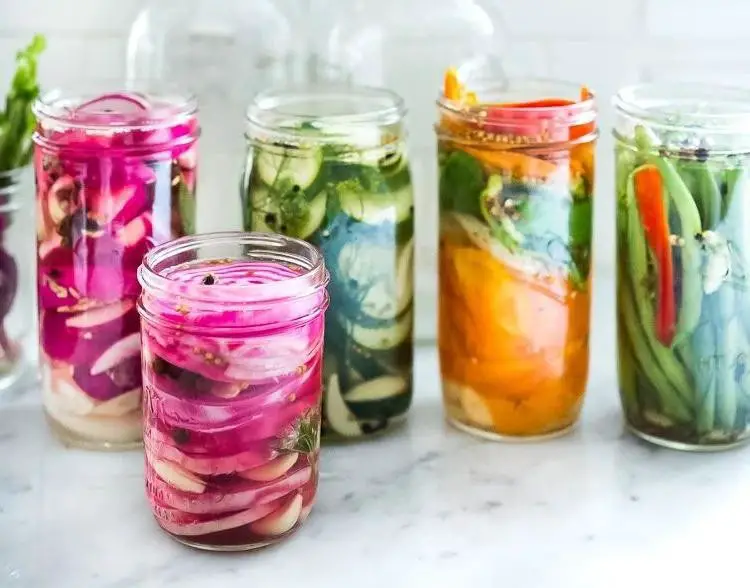
There’s something deeply satisfying about the crisp, tangy bite of quick pickled vegetables, a simple pleasure that transforms the humblest of ingredients into something vibrant and alive. Today, let’s embrace the slow art of pickling, a process that feels both ancient and wonderfully immediate.
Ingredients
- 2 cups distilled white vinegar (I find its clean sharpness perfect for pickling)
- 2 cups water
- 1/4 cup granulated sugar (a little sweetness balances the acidity)
- 2 tbsp kosher salt (its coarse grains dissolve beautifully)
- 1 lb mixed vegetables (carrots, cucumbers, and radishes are my go-to for their crunch and color)
- 4 cloves garlic, thinly sliced (because garlic makes everything better)
- 1 tsp black peppercorns (for a subtle kick)
- 1 tsp mustard seeds (they add a lovely pop of flavor)
Instructions
- In a medium saucepan, combine the vinegar, water, sugar, and salt. Bring to a boil over medium-high heat, stirring occasionally until the sugar and salt dissolve completely.
- While the brine heats, prepare your vegetables by washing and cutting them into uniform pieces. This ensures they pickle evenly.
- Pack the vegetables, garlic, peppercorns, and mustard seeds tightly into a clean quart-sized jar. Pour the hot brine over the vegetables, ensuring they’re completely submerged.
- Let the jar cool to room temperature, then seal with a lid and refrigerate. The vegetables will be ready to eat in as little as 1 hour, but for best flavor, wait 24 hours.
The vegetables emerge from their brine bath transformed, their colors brightened and flavors deepened. Serve them alongside a rich pâté or atop a grain bowl for a burst of acidity that cuts through the richness.
Cottage Cheese with Pineapple
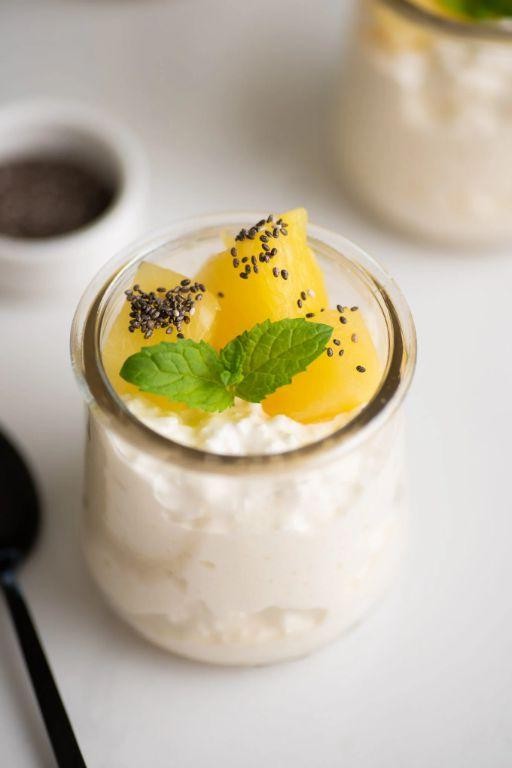
Venturing into the simplicity of cottage cheese with pineapple brings a refreshing pause to the hustle of daily life. This dish, with its creamy and tangy interplay, is a humble reminder of how uncomplicated ingredients can create moments of pure delight.
Ingredients
- 1 cup cottage cheese (I love the small-curd, full-fat version for its richness)
- 1/2 cup fresh pineapple chunks (or canned if fresh isn’t available, but drain well)
- 1 tbsp honey (local honey adds a lovely floral note)
- A pinch of salt (just a whisper to balance the sweetness)
Instructions
- In a medium bowl, gently spoon the cottage cheese, being careful not to break up the curds too much for that perfect texture.
- Add the pineapple chunks to the bowl, distributing them evenly among the cottage cheese.
- Drizzle the honey over the top, allowing it to cascade down the sides for a beautiful presentation.
- Sprinkle a tiny pinch of salt over the dish to enhance all the flavors.
- Give the mixture a very gentle stir, just enough to combine the ingredients without mashing the cottage cheese.
- Serve immediately, or let it sit for 5 minutes to allow the flavors to meld slightly.
Gently spooning into this dish reveals a delightful contrast between the creamy cottage cheese and the juicy pineapple. The honey adds a sweet depth, making each bite a harmonious blend of flavors. For an extra touch, serve it in a hollowed-out pineapple half for a tropical presentation that’s as fun as it is delicious.
Spicy Roasted Chickpeas

Flickering through the pantry, I often find myself reaching for a can of chickpeas, their versatility unmatched. Today, let’s transform them into a snack that’s both fiery and comforting, perfect for those quiet afternoons when you crave a little spice in your solitude.
Ingredients
- 1 can (15 oz) chickpeas, drained and patted dry (I find the drier they are, the crispier they get)
- 2 tbsp extra virgin olive oil (my go-to for its fruity notes)
- 1 tsp smoked paprika (for that deep, smoky whisper)
- 1/2 tsp cayenne pepper (adjust to dance on your palate just right)
- 1/2 tsp sea salt (I prefer the crunch of flaky sea salt here)
Instructions
- Preheat your oven to 400°F (200°C), ensuring it’s fully heated for even roasting.
- In a bowl, toss the dried chickpeas with olive oil until each one glistens like morning dew.
- Sprinkle smoked paprika, cayenne pepper, and sea salt over the chickpeas, stirring gently to coat them evenly. Tip: Use a sieve for dusting spices to avoid clumps.
- Spread the chickpeas in a single layer on a baking sheet lined with parchment paper, giving them space to crisp up. Tip: Crowding leads to steaming, not roasting.
- Roast for 25-30 minutes, shaking the pan halfway through, until they’re golden and crisp to the bite. Tip: Listen for a slight rattle when shaken; that’s the sound of perfection.
Golden and glistening, these chickpeas carry a smoky heat that builds slowly, perfect for sprinkling over salads or enjoying straight from the bowl. Their crunch is a textural delight, a little reminder of the joy found in simple transformations.
Apple Slices with Peanut Butter
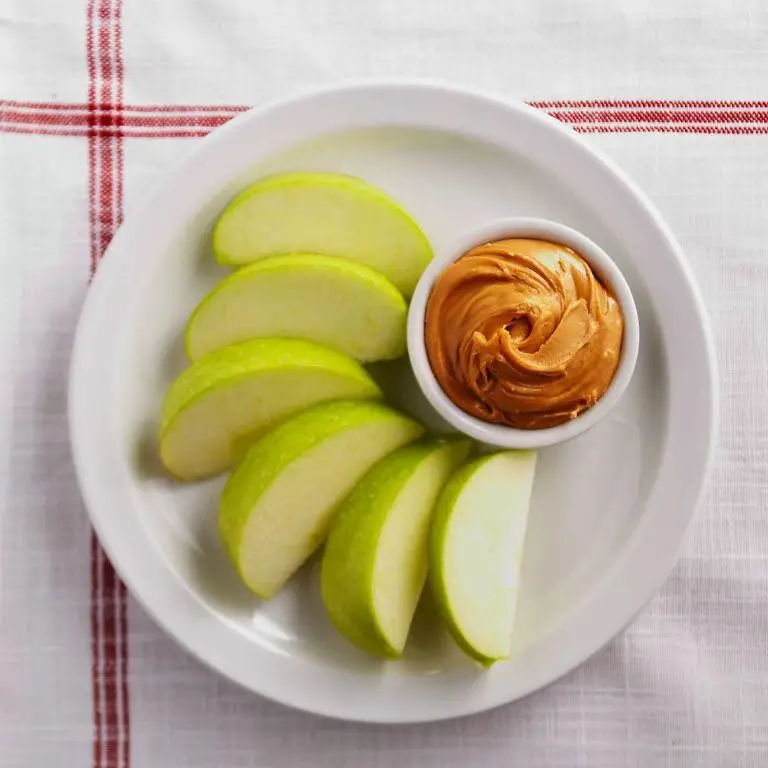
Now, as the morning light filters through the kitchen window, there’s something profoundly comforting about the simplicity of apple slices with peanut butter. It’s a humble dish that carries the warmth of home and the promise of a gentle start to the day.
Ingredients
- 2 medium apples (I love using Honeycrisp for their crisp texture and sweet-tart balance)
- 1/4 cup creamy peanut butter (I reach for the natural kind, stirred well to blend the oils)
- 1 tsp honey (a drizzle adds a lovely sweetness, but it’s optional)
- A pinch of cinnamon (just a whisper to complement the apples)
Instructions
- Wash the apples under cool running water, then pat them dry with a clean towel to ensure they’re clean and ready to slice.
- Using a sharp knife, slice the apples into 1/4-inch thick pieces, removing the core and seeds as you go. Tip: A melon baller works wonders for coring apples quickly.
- Arrange the apple slices on a plate, slightly overlapping for a pretty presentation.
- In a small bowl, stir the peanut butter until it’s smooth and easy to drizzle. Tip: If the peanut butter is too thick, a 10-second microwave burst can make it more pliable.
- Drizzle the peanut butter over the apple slices, using a spoon to guide the flow. Tip: For an even distribution, zigzag the spoon back and forth across the slices.
- Lightly drizzle honey over the top, if using, and sprinkle with a pinch of cinnamon for that extra cozy flavor.
Crunchy, creamy, and just a tad sweet, these apple slices with peanut butter are a joy to eat. Try serving them on a wooden board for a rustic touch, or pack them in a bento box for a delightful midday snack.
Mini Pita Pizzas

Mornings like these, with the sun just peeking through the curtains, call for something simple yet comforting to start the day. Mini pita pizzas, with their crispy edges and soft centers, are my go-to for a quick, satisfying bite that feels like a hug in food form.
Ingredients
- 4 mini pita breads (I love the whole wheat ones for a nuttier flavor)
- 1/2 cup marinara sauce (homemade or your favorite jarred kind)
- 1 cup shredded mozzarella cheese (the fresher, the better)
- 1/4 cup sliced black olives (they add a lovely briny contrast)
- 1 tbsp extra virgin olive oil (my kitchen staple for that golden crisp)
- A pinch of dried oregano (for that whisper of herby goodness)
Instructions
- Preheat your oven to 375°F (190°C), ensuring it’s fully heated for that perfect crisp.
- Brush each mini pita lightly with extra virgin olive oil on both sides to achieve a golden finish.
- Spread 2 tablespoons of marinara sauce evenly over each pita, leaving a small border for the crust.
- Sprinkle shredded mozzarella cheese generously over the sauce, covering it completely for a melty top.
- Scatter sliced black olives and a pinch of dried oregano over the cheese for flavor and color.
- Bake in the preheated oven for 10-12 minutes, or until the cheese is bubbly and the edges are crisp.
- Let them cool for a minute before serving to avoid burning your mouth—trust me, it’s worth the wait.
Crunchy, cheesy, and utterly comforting, these mini pita pizzas are a delight to eat straight off the tray or shared with someone special. The contrast between the crispy base and the gooey cheese makes each bite a little celebration.
Conclusion
Delightfully easy and utterly delicious, these 18 quick snack recipes are your ticket to satisfying those sudden cravings with minimal fuss. Perfect for busy home cooks across North America, each recipe promises a tasty escape. We’d love to hear which ones become your go-to favorites—drop us a comment below! And if you found this roundup helpful, why not share the love on Pinterest? Happy snacking!

Michael Johnson is the founder of Pan Mastery, Inspired by his blacksmith grandfather’s legacy has a deep appreciation for hand-crafted pots and pans, he provides invaluable guides, reviews, and recipes to enhance your culinary journey.