Are you ready to embark on a culinary journey through the heart of San Francisco without leaving your kitchen? Our roundup of 18 Delicious San Francisco Famous Food Recipes Authentic brings the city’s iconic flavors right to your table. From sourdough bread to cioppino, these dishes promise to delight your taste buds and inspire your inner chef. Dive in and discover how easy it is to recreate these Bay Area classics at home!
San Francisco Cioppino

Every time I think about San Francisco, my mind (and stomach) immediately jumps to Cioppino—a seafood stew that’s as bustling and vibrant as the city itself. Imagine a bowl so packed with the ocean’s bounty, it’s basically a party where crab, clams, and shrimp are the life of it.
Ingredients
- 2 tbsp olive oil (or any neutral oil)
- 1 onion, diced (yellow or white works best)
- 3 garlic cloves, minced (because more is always better)
- 1 can (28 oz) crushed tomatoes (san Marzano if you’re feeling fancy)
- 1 cup dry white wine (something you’d drink, please)
- 2 cups fish stock (homemade or store-bought, no judgment here)
- 1 lb mixed seafood (think crab, clams, shrimp, and mussels)
- 1/2 tsp red pepper flakes (adjust to taste, unless you’re brave)
- Salt and pepper (to taste, but don’t be shy)
- Fresh parsley, chopped (for that Instagram-worthy garnish)
Instructions
- Heat olive oil in a large pot over medium heat until shimmering, about 2 minutes.
- Add diced onion and cook until translucent, stirring occasionally, about 5 minutes.
- Stir in minced garlic and red pepper flakes, cooking until fragrant, about 1 minute (don’t let it burn!).
- Pour in white wine, scraping up any browned bits from the bottom of the pot, and let it reduce by half, about 3 minutes.
- Add crushed tomatoes and fish stock, bringing the mixture to a simmer. Let it cook for 20 minutes to meld the flavors.
- Gently add the mixed seafood to the pot, covering with the sauce. Cook until the seafood is done—clams and mussels will open, shrimp will turn pink, about 5-7 minutes.
- Season with salt and pepper to taste, then sprinkle with chopped parsley before serving.
What you’ve got now is a stew that’s a symphony of textures—tender seafood, a broth that’s rich yet bright, and just enough kick to keep things interesting. Serve it with a crusty loaf of sourdough because, well, San Francisco.
Sourdough Bread Bowl with Clam Chowder
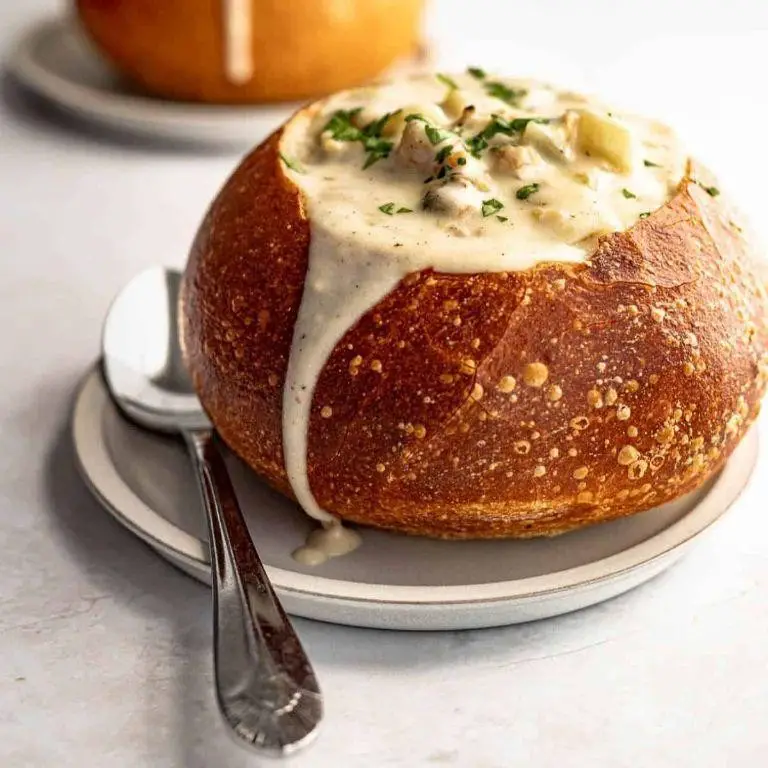
Craving something that’s a hug in a bowl? This Sourdough Bread Bowl with Clam Chowder is your edible snuggle, combining the tangy crunch of sourdough with the creamy, briny bliss of clam chowder. It’s like the ocean and a bakery had a delicious baby.
Ingredients
- 1 large sourdough bread bowl (or any sturdy bread bowl)
- 2 cups clam chowder (homemade or store-bought, because we’re not judging)
- 1 tbsp butter (for that golden, buttery hug)
- 1/4 cup shredded cheddar cheese (because cheese makes everything better)
- 1 tbsp chopped parsley (for a pop of color and freshness)
Instructions
- Preheat your oven to 350°F (175°C) – because warmth is key to this hug.
- Using a serrated knife, carefully cut the top off the sourdough bread bowl and hollow out the center, leaving about a 1-inch border. Save the insides for dipping or making breadcrumbs.
- Brush the inside of the bread bowl with melted butter, ensuring every nook gets some love.
- Pour the clam chowder into the prepared bread bowl, filling it to just below the rim to prevent spillage.
- Sprinkle the shredded cheddar cheese on top of the chowder, because, again, cheese.
- Place the bread bowl on a baking sheet and bake for 10-15 minutes, or until the cheese is bubbly and the bread is toasted to golden perfection.
- Garnish with chopped parsley right before serving for that Instagram-worthy finish.
Let’s talk about the magic here: the sourdough’s crust gives way to a creamy, dreamy chowder, with each bite offering a perfect balance of textures and flavors. Serve it with the bread top for dipping, and watch as it disappears faster than your resolve to eat just one bowl.
Mission-Style Burrito

Look no further for your next meal prep hero, the Mission-Style Burrito is here to save your hungry soul with its hefty, flavor-packed embrace. Perfect for those who believe in the philosophy of ‘more is more,’ this burrito is a hearty hug in edible form.
Ingredients
- 2 cups cooked rice (white or brown, for that extra fiber kick)
- 1 tbsp olive oil (or any neutral oil, because we’re not picky)
- 1 lb chicken breast, diced (or go veggie with black beans)
- 1 tbsp taco seasoning (store-bought or homemade, no judgment here)
- 1 cup shredded cheese (cheddar or a Mexican blend, because cheese is life)
- 4 large flour tortillas (the bigger, the better for wrapping)
- 1/2 cup sour cream (or Greek yogurt for a tangy twist)
- 1 avocado, sliced (for that creamy, dreamy texture)
- 1/2 cup salsa (heat level up to you, brave soul)
Instructions
- Heat olive oil in a large skillet over medium-high heat (about 350°F, or until oil shimmers).
- Add diced chicken to the skillet, sprinkle with taco seasoning, and cook until no longer pink, about 6-8 minutes. Tip: Don’t overcrowd the pan to get a nice sear.
- Warm tortillas in a dry skillet for about 30 seconds each side to make them pliable. Tip: Keep them covered with a towel to stay warm.
- Layer rice, chicken, cheese, sour cream, avocado, and salsa in the center of each tortilla. Tip: Leave a 2-inch border for easy rolling.
- Fold the sides of the tortilla over the filling, then roll from the bottom up, tucking in the sides as you go.
- Heat a clean skillet over medium heat and place the burrito seam-side down. Cook for 2-3 minutes until golden, then flip and repeat. This step is optional but adds a crispy texture.
Feast your eyes on this behemoth of flavor and texture—crispy on the outside, with a melty, gooey center that’s a riot of flavors. Serve it with extra salsa on the side for dipping, or wrap it in foil for the ultimate on-the-go meal that eats like a dream.
Anchor Steam Beer Battered Fish and Chips

So, you’ve decided to dive into the crispy, golden world of homemade fish and chips, but not just any—Anchor Steam Beer Battered Fish and Chips. Because why settle for ordinary when you can have extraordinary with a side of bubbly?
Ingredients
- 1 cup all-purpose flour (for that perfect crisp)
- 1 tsp baking powder (the secret to lightness)
- 1 tsp salt (because flavor matters)
- 1/2 tsp black pepper (adjust to taste)
- 1 cup Anchor Steam beer (or any beer you love, but Anchor Steam is magic here)
- 1 egg (for binding)
- 4 cod fillets (about 6 oz each, because size matters)
- 2 cups vegetable oil (or any neutral oil for frying)
- 4 large potatoes (cut into chips, because we’re traditionalists)
Instructions
- In a large bowl, whisk together flour, baking powder, salt, and pepper. This is your dry team.
- Make a well in the center of your dry ingredients and pour in the Anchor Steam beer and crack in the egg. Whisk until smooth. Tip: The batter should coat the back of a spoon but still be slightly runny.
- Heat oil in a deep fryer or large pot to 375°F. Use a thermometer for accuracy—guessing leads to sadness.
- While the oil heats, pat the cod fillets dry with paper towels. Moisture is the enemy of crispiness.
- Dip each fillet into the batter, letting excess drip off, then carefully lower into the hot oil. Fry for about 4-5 minutes until golden and crispy. Tip: Don’t overcrowd the pot; give each fillet its moment to shine.
- Remove with a slotted spoon and drain on paper towels. Repeat with remaining fillets.
- For the chips, fry the potato strips in the same oil at 325°F until golden and crispy, about 3-4 minutes. Tip: Fry in batches to maintain oil temperature.
- Drain chips on paper towels and season with salt while hot.
Behold your masterpiece: fish with a crackling, airy crust giving way to tender, flaky cod, paired with chips that are the perfect mix of crispy and fluffy. Serve with a cheeky side of mushy peas or go rogue with a spicy aioli—because rules are made to be broken.
Ghiberti Chocolate Sundae

Ready to dive spoon-first into a dessert that’s as extravagant as its name suggests? The Ghiberti Chocolate Sundae is your ticket to a blissful sugar coma, combining rich, velvety chocolate with playful textures that’ll make your taste buds do a happy dance.
Ingredients
- 1 cup heavy cream (chilled for best results)
- 1/2 cup whole milk (the richer, the better)
- 1/4 cup granulated sugar (adjust to sweetness preference)
- 1/2 cup Ghirardelli chocolate chips (because quality counts)
- 1 tsp vanilla extract (pure, for that aromatic punch)
- 2 scoops vanilla ice cream (homemade or store-bought)
- Whipped cream for topping (go crazy with it)
- Maraschino cherries for garnish (because it’s not a sundae without one)
- Crushed nuts for crunch (optional, but highly recommended)
Instructions
- In a medium saucepan over low heat, combine heavy cream, whole milk, and granulated sugar. Stir gently until the sugar dissolves, about 3 minutes. Tip: Keep the heat low to avoid scalding the milk.
- Add Ghirardelli chocolate chips and vanilla extract to the saucepan. Stir continuously until the chocolate is fully melted and the mixture is smooth, about 5 minutes. Tip: A silicone spatula works wonders here to scrape the sides and bottom of the pan.
- Remove the saucepan from heat and let the chocolate sauce cool slightly, about 2 minutes. This prevents the ice cream from melting too quickly when added.
- Place two scoops of vanilla ice cream into a serving bowl. Pour the warm chocolate sauce over the ice cream. Tip: For an extra indulgent touch, warm the sauce just before serving.
- Top with whipped cream, a maraschino cherry, and a sprinkle of crushed nuts if using. Serve immediately and enjoy the gooey, chocolatey goodness.
Now, this Ghiberti Chocolate Sundae isn’t just a dessert; it’s a masterpiece of contrasting temperatures and textures. The warm, silky chocolate sauce against the cold, creamy ice cream creates a symphony in your mouth. For an extra flair, serve it in a chilled glass to keep it cool longer, or add a drizzle of caramel for a sweet twist.
Irish Coffee from Buena Vista Cafe

Mmm, nothing says ‘good morning’ or ‘why not?’ like a steaming cup of Irish Coffee from the legendary Buena Vista Cafe. This boozy, creamy delight is the perfect pick-me-up that promises to warm your soul and tickle your taste buds with its rich, coffee-forward charm.
Ingredients
- 1 cup freshly brewed hot coffee (go for a medium roast to balance the flavors)
- 1 1/2 oz Irish whiskey (the smoother, the better)
- 2 tsp brown sugar (adjust to sweetness preference)
- Heavy cream, lightly whipped to soft peaks (about 1/4 cup, or enough to float)
Instructions
- Preheat a glass mug by filling it with hot water, then empty it after a minute. This keeps your coffee warmer longer.
- Pour the freshly brewed hot coffee into the preheated mug until it’s about 3/4 full.
- Add the brown sugar to the coffee and stir until completely dissolved. Taste and adjust sweetness if needed.
- Gently pour the Irish whiskey into the coffee and give it a quick stir to combine.
- Using the back of a spoon, carefully float the lightly whipped heavy cream on top of the coffee by pouring it over the spoon’s convex side. This creates the signature layer without mixing.
- Do not stir after adding the cream; sip the coffee through the cream for the full experience.
So, there you have it—a velvety, spirited concoction that’s as much a treat for the eyes as it is for the palate. Serve it as is for a classic touch, or sprinkle a little cocoa powder on top for an extra hint of decadence.
Dungeness Crab Cakes

Savory, succulent, and slightly sassy, Dungeness crab cakes are the ocean’s answer to your snack-time prayers. These golden little patties pack a punch of flavor that’ll make your taste buds do a happy dance.
Ingredients
- 1 lb Dungeness crab meat, picked over for shells (fresh or high-quality canned)
- 1/2 cup panko breadcrumbs (for that perfect crunch)
- 1/4 cup mayonnaise (the glue that holds it all together)
- 1 large egg, lightly beaten (because every cake needs a binder)
- 2 tbsp Dijon mustard (for a tangy kick)
- 1 tbsp Worcestershire sauce (the secret umami booster)
- 1/2 tsp Old Bay seasoning (or more, if you’re feeling spicy)
- 2 tbsp unsalted butter (for frying, because butter makes everything better)
- 1 tbsp olive oil (or any neutral oil, to prevent sticking)
- Salt and pepper to taste (adjust to your heart’s desire)
Instructions
- In a large bowl, gently mix the crab meat, panko, mayonnaise, egg, Dijon mustard, Worcestershire sauce, and Old Bay seasoning until just combined. Tip: Overmixing can lead to tough crab cakes, so keep it light and easy.
- Form the mixture into 8 equal-sized patties, about 1/2 inch thick. Tip: Wet your hands slightly to prevent sticking.
- Heat the butter and olive oil in a large skillet over medium heat until the butter is melted and the oil is shimmering.
- Carefully place the crab cakes in the skillet and cook for 4-5 minutes on each side, or until golden brown and crispy. Tip: Resist the urge to flip them too early; patience ensures a perfect crust.
- Transfer the cooked crab cakes to a paper towel-lined plate to drain any excess oil.
Just imagine biting into these crab cakes: the crispy exterior gives way to a tender, flavorful center that’s bursting with the sweet taste of Dungeness crab. Serve them atop a bed of mixed greens with a dollop of remoulade, or go rogue and stuff them into a buttery brioche bun for the ultimate seafood sandwich experience.
Bay Shrimp Louie Salad
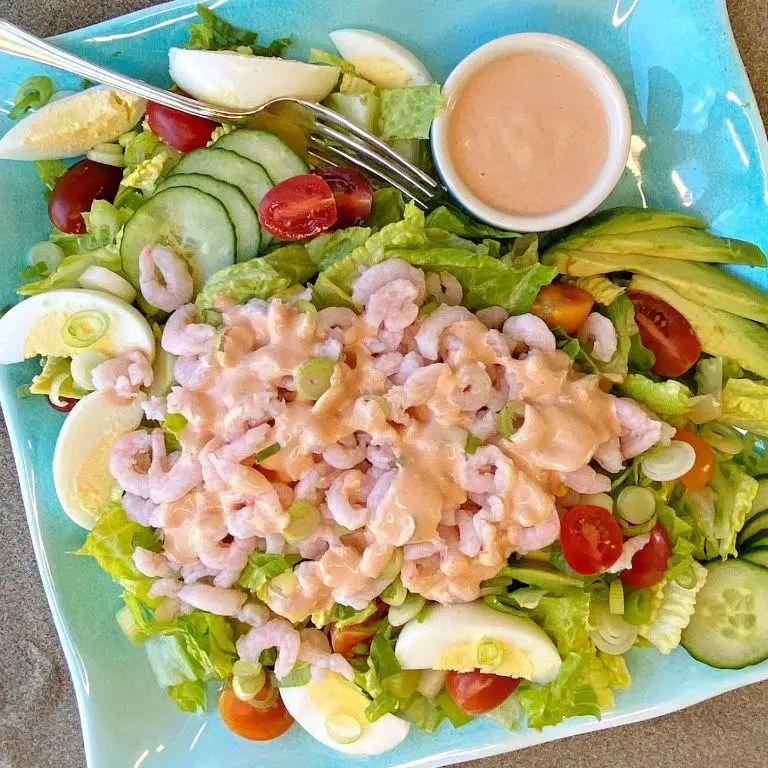
Zesty and zippy, this Bay Shrimp Louie Salad is the culinary equivalent of a beach vacation—no sunscreen required! Packed with succulent shrimp, crisp veggies, and a creamy dressing that’ll make your taste buds do the cha-cha, it’s a dish that’s as fun to eat as it is to say.
Ingredients
- 1 lb bay shrimp, cooked and chilled (thaw if frozen)
- 2 cups romaine lettuce, chopped (or any crisp greens)
- 1 cup cherry tomatoes, halved (for a pop of color)
- 1/2 cup cucumber, diced (peel if you prefer)
- 1/4 cup red onion, thinly sliced (soak in cold water to mellow the bite)
- 1/2 cup mayonnaise (or Greek yogurt for a lighter twist)
- 2 tbsp ketchup (trust us, it works)
- 1 tbsp lemon juice (freshly squeezed for maximum zing)
- 1 tsp Worcestershire sauce (a little goes a long way)
- 1/2 tsp hot sauce (adjust to taste)
- Salt and pepper to taste (because seasoning is key)
Instructions
- In a large bowl, combine the romaine lettuce, cherry tomatoes, cucumber, and red onion. Toss gently to mix.
- In a separate bowl, whisk together the mayonnaise, ketchup, lemon juice, Worcestershire sauce, and hot sauce until smooth. Taste and adjust seasoning with salt and pepper.
- Add the bay shrimp to the dressing and stir until evenly coated. Tip: Let the shrimp marinate in the dressing for 10 minutes for extra flavor.
- Pour the shrimp and dressing mixture over the prepared veggies. Toss lightly to combine, ensuring everything is well coated. Tip: Don’t overmix to keep the veggies crisp.
- Divide the salad among plates and serve immediately. Tip: Garnish with extra lemon wedges or a sprinkle of paprika for a fancy touch.
Vibrant and satisfying, this Bay Shrimp Louie Salad offers a delightful crunch with every bite, thanks to the fresh veggies, while the creamy dressing brings a tangy, slightly spicy kick. Serve it in a hollowed-out avocado for an Instagram-worthy presentation that’s as delicious as it is photogenic.
Chicken Tetrazzini
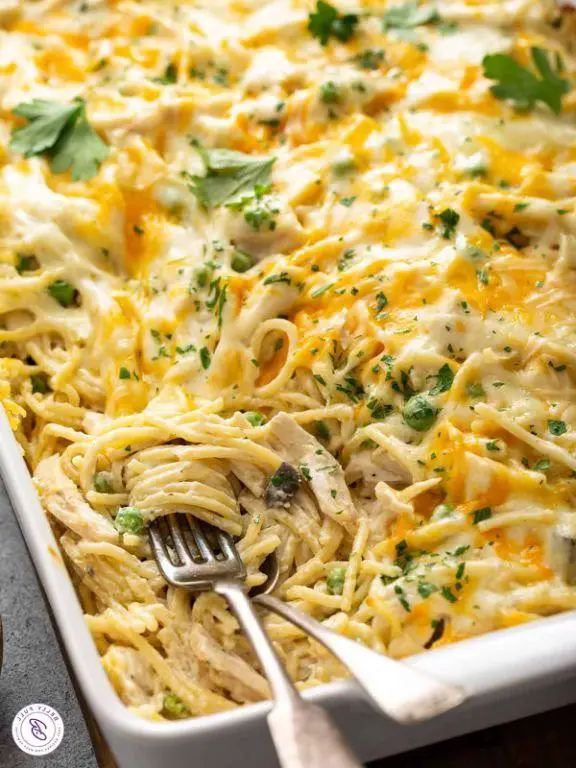
Venture into the comfort zone with a dish that’s as fun to say as it is to eat—Chicken Tetrazzini, the pasta bake that’s like a hug from your oven. Perfect for those days when you want to impress without the stress, this creamy, cheesy masterpiece is a crowd-pleaser that’ll have everyone asking for seconds.
Ingredients
- 8 oz spaghetti (break in half for easier mixing)
- 2 cups cooked chicken, shredded (leftover rotisserie works wonders)
- 1/4 cup unsalted butter (because everything’s better with butter)
- 1/4 cup all-purpose flour (the magic thickener)
- 2 cups whole milk (for that creamy dreaminess)
- 1 cup chicken broth (homemade or store-bought, no judgment here)
- 1 cup heavy cream (go big or go home)
- 1/2 cup grated Parmesan cheese (the salty, nutty kick)
- 1 cup shredded mozzarella cheese (for that gooey pull)
- 1/2 tsp garlic powder (a little goes a long way)
- Salt and pepper to taste (because seasoning is key)
- 1/4 cup breadcrumbs (for that golden, crunchy top)
Instructions
- Preheat your oven to 375°F (190°C) and grease a 9×13 inch baking dish. Tip: A light spray of cooking oil prevents sticking without the fuss.
- Cook spaghetti according to package instructions until al dente, then drain and set aside. Tip: Reserve a cup of pasta water to adjust sauce consistency later.
- In a large saucepan, melt butter over medium heat. Whisk in flour to create a roux, cooking for 1-2 minutes until golden. Tip: Constant whisking prevents lumps for a silky sauce.
- Gradually whisk in milk, chicken broth, and heavy cream, bringing to a simmer until thickened, about 5 minutes. Stir in garlic powder, salt, and pepper.
- Remove from heat and stir in Parmesan and mozzarella until melted. Fold in cooked spaghetti and shredded chicken until evenly coated. Tip: If the sauce is too thick, loosen with reserved pasta water a tablespoon at a time.
- Transfer mixture to the prepared baking dish and sprinkle with breadcrumbs. Bake for 20-25 minutes until bubbly and golden on top.
Dig into a dish where every forkful is a creamy, cheesy, crunchy delight. Serve it straight from the oven with a side of garlic bread to sop up every last bit of that glorious sauce, or pair with a crisp green salad for a touch of freshness.
Fortune Cookies from Golden Gate Fortune Cookie Factory

Fancy a twist on your snack game that’s as fun to make as it is to crack open? These homemade fortune cookies from the Golden Gate Fortune Cookie Factory are your ticket to a kitchen adventure, blending crunch, sweetness, and a dash of mystery in every fold.
Ingredients
- 1 cup all-purpose flour (sifted for lightness)
- 1 cup granulated sugar (because life’s sweet)
- 2 large egg whites (room temperature for happy mixing)
- 1/4 cup water (just enough to bring it all together)
- 1/2 tsp vanilla extract (or almond for a nutty twist)
- 3 tbsp unsalted butter, melted (because butter makes everything better)
- A pinch of salt (to balance the sweetness)
Instructions
- Preheat your oven to 350°F (175°C) – no guessing, this cookie demands precision.
- Whisk together the sifted flour, sugar, and salt in a bowl. Tip: Sifting not only prevents lumps but also introduces air for a lighter cookie.
- In another bowl, mix the egg whites, water, vanilla extract, and melted butter until just combined. Overmixing is the enemy of fluffiness.
- Gently fold the wet ingredients into the dry until you have a smooth batter. Think gentle hugs, not vigorous shakes.
- Drop tablespoonfuls of the batter onto a parchment-lined baking sheet, spacing them well. They’ll spread like gossip in a small town.
- Bake for 8-10 minutes until the edges are golden brown. Watch closely; they go from perfect to overdone faster than you can say ‘fortune’.
- Quickly but carefully, place a fortune in the center of each cookie, fold in half, then bend over the edge of a cup to create the classic shape. Speed is key – they harden fast.
So there you have it – cookies that are crispy on the outside, with a slightly chewy center, and a surprise inside. Serve them at your next gathering or sneak a few into lunchboxes for a midday smile.
Chinese Chicken Salad
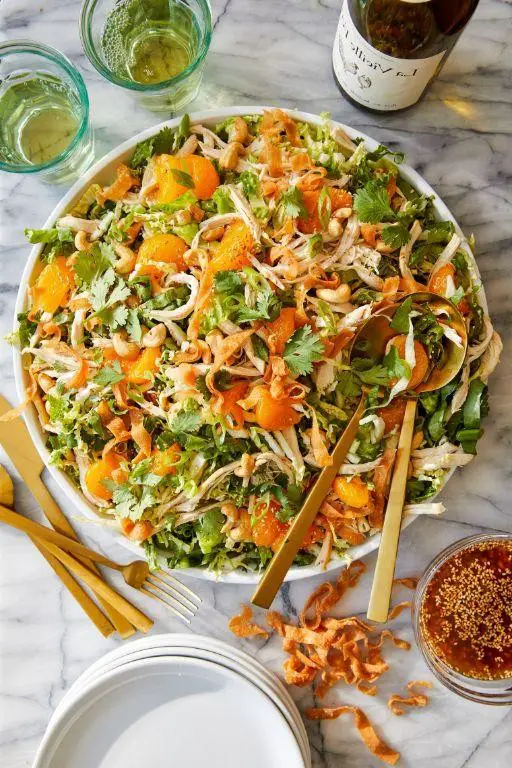
Unbelievably crunchy, delightfully tangy, and packed with flavors that dance on your palate, this Chinese Chicken Salad is the no-fuss, all-flavor dish you didn’t know you needed in your life. Perfect for those days when you’re craving something light yet satisfying, or when you want to impress without the stress.
Ingredients
- 2 cups shredded cooked chicken (leftovers work great here!)
- 4 cups shredded napa cabbage (for that perfect crunch)
- 1 cup shredded carrots (because color is flavor)
- 1/2 cup sliced almonds (toasted, for an extra nutty kick)
- 1/4 cup chopped green onions (for a mild, oniony bite)
- 1/4 cup vegetable oil (or any neutral oil you have on hand)
- 2 tbsp rice vinegar (adjust to taste for more tang)
- 1 tbsp soy sauce (low sodium works too)
- 1 tbsp honey (for a touch of sweetness)
- 1 tsp sesame oil (don’t skip this flavor bomb)
- 1/2 tsp grated ginger (fresh is best, but powdered in a pinch)
Instructions
- In a large bowl, combine the shredded chicken, napa cabbage, carrots, almonds, and green onions. Toss lightly to mix.
- In a small bowl, whisk together the vegetable oil, rice vinegar, soy sauce, honey, sesame oil, and grated ginger until well combined. Tip: Taste the dressing and adjust the vinegar or honey to suit your palate.
- Pour the dressing over the salad and toss until everything is evenly coated. Tip: For best results, let the salad sit for 10 minutes before serving to allow the flavors to meld.
- Serve the salad chilled or at room temperature. Tip: Garnish with extra sliced almonds and green onions for a photo-worthy finish.
Outrageously fresh and bursting with textures, this salad is a symphony of crunch, tang, and umami. Serve it in a hollowed-out pineapple for a tropical twist that’ll have your guests talking!
Artichoke Soup
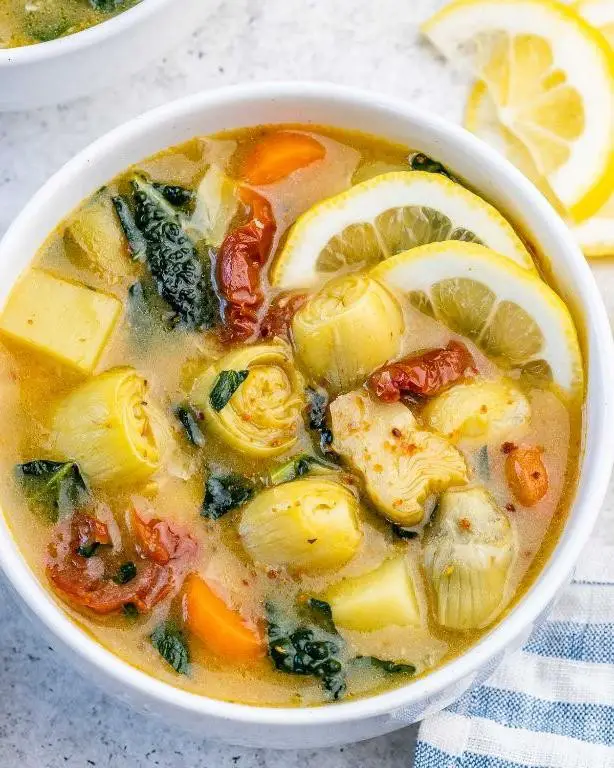
Alright, let’s dive into the world of creamy, dreamy Artichoke Soup—a dish that’s as fun to make as it is to slurp down. Whether you’re an artichoke aficionado or a veggie skeptic, this soup is about to win you over with its velvety texture and rich, earthy flavors.
Ingredients
- 2 tablespoons olive oil (or any neutral oil)
- 1 large onion, diced (yellow or white works best)
- 3 garlic cloves, minced (because more garlic is always better)
- 4 cups vegetable broth (homemade or store-bought)
- 2 cans (14 oz each) artichoke hearts, drained and chopped (no need to be fancy here)
- 1 cup heavy cream (for that luxurious feel)
- 1 teaspoon salt (adjust to taste)
- 1/2 teaspoon black pepper (freshly ground if you’re feeling fancy)
- 1 tablespoon lemon juice (to brighten things up)
Instructions
- Heat the olive oil in a large pot over medium heat until shimmering, about 1 minute.
- Add the diced onion and sauté until translucent, about 5 minutes, stirring occasionally to avoid burning.
- Toss in the minced garlic and cook for another 30 seconds, just until fragrant—don’t let it brown!
- Pour in the vegetable broth and bring to a gentle boil over medium-high heat.
- Add the chopped artichoke hearts, reduce the heat to medium, and let simmer for 15 minutes to meld the flavors.
- Carefully blend the soup using an immersion blender until smooth, or transfer to a blender in batches (tip: hold the lid down with a towel to avoid hot soup explosions).
- Stir in the heavy cream, salt, and black pepper, then let the soup simmer for another 5 minutes to thicken slightly.
- Finish with a splash of lemon juice, taste, and adjust seasoning if needed.
This Artichoke Soup is like a cozy blanket for your taste buds—creamy, comforting, and just a little bit tangy. Serve it with a sprinkle of Parmesan or a side of crusty bread for dipping, and watch it disappear faster than you can say “seconds, please!”
Pasta Pomodoro
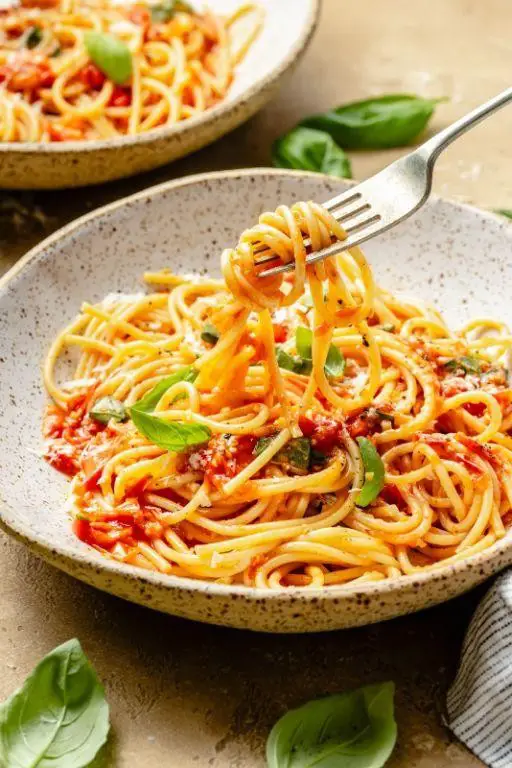
Pasta Pomodoro is the superhero of weeknight dinners—simple, speedy, and packed with flavor that punches above its weight. Perfect for when your stomach’s growling louder than your neighbor’s lawnmower at 7 AM.
Ingredients
- 8 oz spaghetti (or any pasta shape that catches your fancy)
- 2 tbsp olive oil (the good stuff, not the sad, dusty bottle at the back of your pantry)
- 3 garlic cloves, minced (because more is always merrier)
- 1/4 tsp red pepper flakes (adjust to scare away the blandness)
- 1 can (28 oz) crushed tomatoes (san Marzano if you’re feeling fancy)
- 1/2 tsp salt (or enough to make your ancestors proud)
- 1/4 cup fresh basil, chopped (because dried basil is just sad confetti)
- 1/4 cup grated Parmesan cheese (plus extra for showering on top)
Instructions
- Bring a large pot of salted water to a rolling boil. Think ocean water salty—this is your only chance to season the pasta from within.
- Add the spaghetti and cook according to package instructions until al dente, about 8-10 minutes. Stir occasionally to prevent a pasta mutiny.
- While the pasta cooks, heat olive oil in a large skillet over medium heat. Add garlic and red pepper flakes, sautéing until fragrant, about 30 seconds. Don’t let the garlic turn brown unless you’re into bitter surprises.
- Pour in the crushed tomatoes and salt, stirring to combine. Let the sauce simmer for 10 minutes, allowing the flavors to marry like a well-planned Vegas wedding.
- Drain the pasta, reserving 1/2 cup of the starchy cooking water. This liquid gold will help the sauce cling to the pasta like a stage 5 clinger.
- Add the drained pasta to the skillet with the sauce, tossing to coat. If the sauce seems too thick, loosen it with a splash of the reserved cooking water.
- Stir in the fresh basil and Parmesan cheese, giving everything one final toss to ensure every strand is dressed to impress.
This Pasta Pomodoro is a vibrant, tangy delight with just the right amount of kick from the red pepper flakes. Serve it with an extra sprinkle of Parmesan and a side of garlic bread for a carb-loaded love story that’ll have everyone at the table swooning.
Joe’s Special
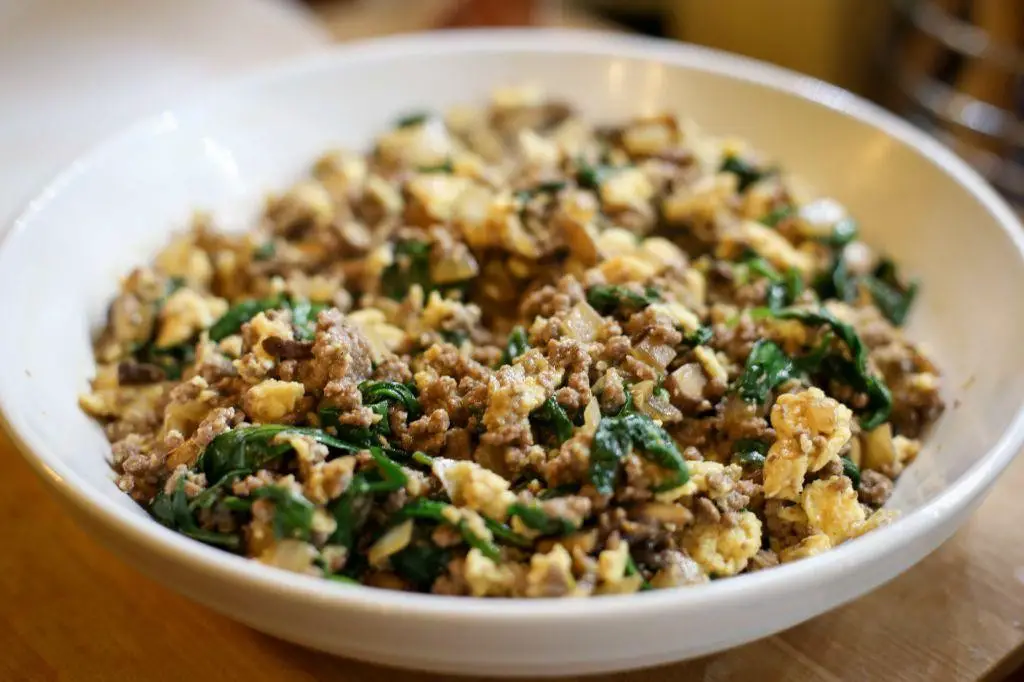
Whisking you away to a culinary adventure, Joe’s Special is the kind of dish that makes you wonder why you ever settled for boring breakfasts. It’s a hearty, flavorful scramble that’s as fun to make as it is to devour, perfect for those mornings when you’re craving something a little extra.
Ingredients
- 1 tbsp olive oil (or any neutral oil)
- 1/2 lb ground beef (lean for less grease)
- 1 small onion, diced (about 1/2 cup)
- 2 cloves garlic, minced (more if you’re a garlic fiend)
- 4 cups fresh spinach, roughly chopped (packed)
- 4 large eggs (room temperature for best results)
- 1/4 tsp salt (adjust to taste)
- 1/4 tsp black pepper (freshly ground if possible)
- 1/4 cup grated Parmesan cheese (for that cheesy goodness)
Instructions
- Heat olive oil in a large skillet over medium heat until shimmering, about 1 minute.
- Add ground beef, breaking it apart with a spoon, and cook until no longer pink, about 5 minutes. Tip: Drain excess fat if desired for a lighter dish.
- Stir in diced onion and minced garlic, cooking until onion is translucent, about 3 minutes. Tip: Don’t rush this step—sweating the onions properly builds flavor.
- Add spinach in batches, wilting each before adding more, about 2 minutes total. Tip: Spinach reduces significantly, so don’t be shy with the amount.
- In a bowl, whisk eggs with salt and pepper. Pour over the beef and spinach mixture in the skillet.
- Cook, stirring gently, until eggs are softly set, about 2 minutes. Tip: Remove from heat just before they’re fully cooked—they’ll continue to set from residual heat.
- Sprinkle with Parmesan cheese and give one final stir to combine.
Craving satisfied? Joe’s Special delivers a delightful mix of textures, from the tender beef to the creamy eggs and slightly crisp spinach. Serve it straight from the skillet for a rustic touch, or pile it high on toast for an open-faced sandwich that means business.
Lobster Thermidor
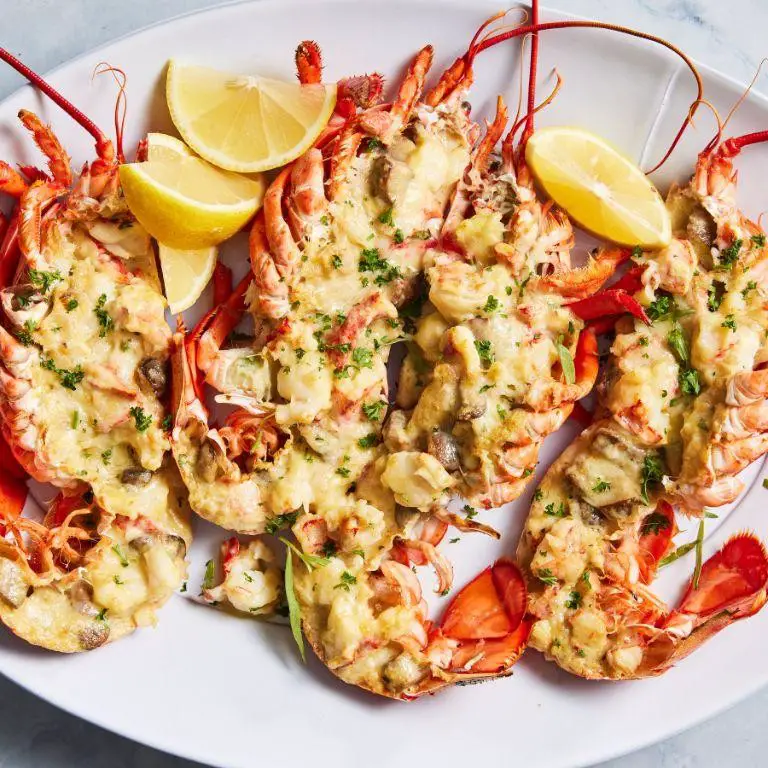
Unbelievably luxurious yet surprisingly doable, Lobster Thermidor is the showstopper your dinner table has been dreaming of. Imagine succulent lobster meat swathed in a creamy, cheesy sauce with just a hint of mustard—it’s like the lobster put on its fanciest outfit just for you.
Ingredients
- 2 live lobsters (1.5 lbs each) – or ask your fishmonger to steam them for you
- 3 tbsp unsalted butter – because everything’s better with butter
- 1/4 cup all-purpose flour – the foundation of any good sauce
- 1.5 cups whole milk – for a richer sauce, half-and-half works too
- 1/2 cup heavy cream – because we’re not counting calories today
- 1/2 cup grated Gruyère cheese – plus extra for sprinkling
- 2 tbsp Dijon mustard – for that tangy kick
- 1/4 cup dry white wine – cook with what you’d drink
- Salt and freshly ground black pepper – to season like a pro
- 1/4 cup breadcrumbs – for that irresistible crunch
- 2 tbsp chopped fresh parsley – because green makes it healthy, right?
Instructions
- Preheat your oven to 375°F (190°C) – because we’re about to get cheesy.
- Carefully remove the meat from the lobsters, chop into bite-sized pieces, and set aside. Tip: Save the shells for an Instagram-worthy presentation.
- In a saucepan over medium heat, melt the butter, then whisk in the flour to create a roux. Cook for 2 minutes until golden. Tip: Constant whisking prevents lumps.
- Gradually add the milk and cream, whisking continuously until the sauce thickens, about 5 minutes.
- Stir in the Gruyère, Dijon mustard, and white wine until the cheese melts and the sauce is smooth. Season with salt and pepper. Tip: Taste as you go—balance is key.
- Fold in the lobster meat gently, then spoon the mixture back into the lobster shells or a baking dish.
- Sprinkle with extra Gruyère and breadcrumbs, then bake for 10-15 minutes until bubbly and golden.
- Garnish with parsley and serve immediately. Tip: Pair with a crisp salad to cut through the richness.
Rich, decadent, and utterly indulgent, this Lobster Thermidor is a textural dream with its creamy interior and crispy top. Serve it with a side of garlic bread to sop up every last bit of that glorious sauce, or go full fancy with a champagne pairing—because why not?
Bananas Foster
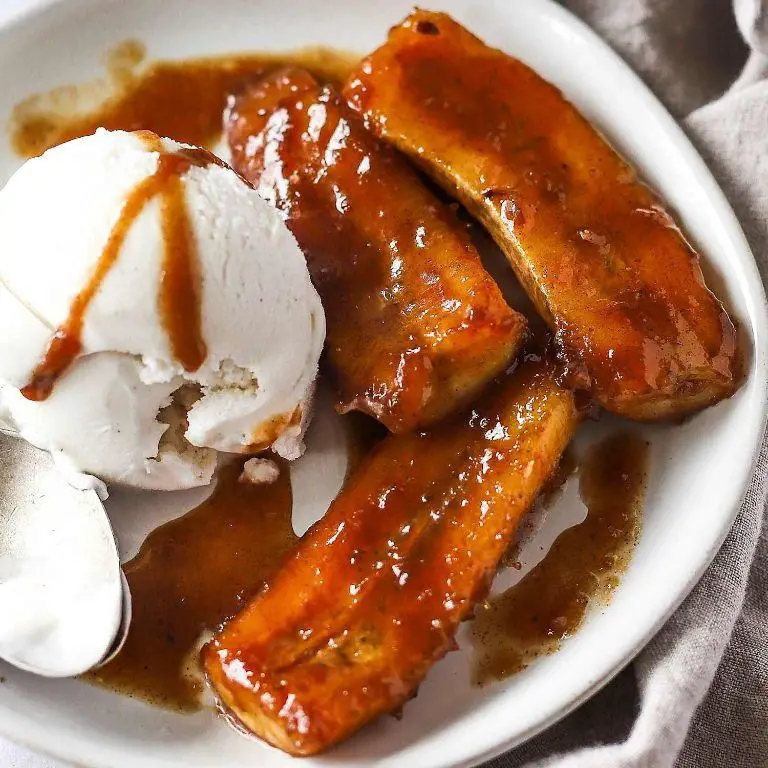
Yowza! If you’re looking to set your taste buds ablaze (figuratively, of course), then Bananas Foster is your ticket to flavor town. This boozy, buttery, banana-packed delight is like a party in your mouth where everyone’s invited—especially your sweet tooth.
Ingredients
- 4 ripe bananas (the spottier, the better for sweetness)
- 1/2 cup unsalted butter (because salted would just be rude)
- 1 cup brown sugar (pack it like you mean it)
- 1/2 tsp cinnamon (or more if you’re feeling spicy)
- 1/4 cup banana liqueur (optional, but why wouldn’t you?)
- 1/4 cup dark rum (for that fiery finish)
- 1 tsp vanilla extract (the good stuff, please)
- Vanilla ice cream (for serving, because duh)
Instructions
- Peel the bananas and slice them diagonally into 1/2-inch thick pieces. Pro tip: Diagonal cuts = more surface area = more caramelization.
- In a large skillet over medium heat, melt the butter until it’s just beginning to bubble. Keep an eye on it—butter has a tendency to go from golden to gone in seconds.
- Sprinkle in the brown sugar and cinnamon, stirring constantly until the sugar dissolves into a luscious syrup, about 2-3 minutes. This is not the time to multitask.
- Gently add the banana slices to the skillet, spooning the syrup over them. Cook for 2 minutes on each side until they’re gloriously golden.
- Remove the skillet from heat and carefully add the banana liqueur (if using) and rum. Stand back and ignite with a long lighter to flambé. Let the flames die down naturally—no blowing, unless you’re making a wish.
- Stir in the vanilla extract, then serve immediately over scoops of vanilla ice cream. The contrast of hot and cold is everything.
Magic happens when the caramelized bananas meet the cool creaminess of ice cream, creating a symphony of textures and temperatures. Serve it in a fancy dish to impress your guests, or straight from the skillet for that ‘I mean business’ vibe.
Pisco Punch

Now, let’s dive into the world of Pisco Punch, a cocktail that’s as fun to make as it is to drink. This frothy, fruity concoction is the perfect way to add a little pep to your step or, let’s be honest, your evening.
Ingredients
- 2 oz Pisco (the star of the show, don’t skimp on quality)
- 1 oz fresh lemon juice (bottled is a no-go here, folks)
- 1 oz pineapple juice (fresh is best, but canned works in a pinch)
- 1 tsp simple syrup (adjust to taste if you’ve got a sweet tooth)
- 1 egg white (for that silky, frothy texture we’re after)
- Ice cubes (because no one likes a warm punch)
Instructions
- In a cocktail shaker, combine the Pisco, lemon juice, pineapple juice, simple syrup, and egg white. Shake vigorously without ice for about 15 seconds to emulsify the egg white.
- Add a handful of ice cubes to the shaker and shake again for another 15-20 seconds, until the mixture is well chilled.
- Strain the mixture into a chilled glass, aiming for as little foam as possible on top (though a little is inevitable and quite delightful).
- Let the drink sit for a minute to allow the foam to settle and create that signature frothy top layer.
- Serve immediately, garnished with a slice of pineapple or a twist of lemon, if you’re feeling fancy.
Velvety smooth with a tangy kick, this Pisco Punch is a tropical escape in a glass. Serve it at your next brunch to impress your friends or enjoy it solo as a reward for adulting.
Avocado Toast with a Twist
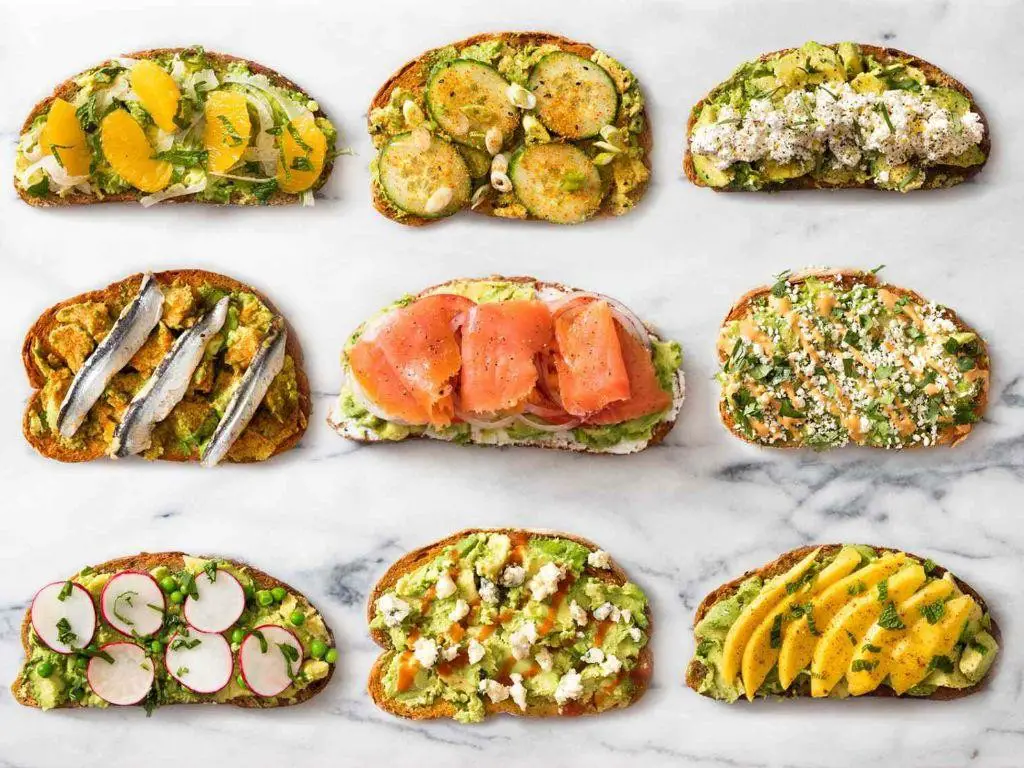
Yummy doesn’t even begin to cover it—this Avocado Toast with a Twist is here to shake up your breakfast routine with a dash of daring and a sprinkle of surprise. Perfect for those mornings when ‘basic’ just won’t cut it.
Ingredients
- 2 slices of sourdough bread (or any hearty bread you love)
- 1 ripe avocado (look for one that’s slightly soft to the touch)
- 1 tbsp olive oil (or any neutral oil)
- 1/2 tsp red pepper flakes (adjust to taste)
- 1/4 cup crumbled feta cheese (goat cheese works too for a tangier twist)
- 1 tbsp honey (for a sweet contrast)
- Salt and pepper to taste (because seasoning is key)
Instructions
- Preheat your oven to 375°F (190°C) to get it ready for toasting perfection.
- Brush both sides of the sourdough slices lightly with olive oil for that golden, crispy edge.
- Place the bread on a baking sheet and toast in the oven for 5-7 minutes, flipping halfway, until each side is perfectly crisp.
- While the bread toasts, halve the avocado, remove the pit, and scoop the flesh into a bowl. Mash it lightly with a fork, leaving some chunks for texture.
- Spread the mashed avocado evenly over the toasted bread. Tip: A squeeze of lime juice can keep the avocado green longer.
- Sprinkle the red pepper flakes over the avocado for a spicy kick, then top with crumbled feta cheese.
- Drizzle honey lightly over the top for a sweet and savory balance that’ll make your taste buds dance.
- Finish with a pinch of salt and a grind of black pepper to elevate all the flavors.
This Avocado Toast with a Twist delivers a creamy, crunchy, spicy, and sweet experience all in one bite. Try serving it with a side of sunny-side-up eggs for an extra protein punch, or enjoy it as is for a light yet satisfying meal.
Conclusion
Exploring these 18 authentic San Francisco famous food recipes offers a delightful journey through the city’s rich culinary heritage. Whether you’re a seasoned home cook or just starting out, these dishes promise to bring a taste of SF right into your kitchen. Don’t forget to try them out, share your favorites in the comments, and spread the love by pinning this article on Pinterest. Happy cooking!

Michael Johnson is the founder of Pan Mastery, Inspired by his blacksmith grandfather’s legacy has a deep appreciation for hand-crafted pots and pans, he provides invaluable guides, reviews, and recipes to enhance your culinary journey.